
I often reach for a tote bag when I want a quick embroidery project.
The fabric is sturdy and the size feels manageable for relaxed stitching.
I’ve collected a few patterns that stay straightforward and don’t ask for too much focus.
These work especially well on quiet evenings at home.
Most of them use basic stitches I already know by heart.
Overlapping Citrus Slices on a Tote Bag

Embroider three citrus slices in a tight cluster on the lower front of a canvas tote bag. One yellow slice and two orange slices overlap slightly, with green outlines defining the rinds. The compact size keeps the design from competing with the bag’s main surface area while still showing up clearly during use.
What makes this idea useful is how the small scale lets you finish it in a few hours on any plain tote you already own. You could shift the cluster higher or move it to a side panel if the bag gets heavy use on one face. Changing the fruit colors or adding a fourth slice gives an easy way to match different bag fabrics without redesigning the whole pattern.
Daisy Sprigs on a Canvas Tote

A small cluster of three daisies connected by thin green stems and scattered buds creates a simple focal point on the front of a canvas tote. Two flowers are worked in soft pink and one in cream, each with a pale yellow center, while the stems curve naturally downward. The design sits low on the bag so it stays visible when the tote is carried without crowding the top edge or handles. This approach works best on everyday accessories where you want a light floral accent rather than a large filled motif.
What makes this idea useful is how the loose stem layout can be stretched taller or compressed shorter depending on the bag size. You could drop just one sprig onto a side pocket or repeat the cluster on the opposite side for balance. Shifting the colors to bolder shades would help the design stand out on darker fabric, while keeping the same scale lets it fit on smaller items like zip pouches.
Mushroom Cluster on Denim Tote Pocket
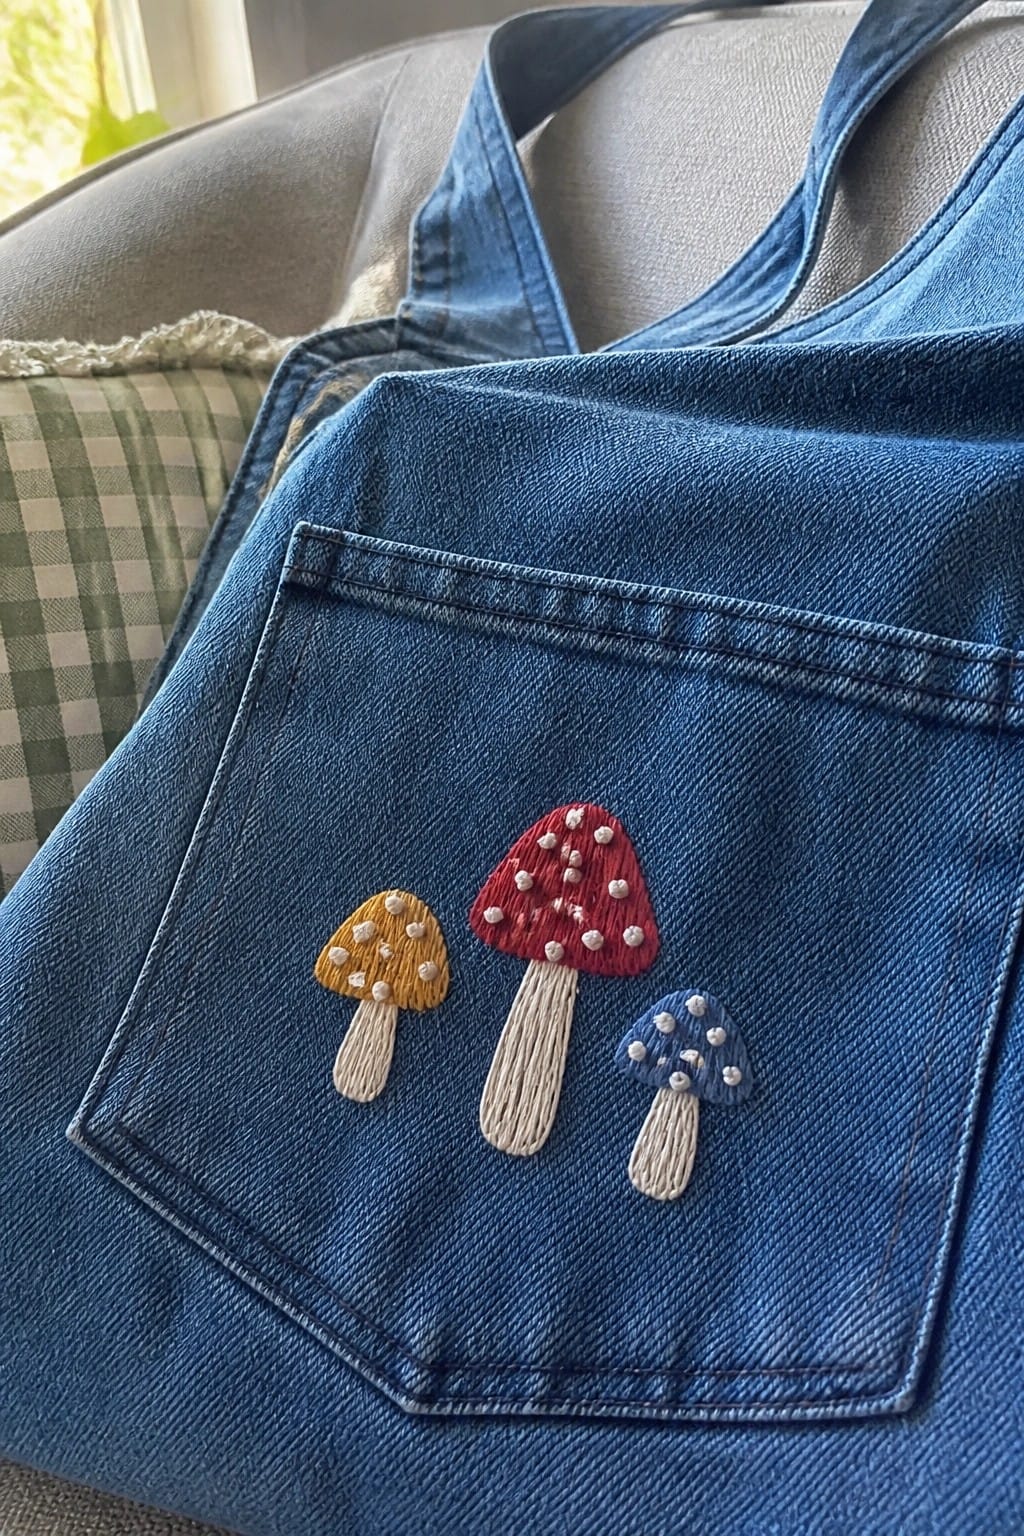
Three mushrooms in different colors sit across the front pocket of a denim tote bag. The small scale keeps the design compact while the varied cap colors create contrast against the blue fabric. This layout works well for accessories that get carried often since the pocket already provides a clear boundary. The idea transfers easily to other fabric items that need a simple repeated motif.
What makes this idea useful is how the existing pocket does most of the framing work. You can swap the cap colors to match a different bag or reduce it to two mushrooms if you want a quicker project. The same arrangement fits on the corner of a jacket or the front of a smaller pouch without much adjustment. On Pinterest this type of design gets saved often because it reads clearly even in a small thumbnail.
Vertical Stars and Dots on Tote Bag Straps

A line of outlined stars in gold thread alternates with small clusters of blue dots down the center of a tote bag handle. The motifs run vertically so the pattern stays visible whether the bag hangs from a shoulder or rests on a surface. Keeping the stars open and the dots tight creates contrast that reads clearly from a distance. This layout suits tote bags, market bags, or any fabric strap that gets regular use.
What makes this idea useful is how the narrow vertical format fits straps of almost any width without crowding the edges. You can repeat the star and dot sequence to match longer handles or shorten it to just two or three stars for a smaller bag. Changing the thread colors to match existing stripes or prints on the bag keeps the look coordinated. The same spacing works on a pencil case or a simple fabric belt if you want to try the pattern on a different item first.
Bee Motif Centered on a Tote Bag

A single bee worked in black, yellow, and white thread sits in the middle of a canvas tote bag. The body uses dense stitching for the thorax and abdomen while the wings stay lighter and more open. This keeps the design compact enough to fit on the flat front panel without crowding the handles or gussets. The idea works best on bags or similar flat fabric items where the embroidery needs to hold up to daily use.
The placement does a lot of the work here because the central spot lets the bee read clearly even when the bag is folded or carried. You could shift the same motif to a smaller scale on a pocket or repeat it in a row along the bottom edge. Changing the thread colors to match a darker bag fabric would keep the same balance without extra outlining. This kind of straightforward insect design shows up well in photos because the limited palette stays easy to recognize at thumbnail size.
Mini Fruit Row on a Canvas Tote

Three small fruit shapes placed in a straight line across the front of a tote create a clean, balanced accent without taking over the whole surface. The strawberry sits on the left, followed by the cherries and then the pear, each kept compact so they read as separate pieces rather than one busy block. The even spacing and limited color palette keep the design simple enough to finish in a few short sessions while still showing clear variety.
What makes this idea useful is how the small scale works on any size tote or similar flat item like a lunch bag or project pouch. You can shift the row higher or lower depending on what you carry most, or repeat the same three fruits in different thread colors for quick variations. On a light background the shapes stand out clearly, so the design stays readable even if you change the fabric color later.
Minimal Mountain Line on a Canvas Tote
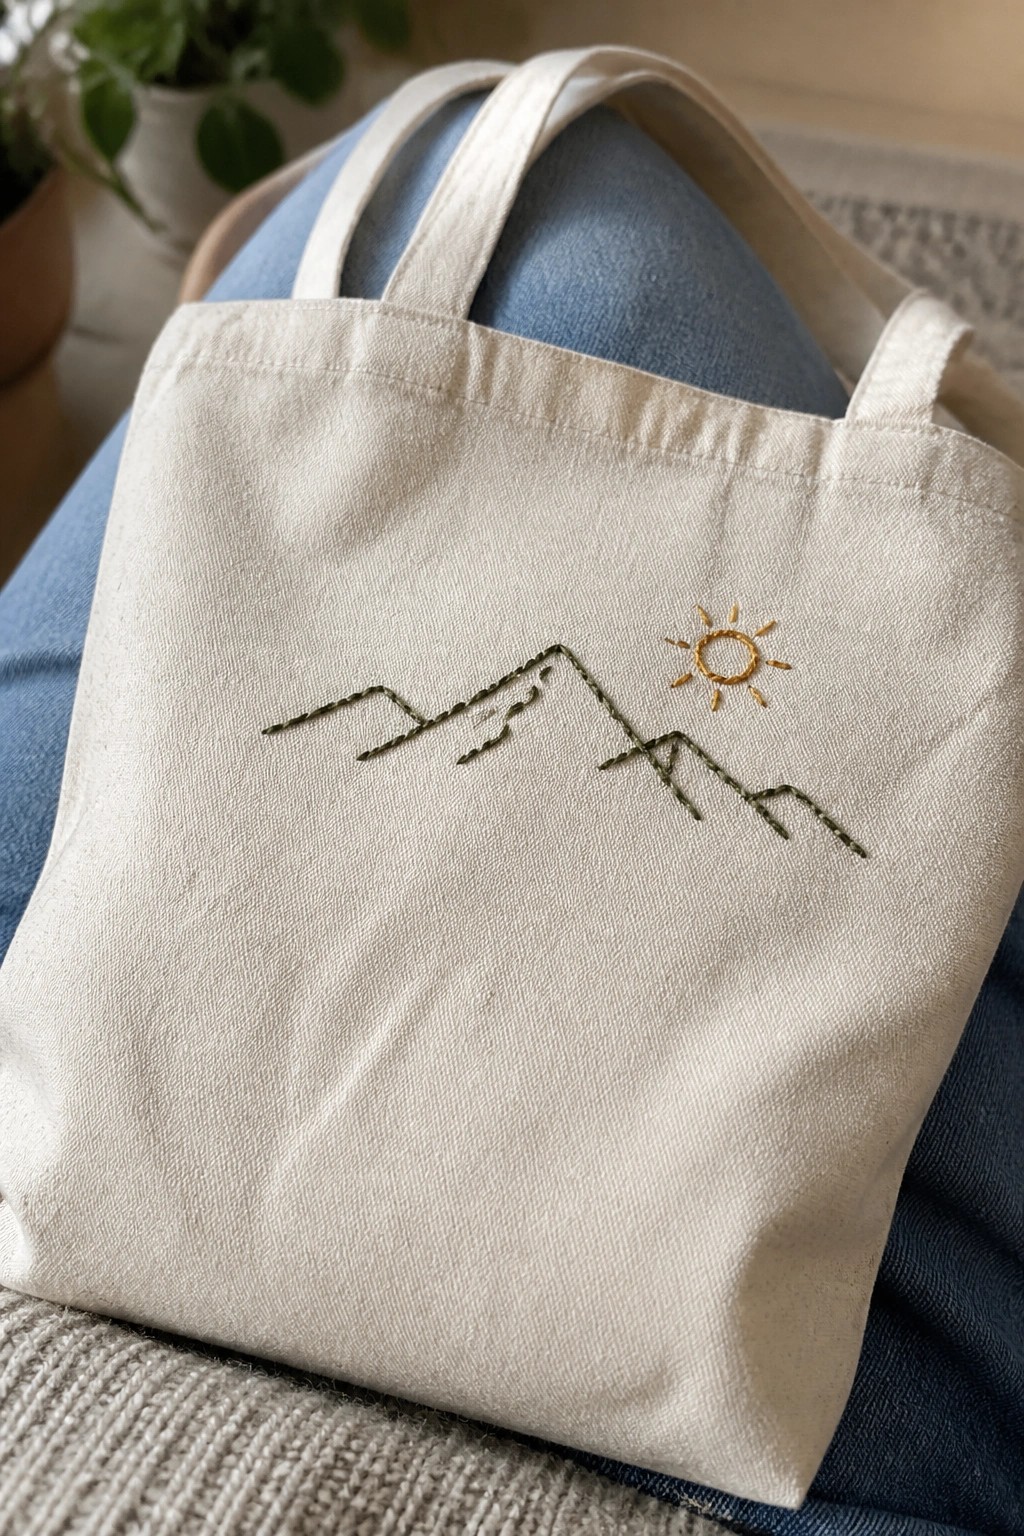
A simple outline of mountain peaks stitched in green thread with a small sun in yellow thread placed to the right makes a clean focal point on the front of a tote bag. The design sits centered but slightly low so it remains visible when the bag is carried. Keeping the stitches thin and the shapes spare prevents the embroidery from stiffening the fabric or competing with the bag’s natural texture.
What makes this idea useful is how well the same line drawing transfers to smaller areas like a pocket or the corner of a larger bag. Swapping the green for navy or the yellow for rust changes the mood without altering the pattern. The small scale also means it finishes quickly and photographs clearly for project sharing.
Seashell Row on a Canvas Tote Bag
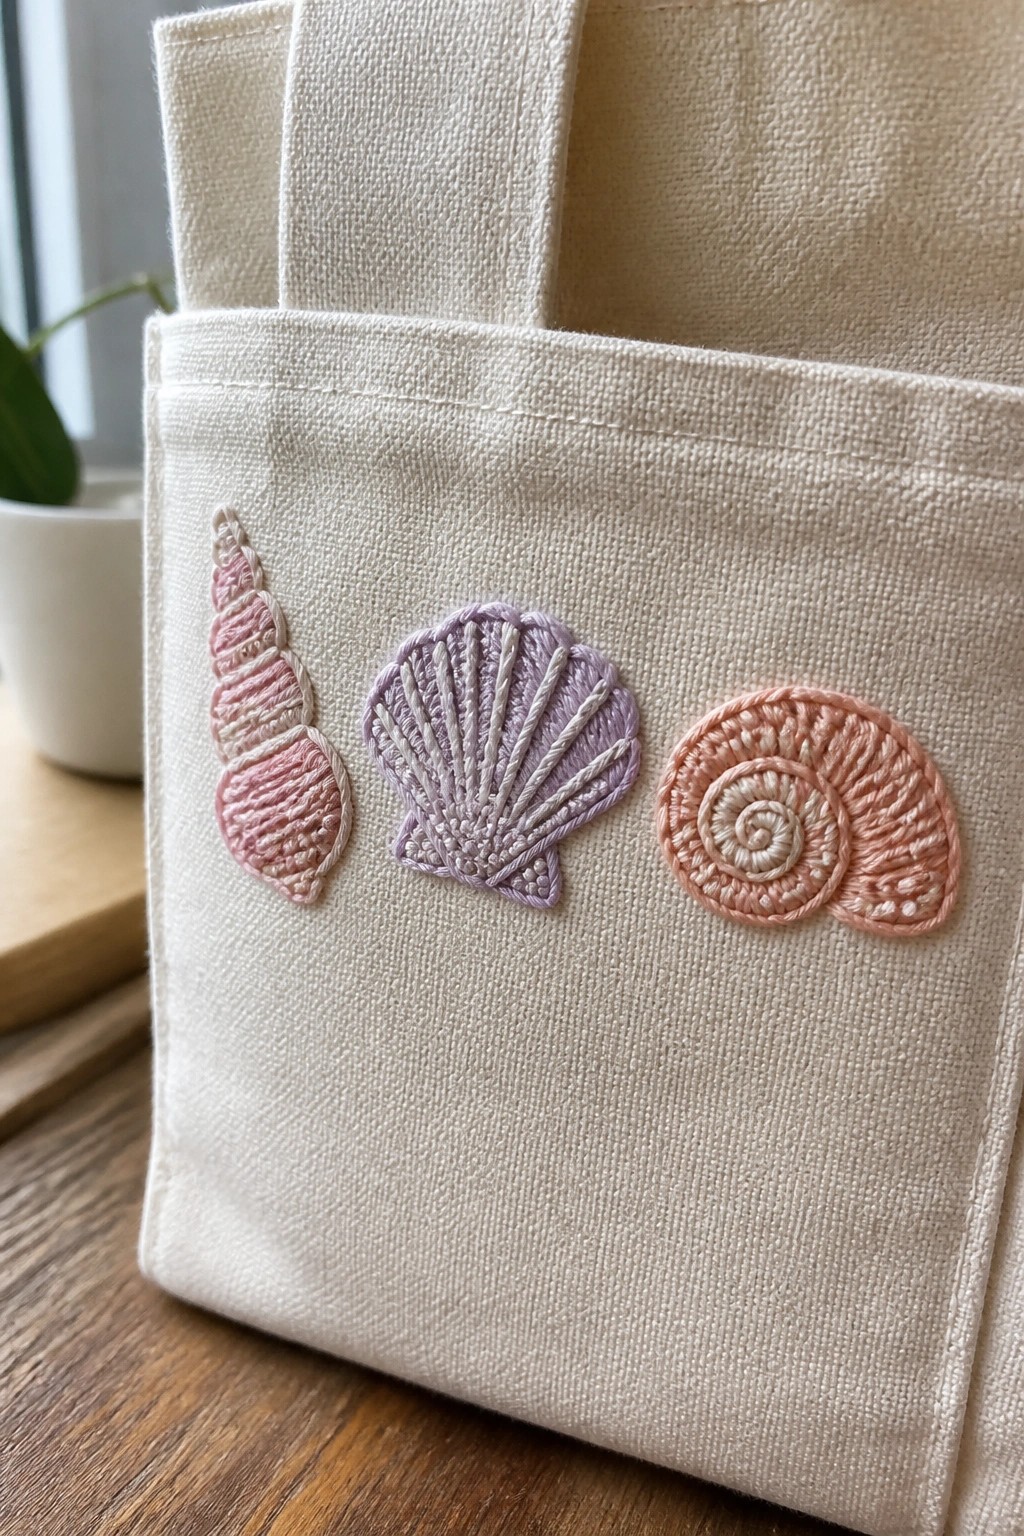
Three different seashell shapes placed in a straight line across the front of a tote bag create a simple repeat motif. The shells sit low on the bag surface so the design stays visible when the bag is carried or set down. Soft pastel threads in pink, lavender, and peach give each shell its own color while keeping the overall look light. This approach works for tote bags or similar flat items where a short horizontal accent is enough.
The placement near the lower edge leaves room above for handles or added text without crowding the design. You could repeat just one shell shape across the row if you want a more uniform look or move the group higher to fit a smaller bag. Changing the thread colors to match a specific palette would shift the feel without changing the layout. A compact row like this photographs clearly for project shares and stays easy to finish in one sitting.
Sunflower Accent on Striped Canvas

A small sunflower motif placed on the front of a striped tote bag gives the plain stripes a single clear focal point. The flower sits slightly to one side rather than dead center, which keeps the horizontal lines visible and balanced. Yellow petals against the beige and navy stripes create enough contrast to read clearly without extra stitching around the edges.
What makes this idea useful is how easily the same motif transfers to other bags or even the corner of a pocket. You can change the petal color to match different stripe combinations or move the flower lower so it sits near the bottom seam. The small scale also means it finishes quickly if you want to make several bags at once for gifts.
Constellation Dots on a Canvas Tote

A pattern of small gold dots linked by straight lines forms a simple constellation across the side of the tote. The design sits slightly off center, leaving the rest of the bag’s surface clear. The thin lines and spaced dots keep the embroidery from feeling heavy on the textured canvas. This layout suits tote bags and other carry items that benefit from a light, graphic touch.
The side placement works because it stays visible when the bag is in use without interfering with the handles or opening. You can shrink the same dot-and-line layout for a smaller bag or switch the thread to silver for darker fabric. This approach stands out in idea roundups because the contrast between the metallic dots and plain weave reads clearly in photos. It also transfers easily to other flat items like zip pouches or notebook covers.
Cactus Trio on a Tote Bag
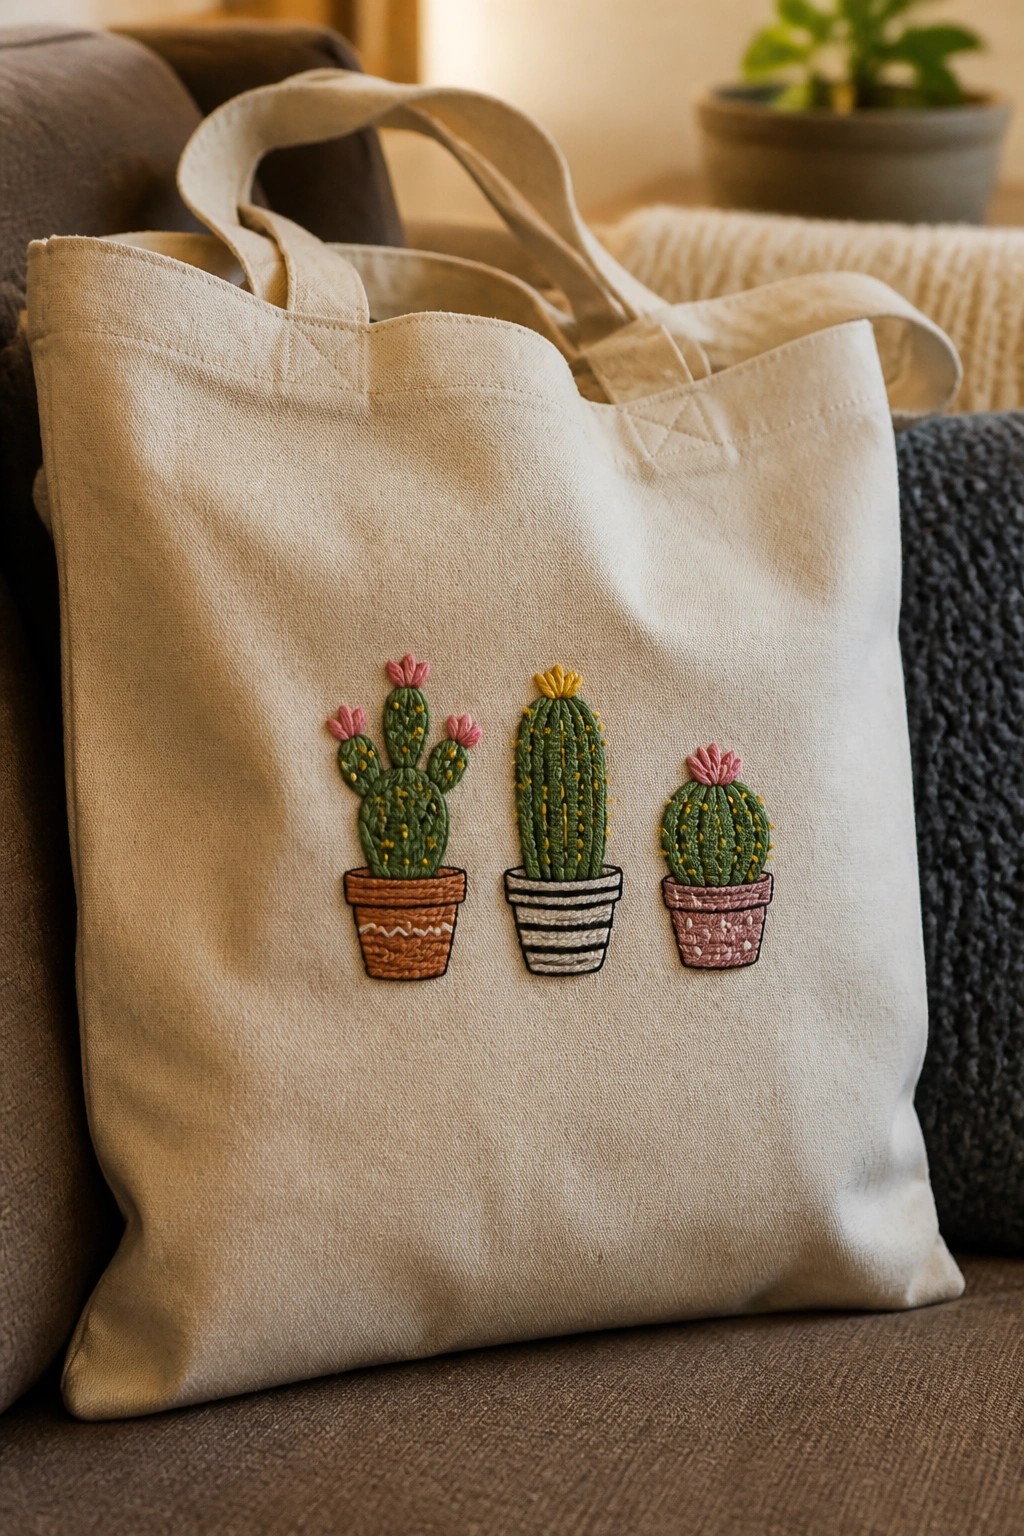
Embroider three small potted cacti in a horizontal row across the front of a canvas tote. Each cactus uses a different pot style and a few color accents on top to create variety while keeping the overall design compact. The centered placement leaves plenty of blank fabric around the edges so the bag still functions as a plain tote when needed. This layout suits accessories like market bags or project totes because the motifs stay small enough to finish in one evening.
What makes this idea useful is how the row format scales easily to narrower bags or wider ones by adjusting the spacing. Swap the pot colors or repeat just two cacti to change the look without redrawing the pattern. The small scale also transfers directly onto a zip pouch or notebook cover if you want the same motif on something smaller. On light canvas the green thread reads clearly without needing extra outline stitches.
Mushroom Cluster on a Navy Tote

A group of mushrooms in different sizes sits low on the front of a navy tote, with one large red cap and several smaller brown and cream ones rising from a narrow band of green stitching. The design uses the bag’s dark fabric to make the red cap pop while the rest of the cluster stays grounded and compact. This approach fits tote bags or similar accessories that get carried around, since the motif stays clear even when the bag is in motion or partially filled.
The low placement leaves the upper half of the tote open for other uses or added details later. You could shrink the same cluster for a pencil case or stretch it wider across a larger market bag without changing the basic layout. Swapping the red cap for a muted tone would make the design blend into lighter fabrics while the shape and grouping stay the same.
Wildflower Border Along the Bottom of a Tote Bag
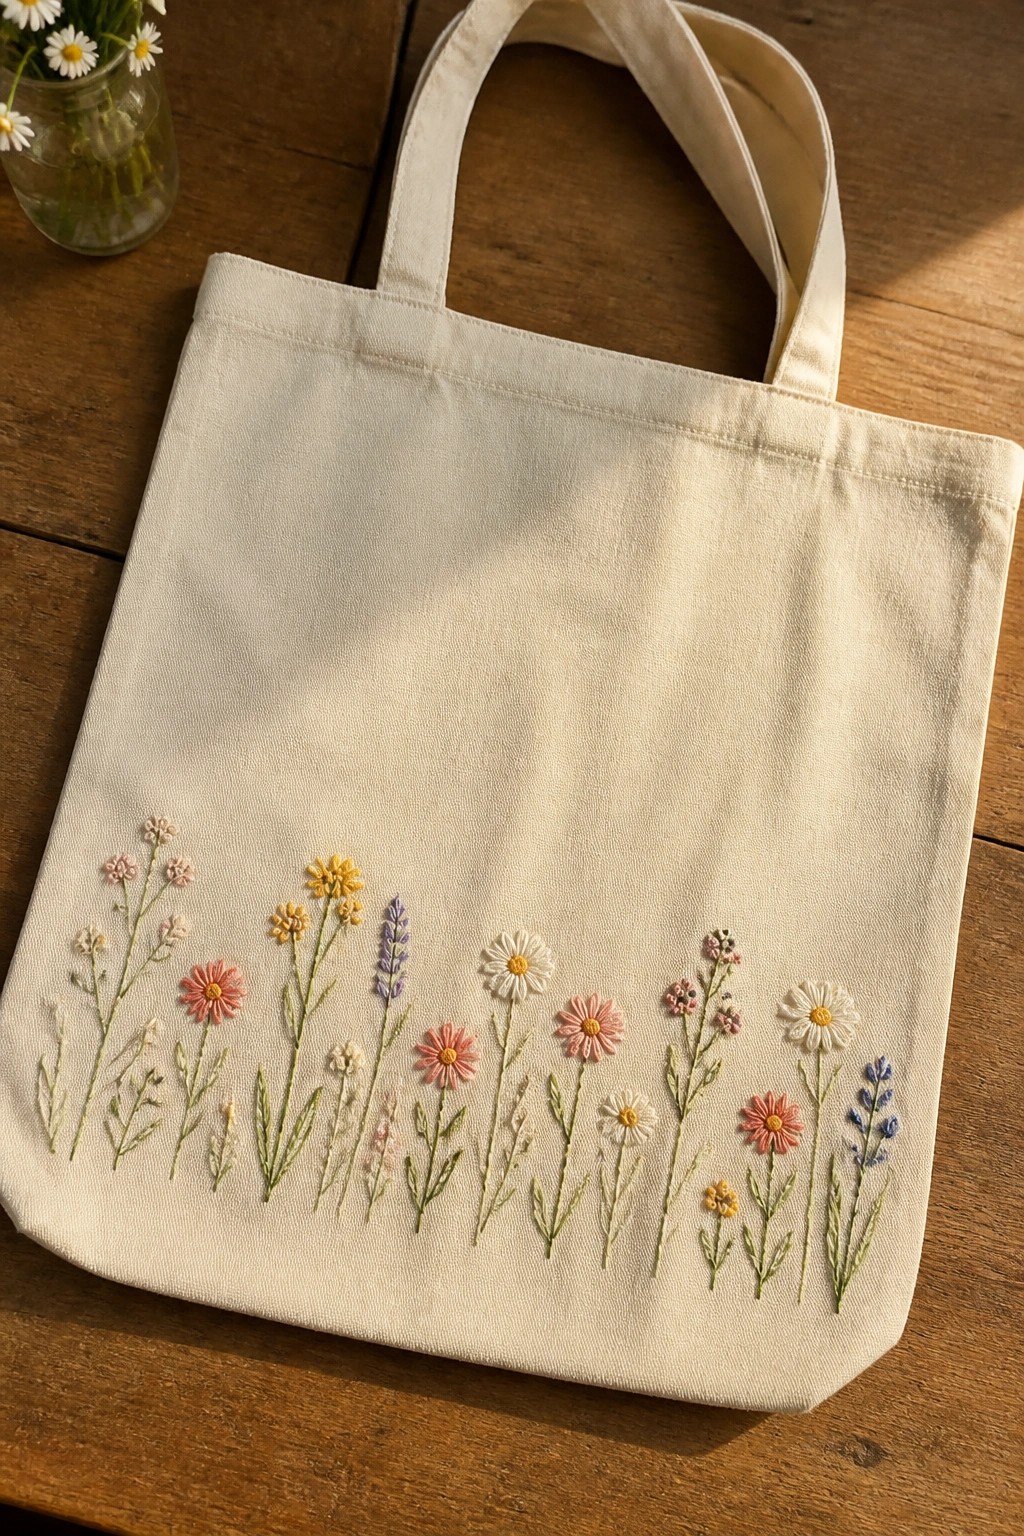
A row of small mixed wildflowers stitched across the lower section of a tote bag forms a simple border that remains visible during use. The design keeps stems short and spreads different flower shapes evenly so the embroidery sits flat without crowding the fabric. Using a limited set of colors with green stems ties the scattered blooms together while leaving most of the bag surface plain.
What makes this idea useful is how the straight horizontal placement lets you match the length to any tote width without redrawing the pattern. You can shorten the row to three or four flowers for a smaller bag or add more repeats for wider fronts. Swapping in fewer colors or tighter spacing changes the density quickly while keeping the same layout. This approach works well on canvas because the sturdy weave supports the stitches without extra backing.
Corner Triangle Cluster for Everyday Totes
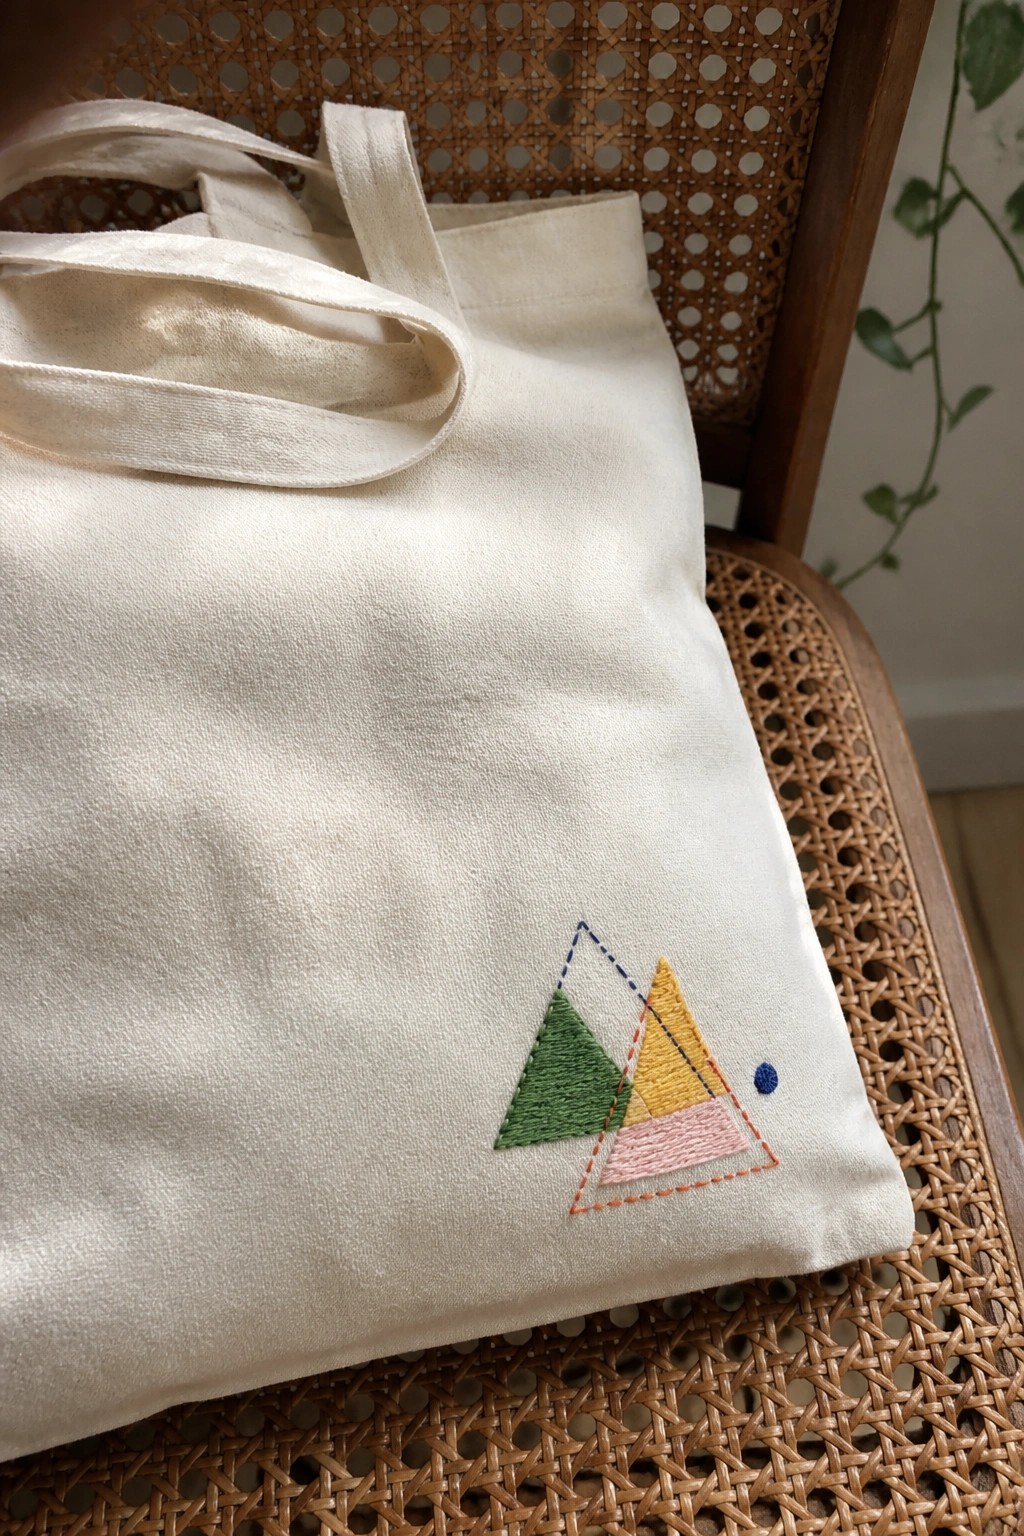
A cluster of overlapping triangles makes a clean motif for a tote bag. The design sits in the lower right corner, with solid blocks of green, yellow, and pink filling some shapes while others use dashed outlines in blue and orange. The small scale keeps the stitching contained and leaves the rest of the bag plain. This layout works best on flat fabric items like totes or pouches where the corner placement avoids bulk or interference with handles.
The placement does a lot of the work here since it stays out of the way during daily use. You could shift the same triangles higher on the bag, change the colors to match a season, or repeat the cluster on the opposite corner for balance. The mix of filled shapes and dashed lines adds interest without needing many colors or complex stitches. This kind of compact design also transfers easily to a smaller pouch or the front of a notebook cover.
Camera Motif on Canvas Tote

A small camera shape stitched onto the front of a canvas tote gives the bag a clear focal point without covering much surface area. The design combines brown sections for the body with navy and light stitching around the lens, keeping the overall size compact and centered. This placement works well on bags because the motif stays visible during everyday use. The approach suits accessories that need a single, recognizable detail rather than scattered stitching.
The placement does a lot of the work here by positioning the camera where it shows when the bag is carried or set down. You could scale the same shape down for a pouch or move it to the corner of a larger tote to leave more blank space. Switching the brown to black or the navy to another accent color changes how much the design stands out against different fabrics. This kind of motif also transfers easily to a jacket or apron if you want to test it on clothing first.
Potted Plants Lined Up on a Tote Pocket

Three small potted plants stitched in a row across the front pocket of a canvas tote give the bag a clean, organized look. The design keeps each plant compact with its own pot so the whole motif stays contained within the pocket rectangle. Different leaf shapes break up the repetition without adding extra space or clutter. This approach works especially well on bags or pouches where the embroidery needs to stay visible but not overwhelm the fabric area.
What makes this idea useful is how the pocket edges already define the layout, so you do not need to plan extra borders. You can swap plant types or shift the row to the lower corner of a larger tote panel if the pocket is missing. The small scale also means the same motif fits on a zip pouch or the front of a notebook cover with minimal changes to thread amounts.
Three Ice Cream Cones in a Row

Embroider three small ice cream cones side by side near the bottom edge of a tote bag. Each cone uses a different scoop color with scattered dots for sprinkles, keeping the overall design compact and evenly spaced. The straight horizontal line balances the motif on the large fabric area while leaving plenty of empty space above it. This layout suits tote bags, market bags, or similar flat accessories where the design needs to stay visible during use.
What makes this idea useful is how the small scale lets you shift the same row onto a zip pouch, the corner of a tea towel, or the front pocket of an apron. Swapping scoop colors for different seasons or using only two cones instead of three changes the look without redrawing the pattern. The even spacing also works on clothing hems or the edge of a canvas pouch where a single larger motif would feel too heavy. On a tote, the lower placement keeps the stitches away from the main stress points of the handles.
Bicycle Silhouette on a Canvas Tote
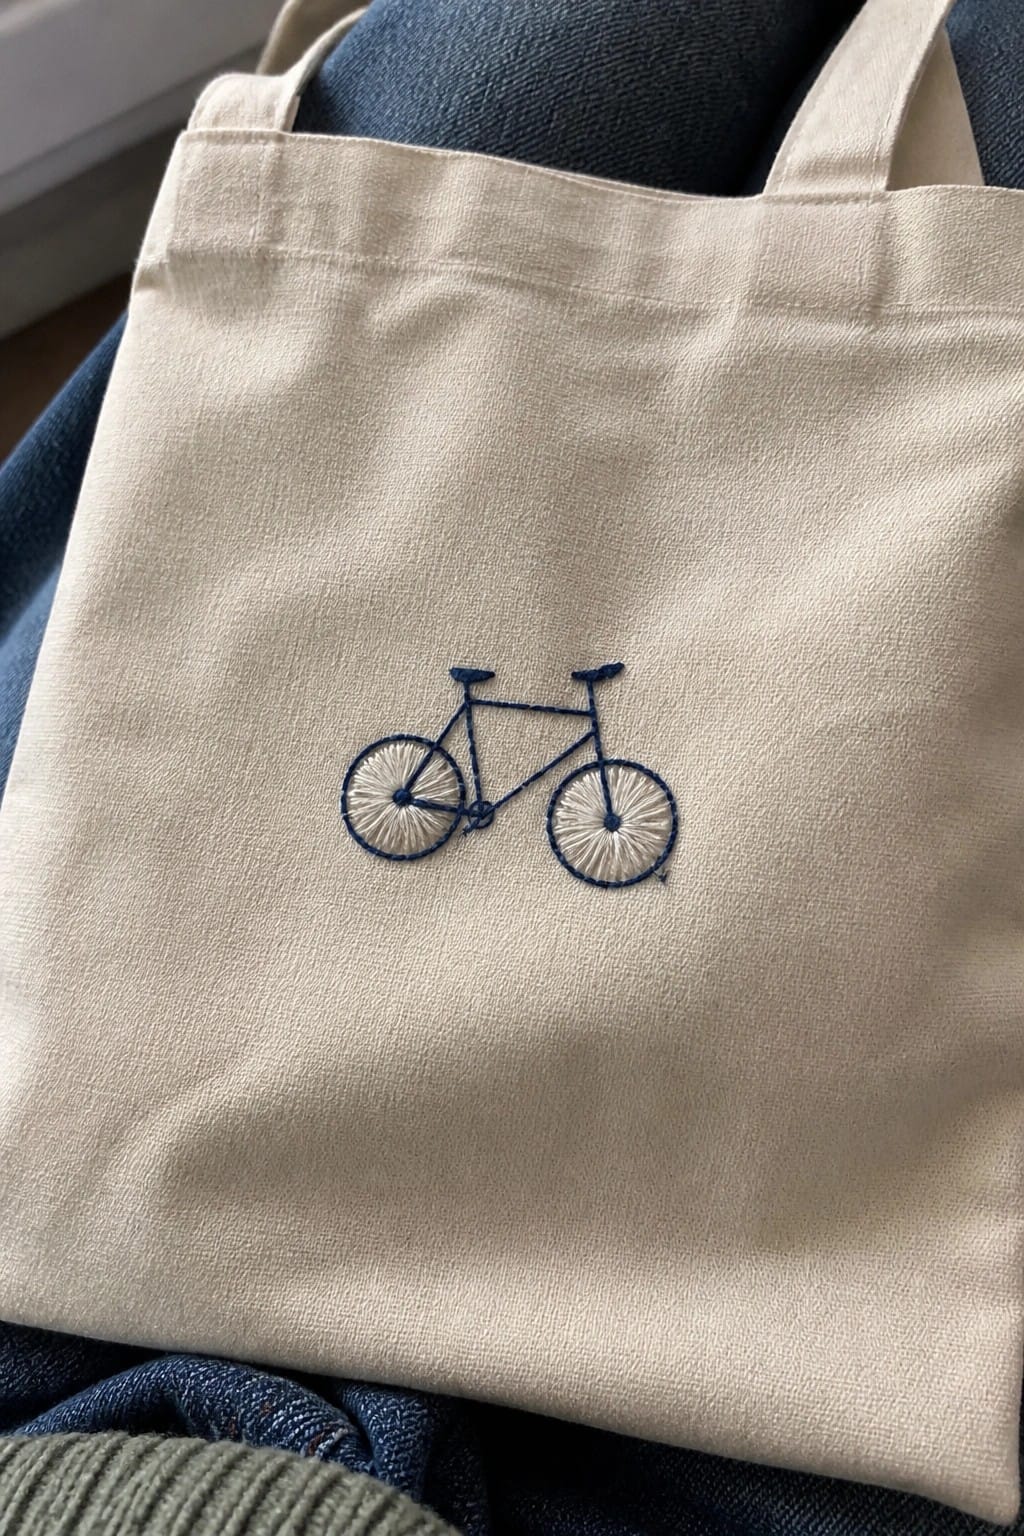
A basic bicycle outline in dark thread sits in the center of a plain canvas tote bag. The frame uses simple line stitches while the wheels are filled with short radiating stitches in a lighter shade to create contrast. This keeps the overall look clean and leaves most of the bag surface untouched. The placement and scale suit a bag that gets carried around rather than something meant for display.
What makes this idea useful is how the small motif leaves room for the fabric to show through on a bag you actually use. You could shift the same design higher or lower depending on the tote size or change the thread color to match whatever you already have on hand. The wheel texture gives it a bit more presence without adding much stitching time. For clothing, this kind of motif would also transfer easily to a pocket or sleeve if you wanted to adapt it.
Cloud and Raindrops on a Canvas Tote

A simple cloud outline stitched near the top of a tote bag works with scattered raindrops in several blue shades placed below it. The drops vary in length and angle so they look like they are actually falling rather than lined up in rows. This layout keeps the whole design compact and leaves most of the bag surface free for regular use. The idea suits tote bags, small pouches, or any flat fabric item that gets carried around.
What makes this idea useful is how little space it takes while still reading clearly from a distance. You can stretch or shrink the raindrop lines to fit narrower or wider bags without redrawing the cloud. Changing the thread colors to greens or grays turns the same pattern into a different season look in minutes. The vertical drop lines also help the design photograph well for project boards because they create instant contrast against the plain fabric.
Ladybug Design on a Tote Bag

A small ladybug makes a clean focal point when stitched onto the front of a canvas tote. The compact shape and high-contrast colors keep the design readable even when the bag is in motion or viewed from a few feet away. This motif suits everyday carry items that benefit from a single, recognizable accent rather than a full scene.
What makes this idea useful is how the rounded form scales easily to different bag sizes without needing extra framing stitches. You could move the same ladybug lower on the bag, repeat it in a row along one side, or change the body color to match a set of totes for gifts. The open space around the motif also leaves room to add a name, date, or small leaf later if the bag needs personalization.
Frequently Asked Questions
What basic supplies do I need to start these tote bag embroidery projects? You will want a simple canvas tote bag, embroidery floss in various colors, needles sized 3 to 7, a small pair of scissors, and an embroidery hoop if your fabric needs stabilizing. Optional items like a water soluble marker for drawing designs and a thimble can make the process smoother during long sessions.
How do I transfer the designs onto my tote bag without special tools? Place a printed template under the fabric or use a light source behind the bag to trace the pattern with a water soluble pen. For darker fabrics a chalk pencil works well too. Keep your lines light so they disappear after stitching or with a gentle rinse.
Which stitches are easiest for beginners working on sturdy tote fabric? Start with backstitch for clean outlines, satin stitch for filling shapes, and French knots for accents. These three stitches handle most of the 20 ideas and require only basic needle movement. Practice each on a scrap piece of canvas first to build confidence before moving to your bag.
How can I set up my space to make embroidery feel truly relaxing on craft nights? Choose a comfortable chair with good lighting and keep your supplies in a small basket so everything stays within reach. Play soft music or a podcast, work on one small section at a time, and pause often to stretch your hands. Many people find that limiting sessions to 45 minutes keeps the activity enjoyable rather than tiring.
What should I do if my stitches look uneven or I make a mistake? Gently remove the thread with a seam ripper or the needle tip and restitch the area. If the hole remains visible, place a small decorative patch or extra knot over it to turn the error into part of the design. Remember that slight variations often add handmade charm to tote bags.