
I have been adding embroidered flowers to my tote bags for some time now.
It gives them a softer look that I enjoy carrying around.
I tried to keep the designs simple and fresh without too much detail.
Some patterns work better on lighter fabrics while others suit canvas better.
These are the ones I found worked nicely in my own projects.
Clustered Bouquet for Tote Bags

A bouquet of mixed flowers with stems gathered at the base creates a compact design that sits neatly on the front of a tote bag. The embroidery covers the lower half of the panel, with stems pointing down and blooms fanning out above them. Varying the flower sizes and using a soft color range keeps the layout balanced without crowding the fabric. This motif works well on bags or other flat fabric items where you need a self-contained shape.
What makes this idea useful is how the stem bundle anchors the design and prevents the flowers from looking scattered. You could adapt it by moving the bouquet higher on the bag or shrinking it for a smaller pouch. Switching to cooler tones would change the overall feel while keeping the same structure. The tight base also makes the pattern easy to transfer onto different bag sizes without major adjustments.
Lavender Stems on a Denim Tote Pocket
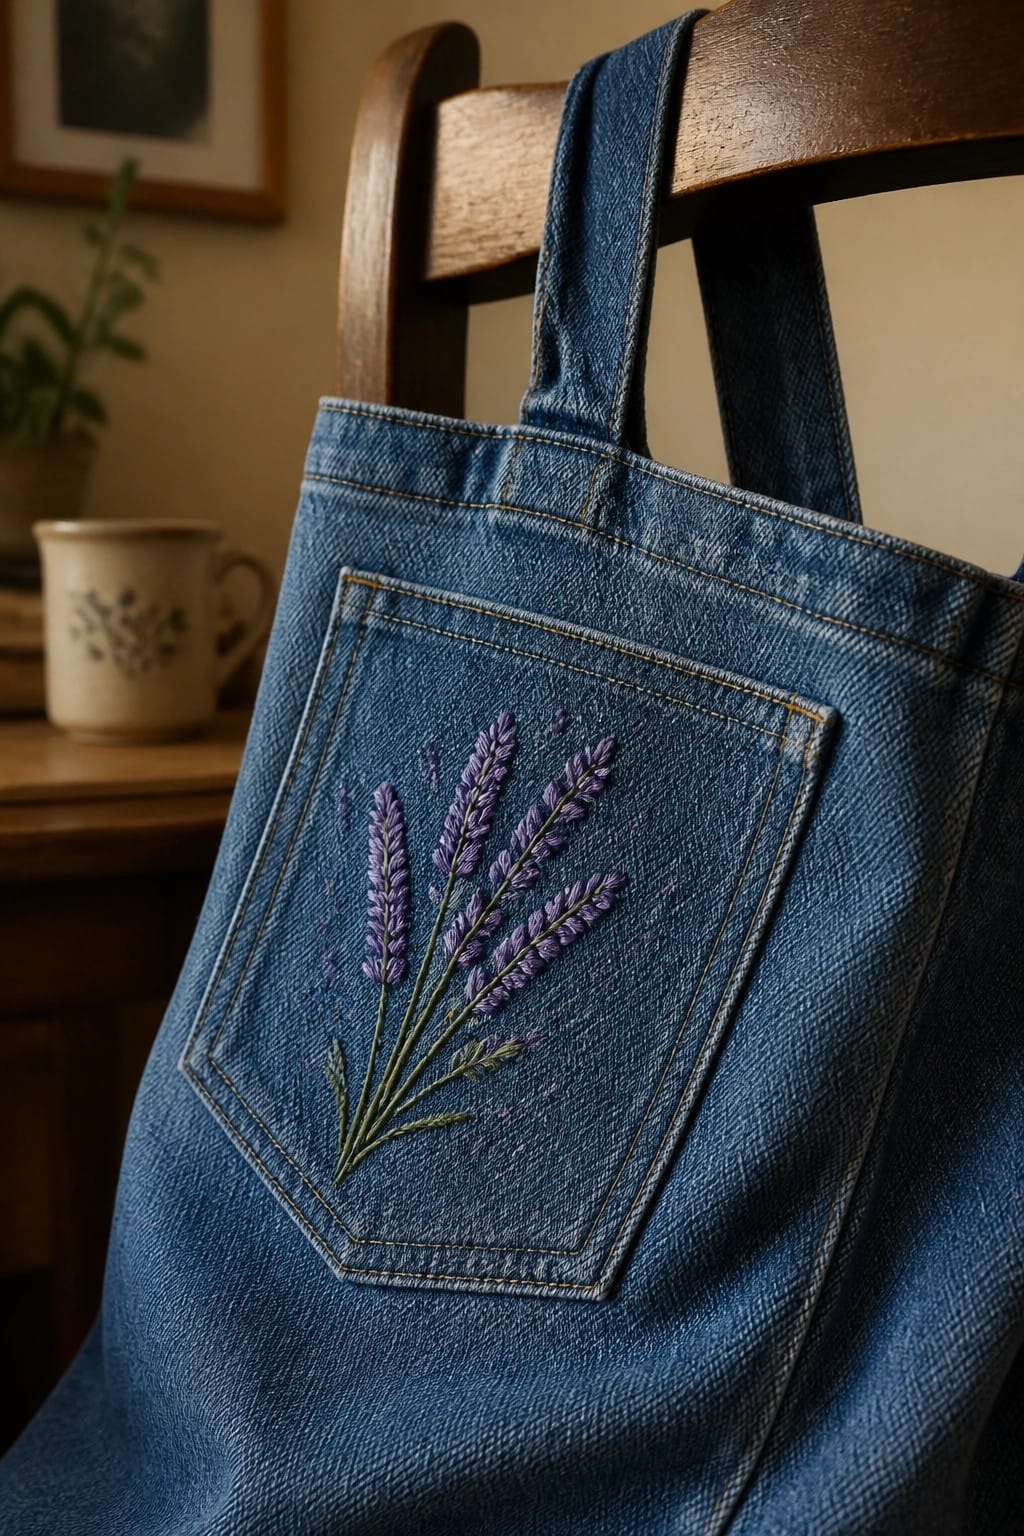
A small cluster of lavender stems works well when placed directly on the front pocket of a denim tote bag. The stems angle outward from a central base with purple blooms stacked along the tops and a few scattered stitches suggesting loose buds around the edges. Green thread defines the leaves and lower stems while the purple creates the flower heads, keeping the whole design contained within the pocket rectangle. This approach adds interest to a bag without covering the main fabric area or affecting the handles.
The pocket placement keeps the embroidery protected and visible at the same time, which makes it practical for a bag that gets daily use. You could easily shift the same bunch to the corner of a different tote or scale it down for a smaller pocket on a jacket. Swapping the purple thread for another shade would change the mood without needing to alter the layout or stitch density. Because the design stays compact it also works as a quick project when you want to refresh an old bag instead of starting from scratch.
Corner Floral Sprig on a Canvas Tote
A tight cluster of three small flowers with short stems and leaves sits in the lower right area of a tote bag. The design keeps most of the fabric plain while still giving the bag a finished detail. Soft pink blooms paired with muted green foliage create a compact motif that fits neatly near the bottom edge without interfering with the bag’s main storage space. This layout works especially well on flat fabric items like totes, pouches, or market bags where you want light decoration rather than full coverage.
The placement does a lot of the work here by anchoring the embroidery in one corner so the rest of the bag stays usable. You could repeat the same small sprig on a jacket cuff or the corner of a tea towel by shrinking the scale slightly or swapping the pink tones for whatever matches your fabric. Adding or removing a few scattered dots around the flowers changes the density without needing a whole new design, which makes it simple to test on different bag sizes before committing to thread colors.
Curved Floral Arc on a Canvas Tote
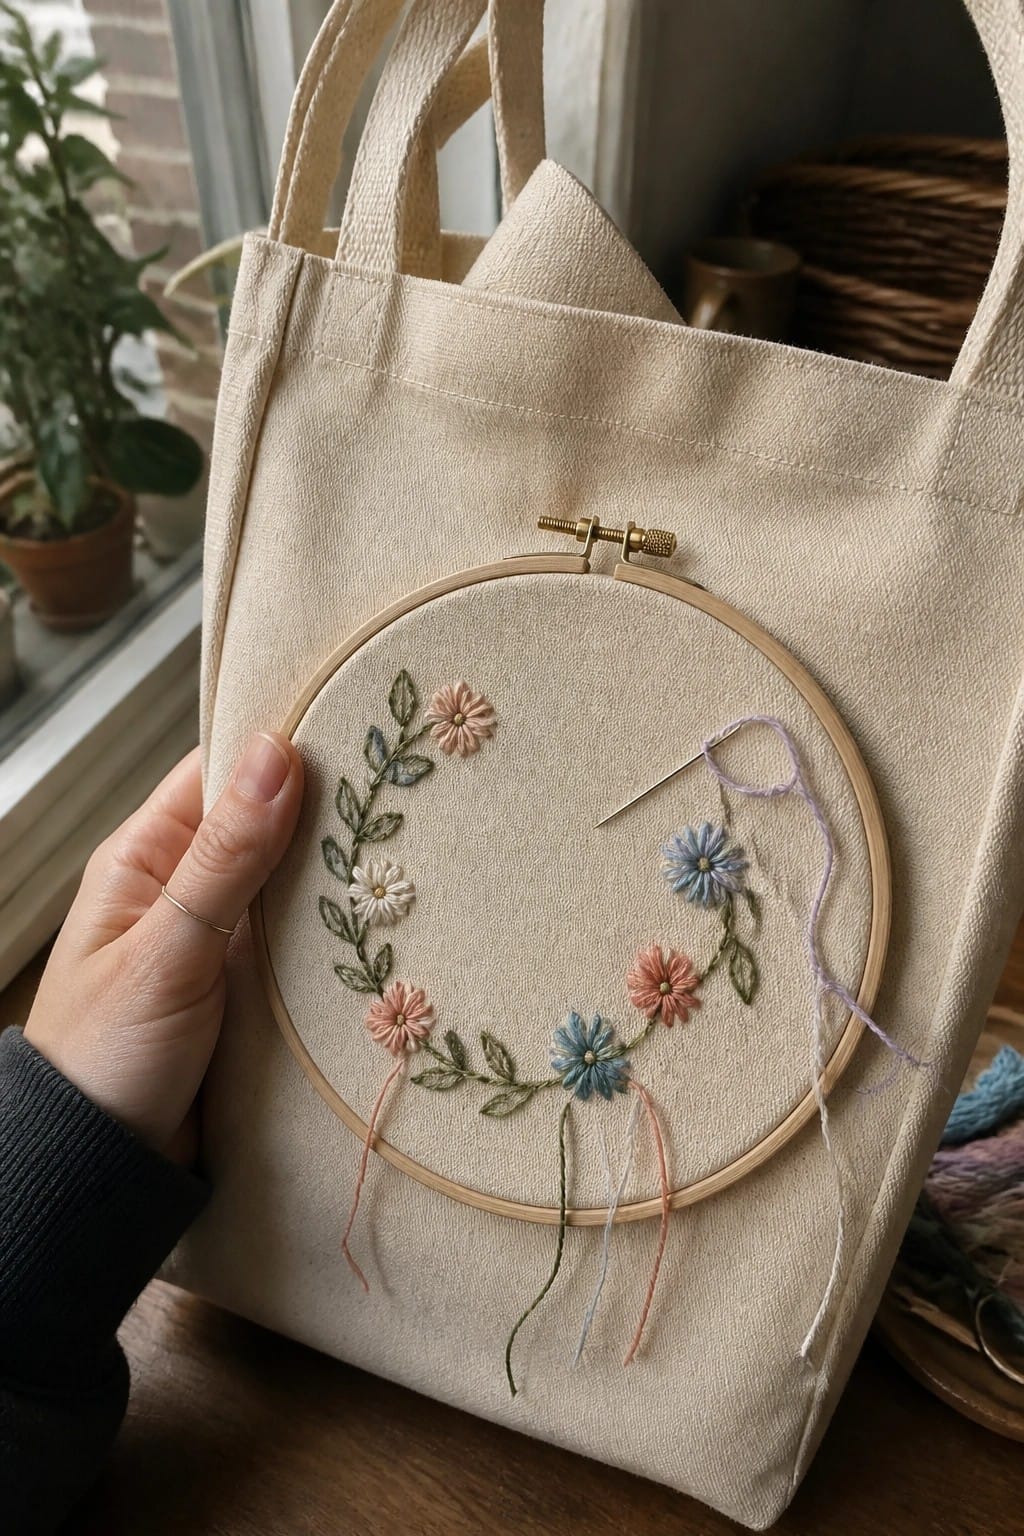
A partial arc of small flowers and leaves runs across the front of a canvas tote bag. Different flower shapes in soft pink, blue, and cream sit along the curve with green leaves connecting them, leaving the upper portion of the bag plain. The open layout keeps the embroidery compact while still using the full width of the hoop area. This approach suits tote bags and other fabric accessories where you want visible detail without covering the entire surface.
The placement low on the bag keeps the stitching away from the handles and main stress points during daily use. You can easily shorten the arc for a smaller bag or stretch it further around the sides for a wider tote. Changing the flower colors to one palette or adding a second layer of the same arc below creates quick variations without redesigning the whole motif. The simple curve also works as a starting point for similar projects on pouches or jacket backs.
Daisy Line Along the Tote Pocket
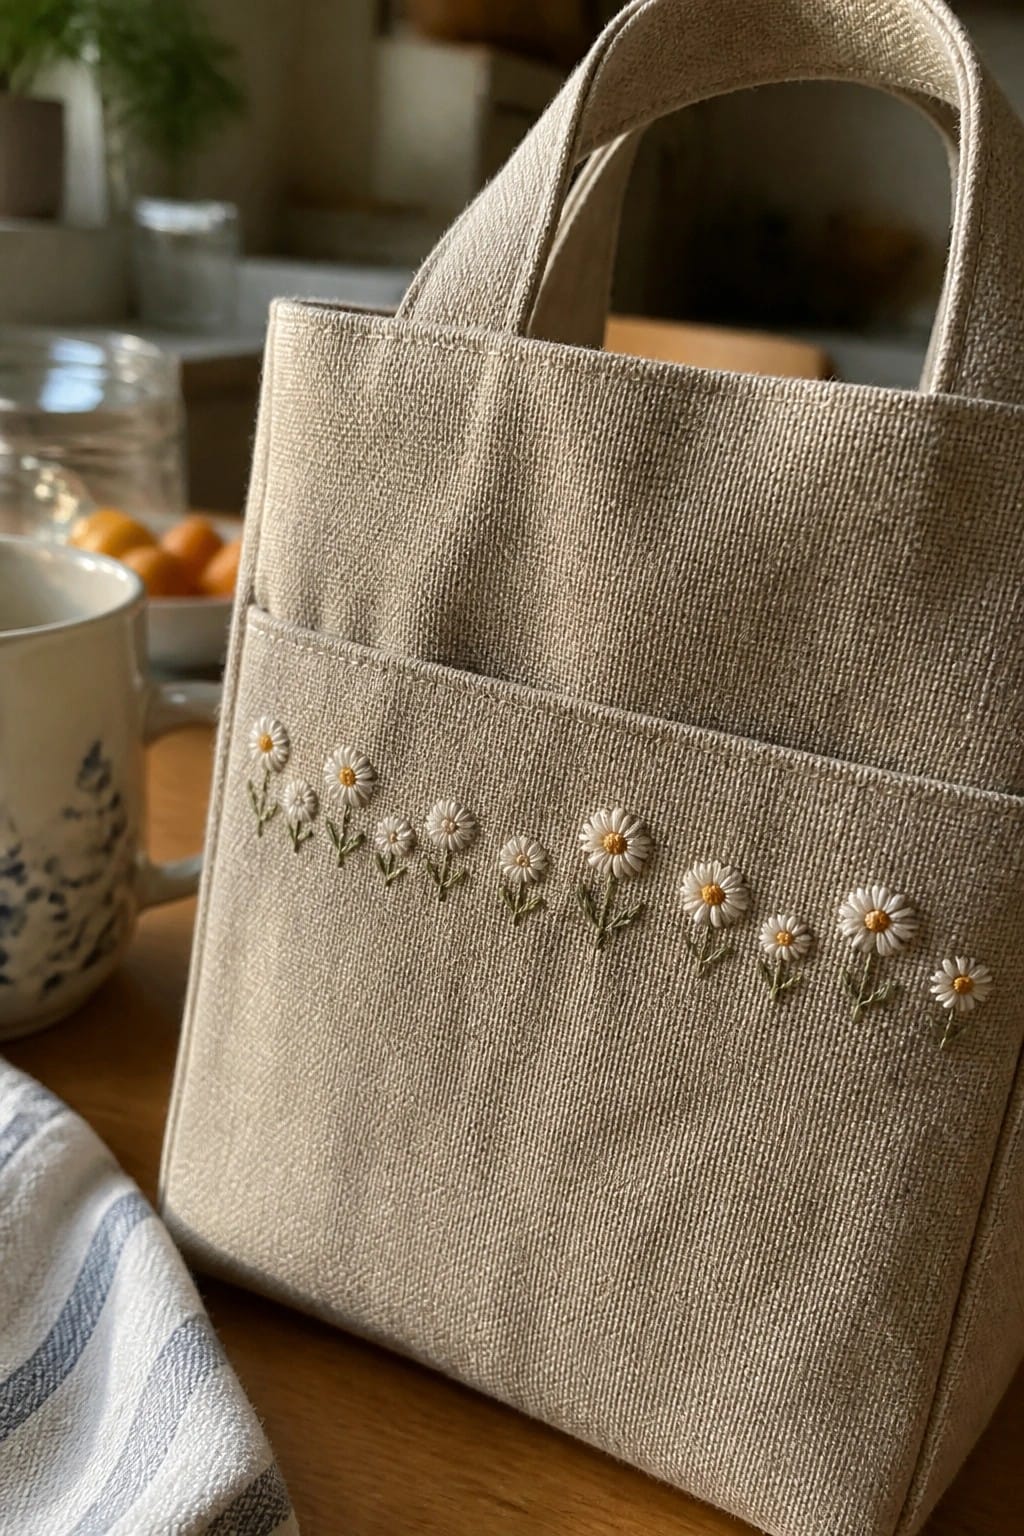
A straight row of small daisies works well as a border on the upper edge of a tote bag pocket. Each flower uses white petals around a yellow center with short green stems and leaves, spaced evenly so the line reads as one continuous accent rather than scattered spots. The placement keeps the embroidery visible when the bag is carried without covering the main body fabric. This approach suits any tote or market bag where you want a quick floral detail that stays out of the way of daily use.
The placement does a lot of the work here because the pocket already creates a natural frame. You can repeat the same line on a smaller scale for a pencil case or scale it up slightly for a larger canvas tote. Changing the centers to a different color or shortening the stems gives an easy variation without redrawing the whole pattern. On Pinterest this kind of clean horizontal motif stands out because it reads clearly even in a thumbnail.
Asymmetric Floral Spray Down a Tote Bag
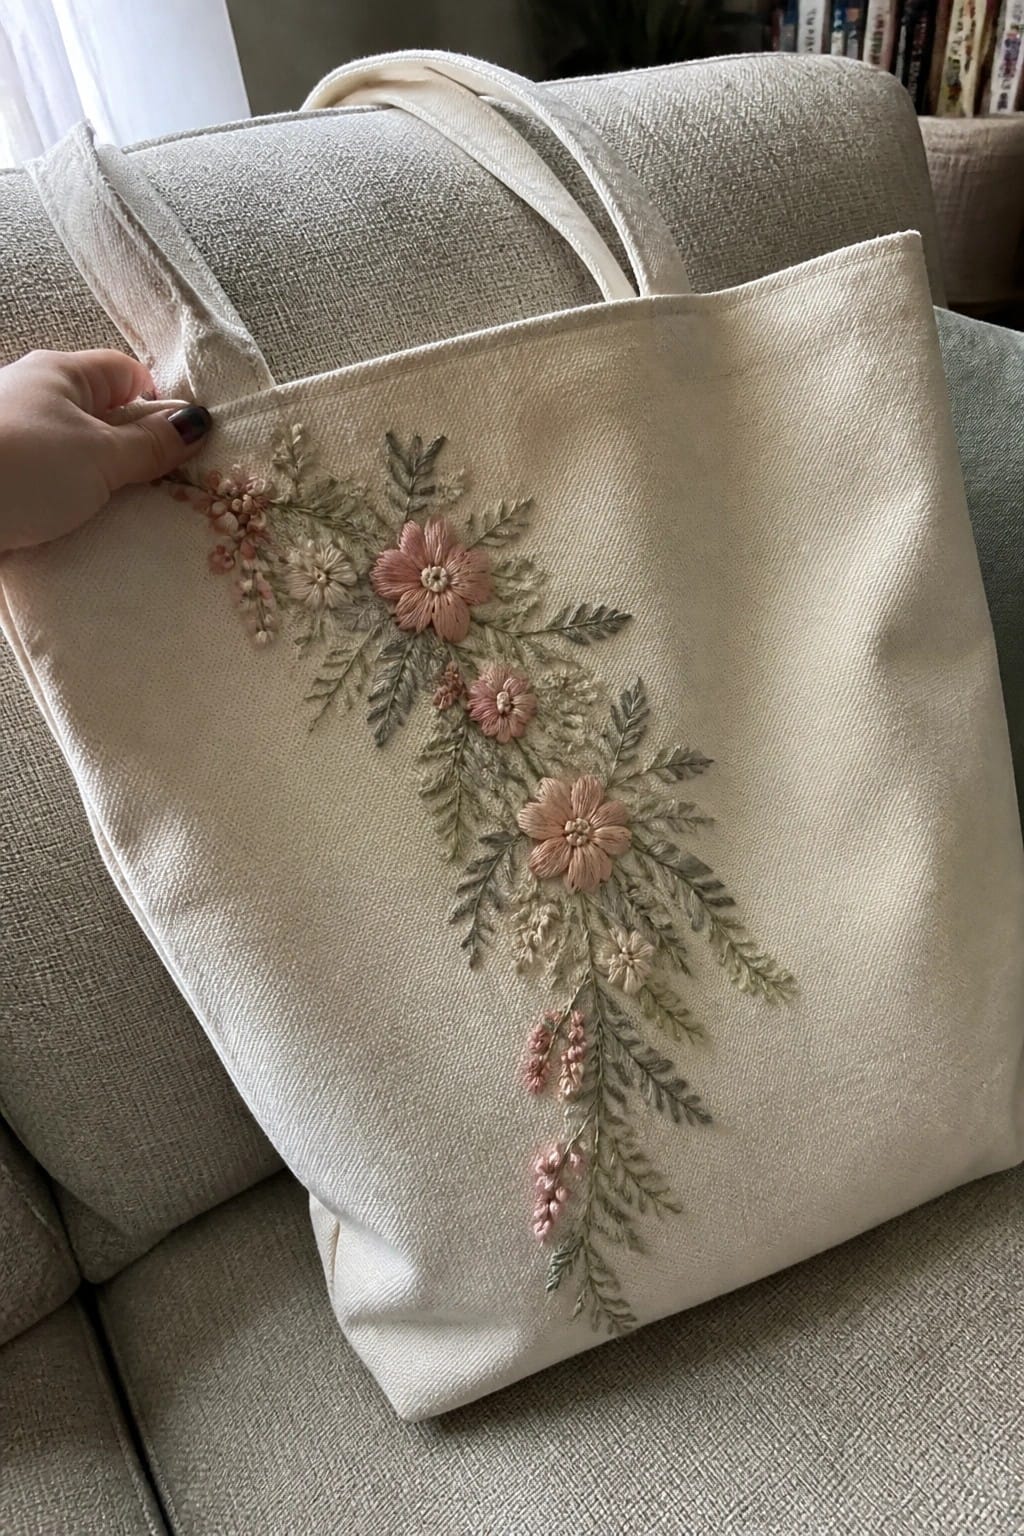
A tall, narrow floral arrangement stitched along one side of a canvas tote gives the bag a clear focal point without covering the whole surface. The design uses several different flower sizes that gradually get smaller toward the bottom, with leaves filling the spaces between them. This tapered layout keeps the tote functional while still looking deliberate. It works especially well on plain cotton or linen bags that get carried often.
What makes this idea useful is how simple it is to adjust the length or width to match different bag sizes. You could flip the spray to the opposite side or shorten it to just the upper half if you want more blank space. The soft pink and green palette stays easy to match with most outfits, but swapping in stronger colors would make the same layout stand out on a darker tote. The same motif also transfers cleanly to a smaller makeup bag or a zip pouch.
Bouquet with Bow on Striped Tote
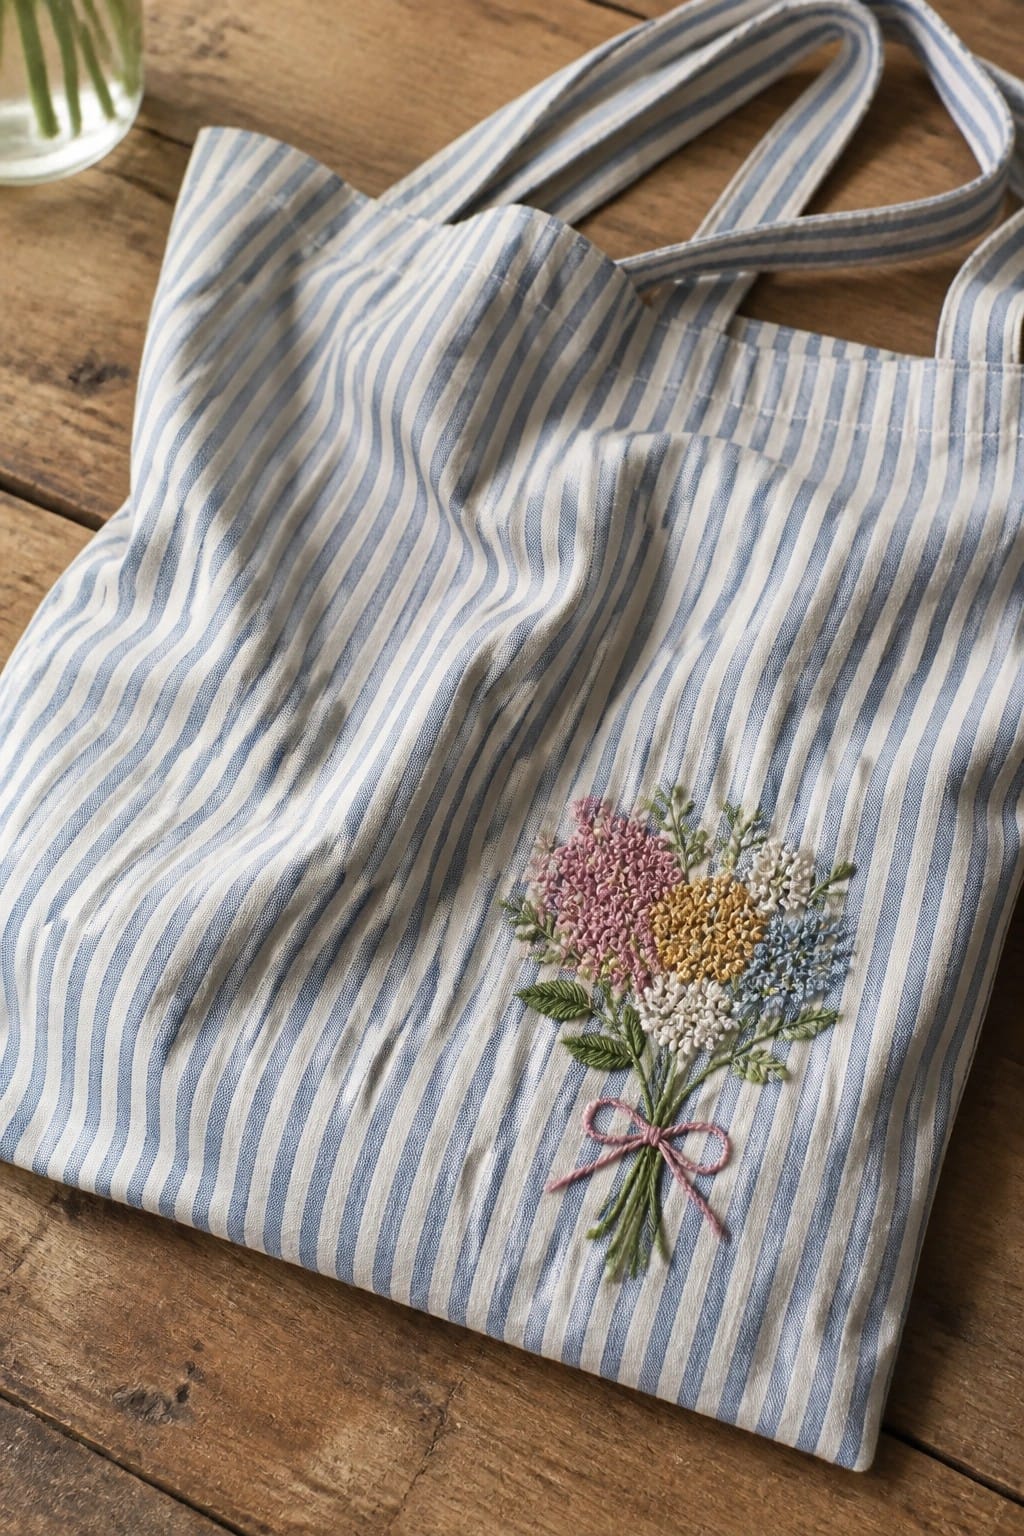
A compact cluster of flowers in pink, yellow, blue, and white sits on the lower front of a blue and white striped tote, finished with a simple pink bow at the stems. The design stays small enough to sit neatly against the stripes without fighting the pattern. Placing it off-center near the bottom edge leaves most of the bag surface clear for everyday use. This motif suits tote bags, market bags, or similar accessories where a single small element is enough.
What makes this idea useful is how the tight grouping and bow keep the embroidery contained on patterned fabric. You could shift the same size bouquet onto a jacket pocket, the corner of a pillow, or the front of a zip pouch. Swapping the flower colors to echo different stripe tones would make the design work across multiple bags without changing the layout. The bow also gives a quick way to connect the thread colors if you adapt the palette.
Row of Tied Stem Bouquets
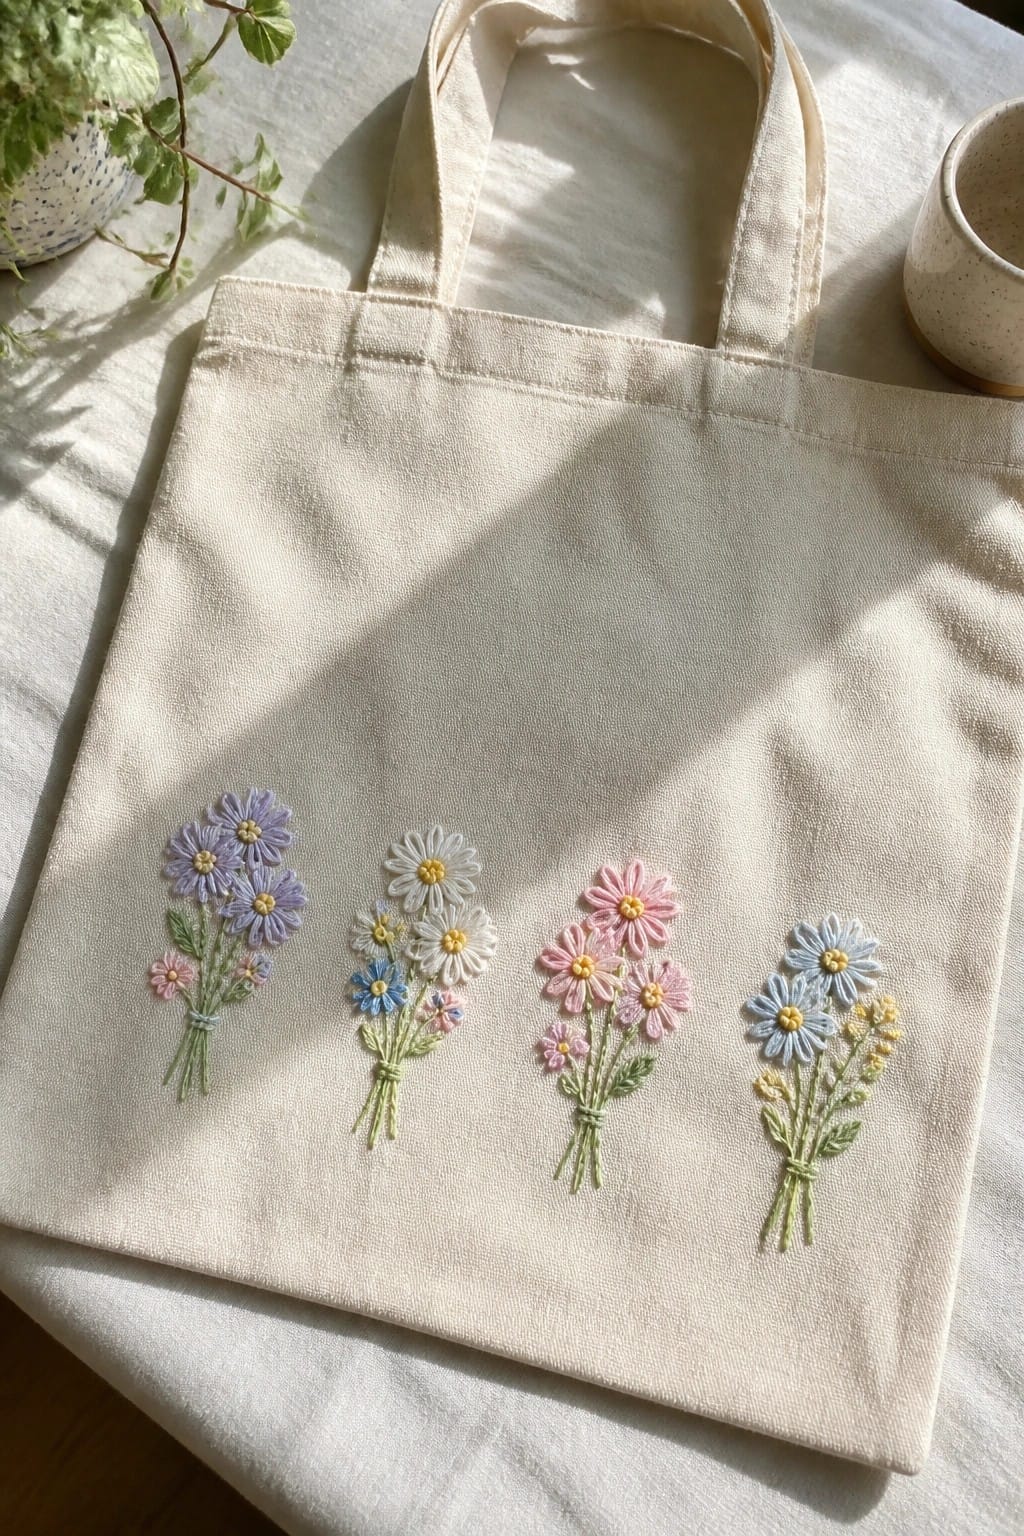
Small flower bunches, each gathered and secured near the base, sit in a straight horizontal line across the front of a tote bag. The bundles repeat the same overall shape and scale but vary slightly in flower types and colors so the row feels balanced rather than repetitive. This layout keeps the embroidery compact enough to leave plenty of blank canvas around it, which helps the design read clearly on a carry bag.
The placement does a lot of the work here because a straight row fits the rectangular shape of most tote fronts without needing extra planning. You can add or remove a bundle depending on bag width, or change the color mix to match different fabrics or seasons. The tied-stem detail also makes each bunch easy to recognize even when the bag is in motion. This approach works especially well for beginners who want multiple motifs without committing to one large design.
Curved Floral Wreath with Bow on Denim Tote
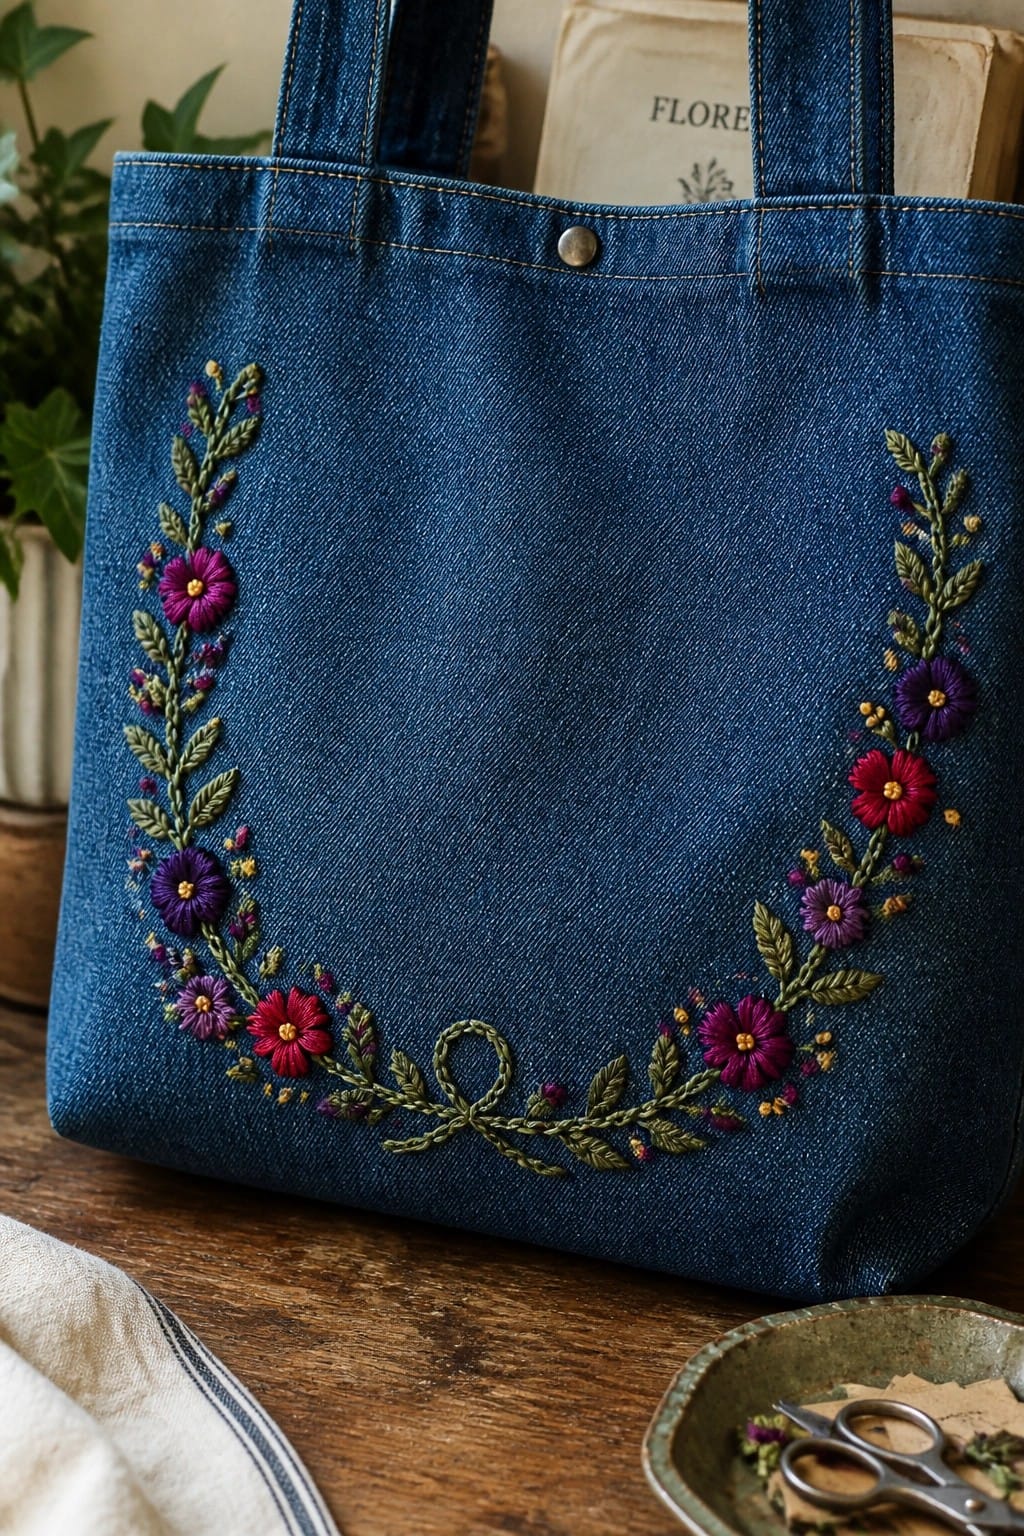
A curved floral wreath works well when placed across the front panel of a denim tote bag. The design uses mixed flower sizes in reds, purples, and magentas with green leaves to form an arch that meets at the bottom with a small stitched bow. The open center and balanced sides leave room for the bag to be used while keeping the embroidery visible during everyday carry. This layout suits accessories like totes or pouches because the curve follows the natural shape of the fabric without crowding the main storage area.
What makes this idea useful is how the wreath adapts to different bag sizes by simply shortening the arch. You could shift the same flowers onto a side pocket or reduce the scale for a smaller crossbody bag. Changing the thread colors to softer tones would let the design blend with lighter fabrics while keeping the bow as the focal point at the base. The placement also photographs clearly for sharing, which helps it stand out in idea collections.
Scattered Rose Clusters on a Canvas Tote

A band of mixed roses in muted pink and cream sits across the upper front of a tote bag, with leaves and small trailing stems filling the spaces between each bloom. The flowers are grouped in loose clusters rather than a single straight line, which lets the design follow the bag’s natural width. This placement keeps the embroidery visible when the bag is carried yet leaves the lower half plain for actual use. The scale works especially well on medium to large totes where the motif can span most of the front without crowding the handles.
The placement does a lot of the work here because a horizontal band matches the shape of most totes and avoids the bottom corners that see the most wear. You could repeat just two or three flowers on a smaller pouch or lengthen the row for an oversized market bag. Swapping the soft pinks for deeper reds or all one shade of green would shift the look without changing the layout. This kind of design also photographs cleanly for project sharing since the empty space below the flowers keeps the focus on the stitching itself.
Arc of Mixed Flowers Along the Tote Base

A curved row of small flowers and leaves placed low on the front of a tote bag creates a simple border that stays visible whether the bag sits open or hangs from a shoulder. The design spaces different bloom sizes along the arc so the center stays open and the sides balance each other. This keeps the embroidery compact enough that it does not get in the way of daily use.
What makes this idea useful is how the low arc can be lengthened or shortened to match any tote width without redesigning the whole motif. Shifting the same flowers onto a smaller scale works on a makeup pouch or the flap of a crossbody bag. Changing the thread colors to match a favorite jacket or using only two shades keeps the layout fresh while the curved placement still guides the eye.
Oversized Layered Flower with Pink Gradient on a Tote

A large flower built from many overlapping petals in shifting pink tones sits directly in the center of a canvas tote bag. The radial layout spreads outward evenly so the motif fills the space without touching the handles or seams. The gradual color change from deeper pink near the middle to lighter edges gives the petals dimension while keeping the overall shape balanced. This kind of single-motif design works best on flat accessories like totes, pouches, or market bags where the embroidery can be seen at a distance.
What makes this idea useful is how the central placement avoids stress points on the bag during daily use. You can shrink the same flower for a smaller crossbody or repeat a smaller version along the bottom edge for a different look. Changing the thread colors to cooler tones would shift it toward spring or summer without altering the structure. On Pinterest, designs like this stand out because the clear focal point reads well even in small preview images.
Iris Motif Centered on a Tote Bag

An iris flower worked in layered purple threads forms the main motif, with green leaves extending downward for balance. The design sits in the middle of a canvas tote bag, positioned so the hoop holds the fabric taut while stitching. Petal shading and leaf direction give the flower clear shape and depth on the plain fabric. This layout fits tote bags or similar flat accessories where the embroidery stays visible during everyday use.
The placement does a lot of the work here because the central spot on a tote keeps the flower away from seams and handles. You could shift the same motif onto a smaller pouch or repeat just the leaves along a bag’s side pocket. Changing the purple threads to softer tones would make it blend with lighter fabrics while keeping the same scale. This kind of single-flower design stands out in project roundups because it reads clearly even in small preview photos.
Mini Flower Border Along a Denim Tote Edge
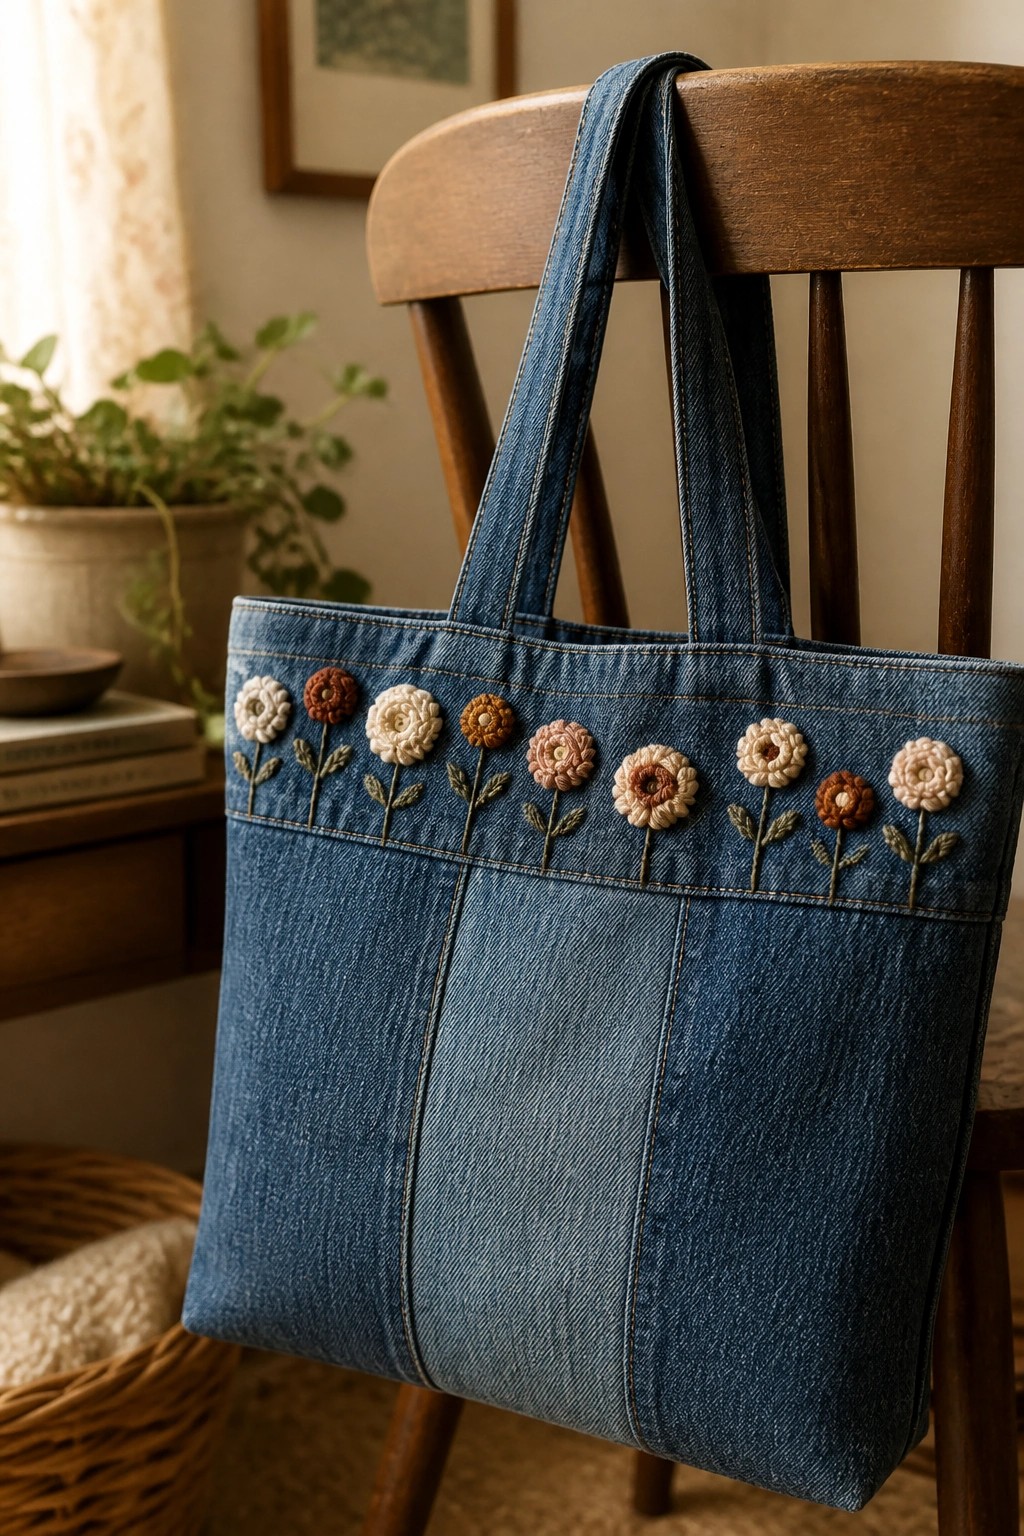
A row of small flowers with short stems sits directly below the top seam of a denim tote. Each flower uses a different neutral shade while the stems and leaves stay in one green tone, so the line reads as a single repeated motif rather than scattered pieces. The narrow height keeps the embroidery from interfering with the bag’s main storage area or getting scuffed during use. This layout suits tote bags, market totes, or zip pouches where you want a visible detail that still leaves most of the fabric plain.
The placement does a lot of the work here because the border stays in view whether the bag hangs on a hook or rests on a shoulder. You can stretch or shorten the row simply by changing how many repeats you stitch, which makes it easy to fit different bag sizes. Swapping the thread colors for brighter pastels or all one shade alters the mood without changing the structure. On Pinterest this kind of clean, low-height floral trim gets saved often because it finishes quickly and works on both new and thrifted bags.
Trailing Wildflowers Along Tote Bag Edges

A vertical mix of small wildflowers and stems runs down both sides of a canvas tote, leaving the center plain. The flowers vary in type and color, placed at slightly different heights to create an uneven but balanced line. This layout works because it follows the bag’s seams without crowding the main fabric area. The idea fits tote bags, market bags, or any accessory where you want decoration that stays out of the way during use.
The placement does a lot of the work here since the design stays narrow and follows existing lines on the bag. You could shorten the trail for a pencil case or stretch it taller on a larger shopping tote. Swapping in fewer colors or sticking to one flower shape would make the same layout look simpler and faster to stitch. This kind of scattered border shows up often in saved images because it gives a finished look without needing a large central motif.
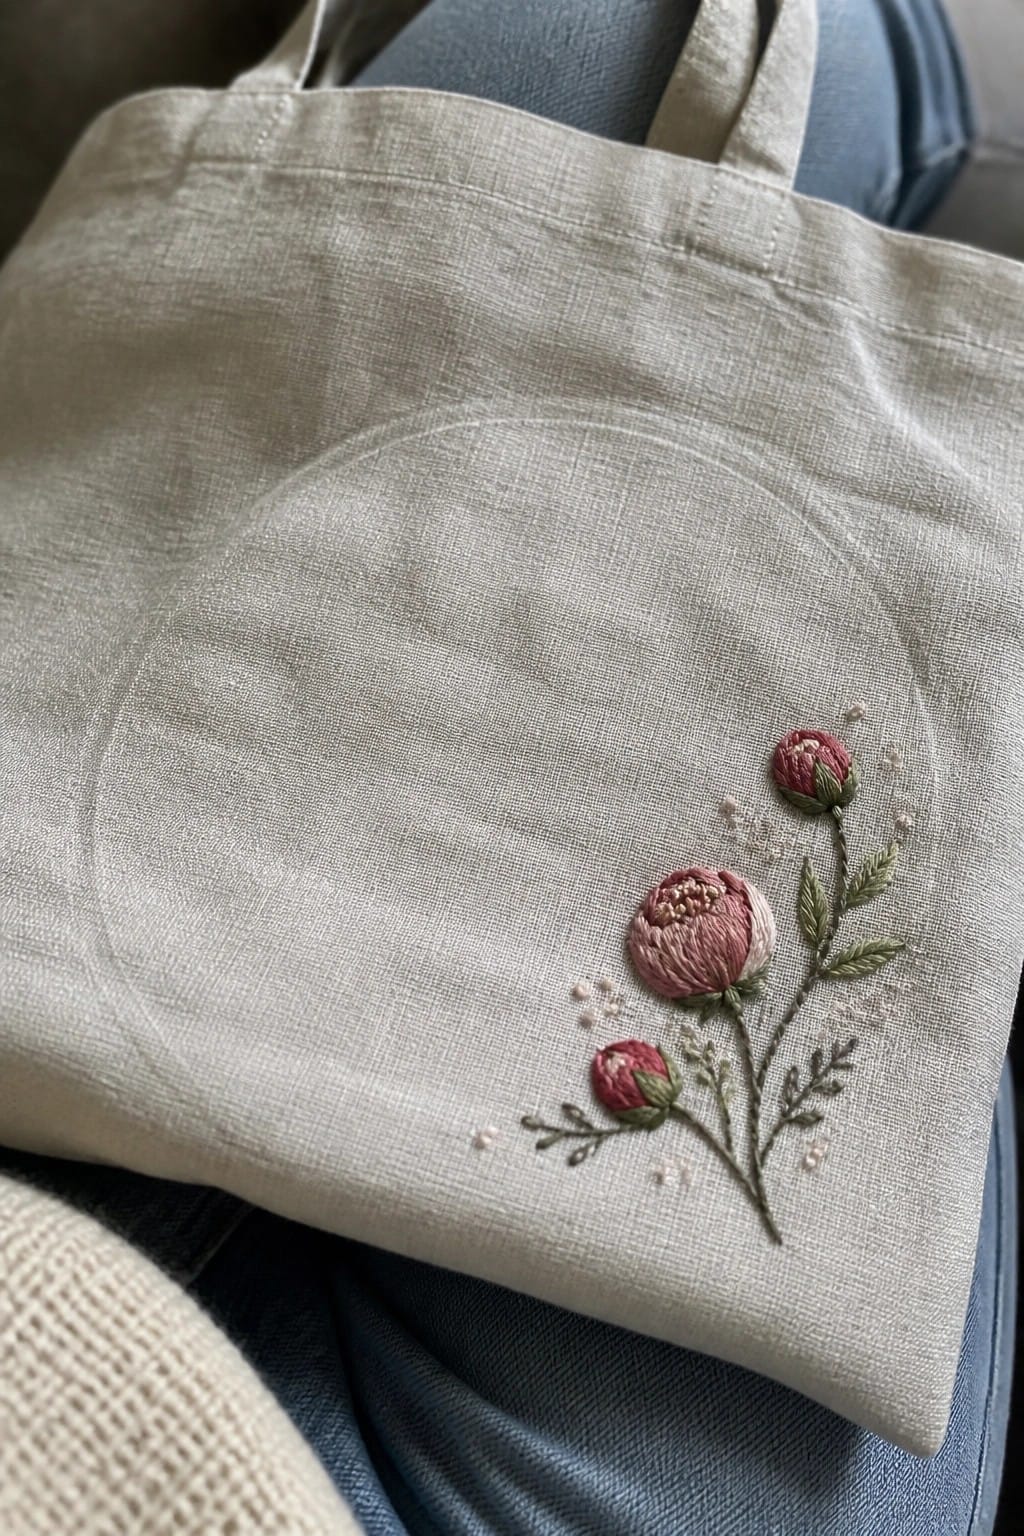
Carnations Stitched on a Removable Patch
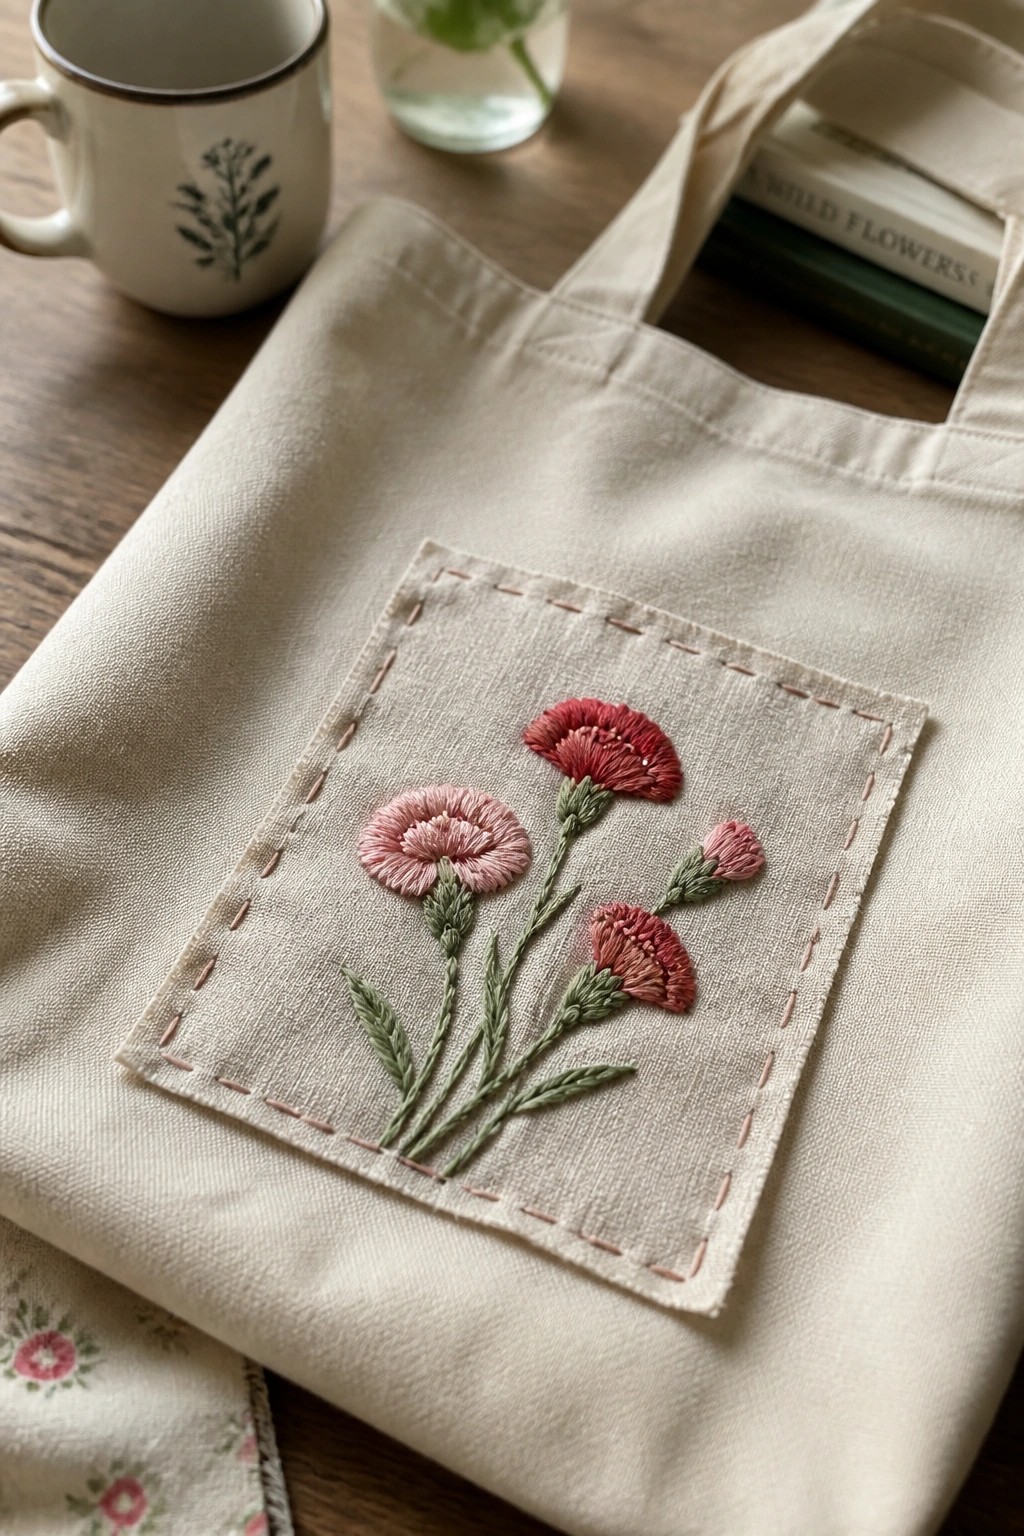
A small bouquet of carnations in soft pink through deep red sits on a separate linen square that gets sewn onto a canvas tote. The flowers sit at different heights with green stems and leaves filling the lower half of the patch, while a dashed running stitch border in pink thread secures the whole piece to the bag. Keeping the embroidery on its own fabric lets you avoid pushing a needle through thick canvas and gives you a clean rectangle that stands out against the plain tote.
What makes this idea useful is that the finished patch can move to a different bag or even a jacket pocket if you change your mind later. You could repeat the same layout at a smaller scale for a coin purse or stretch the stems longer to fill a taller rectangle. Changing the thread colors to one shade of pink or adding a second row of flowers would shift the look without changing the basic placement.
Vertical Floral Stem on Striped Tote

A single curving stem of mixed flowers in yellow, pink, and white runs vertically down the front of a blue striped tote bag. The embroidery sits mostly along one side, with part of the stem and lower blooms extending onto the front pocket to connect the two sections. This placement keeps the design narrow enough to follow the bag’s shape while letting the blooms stand out against the stripes.
The vertical format uses the full height of the bag without spreading wide, so it works on most standard totes or even smaller market bags. Shortening the stem or dropping a couple of flower clusters makes it easy to move onto a pouch or lunch bag. Keeping the same color mix but shifting the stripe direction changes how much the flowers pop without needing new thread colors.
Clustered Anemones with Scattered Dots
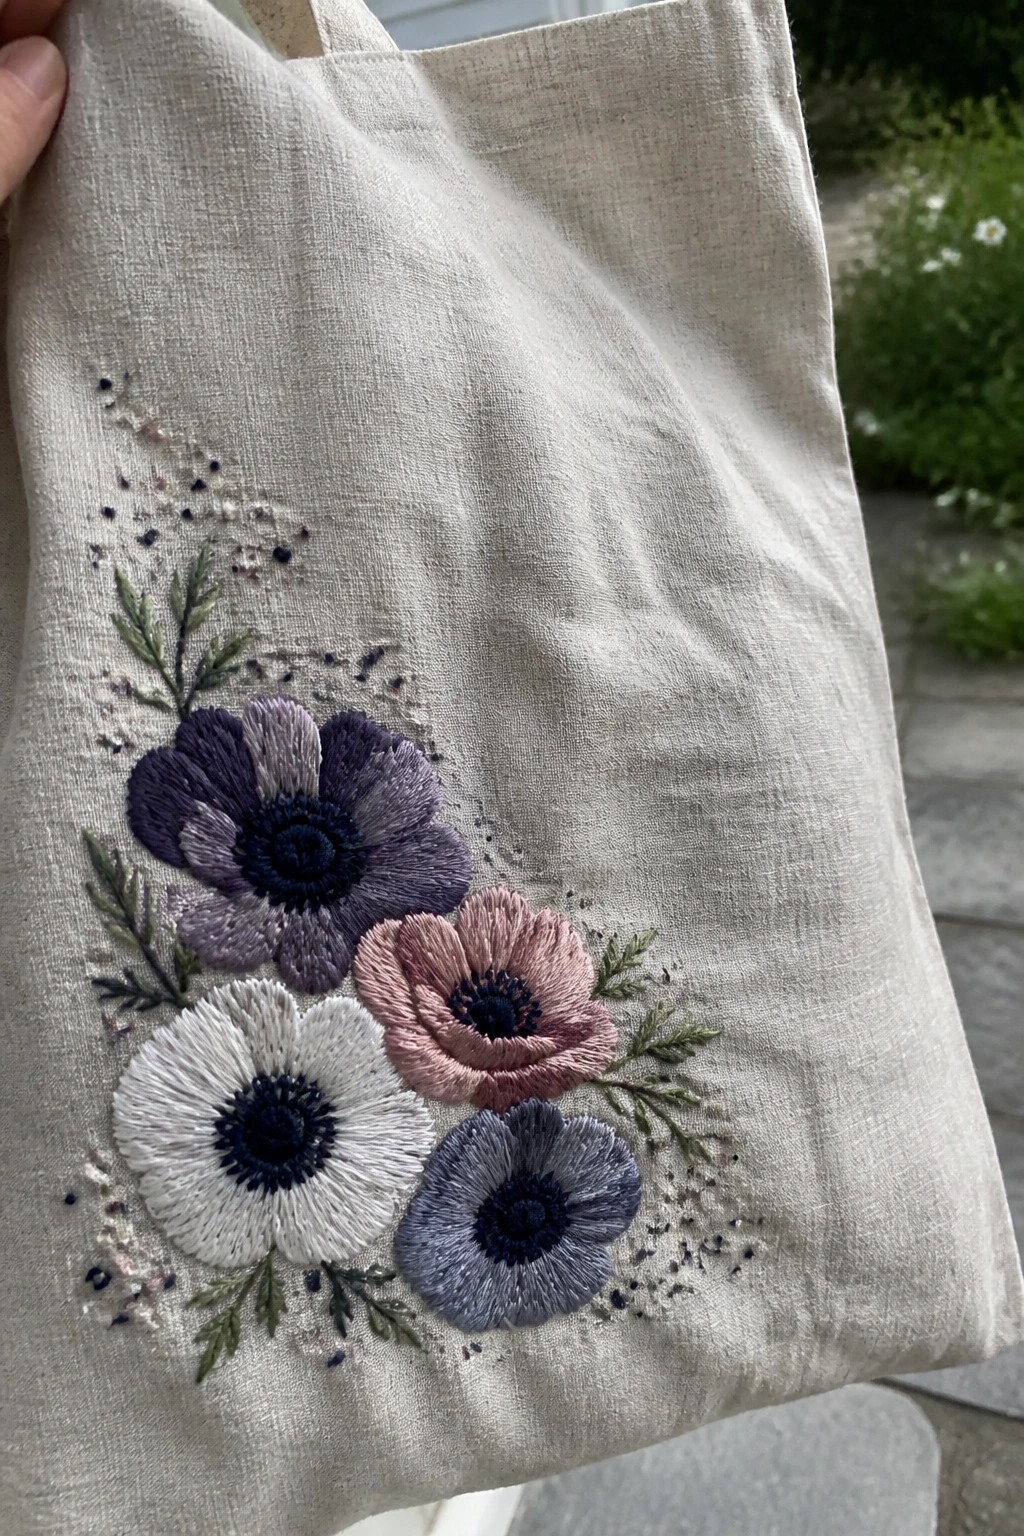
A group of anemone flowers in soft purple, pink, white, and gray tones forms a loose cluster on the lower front of a canvas tote bag. Green leaves fill in around the edges while small dark dots and a few pink specks spread out above and beside the flowers. The overlapping petals and uneven spacing let the design cover area quickly without a rigid frame, which suits tote bags and other flat fabric accessories.
What makes this idea useful is how the cluster shape can move to a corner or center depending on bag size. You could drop the dots entirely or repeat just two flowers on a smaller pouch to change the scale. The muted color mix keeps the look calm on light fabric, but swapping in brighter shades would make the same layout pop on darker bags.
Subtle Monochrome Floral Branch on Canvas

A branching floral motif with several open flowers and layered leaves covers the front of a plain canvas tote bag. The design uses a single light thread color that sits close to the fabric tone, so the pattern shows up mainly through raised stitching and texture. This placement centers the bouquet across the main panel, letting the stems flow downward naturally. The idea suits tote bags or similar flat accessories where a soft, tonal look keeps the bag versatile for daily use.
What makes this idea useful is how the matching thread lets you keep the bag neutral while adding visible detail through stitch height alone. You could shrink the same branch for a smaller pouch or move it off-center to leave room for a pocket. Switching to a slightly darker thread would increase contrast on a dyed bag without changing the layout. This approach works well for Pinterest because the clean lines read clearly even in small preview images.
Wildflower Meadow Along the Lower Front
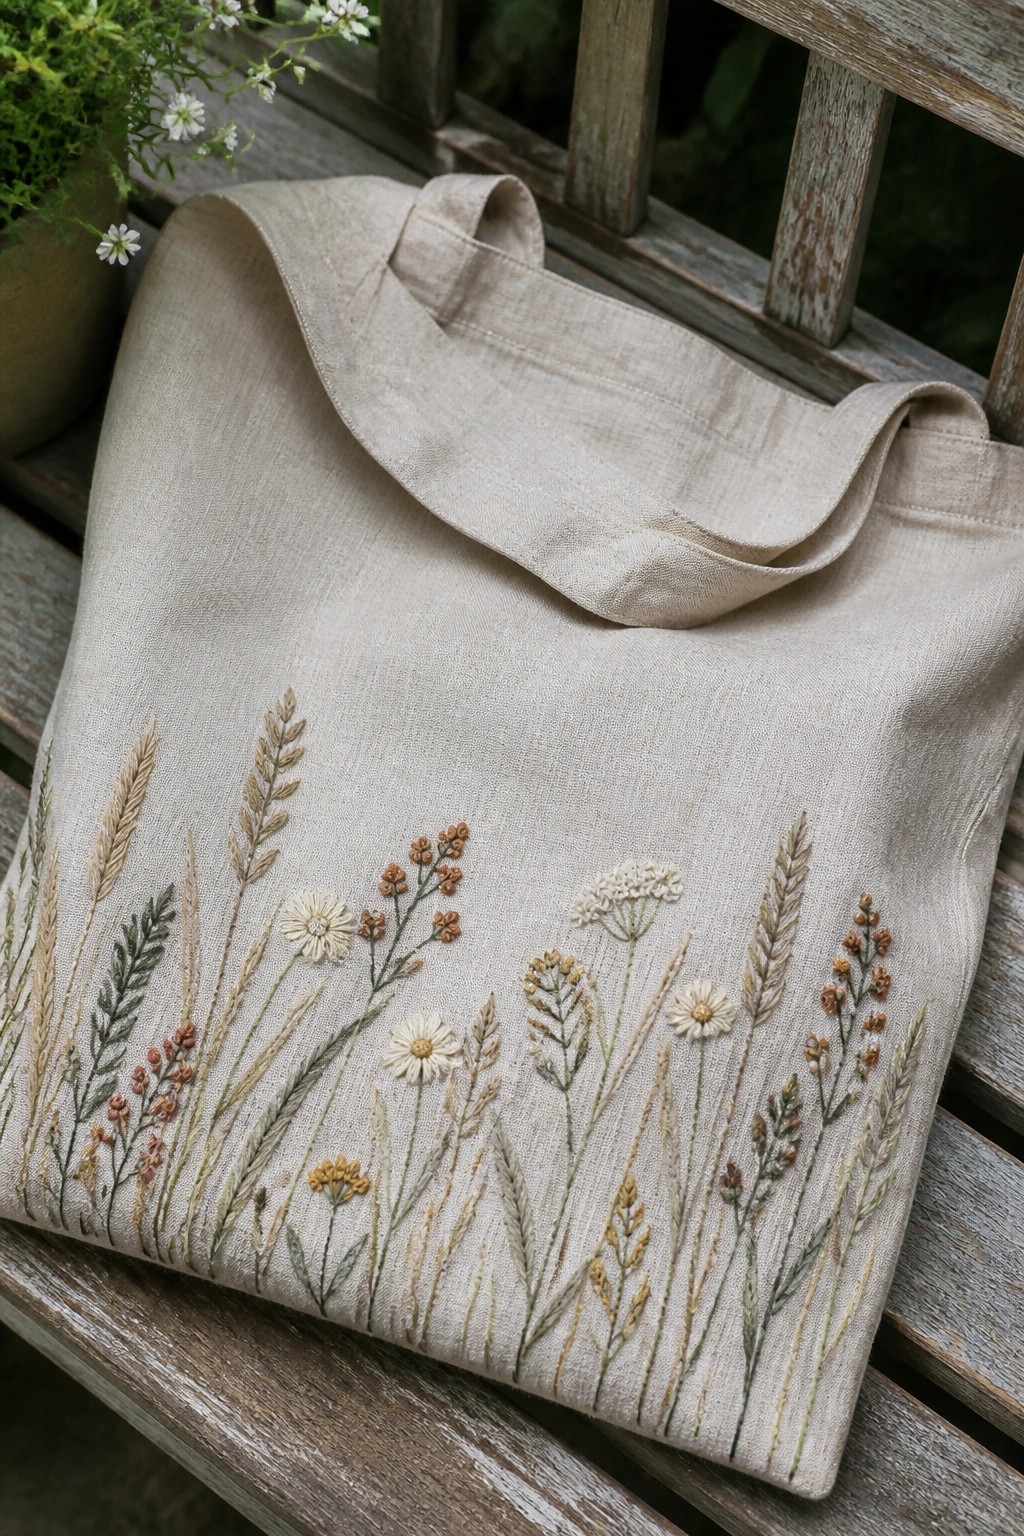
A horizontal band of mixed grasses, daisies, and seed heads runs across the bottom half of a tote bag. The design uses different plant heights and muted thread colors to build a loose, natural arrangement that sits well below the main carrying area. This leaves the upper section of the bag plain and functional while still giving the piece a clear embroidered focal point.
What makes this idea useful is how the low placement avoids the handle and opening area entirely. You could shorten the width for a smaller crossbody bag or stretch it into a full hem on a skirt. Keeping the threads in similar tones works on light fabric, but swapping in a few brighter shades would help it show up on darker linen without changing the layout. The scattered scale also makes it simple to trace and repeat on other flat surfaces like a makeup pouch.
Poppy and Daisy Bouquet on a Canvas Tote
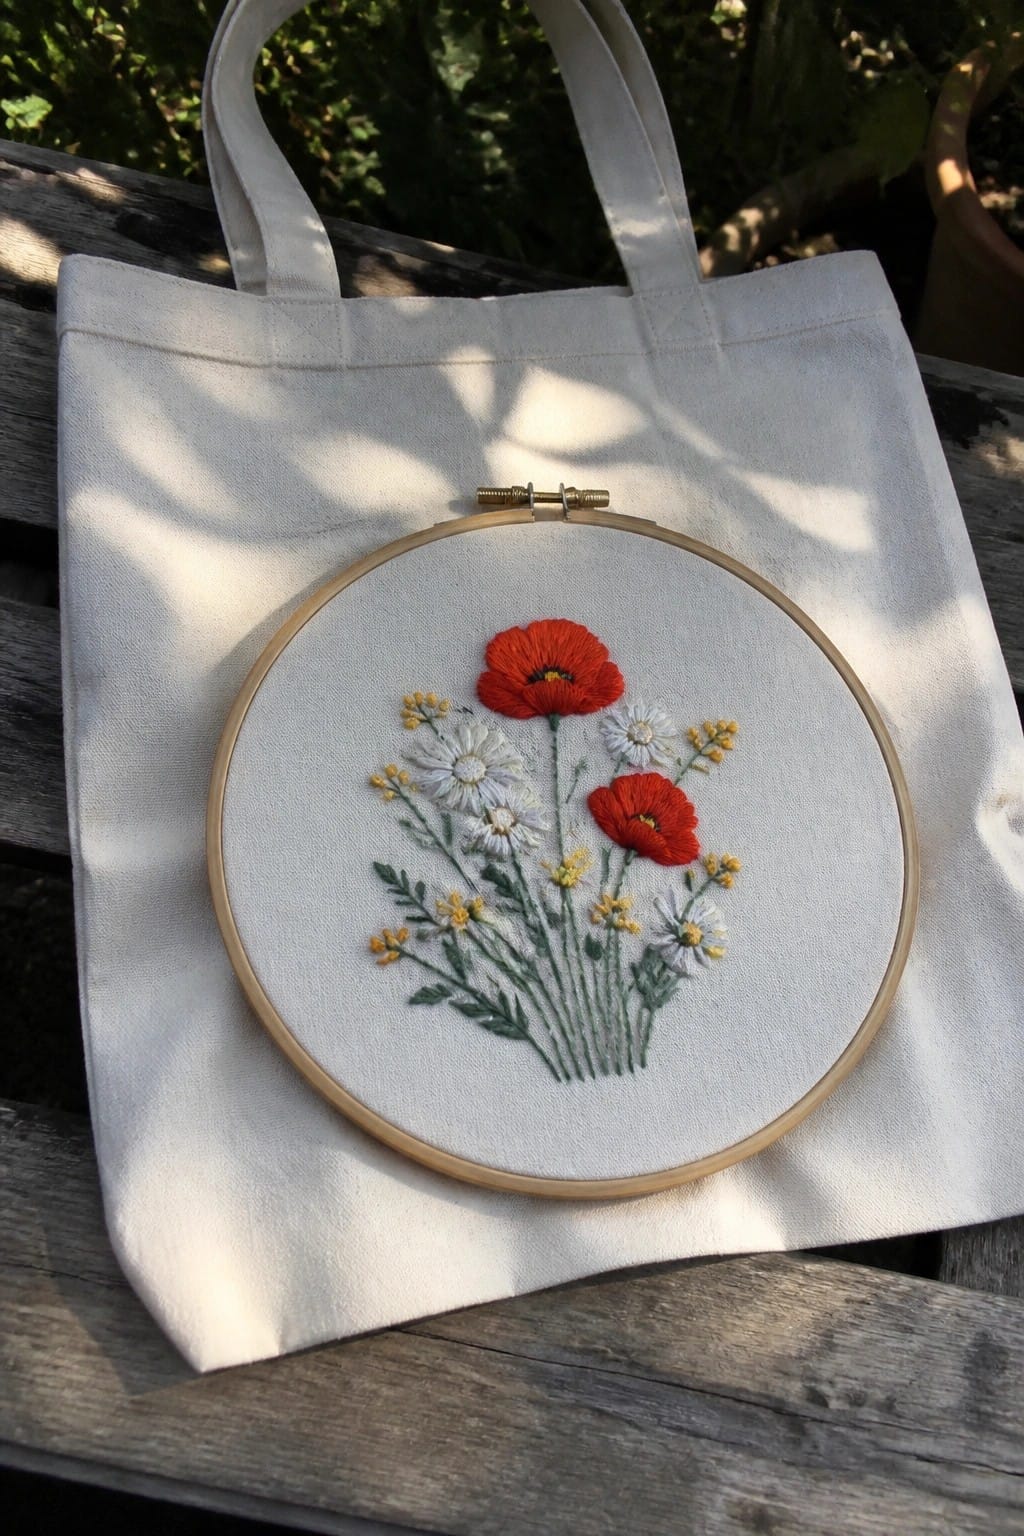
A small bouquet of two red poppies with white daisies and yellow filler flowers creates the main motif here. The stems are grouped together at the base and the whole cluster sits centered on the tote bag front. The larger red blooms stand out against the lighter flowers and green stems, which keeps the arrangement readable from a distance. This layout suits tote bags or similar flat fabric items that need a focal point without covering too much surface area.
A design like this works especially well on reusable totes because the stems stay compact and do not interfere with the bag’s opening. You could shift the same cluster toward one corner or repeat a smaller version on the opposite side for balance. Changing the red poppies to a single color family would let the motif blend with different bag fabrics while keeping the same structure. The clear separation between the bold blooms and fine stems also makes it easy to resize for other accessories like pouches.
Vertical Strawberry Vine with Daisies

A vertical vine of strawberries, daisies, and leaves placed on the lower front of a canvas tote creates a simple focal point without filling the whole surface. The design uses a loose arrangement so the red berries sit lower while the white flowers and green leaves trail upward along the fabric. This keeps the embroidery compact enough for a bag that gets carried daily yet still shows clearly from a distance. The idea works best on totes, market bags, or similar flat fabric items where the vertical line follows the bag’s natural shape.
The placement leaves plenty of blank canvas above and to the side, so the same vine can shift to a smaller pouch or sit in one corner of a larger bag. Changing the berry color or swapping daisies for other simple flowers lets the design match different fabric tones without much extra work. The scattered spacing also makes it simple to add a short name or date beside the vine if the bag is meant as a gift. Designs with this loose vertical layout tend to show up well in photos because the elements stay separate and easy to see.
Wildflower Meadow Band on a Tote Bag

A horizontal strip of assorted wildflowers and grasses embroidered along the bottom front of a canvas tote creates a natural border effect. The design mixes taller stems with shorter blooms to fill the space evenly while leaving the upper bag plain. This placement works well on totes because the embroidery stays visible when the bag is carried or set down without covering the main storage area.
What makes this idea useful is how the band shape matches the rectangular form of most totes and avoids the handles completely. You could shorten the width for a smaller bag or repeat the same flowers in a thinner line near the top edge. Switching to fewer colors or a single flower type would make the project faster while keeping the meadow feel. This style shows up often in searches because the low placement keeps the design practical for daily use.
Frequently Asked Questions
What types of fabric work best for embroidering floral designs on tote bags?
Canvas or linen tote bags provide a sturdy base that holds embroidery well while allowing for a soft handmade feel. Choose natural fibers like cotton canvas in neutral tones to enhance the fresh floral aesthetic. Prewash the fabric to prevent shrinkage after stitching, and consider adding a stabilizer on the back for cleaner results with delicate floral motifs.
How can beginners start creating these floral embroidery ideas on tote bags?
Begin with simple outlines using a water soluble pen to sketch flowers directly on the tote. Practice basic stitches like chain or lazy daisy on scrap fabric first to build confidence. Select one or two floral ideas from the collection that use minimal colors for a soft look, and work in small sections to avoid overwhelming the process while achieving that organic handmade texture.
What embroidery stitches create the softest floral patterns for a handmade aesthetic?
French knots and satin stitches work well for petals and centers, giving a gentle raised effect without stiffness. Combine them with running stitches for stems to keep the design light and flowing. Use cotton embroidery floss in muted pastels or soft greens to maintain the fresh aesthetic, and avoid pulling threads too tight so the fabric retains its natural drape.
How should embroidered tote bags be cared for to preserve their look over time?
Hand wash in cold water with mild detergent to protect the stitches and fabric. Gently squeeze out excess water instead of wringing, then lay flat to air dry away from direct sun. Store the bag flat or rolled loosely to prevent creases on the embroidery, which helps keep the soft floral details intact for repeated use.
Where can supplies and patterns be found to explore more of these 23 ideas?
Local craft stores often carry embroidery hoops, floss, and blank tote bags in various sizes. Online platforms like Etsy provide digital floral patterns suited to a handmade style, while Pinterest boards offer visual inspiration for arranging the 23 designs. Start with affordable starter kits that include needles and thread to match the soft aesthetic without extra cost.