
I started embroidering on tote bags a while ago because they are easy to handle and the fabric holds stitches well.
My first attempts were pretty basic but I liked how they turned out.
Over time I collected some designs that don’t require much experience.
These ideas are mostly simple patterns that anyone can try with basic stitches.
I hope you find something here that fits what you are looking for.
Wildflower Bouquet on a Canvas Tote

A small bouquet of daisies and wildflowers works well as an embroidery motif for a tote bag. The flowers sit clustered in the lower front corner with stems gathered at the base. Varied petal colors in blue, yellow, pink, and purple keep the group balanced while the green stems add a simple frame.
What makes this idea useful is how the compact size leaves most of the bag surface free for everyday use. You can swap the colors to match different fabrics or move the bouquet higher if you want it more visible when the bag is carried. The same layout works on a smaller scale for a pencil case or the corner of a larger market bag.
Mushroom Cluster on a Tote Bag Pocket
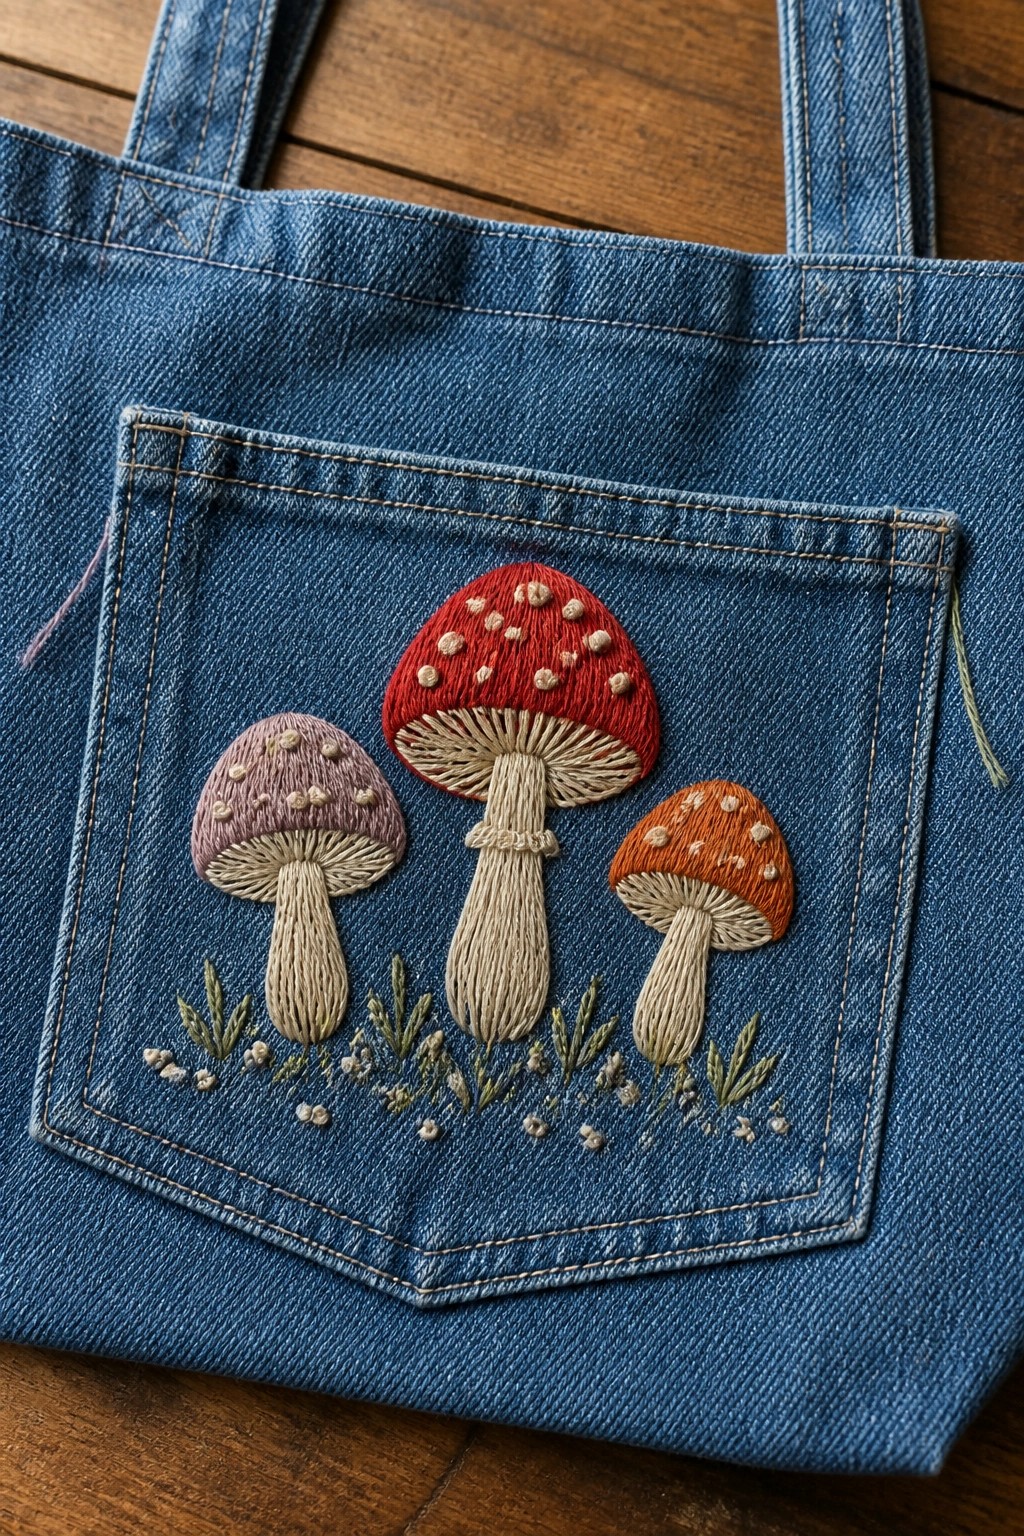
Embroider a tight group of three mushrooms straight onto the front pocket of a denim tote. The caps use solid red, muted purple, and orange fills with scattered dots, while the stems stay in a single light thread and the base gets a thin line of grass and tiny flowers. The pocket edges act as a built-in border so the design stays contained and balanced without extra framing stitches.
What makes this idea useful is that the pocket already supplies the right scale and fabric weight for quick coverage. You can drop the same layout onto a backpack front, a canvas pouch, or even a denim jacket chest pocket with almost no changes. Shifting the cap colors to match the bag fabric keeps the look coordinated, and shrinking the whole cluster by half lets it fit smaller items without losing the grouped shape.
Repeating Stars Down a Tote Bag Strap

A simple row of stars with small dots between them runs the full length of the tote bag strap. The motif stays narrow and linear so it fits the width of the handle without crowding. This placement turns the strap itself into the main decorative element while leaving the body of the bag plain. The design suits any tote that gets carried over the shoulder since the pattern stays visible in use.
What makes this idea useful is how well the narrow repeat works on straps or handles where wider motifs would not fit. You can swap the star color or dot spacing to match different bag fabrics without changing the layout. The same line of stars would also transfer easily to a pencil case zipper pull or the edge of a book sleeve. Scaling the stars slightly larger or smaller lets the pattern stretch or compress to fit shorter or longer straps.
Smiling Sun Centered on a Tote Bag

A smiling sun motif works as a centered design on a canvas tote bag. The face is filled solidly in yellow while straight rays in orange extend outward from the circle. This layout keeps the pattern balanced and readable even when the bag is in motion. The idea suits tote bags and similar fabric accessories that need a bold but simple focal point.
What makes this idea useful is how the motif fills the main panel without extra borders or details. You can shrink the whole sun to fit a side pocket or enlarge it by using a bigger hoop. Swapping the ray color to match the bag handles or straps ties the look together quickly. On light fabric the contrast stays strong, so the design remains clear after repeated use and washing.
Framed Ice Cream Cone on a Tote Bag
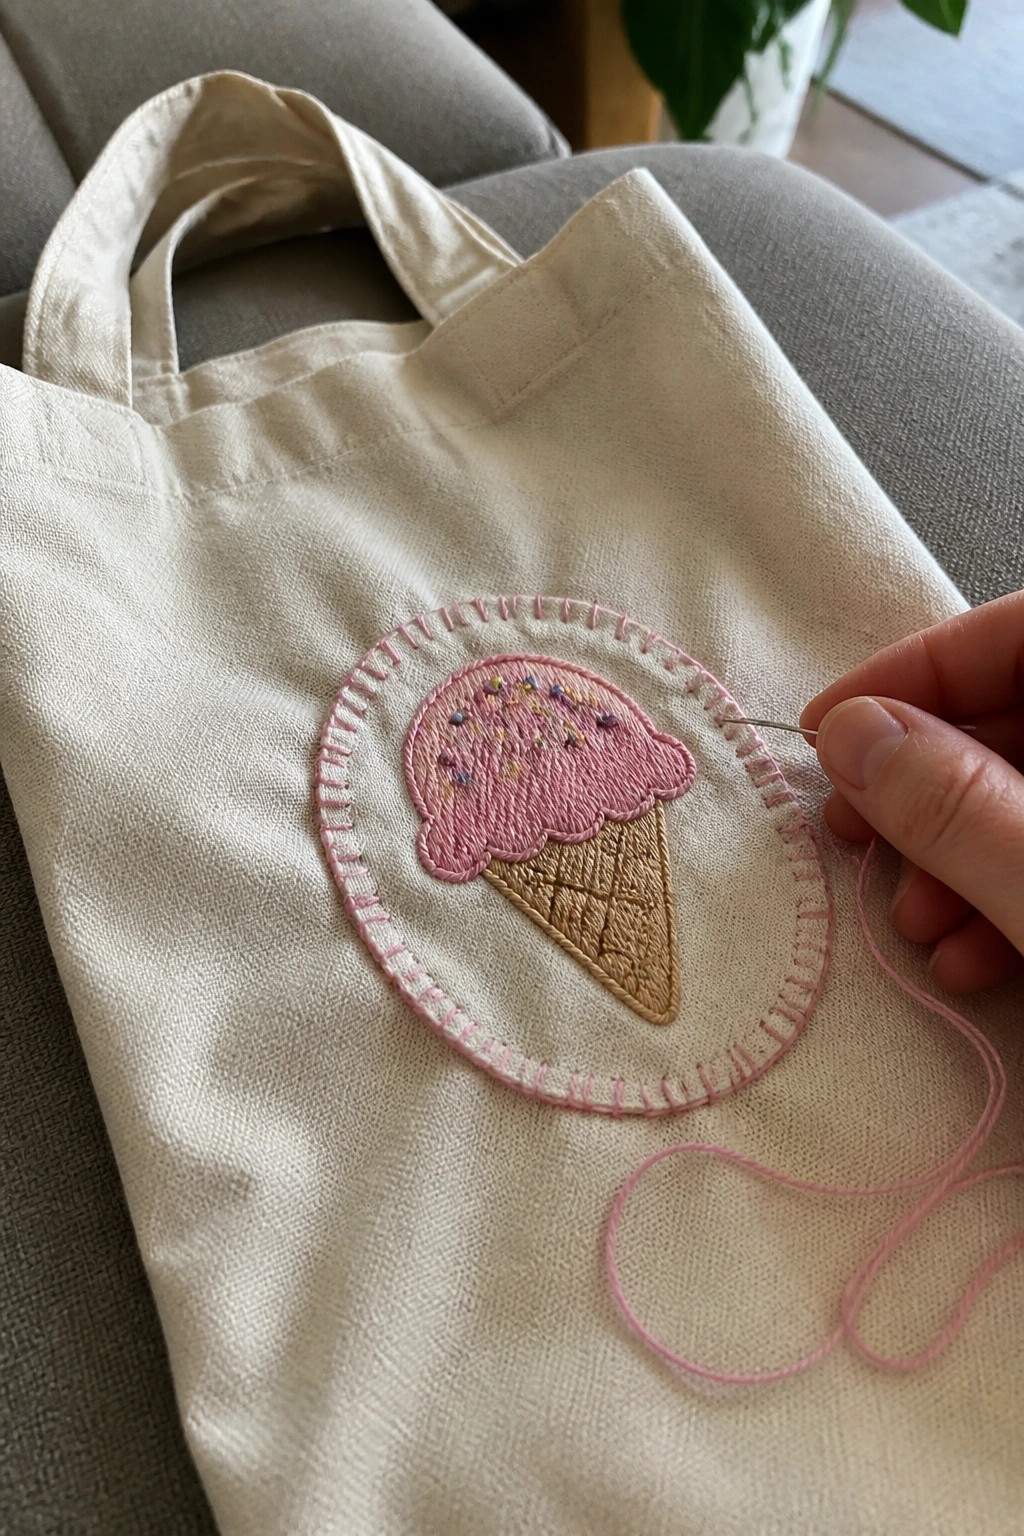
An ice cream cone motif set inside a stitched circle creates a contained design that sits neatly on the front of a canvas tote. The pink scoop stands out against the tan cone, with small scattered stitches suggesting sprinkles, while the outer circle border keeps the whole piece balanced and easy to read from a distance. This approach works especially well on flat fabric surfaces like bags because the circle prevents the shape from looking loose or unfinished. It fits projects where you want a single focal point rather than scattered elements.
What makes this idea useful is how the border lets you adjust scale without the design losing shape on larger or smaller totes. You could change the scoop color for different flavors or match the circle thread to the bag handles for a pulled-together look. For clothing or smaller accessories, shrinking the circle would keep the same layout intact while fitting tighter spaces. The contained format also photographs cleanly, which helps when saving ideas for later reference.
Rainbow Arcs on a Striped Tote Bag

A rainbow built from stacked curved bands in soft pastel colors sits centered on the front of a striped tote bag. Each band uses a different shade and follows the same gentle arc, creating a clean layered effect across the fabric. The neutral stripes keep the focus on the colors while the placement leaves plenty of empty space around the edges so the bag still looks balanced when full. This approach suits a reusable tote that gets daily use rather than something meant for display.
What makes this idea useful is how the curved shape matches the natural width of a tote without extra measuring. You could drop the number of bands to three or four for a quicker version or shift the whole rainbow lower so it shows even when the bag is open. The same layout works on a smaller scale for a pencil case or lunch bag if you want to test it first. The stripes give the design built-in contrast that makes color changes easy to try without reworking the background.
Scattered Bee Motifs on a Tote Bag
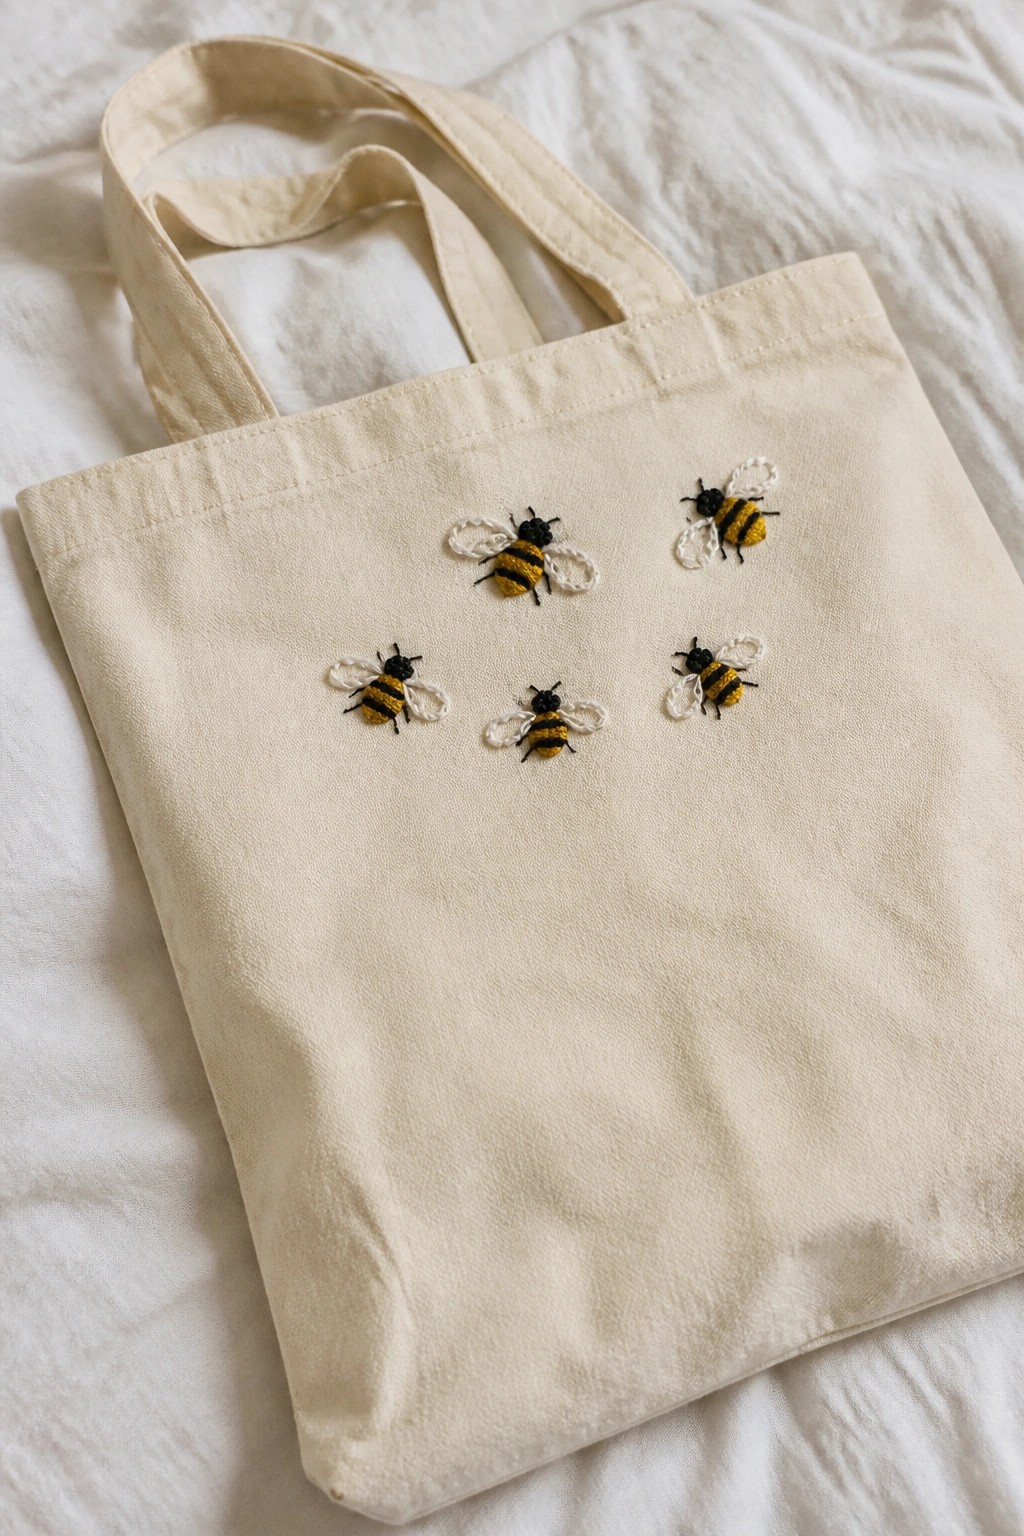
Multiple small bees worked in yellow and black thread sit across the front of a canvas tote. The bees vary slightly in size and angle, with some placed higher and others lower to create an uneven but balanced spread. This keeps the design from looking too centered or formal while staying within a small area of the bag. The approach works best on accessories where the fabric moves and the embroidery needs to stay compact.
What makes this idea useful is how the loose arrangement leaves room around each bee so the tote surface stays usable. You can shift the same layout onto a smaller pouch by dropping two bees or stretch it across a larger market bag by adding more. Swapping the yellow for a different bright color changes the mood without altering the stitching. The repeated motif also photographs clearly for sharing, which helps it perform well as a simple project idea.
Camper Van Embroidery on a Denim Tote Pocket
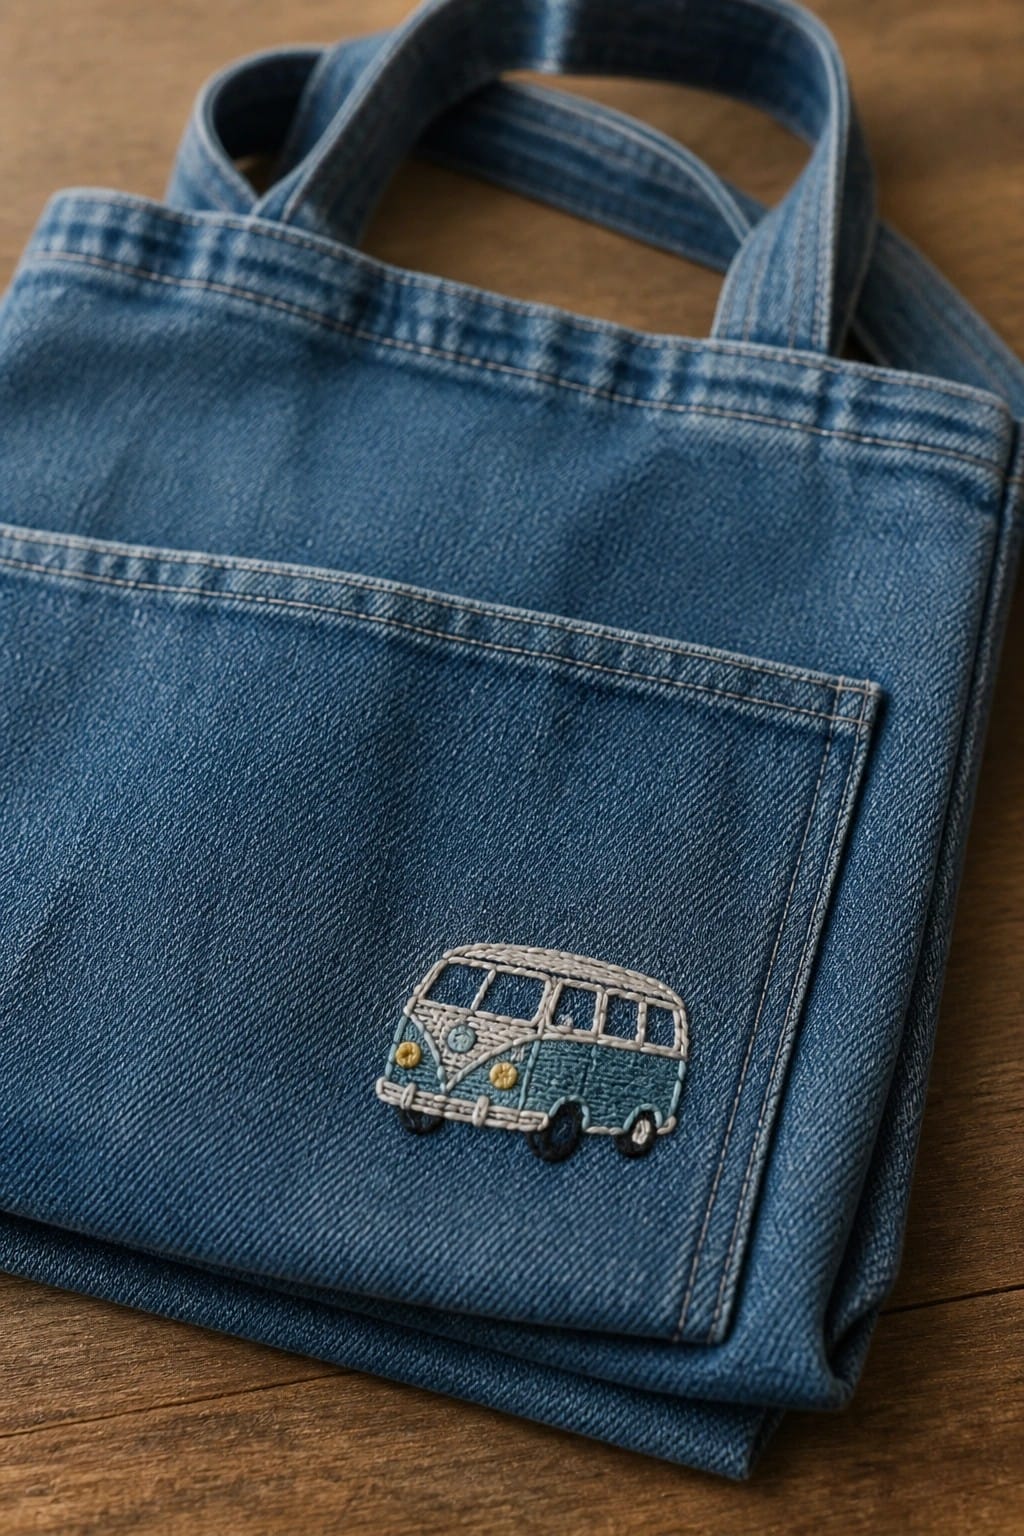
A small camper van design stitched onto the front pocket of a denim tote bag gives the accessory a clear focal point without covering much surface area. The motif stays contained within the pocket boundaries and uses thread colors that sit against the denim rather than competing with it. Yellow accents on the wheels provide enough contrast to keep the shape readable from a short distance. This placement suits tote bags, market bags, or any fabric item that already has a defined pocket area.
What makes this idea useful is how the pocket edges act as a built-in border that simplifies placement decisions. You could move the same van to the lower corner of a larger tote or repeat a smaller version along the strap. Switching the van colors to match a different denim wash or using a single thread color would change how much the design stands out. The contained scale also makes it simple to test on scrap denim before committing to the final bag.
Cactus Trio on a Tote Pocket
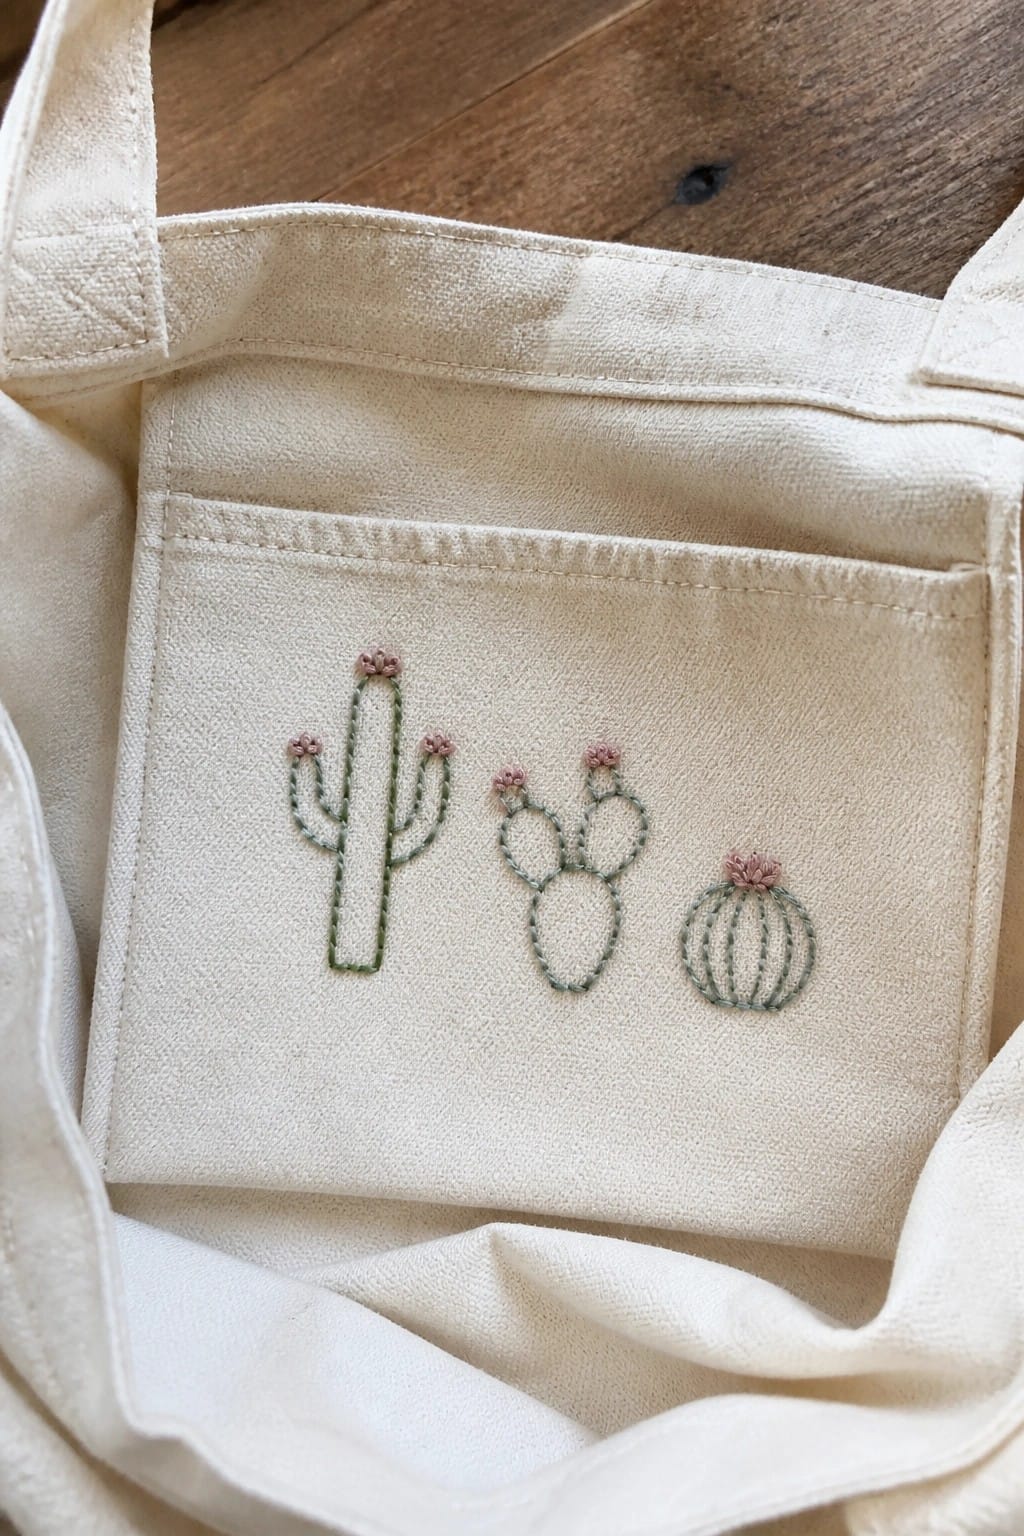
Three different cactus shapes stitched in a row across the front pocket of a tote bag give a simple, contained design that still reads clearly from a distance. The green outlines stay thin and open while the small pink flowers add just enough contrast at the tops. Placement on the pocket works because it keeps the embroidery in a flat, visible spot without interfering with the bag’s main opening or handles. This kind of motif suits any canvas tote or similar fabric bag where you want a quick seasonal accent.
The small scale makes this easy to adapt to other bags or even a zip pouch by dropping one cactus or tightening the spacing. You could change the thread colors to match different seasons or swap the round cactus for another shape if you want more variety. A design like this stands out on Pinterest because the pocket creates its own frame and the whole piece finishes fast enough to make multiples. For clothing, the same row would work along a jacket hem or the corner of a shirt pocket if you keep the stitches light.
Coffee Cup Motif on a Tote Bag

A coffee cup design stitched onto a tote bag uses a simple shape with the cup filled in one color and a vertical line of small stitches rising from it. The placement sits low on the front panel so the bag stays easy to carry and the motif remains visible when the bag is in use. Brown filling inside the cup adds contrast against the blue outline and helps the shape read clearly from a distance.
What makes this idea useful is how the vertical steam line balances the cup shape on tall items like totes or market bags. The same motif can move to the corner of an apron or the front of a small zip pouch without losing impact. Swapping the cup color to match the bag fabric keeps the design from feeling too busy while the brown center stays as the main focal point.
Moon and Stars Motif on a Tote Bag

A crescent moon with a ring of small stars scattered around it makes a compact design that sits neatly on the front of a canvas tote. The gold thread creates clear contrast on the light fabric without needing dense stitching or extra layers. This placement keeps the design away from the handles and seams so it stays visible when the bag is in use. The loose arrangement of stars also leaves room for the fabric to flex during everyday carrying.
What makes this idea useful is how easily the same motif can move to other flat surfaces like a zip pouch or the corner of a market bag. Scaling the stars smaller would let you repeat the pattern along one edge without crowding the space. Switching the thread to a darker color on a colored tote would keep the look simple while still showing the shape. The open layout also photographs cleanly for pattern sharing since there are no overlapping stitches to obscure the lines.
Solar System Orbit Design on a Canvas Tote
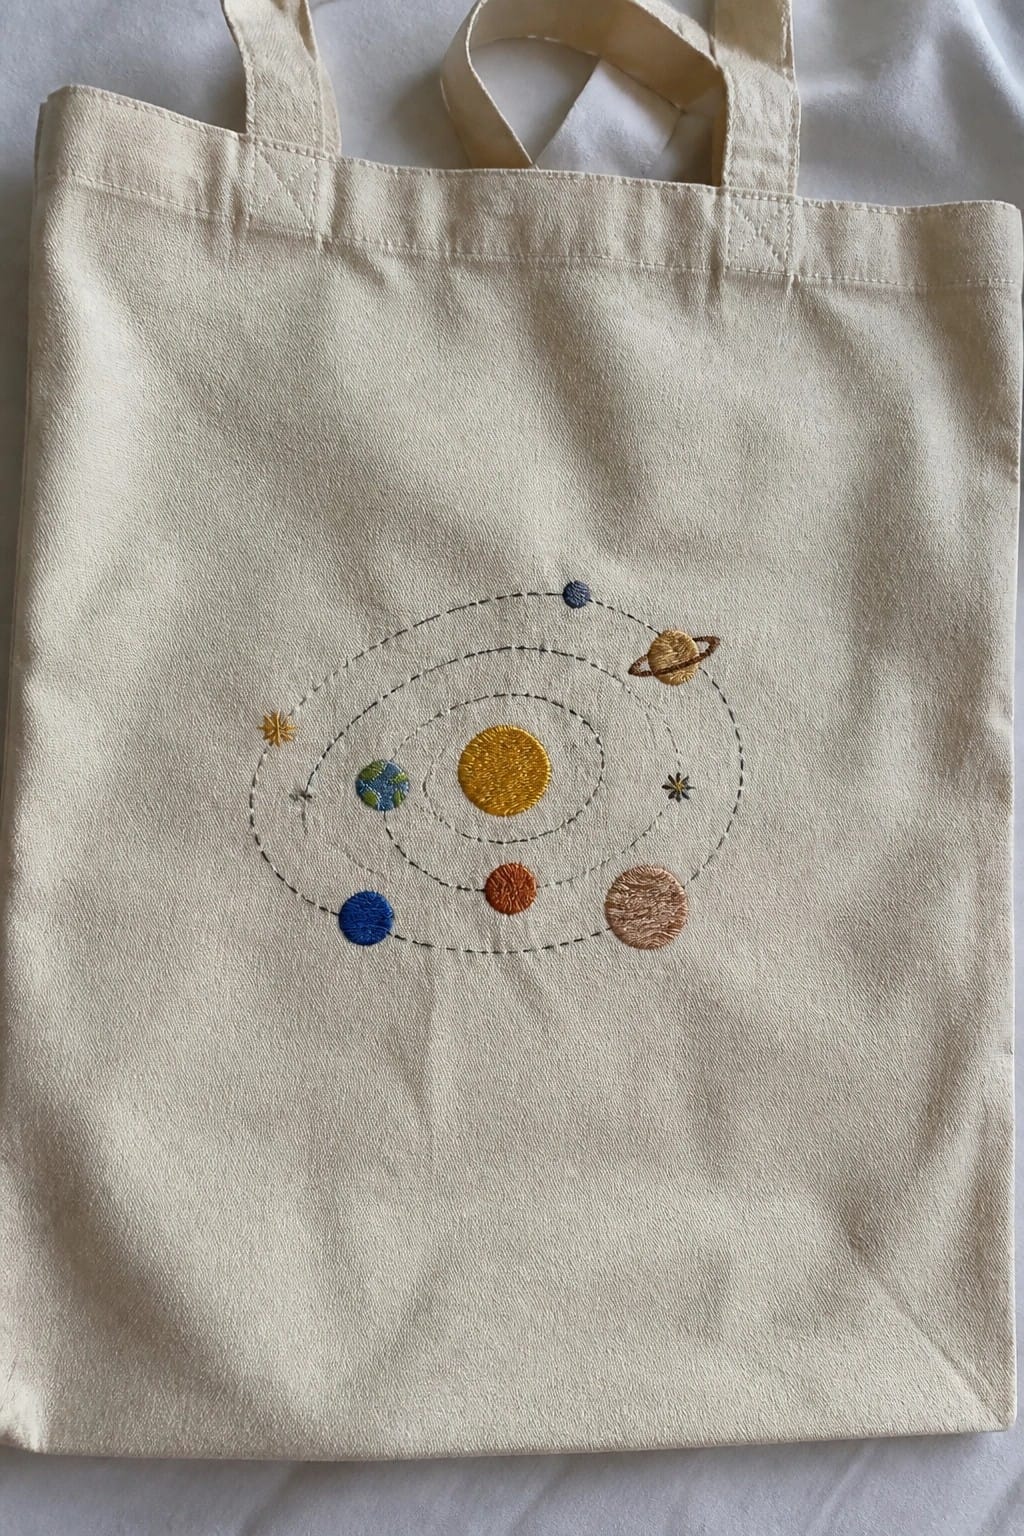
A solar system motif with a central sun and planets arranged along dashed orbital lines works well centered on the front of a tote bag. The planets vary in size and color while small stars fill gaps in the outer rings, keeping the overall shape compact. This layout uses the bag’s flat surface to show the full circle without crowding, and the dashed lines help separate the elements so they read clearly from a distance. The design suits reusable bags or similar accessories that need a single focal point rather than scattered details.
What makes this idea useful is how the orbital lines organize the planets and prevent the design from looking scattered on a large fabric area. You could shrink the whole motif to fit a smaller pouch or move it toward one corner if you want room for text on the opposite side. Switching the fabric to a darker color would let the yellow sun and brighter planets stand out more, while keeping the same scale works if you want to add it to a jacket back or a larger market tote. The structured layout tends to photograph cleanly, which helps it perform well when people search for simple space-themed projects.
Fruit Motifs Lined Up on a Denim Tote

Three small fruit shapes sit in a row across the lower front of a denim tote bag. A pear on the left, two cherries in the center, and a small plum on the right each use thread colors that match their real-life versions. The spacing leaves plenty of plain denim between them so none of the motifs crowd together. This layout works well on bags because the fruits stay visible whether the tote hangs from a shoulder or rests on a table.
What makes this idea useful is how simple it is to swap in different fruits or adjust the spacing to fit a narrower or wider bag. The small size of each motif means you can finish one in a single sitting and still see progress quickly. Try moving the whole row higher or lower depending on where your bag folds when carried. A design like this also adapts easily to a canvas pouch or the corner of a jacket pocket if you want to test the same fruits on a different surface.
Mountain Silhouette with Sun for Tote Bags
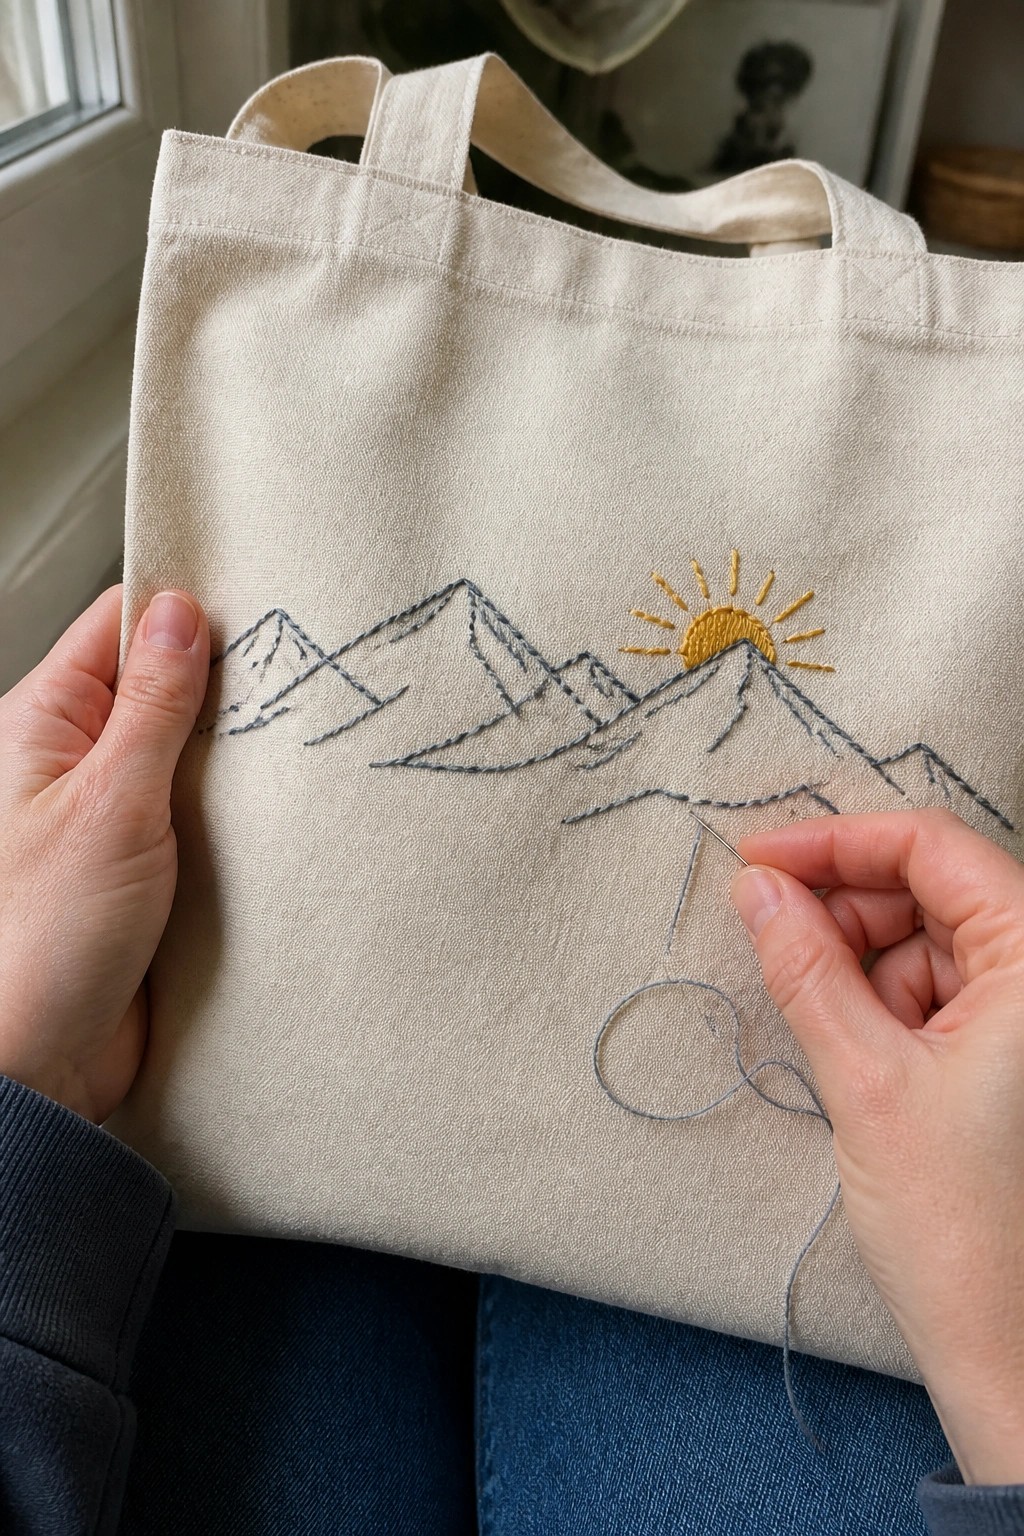
A simple line of connected mountain peaks stitched in gray across the front of a tote bag creates a clean horizontal design that sits below the handles. The yellow sun positioned on the right side breaks up the line and gives the motif a clear focal point without needing extra elements. This layout works especially well on the large flat surface of a canvas tote because the scale stays visible when the bag is in use.
What makes this idea useful is how the horizontal mountain line fits the rectangular shape of most tote bags. You could shrink the whole design to fit a smaller pouch or change the sun color to match a different bag fabric. The same outline would also transfer easily to the lower corner of a jacket or the front of a pencil case.
Camera Motif on a Canvas Tote

A small camera design stitched onto the front of a canvas tote gives the bag a clear focal point without covering much surface area. The motif sits in the upper right section, leaving the rest of the fabric open for daily use. Gray and black threads define the camera body and lens details against the light fabric, keeping the shape readable from a short distance.
What makes this idea useful is how the compact size fits on other fabric items like zip pouches or book bags with little adjustment. You can change the thread colors to match a darker tote or scale the motif down further for a pocket. The simple outline style also works as a starting point for other small objects like a mug or key, since the placement already keeps the design balanced on a large surface.
Daisy Cluster on Tote Bag Pocket

A small group of daisies stitched onto the front pocket of a canvas tote gives the bag a simple focal point without covering the whole surface. The flowers sit in the lower half of the pocket with stems at slightly different angles so the cluster feels natural rather than rigid. White petals and yellow centers show up clearly on the light fabric, and the pocket edge itself acts as a built-in frame. This approach suits everyday bags that need a quick decorative touch rather than a full-panel design.
What makes this idea useful is that the pocket already limits the stitching area, so the project stays small and quick to finish. You can move the same cluster to the corner of a different tote, reduce it to three flowers for a smaller pouch, or change the petal color to match a darker bag fabric. The loose spacing also leaves room to add a name or date later if the bag is meant as a gift. Designs this size tend to perform well online because they read clearly even in a thumbnail.
Heart Balloon Cluster Tied at the Base
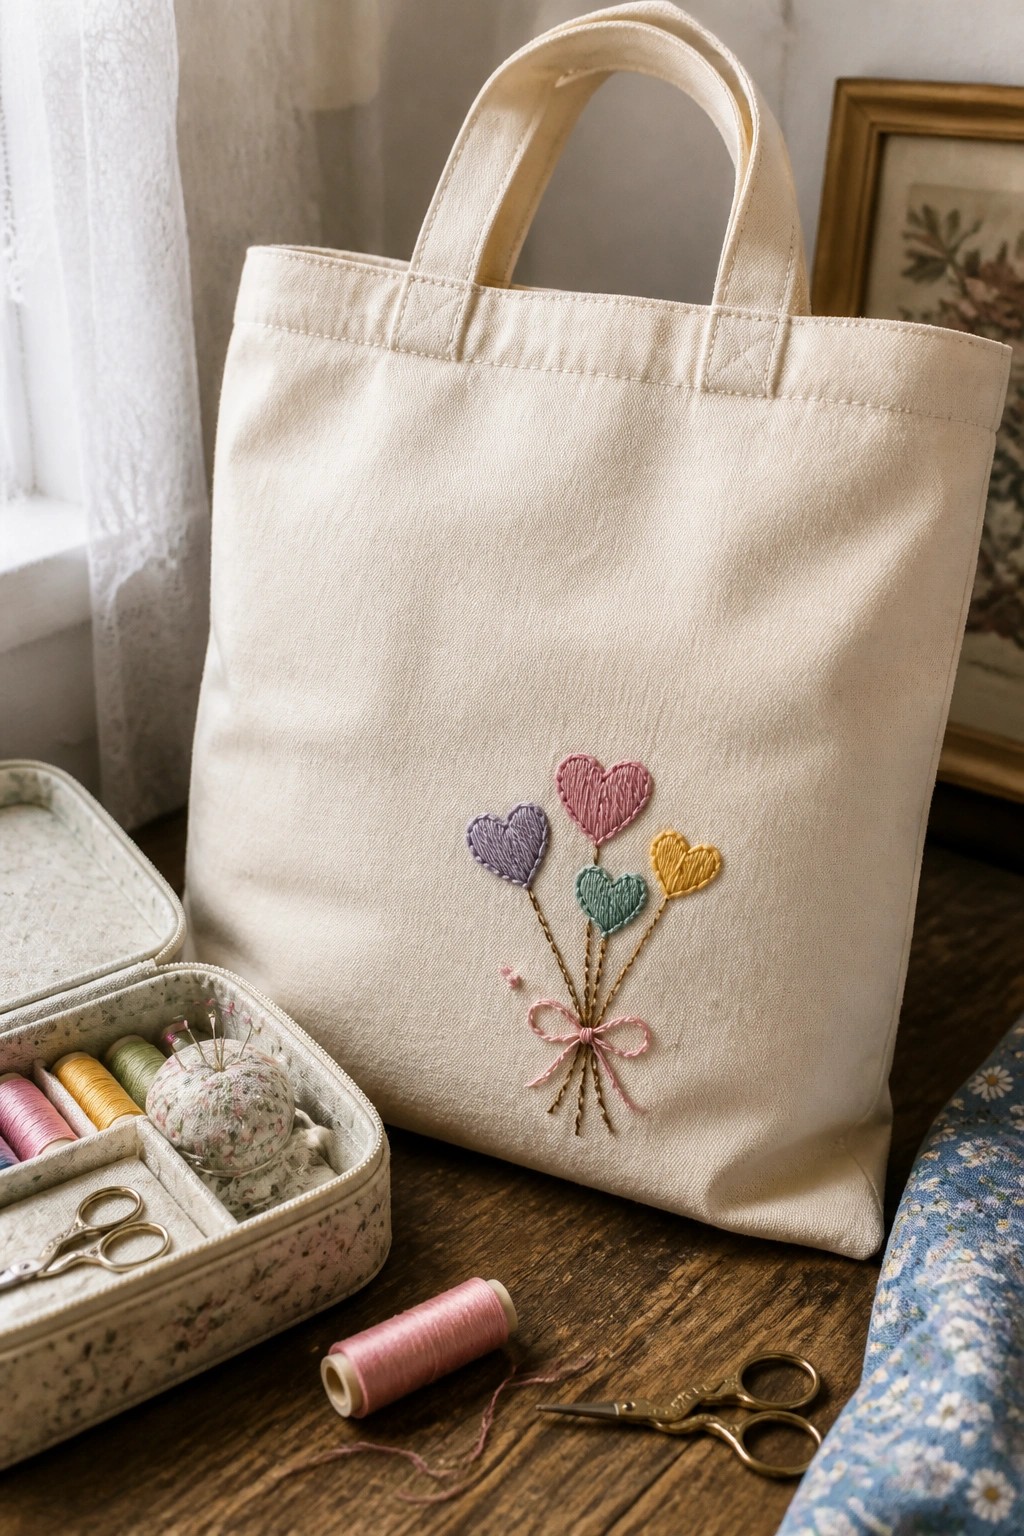
A group of small hearts in different colors sits across the center of a canvas tote, each connected by a straight line that meets at a bow near the bottom. The hearts are spaced at uneven heights so the overall shape reads as a loose bunch rather than a straight row. Keeping the lines thin and the bow small prevents the design from looking heavy on the large fabric area. This arrangement fits tote bags, market bags, or any flat carry item where the motif needs to stay visible but not dominate the whole surface.
What makes this idea useful is how simple it is to change the number of hearts or swap colors without redrawing the layout. The converging lines hold the design together even if you move it higher or lower on the bag. On a smaller item like a pouch the same idea works with just three hearts and shorter lines. The color contrast between the hearts and the natural canvas keeps the stitching readable from a distance, which helps when the finished piece shows up in photos online.
Horizontal Wave Border on Denim Tote

A simple row of repeating waves stitched across the lower section of a tote bag creates a clean border without taking up much space. The curved lines sit close together with small dots scattered above them to suggest water movement. This placement keeps the design visible when the bag is in use while leaving the rest of the fabric plain for storage. The idea fits tote bags or similar accessories where a narrow decorative strip adds detail without extra bulk.
The lower edge placement makes the design easy to adapt to different bag widths by extending or shortening the wave repeat. You can shift the same motif higher on the bag or use it on a lighter fabric with darker thread for stronger contrast. Scaling the waves down works for smaller pouches while keeping the same spacing. The repeating pattern shows up well in photos because the lines stay consistent across the width.
Centered Wreath Motif on a Tote Bag

A simple circular wreath built from small leaves and scattered flowers makes a clean motif when stitched directly onto the front of a canvas tote. Keeping the design centered on the panel helps it sit evenly whether the bag is empty or full. The contained shape of the wreath keeps the stitching compact, so it works well on a medium or large tote without needing extra borders or filler. This placement suits someone making a first bag project because the circle gives a natural stopping point.
What makes this idea useful is how easily the same wreath can be resized to fit smaller totes or even a zip pouch. You could change the thread colors to match a favorite set of grocery bags or shift the whole design lower on the panel so it shows better when the bag is slung over a shoulder. The contained motif also transfers well if you want to test it on a scrap first before committing to the finished tote. A design like this shows up clearly in photos because the round shape creates a strong focal point against the flat fabric.
Running Fox Motif Centered on a Tote Bag
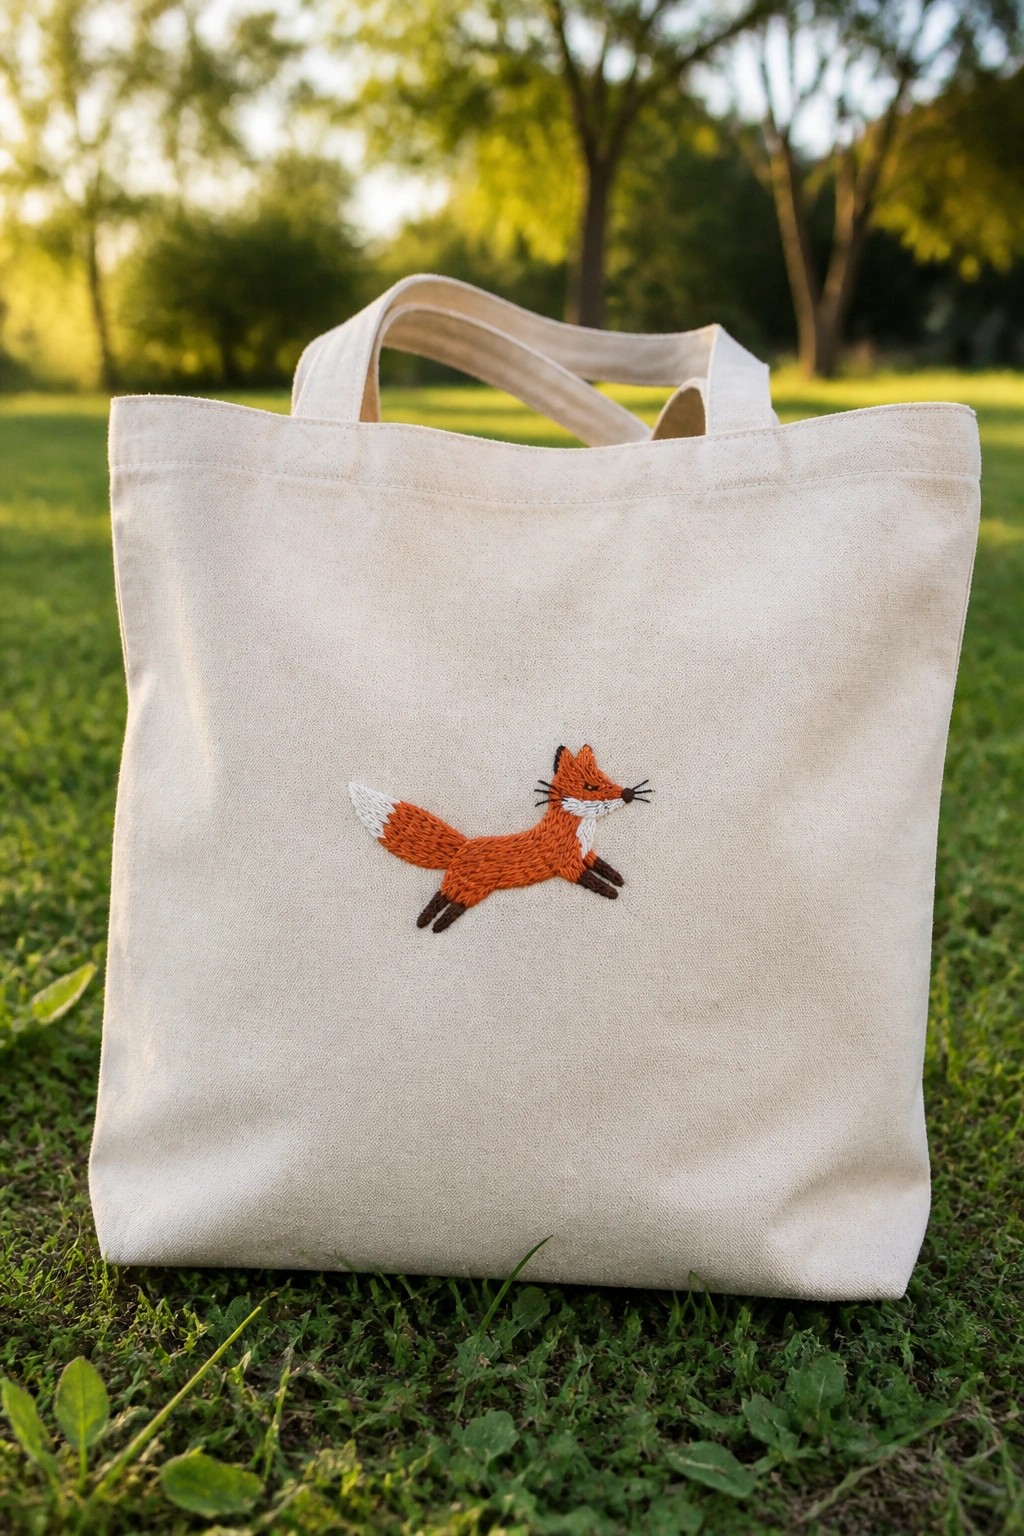
A running fox works as a compact motif that fits neatly in the middle of a tote bag front. The design uses a few thread colors to separate the body, tail tip, and feet, keeping the shape readable from a distance. Its small scale leaves most of the bag surface plain, which suits a bag meant for daily use rather than decoration.
What makes this idea useful is how the centered placement stays visible whether the bag is empty or full. The same fox can be shifted to a lower corner or stitched smaller for a zippered pouch. Changing the thread colors to match a different bag fabric takes little extra effort and still keeps the simple outline intact.
Simple Sun Motif on a Canvas Tote

A sun design made from straight radiating lines sits low on the front panel of a canvas tote bag. The motif uses one thread color and stays compact so it does not interfere with the bag’s opening or handles. This placement keeps the embroidery visible during normal use and suits a first project because the lines require only basic straight stitches.
What makes this idea useful is how cleanly it fits the rectangular shape of most totes without needing extra borders. The same sun works on smaller accessories such as zip pouches or the lower corner of a market bag if you reduce the ray count. Switching the thread to a darker shade on a colored tote creates instant contrast while keeping the pattern unchanged.
Frequently Asked Questions
What materials are essential for starting these tote bag embroidery projects?
You will need a tote bag made from sturdy cotton or canvas fabric, embroidery floss in various colors, a needle with a large eye, a water soluble fabric marker for drawing designs, and a small embroidery hoop if your bag allows it. Optional items like scissors and a thimble can make the process smoother for beginners. Start with basic supplies to keep costs low while trying the simple designs.
How do I prepare my tote bag before beginning to stitch?
Begin by washing and drying the tote bag to remove any sizing or shrinkage that could distort your embroidery later. Iron it flat and insert a piece of cardboard inside to create a firm surface for drawing and stitching. Lightly sketch your chosen design with the fabric marker, keeping lines simple and bold to match the beginner friendly ideas in the article.
Which of the 21 designs are best suited for absolute beginners?
The easiest options include basic shapes like hearts, stars, flowers, or single words using straight stitches and French knots. These require minimal thread changes and can be completed quickly without complex layering. Avoid designs with many curves or multiple colors until you gain confidence with the simpler ones listed.
How long does it typically take to complete one of these simple embroidery ideas?
Most of the beginner designs can be finished in one to three hours depending on the size and your stitching speed. Start with small motifs that use only a few stitches to build momentum. Working in short sessions helps maintain neat tension and prevents hand fatigue on the tote bag fabric.
What are some common mistakes to avoid when embroidering on tote bags?
Pulling the thread too tightly can pucker the fabric, so keep even tension throughout each stitch. Do not skip securing the thread ends at the back with small knots or loops, as this prevents unraveling during use. Test your needle size on a scrap first to ensure it glides smoothly without damaging the tote material.