
I carry a tote bag most days when I head out for coffee or to pick up a few things.
Lately I have been stitching small designs on them to make the bags easier to spot and a little less plain.
The ideas here are meant for regular use like carrying books or groceries without getting in the way.
I kept the patterns straightforward so they can be done in a few evenings.
Some of these have become the ones I reach for without thinking.
Coffee Cup Cluster on a Canvas Tote

Three small coffee cups in different colors form a loose group on the front of a canvas tote bag. The cups sit toward the lower right side with one placed slightly higher to avoid a straight line. The compact size keeps the design from getting in the way when the bag is in use. This approach works best on tote bags or similar fabric carriers where you want a quick visual detail without covering much surface area.
The small scale lets you finish the whole design in one short session and move it to other items like zip pouches or lunch bags. Shifting the cluster a few inches higher or lower changes how visible it stays when the bag is full. Swapping the cup colors for different shades keeps the same layout fresh across multiple projects. Simple clusters like this get saved often because they need little fabric space and still read clearly from a distance.
Sleeping Cat Pocket Motif

A sleeping cat face makes a compact motif that fits neatly on a pocket. The design relies on simple color blocks in brown, white, and pink thread, with whiskers stitched outward to add width without extra space. It sits in the lower corner of the pocket so the existing seam lines frame the embroidery naturally. This approach suits tote bags that have side or front pockets, or it can be placed directly on the main body fabric.
The placement does a lot of the work here because the pocket already gives the cat a clear boundary. A design like this works especially well on a canvas tote where you want a small focal point that does not overwhelm the bag. You could move it to the lower front panel or repeat a smaller version on the opposite side for balance. Changing the thread colors to match the tote fabric keeps the same layout while making it blend better with different bag styles.
Daisy Cluster Tote Bag

A small cluster of daisies with white petals and yellow centers works well as a central motif on a canvas tote. The stems and leaves are stitched to trail downward in a natural spread, keeping the design compact yet balanced across the fabric. This layout suits bags meant for books or errands because the flowers stay visible without interfering with the bag’s opening or handles. The scale stays modest enough to finish in a few sessions while still reading clearly when the tote is in use.
The placement does a lot of the work here by centering the motif where it shows most during everyday carry. You can easily shift the same cluster to a smaller pouch or repeat it lower on the bag for a different proportion. Changing the leaf color or adding one extra bloom gives quick variety without redesigning the whole piece. This kind of straightforward floral grouping tends to save well on Pinterest because it photographs cleanly on neutral fabric and adapts to multiple bag sizes.
Strawberry Row Along a Tote Strap

A single column of small strawberries stitched down the center of a tote bag strap turns the handle into the main decorative feature. The design uses a repeating motif with even spacing so the pattern runs the full visible length without crowding. The red fruit against the light canvas creates enough contrast to stand out while the green tops add a second color without complicating the layout. This approach suits canvas totes or similar fabric bags where the strap gets daily use and needs simple, durable stitching.
What makes this idea useful is that the narrow strap naturally guides the placement, so you only need to plan one straight line. You could swap the strawberries for cherries, lemons, or tiny flowers and keep the same spacing and scale. The design also translates easily to the opposite strap or to a shorter row near the top edge if you want less coverage. On Pinterest it performs well because the clean vertical repeat reads clearly even in a small thumbnail.
Avocado Patch on a Canvas Tote
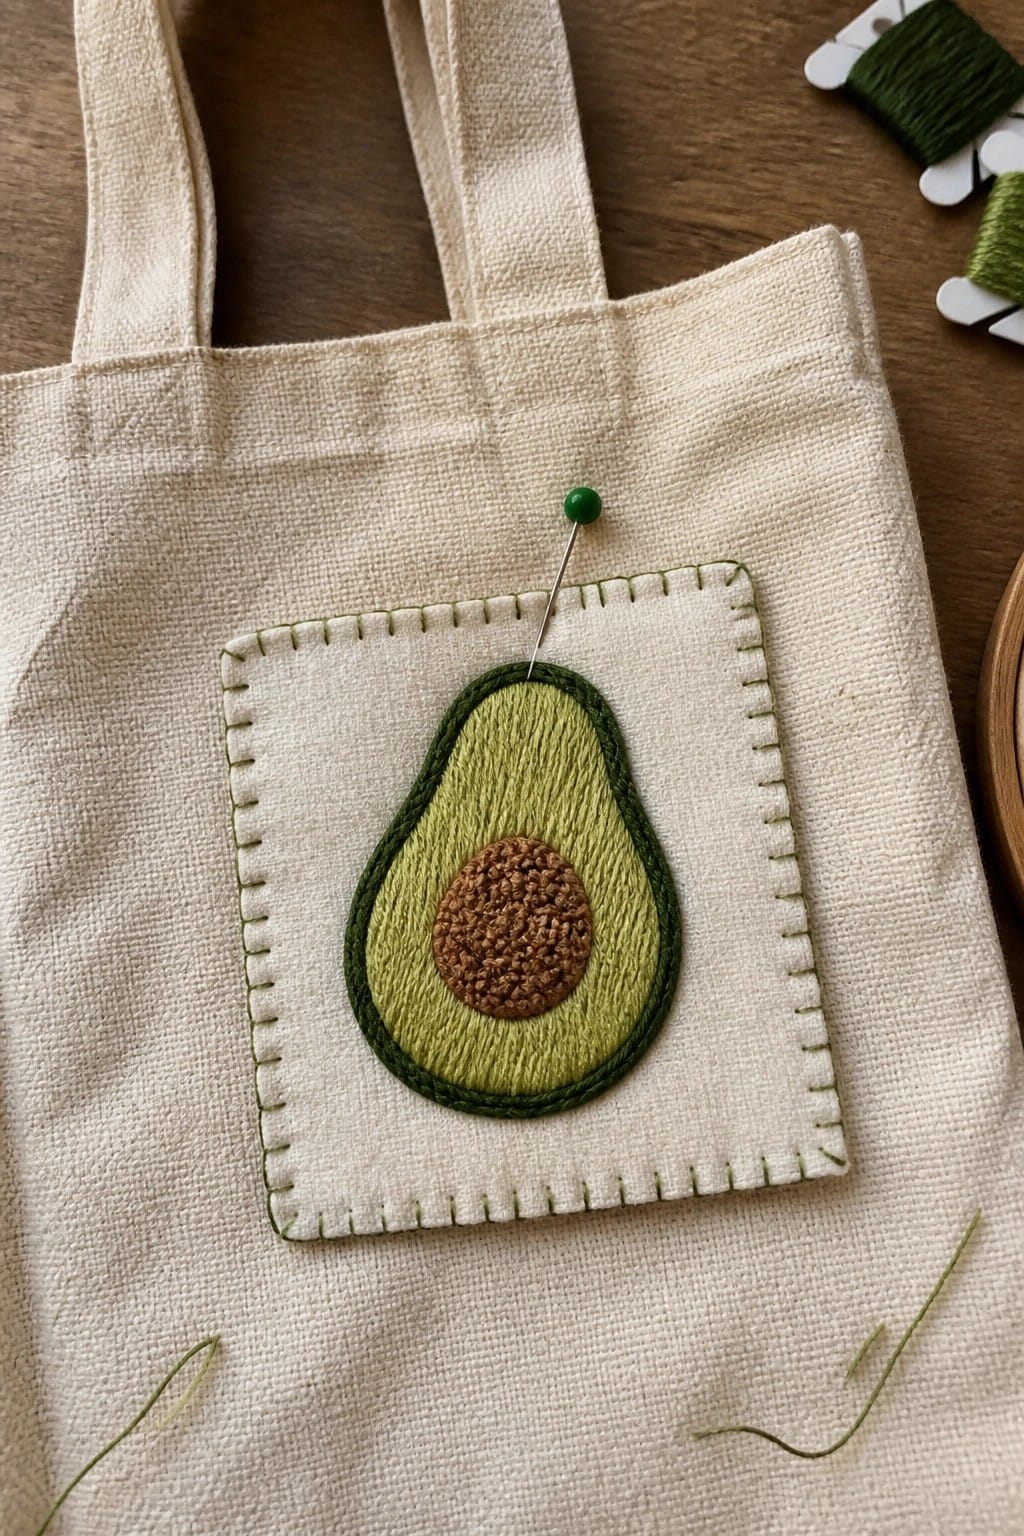
An avocado embroidered on a separate fabric square and then stitched onto a tote bag keeps the main bag surface clean while adding a clear focal point. Different green shades build the outer layers with a denser brown center for the pit, and the square patch gets secured with a visible running stitch border. The small scale fits well on the front of a tote or similar accessory where space is limited. This approach works for anyone who wants to test a motif on scrap fabric before committing it to the finished item.
The patch format makes the design easy to swap out or move to another bag later. You could shrink the avocado for a smaller pouch or change the thread colors to create a different fruit like a peach or kiwi. It stands out on Pinterest when the patch sits centered on a plain tote because the contrast stays sharp without overwhelming the whole bag. Try the same layout on a backpack or jacket pocket if you want the motif on something you carry daily.
Mushroom Cluster in the Corner of a Tote
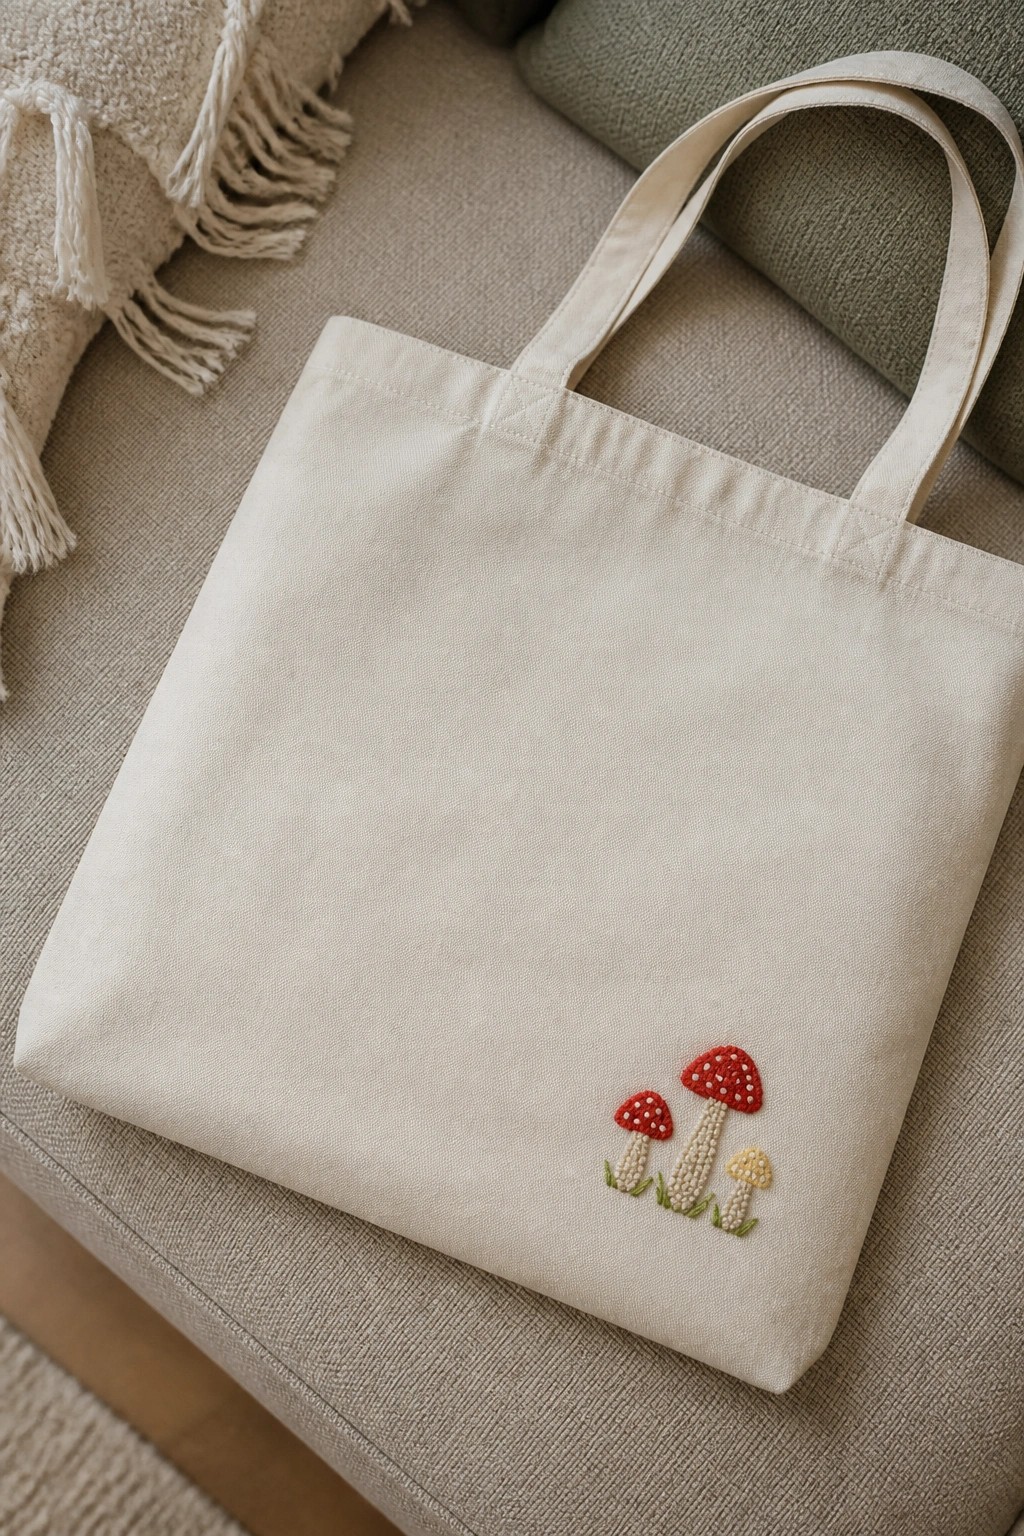
A small group of three mushrooms works as a contained motif embroidered near the bottom corner of a canvas tote. The design keeps red and yellow caps with dotted texture on the larger ones and adds short green stitches at the base to suggest grass. This placement leaves the rest of the bag surface open for daily use while still showing when the bag is carried or set down. The idea fits tote bags or similar fabric accessories where a compact motif adds interest without covering much space.
The placement does a lot of the work here by keeping the embroidery out of the way of the bag’s main area. You could shift the same cluster higher or repeat it on the opposite corner for balance. A design like this works especially well on lighter fabrics where the thread colors stand out without extra outlining. Changing the cap colors or making the cluster slightly larger would let it move to a jacket pocket or smaller pouch without losing its shape.
Stacked Macarons on a Canvas Tote
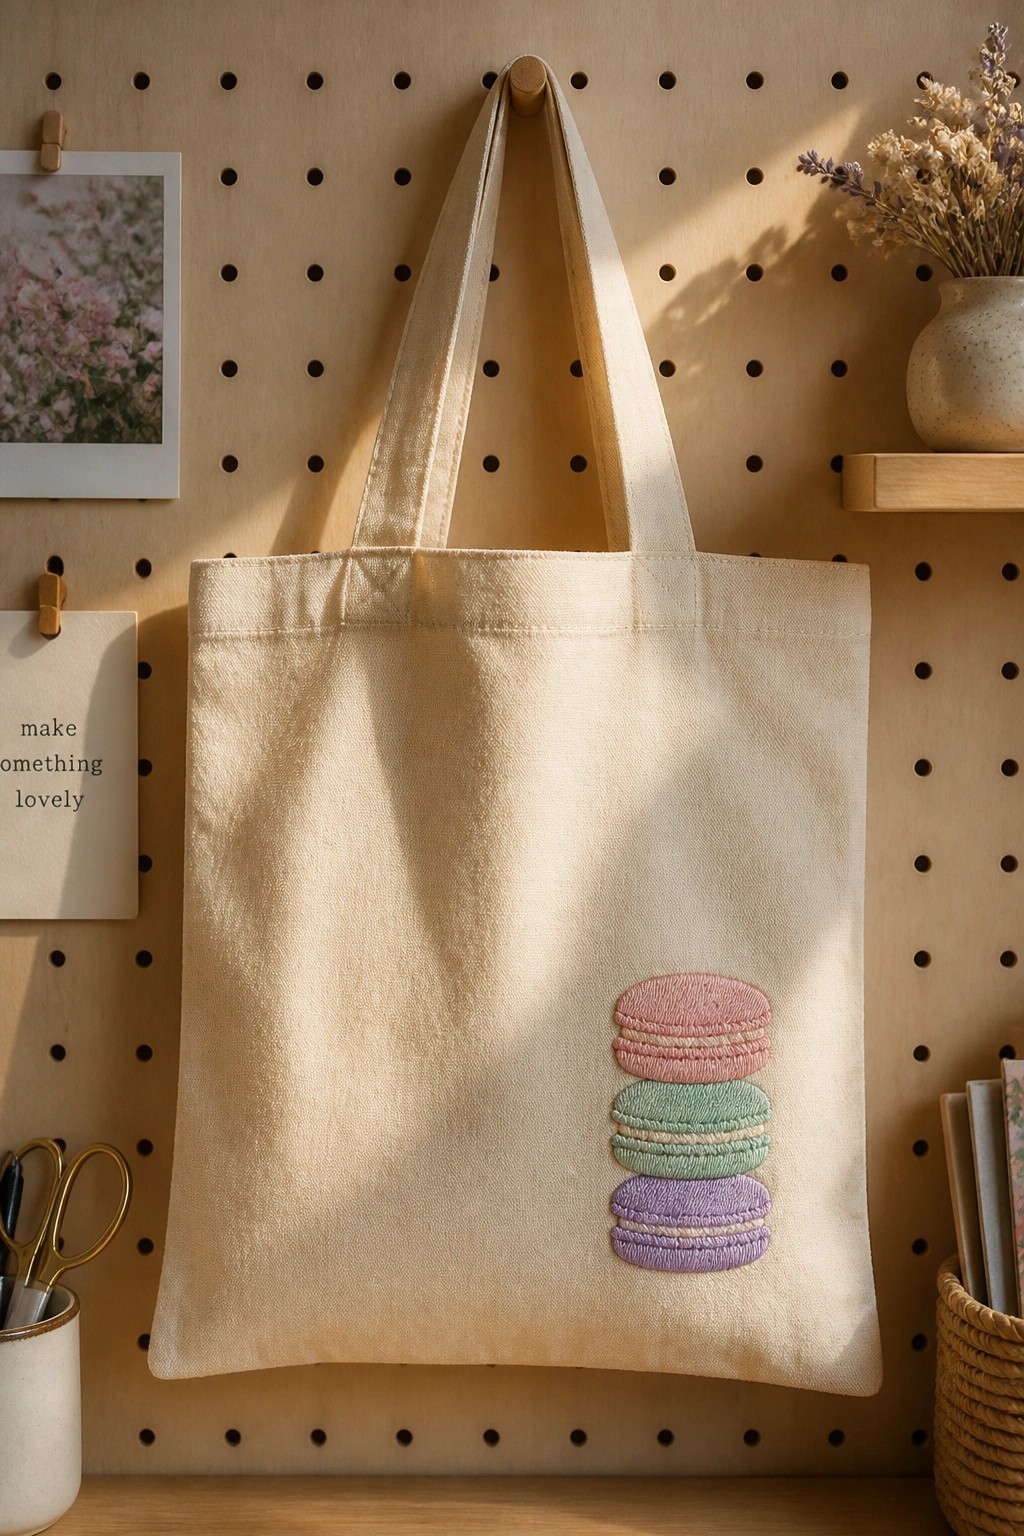
A row of three macarons stacked vertically in soft pink, mint green, and lavender creates a compact food motif on the lower right side of a plain tote bag. The design uses simple rounded shapes with subtle color changes between layers to keep it readable from a distance. Placement low on the bag leaves the upper area clear for everyday use while still making the embroidery visible when the bag hangs or sits upright. This approach suits tote bags or similar accessories where you want a small accent rather than a full-surface pattern.
What makes this idea useful is how the vertical stack keeps the overall size small, so it fits on bags of many widths without looking crowded. You could shift the same motif to a pencil case or the corner of a market bag by reducing the number of macarons or tightening the spacing. Changing the thread colors to match a favorite bakery palette or using bolder shades would alter the mood without changing the layout. The clean outlines also help the design read well in photos, which explains why similar simple motifs spread quickly on Pinterest.
Bee Motif Stitched Above the Pocket

A small bee works as a single motif on the front of a canvas tote, placed right above the pocket so it stays visible when the bag is carried or set down. The design uses simple striped segments in black and yellow with light wings that sit flat against the fabric. This keeps the embroidery compact and avoids interfering with the pocket opening or handle area. The idea suits anyone who wants a quick accent on a bag they already use for errands or library runs.
The small scale makes this easy to finish in one sitting and move straight onto daily use. You could repeat the same bee along the top edge of the bag or shift it to a bottom corner if the pocket placement does not fit your tote. Swapping the yellow for a different accent color lets the motif match other bags or pouches without changing the shape. Single motifs like this hold up well on Pinterest because they read clearly even in small thumbnails.
Scalloped Border Along a Tote Bag Opening

A scalloped edge worked in green thread follows the top rim of a canvas tote bag. The pattern uses a looped stitch to create a series of connected waves with small dots placed below each curve. This placement highlights the bag opening while leaving the main body plain. The design suits tote bags or similar fabric carriers where you want a clean finish on the edge without heavy coverage.
What makes this idea useful is how the border adds structure to an otherwise plain opening and can be widened or narrowed depending on the bag size. You could repeat the same scallops on a smaller pouch or shift the color to match a different fabric tone for better contrast. Keeping the dots spaced evenly helps the pattern read clearly from a distance. On a tote this placement also stays visible when the bag is carried.
Moon and Stars Scattered on a Tote Bag

A crescent moon and four small stars in metallic gold thread are stitched directly onto the front of a canvas tote. The pieces sit at different heights instead of forming a centered or symmetrical pattern. This spread-out placement keeps the design from feeling too formal on a bag that gets carried often. The idea suits tote bags, market bags, or any fabric item where you want light coverage without filling a large area.
The small scale lets you finish the whole thing in a few short sessions and makes it simple to move the motifs around before you start stitching. You could drop the same layout onto a zip pouch, the back pocket of a jacket, or even a notebook cover with almost no adjustment. Using a non-metallic thread color would make the design blend in more on darker fabrics. A loose scatter like this stands out in photos because it reads clearly even when the bag is not laid flat.
Potted Cacti Row on a Canvas Tote
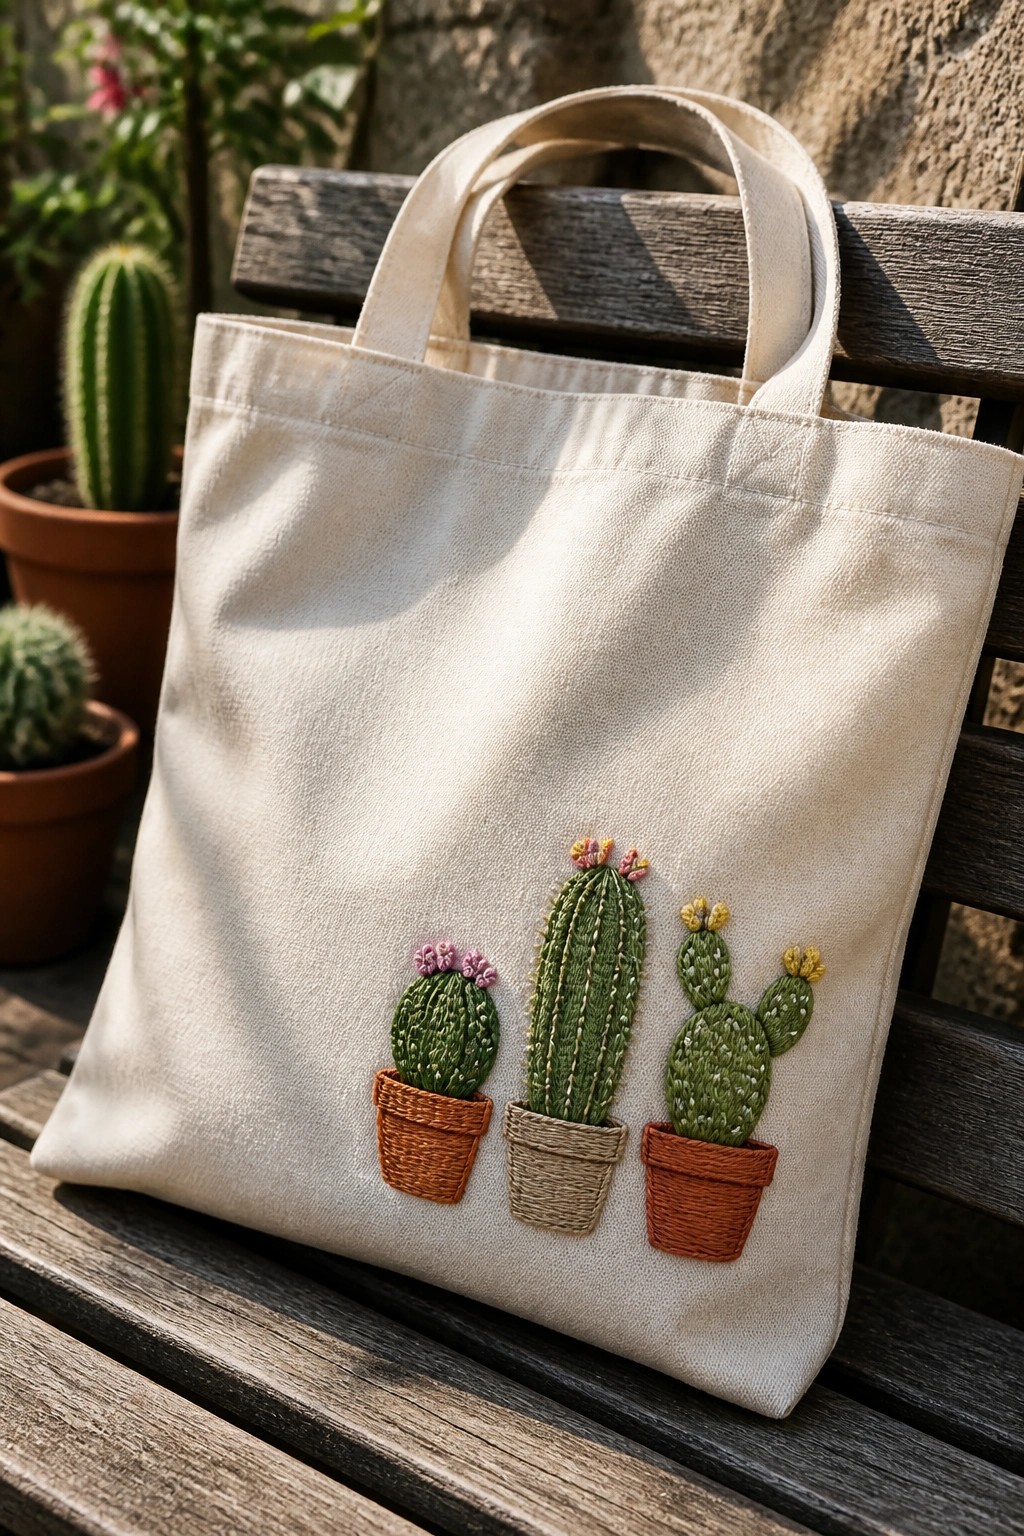
Three small cacti in separate pots form a simple repeating motif across the lower front of a tote bag. Each cactus uses a slightly different shape and pot color so the line stays interesting while staying compact. The placement keeps the embroidery below the main carrying area so it remains visible when the bag is in use. This kind of motif fits well on any flat fabric surface that sees regular handling.
The small scale makes the design easy to move to a smaller pouch or the corner of a larger bag without crowding the space. Changing the pot colors or spacing lets you adjust the look for different fabric tones. A design like this works especially well on totes because the repeated shapes stay readable even when the bag is folded or slung over a shoulder. You can also stretch the same row into a longer border if you want to cover more ground on a bigger item.
Camera Embroidery on a Tote Bag Pocket
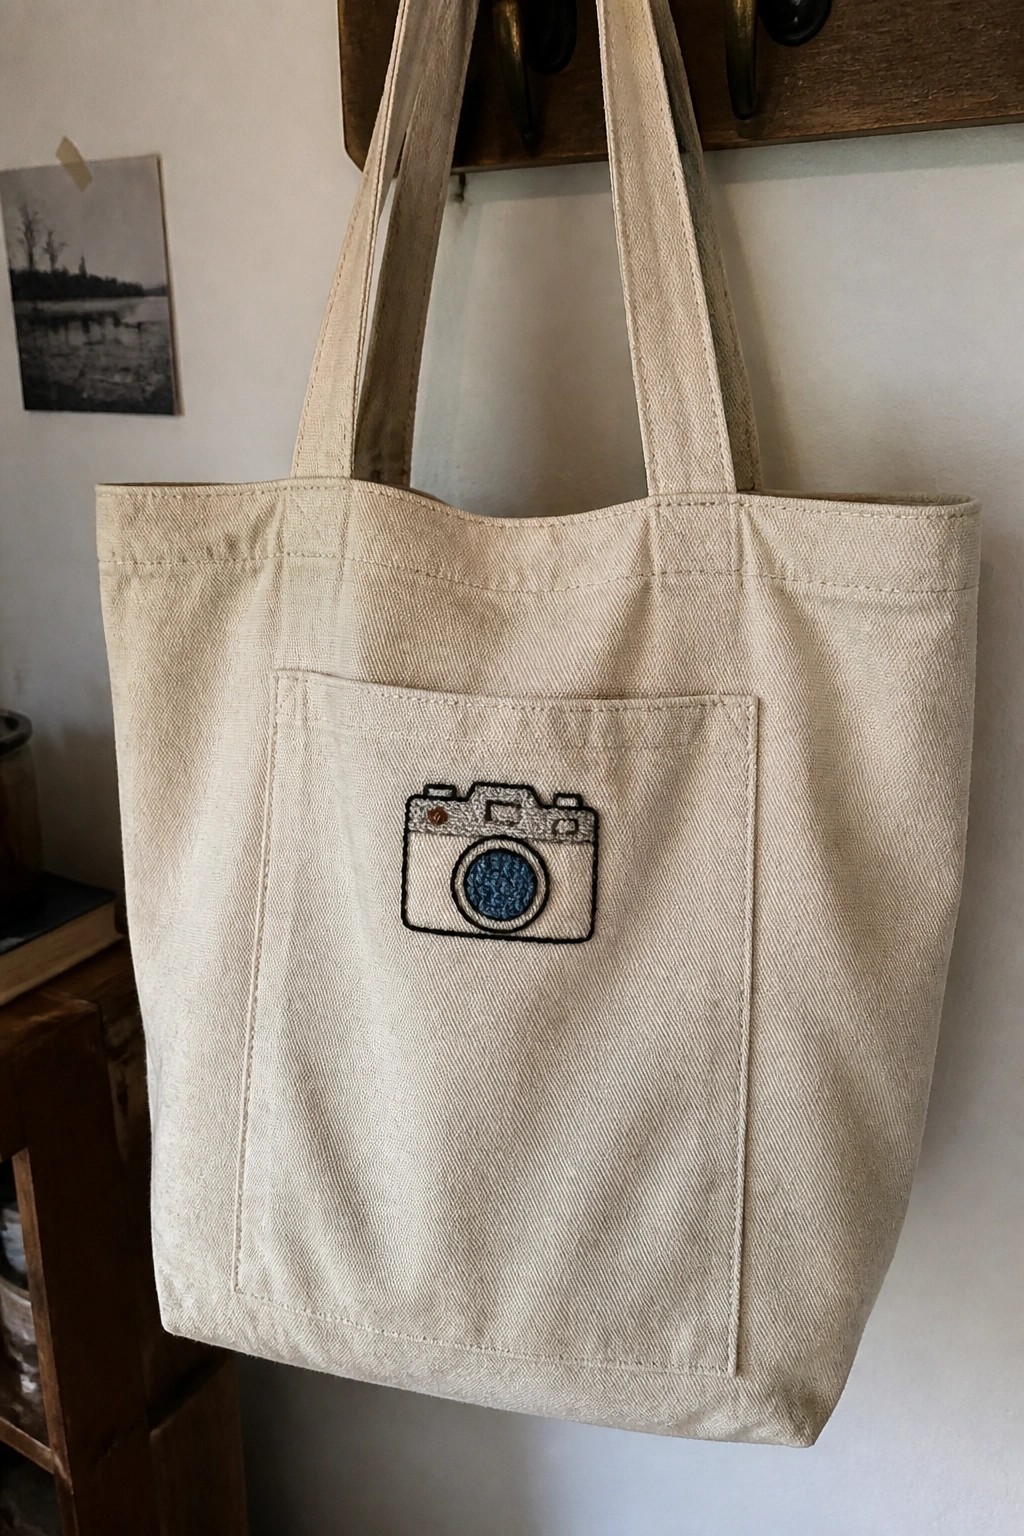
A simple camera outline stitched onto the front pocket of a canvas tote creates a small, clear focal point that fits the scale of the bag. The design relies on a dark border with a single blue circle for the lens to add contrast without needing dense stitching. Centering it on the pocket puts the embroidery in a visible spot that still avoids the main stress points when the bag is carried.
What makes this idea useful is how the compact size works on any light-colored tote or similar fabric item without competing with the overall shape. You could shift the same motif to a smaller pouch or the corner of a larger bag by reducing the scale slightly. Swapping the blue thread for another color changes the look quickly while keeping the same simple outline. The placement on a pocket also makes it easy to test the design on scrap fabric first before committing to the finished piece.
Coffee Cup with Steam on a Tote

A filled coffee mug with simple rising steam lines works well as a small motif on the front of a canvas tote. The solid stitching on the cup creates a clear shape while the thin steam outlines stay light and easy to read from a distance. This placement keeps the design centered and visible without taking up too much space on the bag fabric.
What makes this idea useful is how the cup size can shift to fit different tote dimensions or handle placements. You could change the cup color to match a favorite mug or reduce the steam lines if the bag already has other details. The design suits everyday coffee runs because it stays compact and does not interfere with loading or carrying.
Corner Rose Cluster on a Canvas Tote

A compact cluster of three rolled roses in cream, pink, and purple sits in the lower corner of a canvas tote, surrounded by small buds and narrow leaves. The flowers overlap slightly to build dimension without spreading too far across the fabric. This layout keeps the embroidery in view when the bag is in use while leaving most of the surface plain.
What makes this idea useful is how the corner placement avoids interfering with the bag’s main storage area. The same motif could shift to the edge of a book sleeve or the flap of a crossbody bag with only minor scaling. Changing the rose colors to match a favorite jacket or using fewer buds would keep the design balanced on smaller items. The limited footprint also makes it a quick project to finish between errands.
Scattered Lemon Slices on a Tote Bag
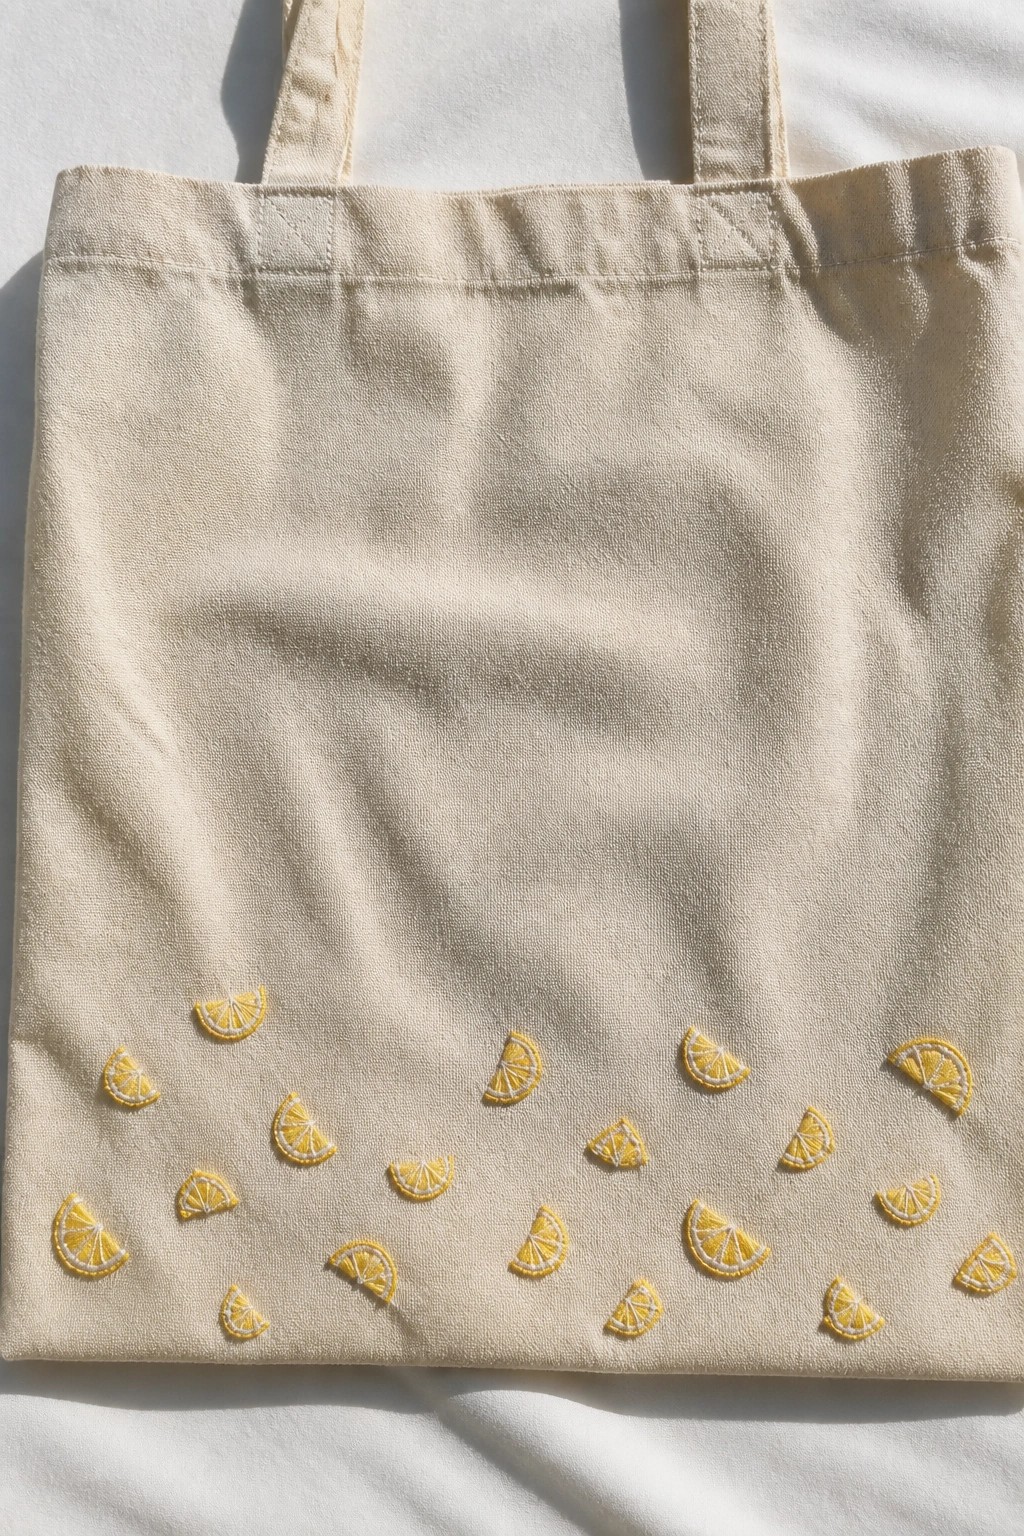
Small lemon slice motifs worked in yellow thread sit scattered across the lower half of a canvas tote. The slices vary slightly in angle and are kept small so they read as a loose pattern rather than a single focal point. This placement keeps the upper part of the bag clear for actual use while still adding detail that shows when the bag is carried or set down. The design suits any plain tote that gets regular use for groceries or library runs.
The placement does a lot of the work here because the lower third of a tote stays visible even when the bag is full. You can repeat the same slices in a different color to match another season or swap the fruit for limes or oranges without changing the layout. On a larger bag the slices can spread out more, while on a smaller one they stay clustered in one corner so the scale still feels right. This kind of simple repeat tends to photograph cleanly for project boards because the contrast stays high against light fabric.
Bicycle with Flower Basket on a Tote

A bicycle outline with a basket of flowers makes a clean motif for a tote bag when stitched across the lower front section. The bike itself stays simple with thin lines in soft green and brown thread while the flowers add small pops of pink, purple, and yellow inside the basket. Keeping the wheels and frame open rather than filled keeps the design from feeling heavy on the canvas. This approach works especially well on bags meant for daily errands or library runs.
What makes this idea useful is how the horizontal bike shape sits naturally on a flat tote surface without crowding the handles. You could shrink the whole motif for a pencil case or move it to one side to leave space for a name or date. Swapping the flower colors for brighter tones would change the mood quickly while the neutral bike thread stays the same. The light density of the stitching also means it holds up better on fabric that gets folded and carried often.
Raccoon Peeking Over Tote Bag Edge

A raccoon design placed right along the side seam of a canvas tote creates the effect of the animal climbing or hiding behind the fabric edge. The motif sits low enough on the bag that it remains visible whether the tote stands upright or hangs from a shoulder. This layout works best on unstructured bags where the fold or seam can act as a natural frame for the stitched figure.
The placement does a lot of the work here because the seam already exists, so the embroidery only needs to suggest the rest of the animal. The same idea adapts quickly to other totes by moving the raccoon to a pocket corner or handle base, or by swapping it for a different small creature like a squirrel or cat. Changing the thread to match the bag color keeps the design subtle, while brighter accents make it pop in photos for sharing.
Rainbow Arc Across a Tote Pocket

A rainbow stitched in horizontal bands across the front pocket of a tote bag gives the design a clear center without taking over the whole surface. The arc curves from one side of the pocket to the other, with small cloud shapes worked at each end to anchor it. The color sequence runs through red to purple in tight rows, which keeps the shape readable even when the bag is in motion. This motif fits tote bags or similar carry items where the pocket gets regular use.
What makes this idea useful is how the pocket placement lets the embroidery show while staying out of the way of the bag’s main opening. You could shift the same arc to the lower corner of a larger tote or scale it down for a smaller pouch. Changing the thread colors to a limited set or a single tone would make it blend with different fabrics. The design shows up well in photos because the curve and color steps create a simple shape that reads from a distance.
Frequently Asked Questions
What kind of tote bag fabric works best for embroidery projects featuring books and coffee themes?
Cotton canvas or linen tote bags provide the sturdiest base because their tight weave holds stitches securely without puckering. These fabrics also accept transfers easily and stand up to everyday use like carrying groceries or library books. Avoid slippery synthetics since they can cause uneven tension and make small details like coffee cup handles hard to stitch neatly.
How do I transfer cute embroidery patterns onto a tote bag without damaging the material?
Use a water-soluble stabilizer sheet or a light pencil trace on the inside of the bag for best results. Print your chosen design on the stabilizer, stick it to the tote surface, and stitch directly through it before rinsing away the residue with cool water. This method keeps lines crisp for motifs like stacked books or steaming mugs while preventing any ink from showing on the finished side.
Which stitches help create durable yet adorable details for errand-themed tote bags?
Backstitch works well for clean outlines on book spines and coffee steam lines because it lies flat and resists snagging. Fill in areas like latte art or cute tote icons with satin stitch for smooth color blocks that hold up after multiple washes. Add French knots for accents such as berry details on a coffee run bag to give texture without bulk that could catch during use.
How can I protect my embroidered tote bag so it lasts through frequent coffee runs and errands?
Apply a fabric sealant spray lightly over the finished stitches after completing the design to guard against stains from spills. Choose strong embroidery floss like cotton or perle and knot ends securely on the inside. For extra strength reinforce the bag handles with additional stitching if your pattern includes elements near the top edges.
What beginner tips help avoid common mistakes when embroidering book and coffee designs on totes?
Start with a small 4 inch hoop to keep fabric taut and prevent distortion around curved shapes like mugs. Practice your chosen motifs on scrap fabric first to test color combinations that pop against the tote color. Work in good lighting and take breaks to check stitch tension so details remain cute and even rather than pulling the material out of shape.