
I often reach for a simple tote bag when I need something practical to carry around.
Adding a bit of embroidery can give it a nicer look without much effort.
Over time I have collected a few designs that feel polished and not too fussy.
These ideas work well if you want something that looks like it came from a boutique.
They are straightforward to stitch and hold up with regular use.
Bouquet Embroidery for Everyday Tote Bags
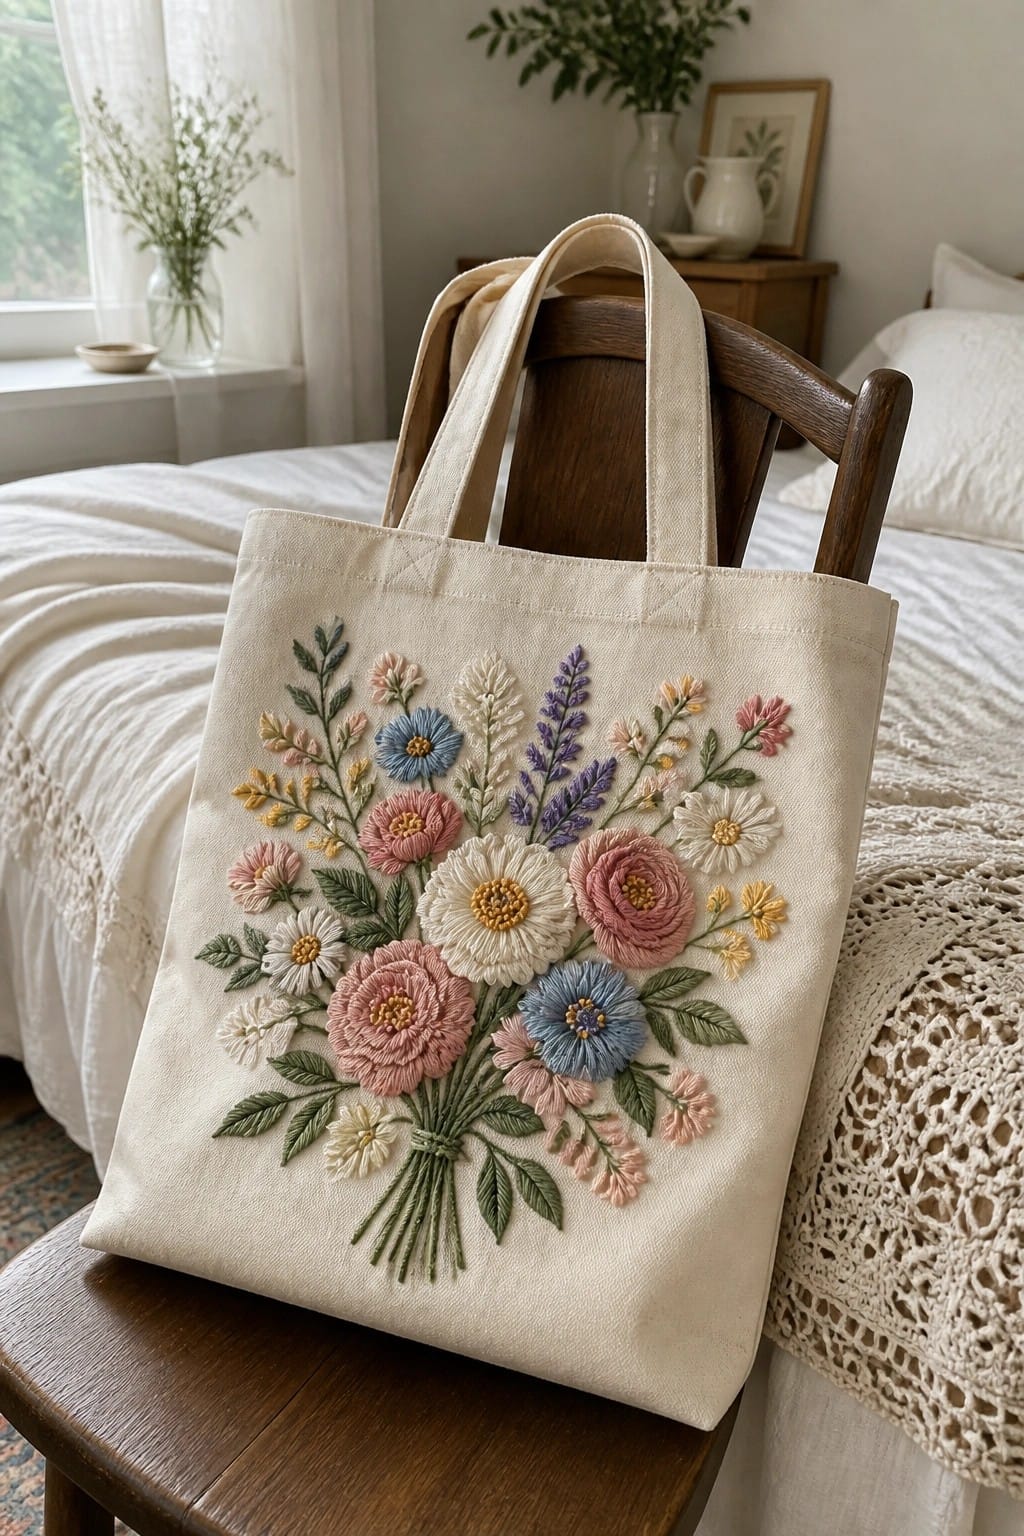
A clustered bouquet of mixed flowers with stems gathered at the base works well as a single focal motif. The design sits centered on the front panel of a canvas tote, using different flower sizes and soft color shifts to fill the space evenly. The stem bundle anchors the layout so the flowers sit naturally without spreading too wide. This approach fits fabric accessories that need a finished look without covering the entire surface.
What makes this idea useful is how the tight bouquet shape leaves room around the edges for the tote fabric to show through. You could shrink the whole cluster for a smaller bag or stretch the stem length slightly for a taller tote. Changing just the outer flowers to one color family keeps the same layout but gives a different result. The centered placement also makes it simple to mark and transfer when you want to repeat the design on matching items.
Laurel Wreath Around a Blended Oval

A simple laurel wreath made from overlapping leaves creates a clean frame when stitched around a central oval. The wreath sits on the front panel of a denim tote, with the branches crossing at the bottom to close the circle. The oval inside uses soft color shifts between pink and green, which keeps the whole motif from feeling flat against the blue fabric. This layout works best on bags or other flat fabric surfaces where the design can be seen straight on.
What makes this idea useful is how easily the wreath scales up or down depending on the size of the tote. You can swap the center colors to match different fabrics or seasons without changing the leaf structure. The crossed stems at the bottom also give you a natural spot to add initials or a small date if you want to personalize it. A design like this translates well to other accessories such as pouches or jacket backs because the shape stays balanced at different sizes.
Floral Cluster on a Canvas Tote

A compact bouquet of flowers placed dead center on a tote bag gives the project a finished, intentional look without covering too much surface area. The design mixes one larger pink bloom with smaller cream and blue flowers plus scattered leaves, which keeps the shape balanced and readable from a distance. This kind of motif works especially well on bags because the rounded arrangement fits neatly inside the typical front panel space.
What makes this idea useful is how simple it is to shrink the whole cluster for a side pocket or repeat it in a smaller version near the bottom corner. Switching the main flower color or swapping the blue accents for a single contrasting thread changes the feel quickly without redrawing the pattern. The layout also transfers easily to other flat items like a makeup pouch or a book sleeve if you want the same motif in a different format.
Vertical Leaf Pattern on Tote Bag Straps

A repeating row of small leaf shapes runs down the center of a tote bag strap to create a simple striped effect. Each motif alternates between two thread colors so the pattern stays visible even on a narrow surface. The vertical placement keeps the design contained while still showing clearly when the bag is in use. This layout suits tote bags, market totes, or any fabric accessory with a visible strap.
What makes this idea useful is how the narrow repeat fits many different strap widths without crowding. You could change the color pairing to match a new bag or shorten the row to leave space for a larger motif on the front panel. The same leaf sequence also transfers easily to apron ties or backpack straps if you want to repeat the design elsewhere. A single row like this stands out on Pinterest because it reads as finished even when kept minimal.
Mushroom Cluster on Tote Bag Pocket

A small group of mushrooms stitched onto the front of an interior pocket gives a tote bag a quiet detail that only shows when the bag is open. The design uses a central tall mushroom flanked by two smaller ones, with a short row of textured stitches along the bottom to suggest ground cover. Brown threads in a few close shades keep the whole thing simple against the natural fabric color. This approach fits tote bags, market bags, or any fabric accessory where you want embroidery that stays contained and practical.
The placement on the pocket protects the stitches from daily wear while still letting the design show during use. You could repeat the same layout on a smaller pouch or shift the cluster to one lower corner of the bag exterior if you want it more visible. Adjusting the thread colors to include a bit more green in the base layer would change the overall tone without needing a new pattern. Small motifs like this one save well for quick projects since they require little fabric space and transfer easily to other items.
Starfish Cluster in the Tote Corner
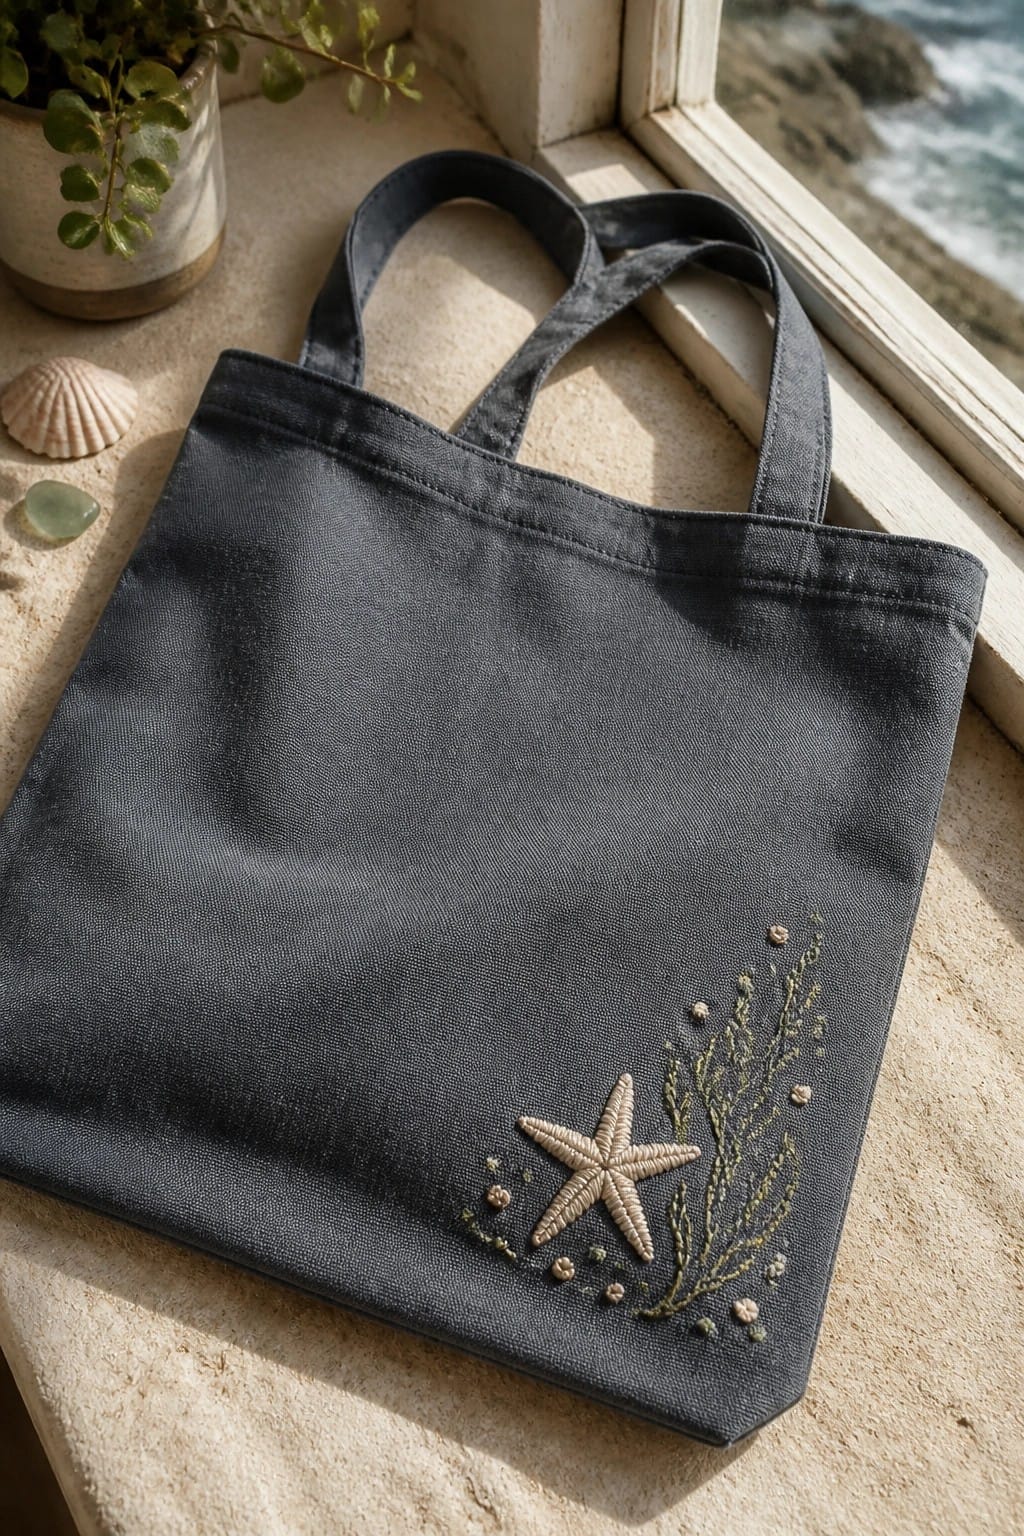
A compact starfish sits beside a few strands of seaweed and small scattered dots in the lower right corner of a dark tote bag. The design stays small and contained so the rest of the bag surface remains plain and usable. This placement works on flat accessories like totes because the embroidery stays visible without covering the main area or getting buried under items inside. The idea suits anyone making market bags or beach totes who wants a single focal point instead of an all-over pattern.
The placement does a lot of the work here because the corner spot stays noticeable whether the bag hangs at your side or rests on a table. You could shift the same cluster to the bottom edge of a lighter-colored tote or shrink it further for a zippered pouch. Swapping the starfish for a different small shape like a shell or leaf keeps the same grouped layout while changing the overall look. This scale also makes the design easy to test first on a fabric scrap before committing to the full bag.
Oval Silhouette with Border on Canvas Tote
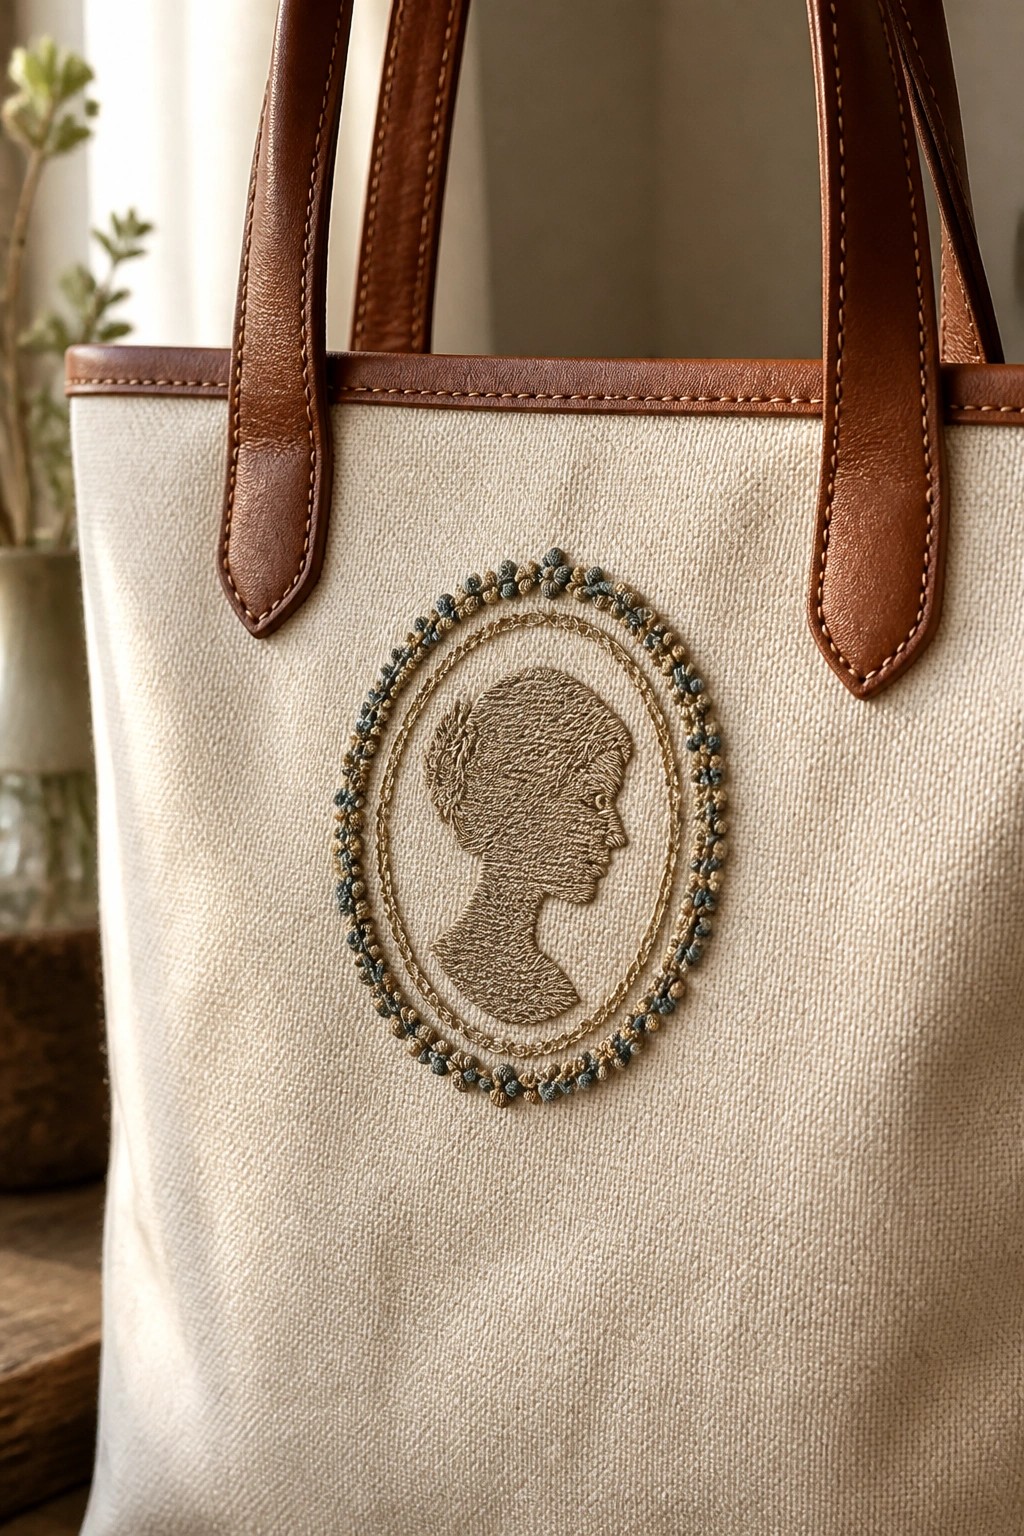
A profile silhouette placed inside an oval border creates a contained focal point that sits neatly on the front of a tote bag. The figure is worked in a single neutral thread while a ring of small stitches in two tones forms the outer frame and adds separation from the canvas. Centering the motif keeps the bag functional since the design stays clear of the handles and base. This layout fits tote bags or similar flat accessories where you need something visible but not bulky.
What makes this idea useful is how the oval automatically organizes the silhouette so it holds up on a large surface like a bag. You can change the border colors to match different fabrics or reduce the size for a zip pouch. The contained shape also makes it simple to move the design higher or lower depending on how the bag will be carried. On Pinterest this type of framed motif shows up well in flat lays because the oval creates a clear shape against plain canvas.
Fan Motif Patch on a Two-Tone Tote

A fan-shaped motif built from layered radiating sections makes a strong central patch on a tote bag. The design sits inside a square border on the front panel, with teal filling the main shapes and pink used for the outer curves. The light background fabric inside the border helps the lines stay visible even from a distance. This layout works best on bags or pouches where the embroidery stays flat and framed by the surrounding fabric.
The placement on a two-tone bag does most of the framing work so the motif does not need extra borders. You could shrink the same fan to fit a smaller flap or repeat it in a row along the side. Changing the teal to navy keeps the contrast if your bag fabric is lighter. This approach stands out on Pinterest because the motif reads clearly in a thumbnail without needing lots of detail.
Repeating Flower Border on a Canvas Tote

A straight row of small flowers stitched just below the top seam turns a plain tote into something more finished. Each flower sits on its own short stem with a couple of leaves, and the colors shift across the row so the pattern stays interesting without crowding the fabric. The scale stays small enough that the design reads as a border rather than a focal point, which leaves the rest of the bag open for daily use. This approach suits any canvas or linen tote that needs a light decorative edge.
What makes this idea useful is how easily the same border transfers to other bags or even the hem of a simple apron. You can change the color sequence to match different fabrics or drop the variety and use only two tones for a quieter result. Because the flowers stay compact, the whole row finishes faster than a larger motif would, and the placement keeps the stitching away from the base where wear happens most. On Pinterest this kind of clean border shows up well in flat-lay photos and still leaves room for people to picture their own color choices.
Bee Border Along the Tote Base

A straight row of small bees stitched across the bottom edge of a tote bag forms a clean repeating border. The bees sit just above the hem in even spacing, using yellow and white thread on dark fabric so the line reads clearly from a distance. This placement keeps the design visible when the bag is in use while leaving the rest of the surface plain for carrying items. The idea suits canvas or denim totes that need a quick, low-coverage accent rather than a large central image.
The small scale makes it simple to adjust the number of bees to fit any bag width. You could shift the same row higher on the front panel or change the thread colors to match a lighter fabric without losing the border effect. It also works as a starting point for other small motifs like leaves or stars if bees do not fit the rest of your project. The even spacing and limited color palette help the design photograph cleanly for sharing.
Scattered Florals on a Tote Bag Handle

Small flowers in soft pinks, purples, and peaches are stitched in a loose vertical line along a fabric strip that covers the tote bag handle. Tiny dots fill the spaces between the blooms, keeping the pattern light and evenly spaced. The placement turns a plain strap into the main focal point while still allowing the bag to function normally. This approach works well for any tote or shoulder bag where you want added detail without covering large areas of fabric.
What makes this idea useful is how easily the same strip can be made separately and attached to an existing bag. You can shift the colors to match different fabrics or swap the flowers for a different motif if you want a less delicate look. The narrow format also means the project stays small enough to finish in a few sessions, which helps when testing new color combinations or trying the design on other straps like those on aprons or market bags.
Wreath Layout for a Centered Tote Bag

A circular wreath built from separate flower and leaf clusters gives the front of a tote bag a finished look without covering the whole surface. The open middle keeps the design from feeling heavy while the varied flower sizes add enough detail to hold interest up close. Keeping the wreath roughly two-thirds the width of the bag panel balances the empty space around it and leaves room for the bag to expand when in use.
What makes this idea useful is how simply it scales down for smaller bags or pouches by dropping a few clusters. You can swap the thread colors to match different seasons or fabrics without changing the basic layout. The centered placement also photographs cleanly, which helps the finished bag stand out in project roundups.
Trailing Stem Design for Everyday Totes

A simple stem with narrow leaves and small berry clusters makes an easy motif for a tote bag. The embroidery runs diagonally across the front panel in a single flowing line, leaving most of the fabric plain. Dark thread on light canvas creates clear contrast without needing dense stitching or extra layers. This approach keeps the bag functional while adding a quiet botanical detail that suits daily use.
What makes this idea useful is how the vertical flow fits the shape of a tote without crowding the edges. You can shorten the stem for a smaller bag or flip the direction for the opposite side. Switching the thread to a softer gray or warm brown changes the look while keeping the same light touch. The open spacing also means the design works on other canvas items like pouches or market bags without extra planning.
Yarrow Motif on a Denim Tote Pocket

A compact cluster of rounded flower heads sits near the top of a rectangular pocket on a denim tote, with stems and leaves extending downward to fill the lower half. The design stays centered inside the pocket outline, using light thread for the blooms and several shades of green for the foliage to create a balanced vertical shape. This approach works well on a tote because the pocket gives the embroidery a clear frame while leaving the rest of the bag plain for daily use.
The pocket placement protects the stitches from constant rubbing against your arm or other items. You could shrink the same motif to fit a smaller bag or shift the colors toward deeper greens and off-white for a different season. Keeping the scale modest also makes it simple to finish in a few sittings without crowding the fabric.
Concentric Spiral Rings on a Canvas Tote
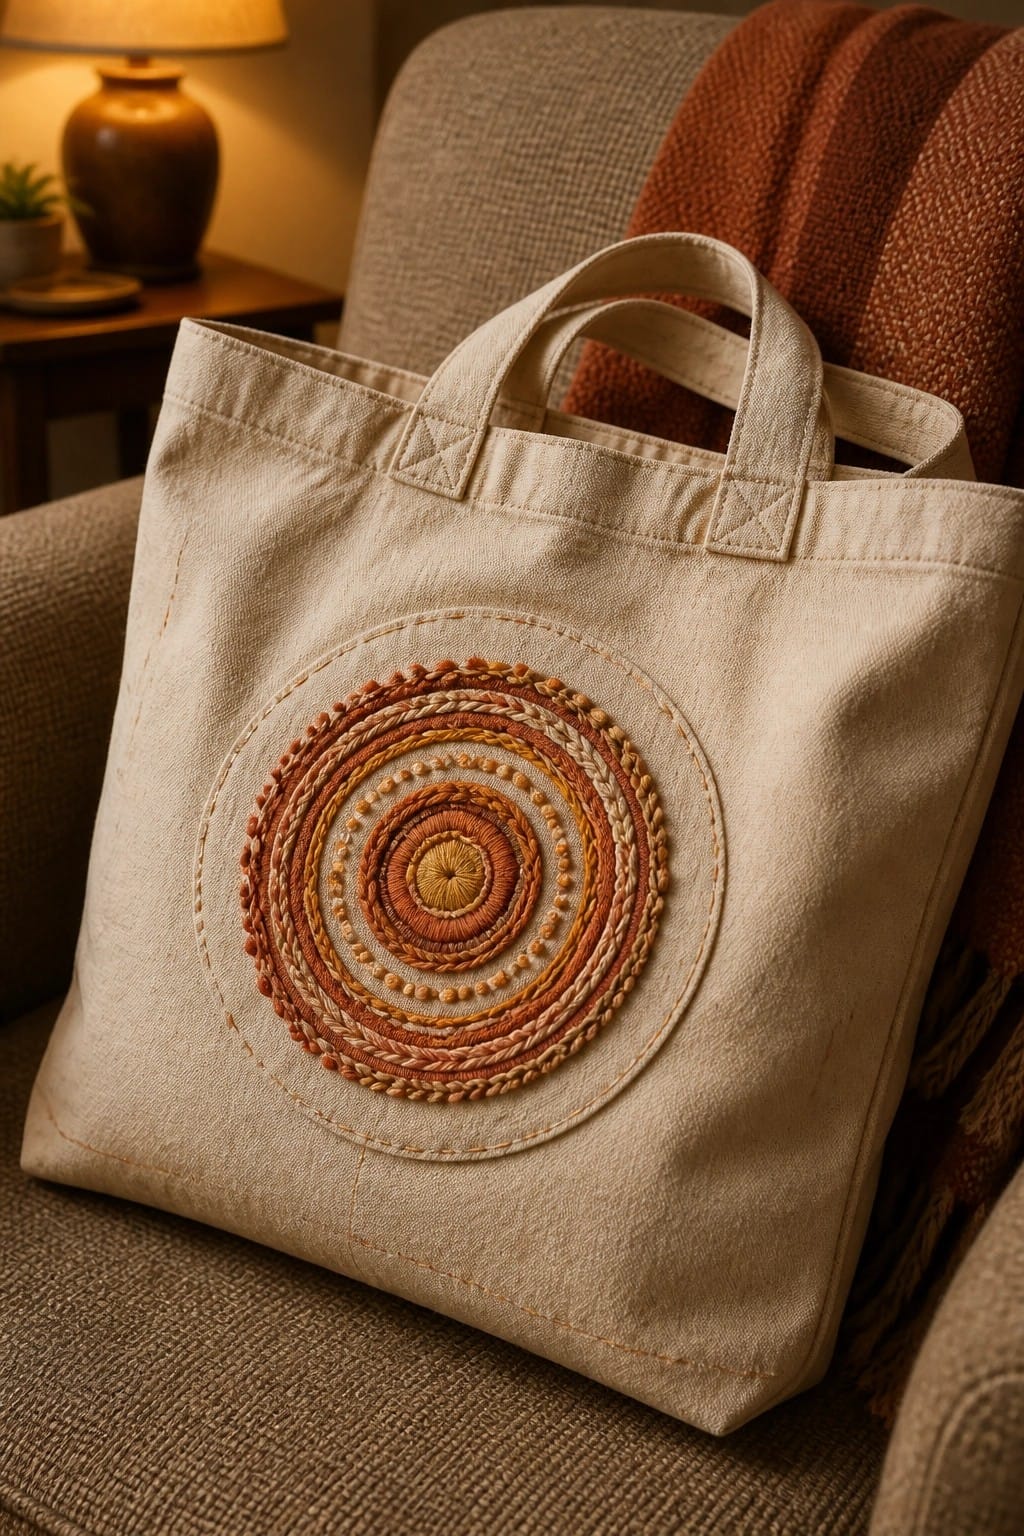
A series of concentric rings built from varied thread thicknesses forms a compact circular motif placed dead center on the front of a plain tote bag. The rings shift gradually through warm rust, ochre, and tan tones, with some sections raised and others flatter to create visible texture layers. This keeps the design self-contained so it does not interfere with the bag’s handles or sides while still filling the space effectively.
What makes this idea useful is how simple it is to scale the whole circle up or down depending on bag size. You can swap the warm palette for cooler shades or a single color family and the layout still reads clearly. The centered placement also works on other flat items like zip pouches or the back of a jacket without needing major changes.
Cherry Cluster on a Canvas Tote

A pair of cherries stitched near the bottom edge of a tote bag gives a simple fruit accent without taking over the whole surface. The red fruit sits against the light canvas while the green stems reach upward, keeping the design compact and balanced. This motif works well on bags, pouches, or the corner of a larger fabric item because it stays small enough to finish in one sitting.
The placement leaves the upper half of the bag clear for actual use. You can shrink the same cherries for a pocket or repeat them along a strap if you want more coverage. Swapping the red thread for a softer shade keeps the design visible but less bold on darker fabrics. A design this size also transfers easily to other accessories when you need a quick repeat project.
Luna Moth Centered on a Canvas Tote

A luna moth worked in soft green and cream threads makes a strong focal point when placed in the middle of a plain canvas tote. The wings are built with directional stitching that creates natural shading and texture across the surface. This approach keeps the design visible from a distance while still looking balanced on the large fabric area of a bag.
What makes this idea useful is how the moth shape fills the front panel without needing extra borders or filler. You can shrink the same outline for a smaller crossbody bag or swap the greens for deeper tones if the tote fabric is darker. The light color choice also helps the stitching stand out on natural or undyed canvas without competing with the bag’s overall clean look.
Circular Sunflower on a Natural Linen Tote
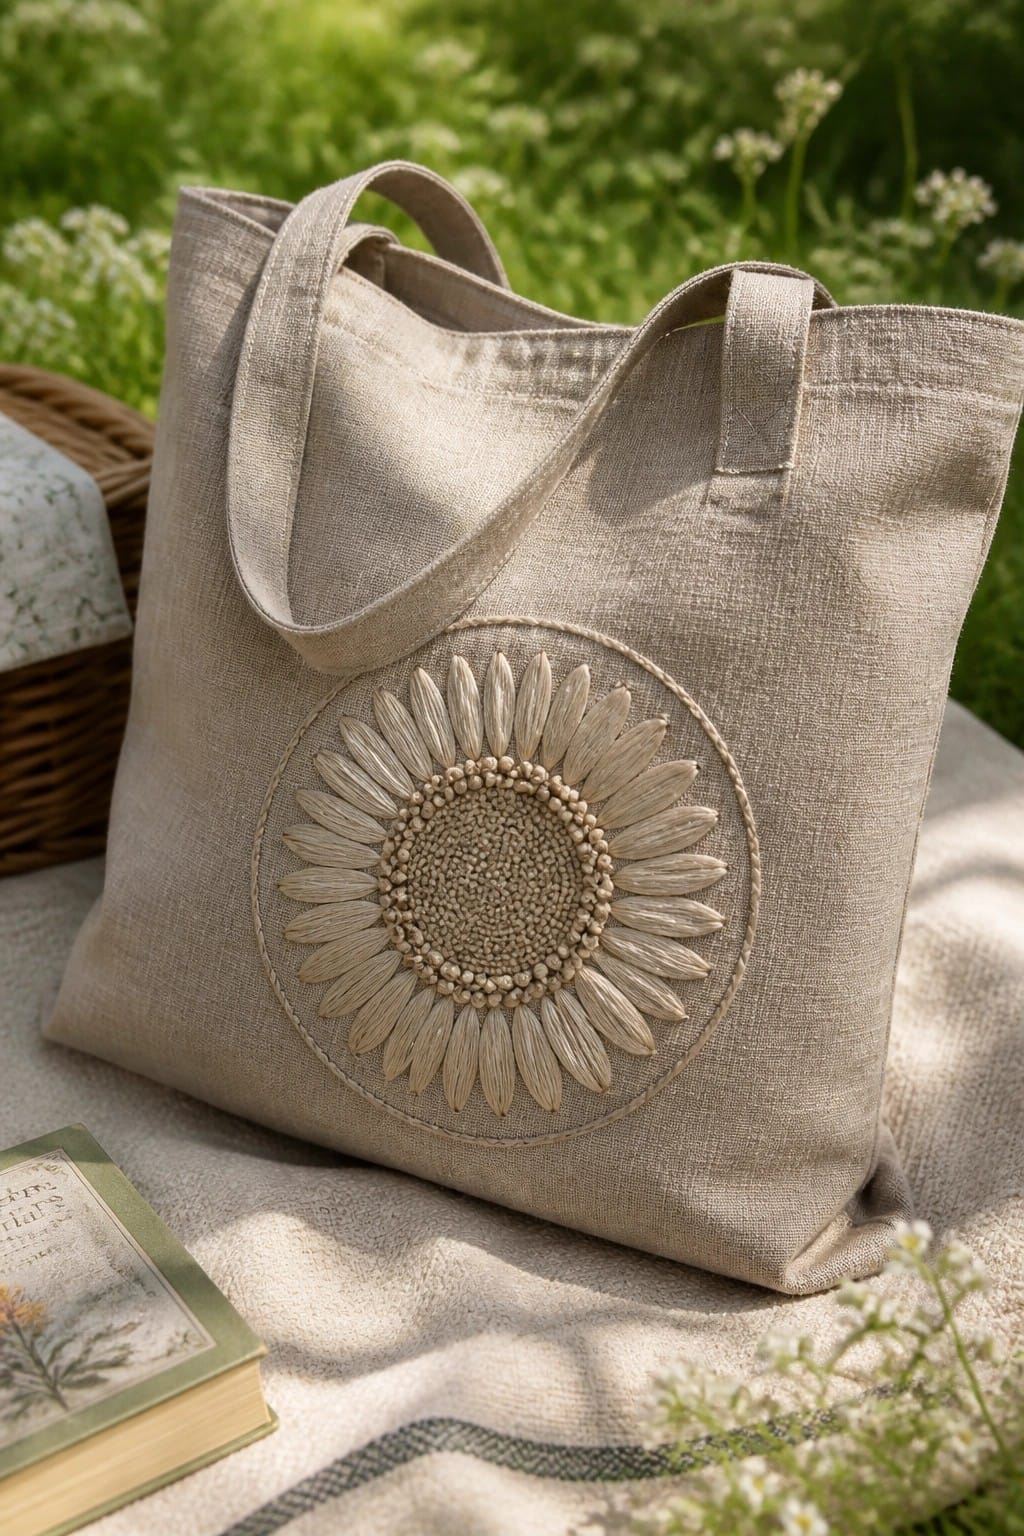
A sunflower motif stitched in a contained circle works well when centered low on the front panel of a tote bag. The design uses straight radiating petals around a tightly filled center, all kept in the same neutral thread as the linen so the texture stands out more than the color. This placement leaves the upper section of the bag clear for actual use while giving the motif enough space to read without crowding the handles.
What makes this idea useful is how the circular border keeps the petals from fraying or snagging during daily wear. You could move the same size motif to one side of the bag or shrink it for a smaller pouch. Switching the thread to a single contrasting color would change the look quickly without altering the stitch layout, and the neutral version stays practical on light-colored totes that see regular use.
Frequently Asked Questions
What materials do I need to start embroidering tote bags with these chic designs?
To create polished boutique style tote bags you will need a sturdy canvas or linen tote bag as your base fabric along with embroidery floss in complementary colors an embroidery hoop to keep the fabric taut sharp embroidery needles fabric stabilizer for clean stitches and basic tools like scissors and a water soluble pen for marking patterns. Choose high quality cotton or wool threads for durability and a professional appearance that holds up to daily use.
How can I achieve a polished boutique style finish on my embroidered tote bags?
Focus on even tension in your stitches by using an embroidery hoop and practicing consistent stitch lengths. Select designs with clean lines and limited color palettes for an elegant look then finish edges with a neat backstitch border or add subtle details like French knots for texture. Always secure thread ends on the inside of the bag and consider adding a lining to hide stitches and give the tote a high end appearance.
Are the 18 chic tote bag embroidery designs suitable for beginners?
Many of the designs feature simple motifs like florals geometric shapes or monograms that work well for beginners using basic stitches such as running stitch backstitch or satin stitch. Start with larger simpler patterns to build confidence before moving to more detailed ones. If you are new to embroidery practice on scrap fabric first to master tension and spacing for that boutique polish.
Where can I find patterns or templates for these embroidery designs?
Search online marketplaces like Etsy or Pinterest for free and paid tote bag embroidery patterns inspired by boutique styles. Many crafters share downloadable PDFs with the exact motifs mentioned in the article or you can adapt illustrations from design books using a lightbox to trace them onto your fabric. Consider joining embroidery communities for shared resources and customization tips.
How should I care for my finished embroidered tote bag to maintain its appearance?
Spot clean the bag with mild soap and water avoiding harsh chemicals that could fade threads. For deeper cleaning hand wash in cold water and lay flat to dry away from direct sunlight. Store the tote in a cool dry place when not in use and consider using a fabric protector spray to guard against stains while preserving the embroidery details over time.