
I started embroidering my tote bags a couple of years ago because I wanted them to stand out a bit more.
Plain bags are fine but adding some stitching makes them feel personal.
I collected a bunch of ideas that use bigger designs and brighter colors.
They range from simple shapes to more detailed patterns.
I think any of them would look good on a basic canvas tote.
Oversized Multi-Tone Flower on a Canvas Tote

A large five-petal flower stitched across the front of a tote bag creates an immediate focal point through its size and color shifts. The petals move from bright pink through coral and magenta, with teal lines radiating from the center to separate the sections and add definition. This layout suits accessories like bags because the scale fills the fabric area without needing extra elements around it.
What makes this idea useful is how the central placement keeps the design visible whether the bag hangs on a shoulder or rests on a table. You can reduce the flower to half the size and shift it toward one corner for a less dominant look, or repeat smaller versions in a row along the bottom edge. Swapping the warm tones for cooler shades changes the mood quickly while keeping the same petal structure. Designs with strong color contrast like this tend to photograph clearly for sharing.
Oversized White Roses on a Denim Tote
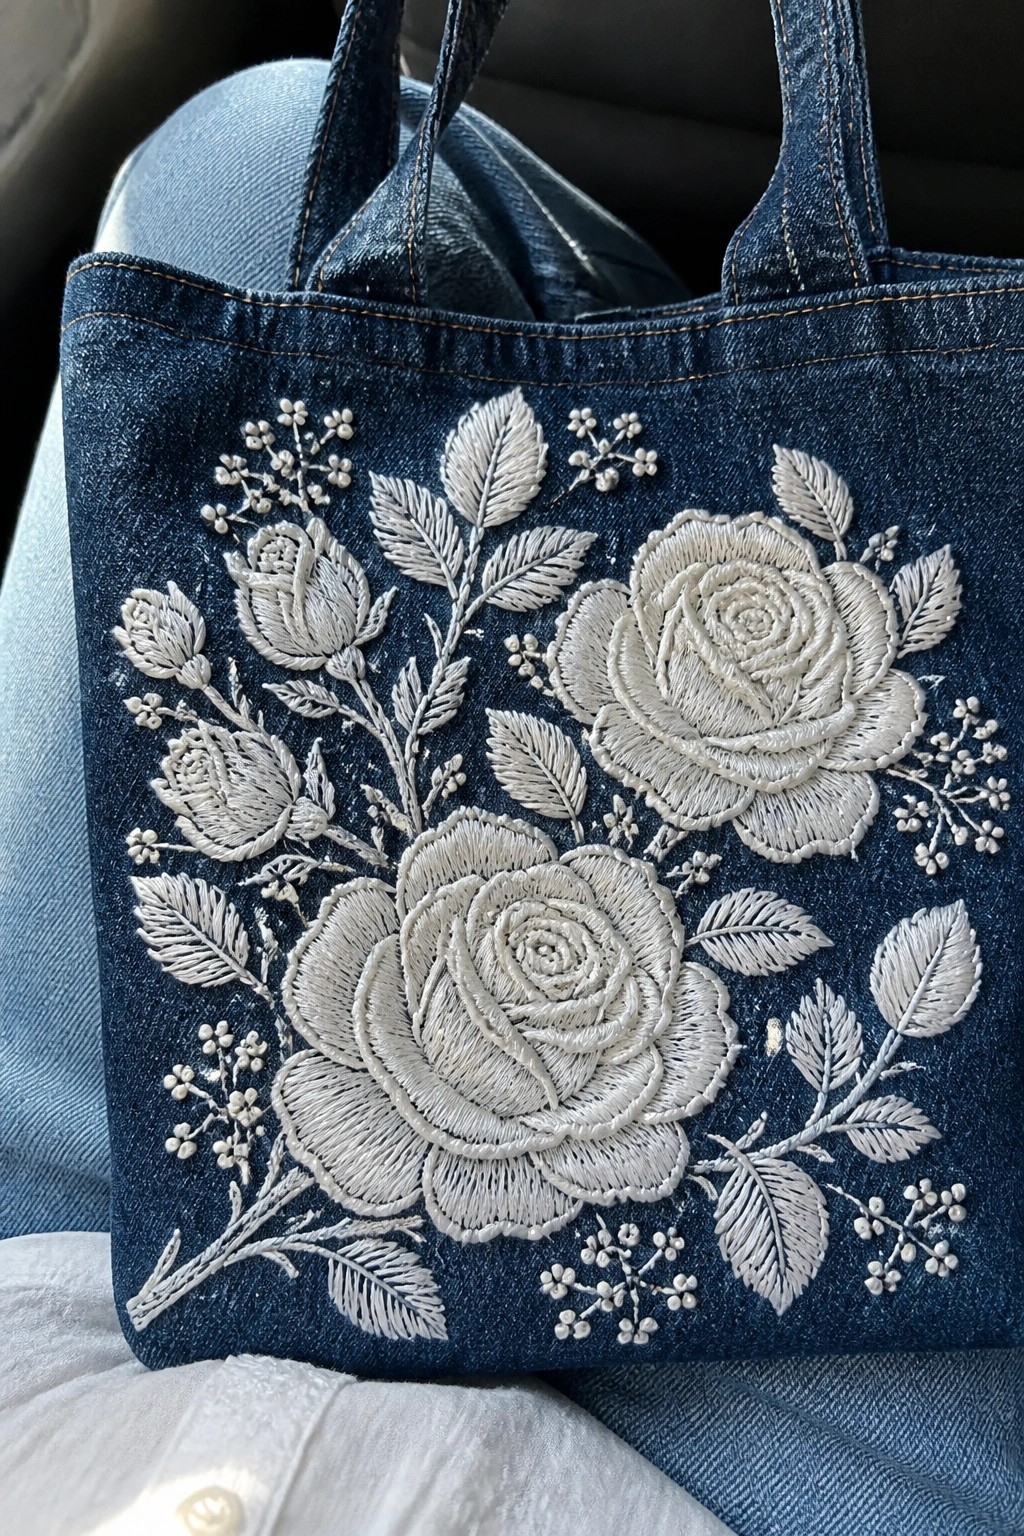
A cluster of large roses worked in white thread sits across the front of a denim tote, surrounded by leaves and small berry-style filler stitches. The design fills the main panel without reaching the edges, leaving enough negative space so the bag still reads as functional. The strong contrast between the light thread and dark denim makes the flowers pop even when the bag is viewed from across a room. This scale works best on roomy totes where the motif can sit flat and stay visible during everyday use.
What makes this idea useful is how the single-color thread keeps stitching time reasonable while still delivering impact. You could drop the same layout onto a smaller crossbody bag by removing one or two roses or move it to the lower corner of a jacket for a subtler version. Switching the thread to navy or black on light denim would flip the contrast and change the overall mood without redrawing the pattern. The compact grouping also saves well as a digital file for anyone who wants to resize it quickly for different bag sizes.
Large Golden Sun Design on a Black Tote

A central sun motif with long metallic gold rays fills the middle of the tote bag. A blue stitched ring frames the sun while red and blue pointed shapes sit around the outside edge to create a balanced circle. The design stays compact enough to remain fully visible when the bag is in use. This approach suits tote bags or similar flat accessories where a single bold motif can stand alone.
What makes this idea useful is the centered placement that works without extra borders or scattered details. You could shrink the whole circle for a smaller bag or swap the red shapes for a different accent color to match new fabric. The gold thread on black fabric creates strong contrast that shows up clearly in photos. This layout also moves easily onto a round pillow cover or jacket back if you want to test it on another item first.
Sunflower Cluster on a Canvas Tote

Three sunflowers grouped together create a clear focal point when placed across the lower half of a tote bag. One larger bloom sits above two smaller ones, with thin stems and scattered leaves filling the spaces between them. The petals use a range of yellow to rust threads that build outward from dark centers, giving the flowers weight without needing extra outlines. This arrangement suits bags because the design stays readable even when the tote is carried or folded.
What makes this idea useful is how the stacked layout leaves the upper section of the bag free for a monogram or small label. You could shrink the whole cluster for a lunch bag or stretch it wider across a market tote by adding one more bloom on the side. Switching the thread colors to cooler tones would change the mood without altering the placement. The design also transfers easily to a jacket back or a zippered pouch if you want the same motif on a different item.
Abstract Brushstroke Streaks on a Tote Bag

An abstract set of overlapping color streaks creates a bold graphic accent on a plain tote bag. Multiple bright threads run in different directions across the fabric to build a loose, energetic shape without any single focal point. A few rows of simple straight stitches in contrasting colors add light texture and help separate the sections. This layout works best on bags or other flat accessories that can handle a larger, freeform design.
The placement does a lot of the work here because the streaks fill the center of the bag and read clearly from a distance. You can shift the same idea onto a smaller scale for a side pocket or change the thread colors to match different seasons. Using fewer colors or tighter spacing would make the result feel more contained while keeping the same loose style. This approach also translates well to other sturdy fabrics like denim or canvas.
Oversized Lightning Bolt with Scattered Stars
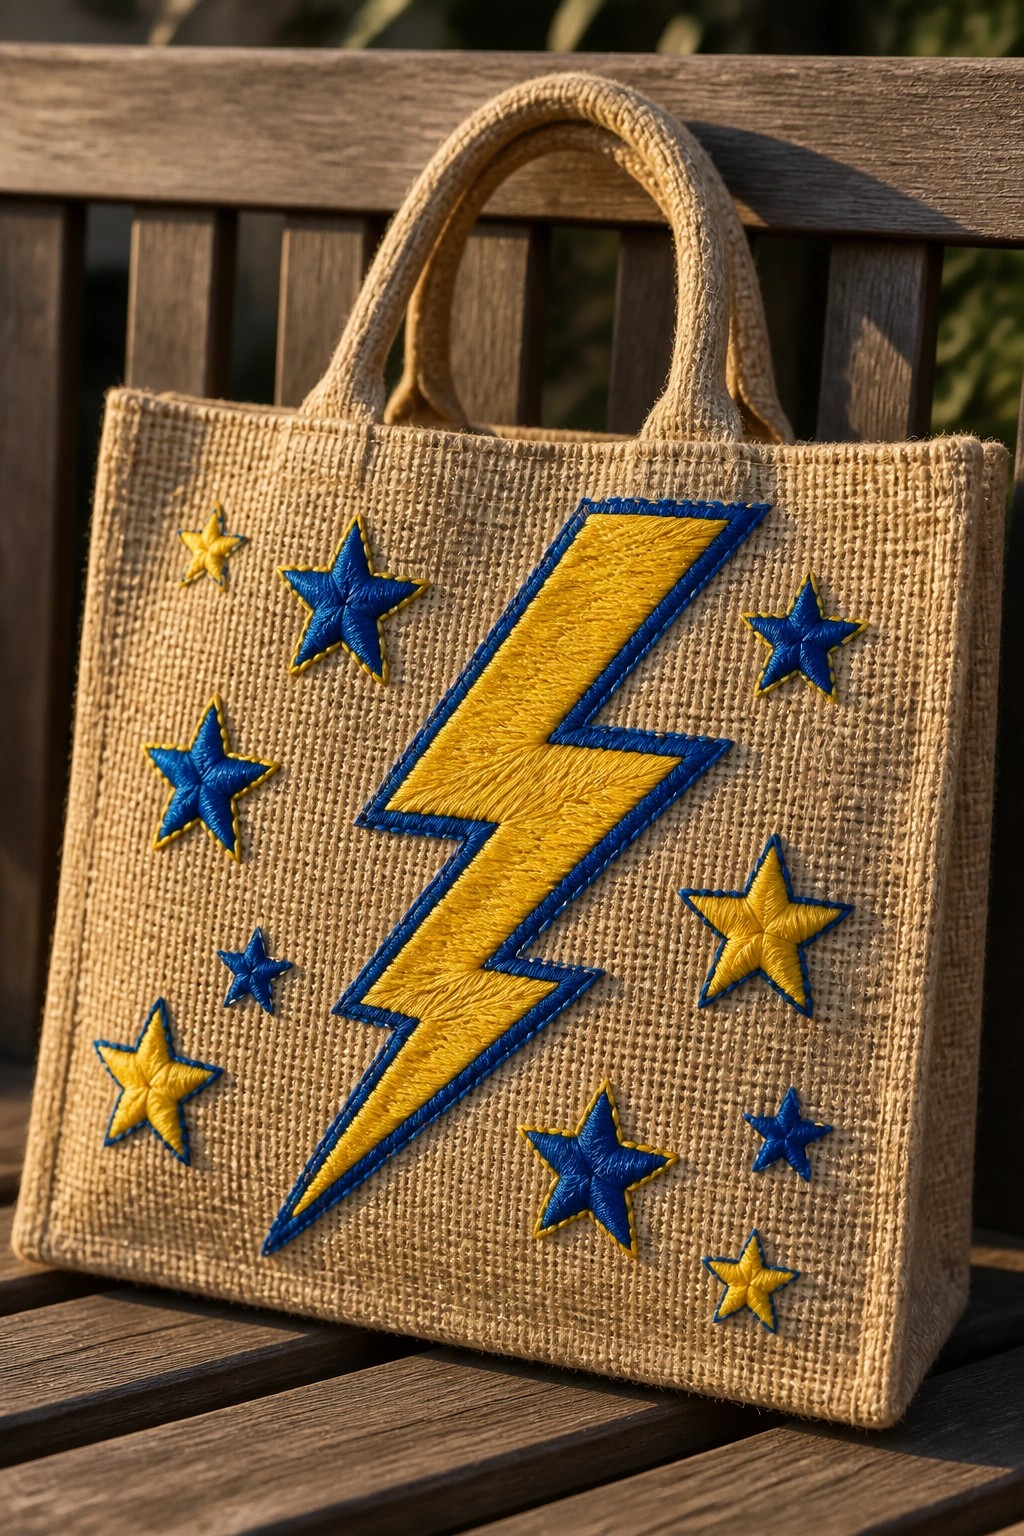
A large lightning bolt worked in yellow thread with a blue outline sits centered on the front of a tote bag, while smaller stars in the same two colors are scattered around it at different angles and distances. The bolt takes up the main visual space so the stars act as supporting accents rather than competing elements. This layout works especially well on flat, sturdy surfaces like tote fronts where the design can be seen from a distance.
What makes this idea useful is the clear size contrast between the main motif and the smaller stars, which keeps the design from looking cluttered. The placement works on canvas or burlap totes and can be scaled down for a smaller pouch or shifted to one side if you want room for a monogram. Changing the bolt to a single color or swapping the star colors for a limited palette makes the same layout feel more minimal without losing impact.
Oversized Parrot Motif on a Denim Tote

A parrot perched on a branch creates a clear focal point when stitched across the front of a denim tote bag. The design takes up most of the visible panel, with the bird’s body and tail filling the space and the branch plus leaves anchoring the bottom edge. Dense stitching in layered greens and blues gives the feathers definition and helps the shape read clearly from a distance. This layout suits tote bags or other flat carry items where the embroidery can stay visible during use.
What makes this idea useful is the way the large scale fills the bag without extra elements around it. You could shrink the same parrot to fit a smaller crossbody bag or swap the branch for a simpler perch if you want less detail. The placement on the main panel keeps the stitching protected from constant friction at the bottom corners. For a different look, reduce the color range to just greens and browns so it blends with lighter denim or canvas.
Geometric Diamonds Down a Tote Strap

A row of repeating diamond and triangle shapes stitched in red and black threads turns the strap into the main feature on an otherwise plain canvas tote. The design runs the full length of the strap with even spacing so the pattern stays visible whether the bag hangs at the side or rests on the shoulder. High contrast between the dark motifs and the light strap keeps the shapes clear without needing extra outline stitches. This approach works well for anyone who wants to add interest to a basic tote while leaving the bag body free for daily use.
What makes this idea useful is that the strap can be finished before it is sewn to the bag, which keeps the embroidery area flat and easy to handle. You can change the thread colors to match other fabrics or repeat just two diamonds instead of the full run for a shorter strap. The bold scale helps the pattern show up in photos, which is why similar strap designs get saved often. Try the same layout on a crossbody bag or a market tote to test how the spacing looks at different widths.
Wave Motif on an Ombre Tote Bag
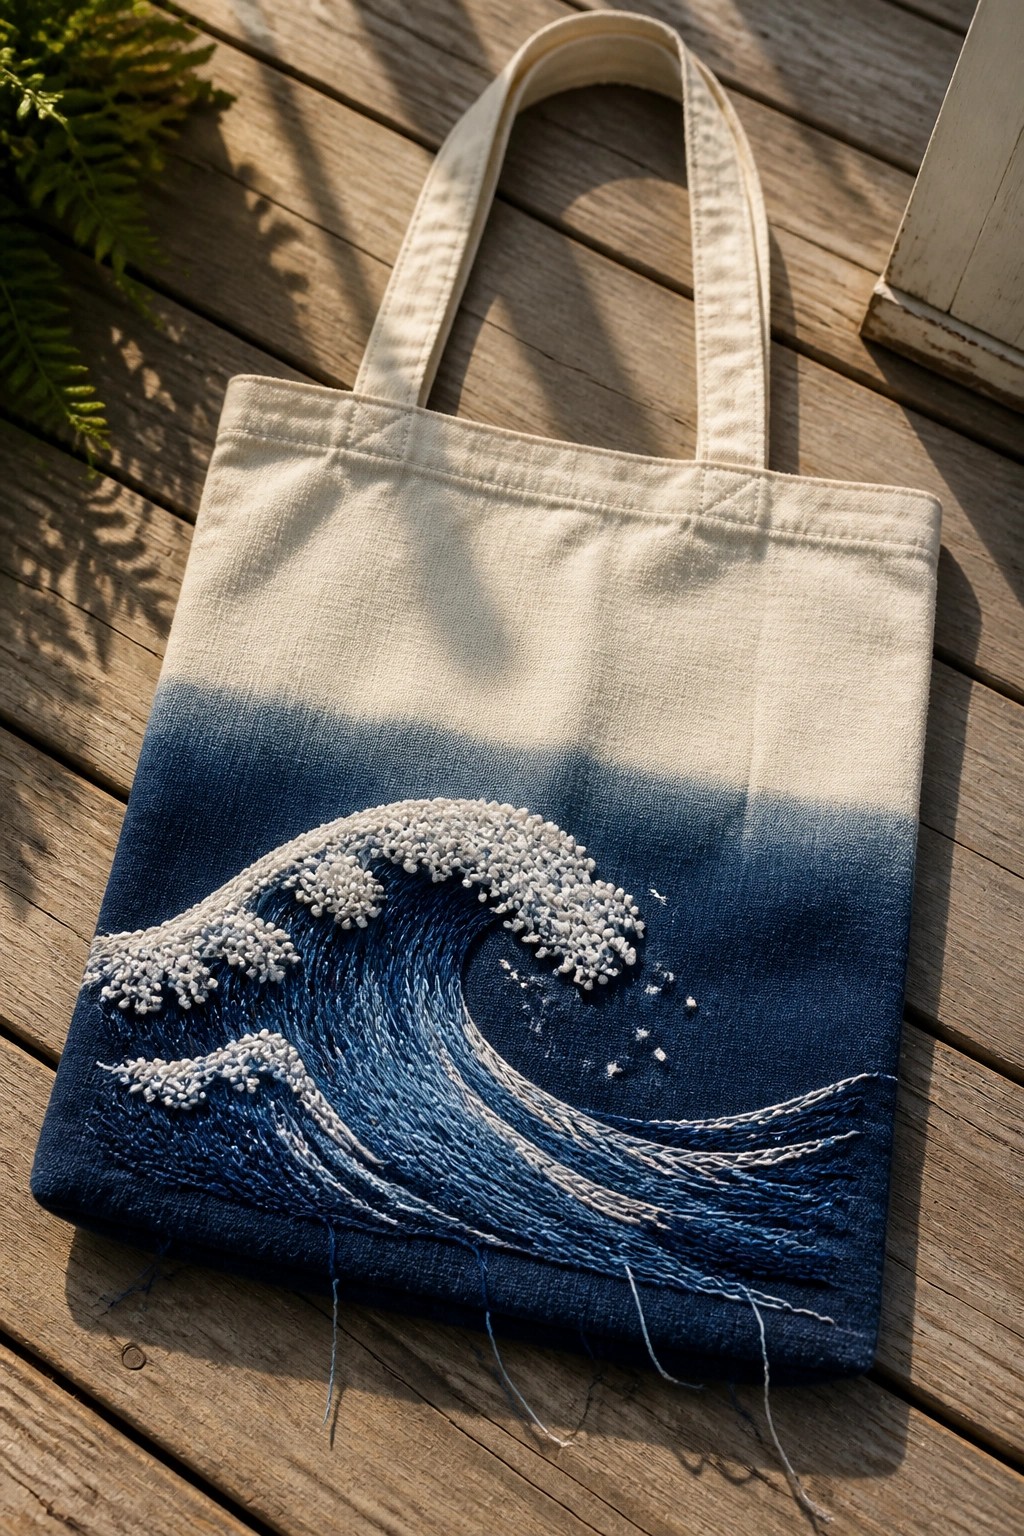
A wave design stitched in layered blue threads across the lower front of a canvas tote follows the fabric’s color gradient from light to dark. The raised stitches sit mainly in the dyed section, so the texture stands out against the smoother cloth above and below. This layout suits tote bags or similar carry items where the design needs to remain visible during regular use without covering the main storage area.
The placement does a lot of the work here because the wave aligns with the natural dye line and keeps the upper half of the bag clean for actual use. You could repeat a smaller version along the side seam of the same tote or move the whole idea onto a denim jacket pocket by adjusting the thread colors to match the garment. Keeping the scale moderate also makes the project faster to finish while still giving enough detail to read from a distance on social media.
Oversized Monstera Leaf on a Canvas Tote
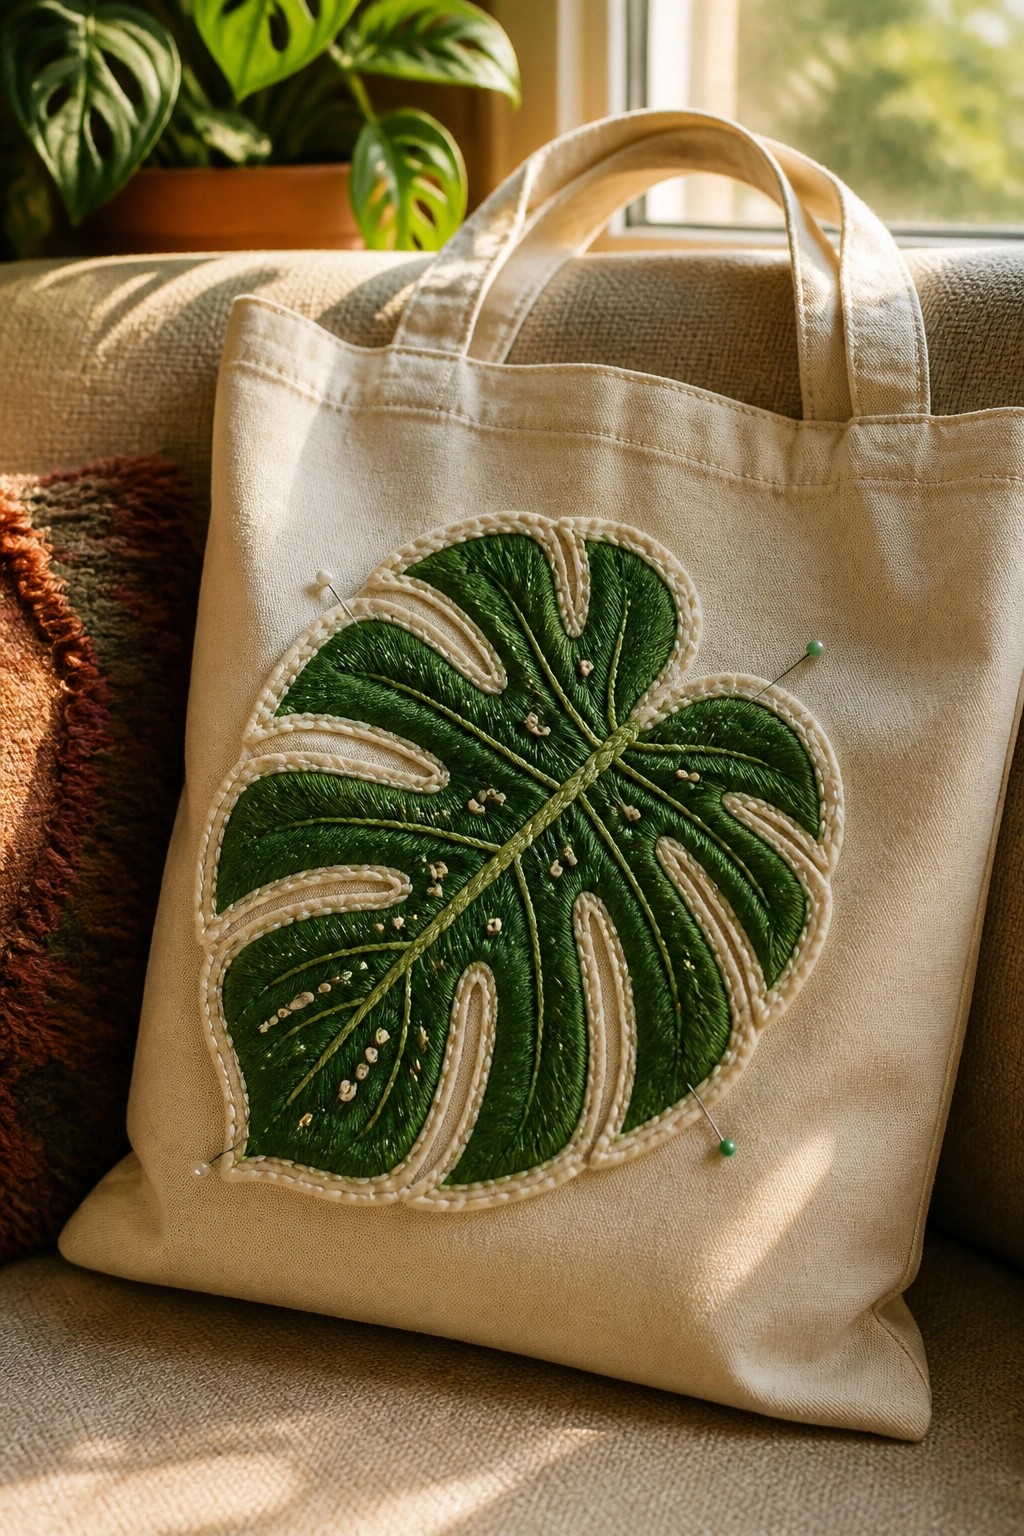
A large monstera leaf placed dead center on a tote bag creates a clear focal point that fills the main panel. Green thread builds up the leaf sections while a lighter outline keeps the shape distinct against the fabric. The scale works because the leaf stays contained within the bag’s width and leaves the handles untouched. This layout fits tote bags or similar flat accessories where one bold motif can carry the whole design.
What makes this idea useful is how the central placement keeps the embroidery visible whether the bag sits open or closed. You could shrink the leaf for a smaller pouch or change the green tones to suit a darker fabric. The approach also works on a jacket back or a makeup bag if you keep the proportions similar to the surface size. A single motif this size stands out in photos because it reads clearly from a distance without extra details.
Mixed Cactus Shapes Across a Tote Front
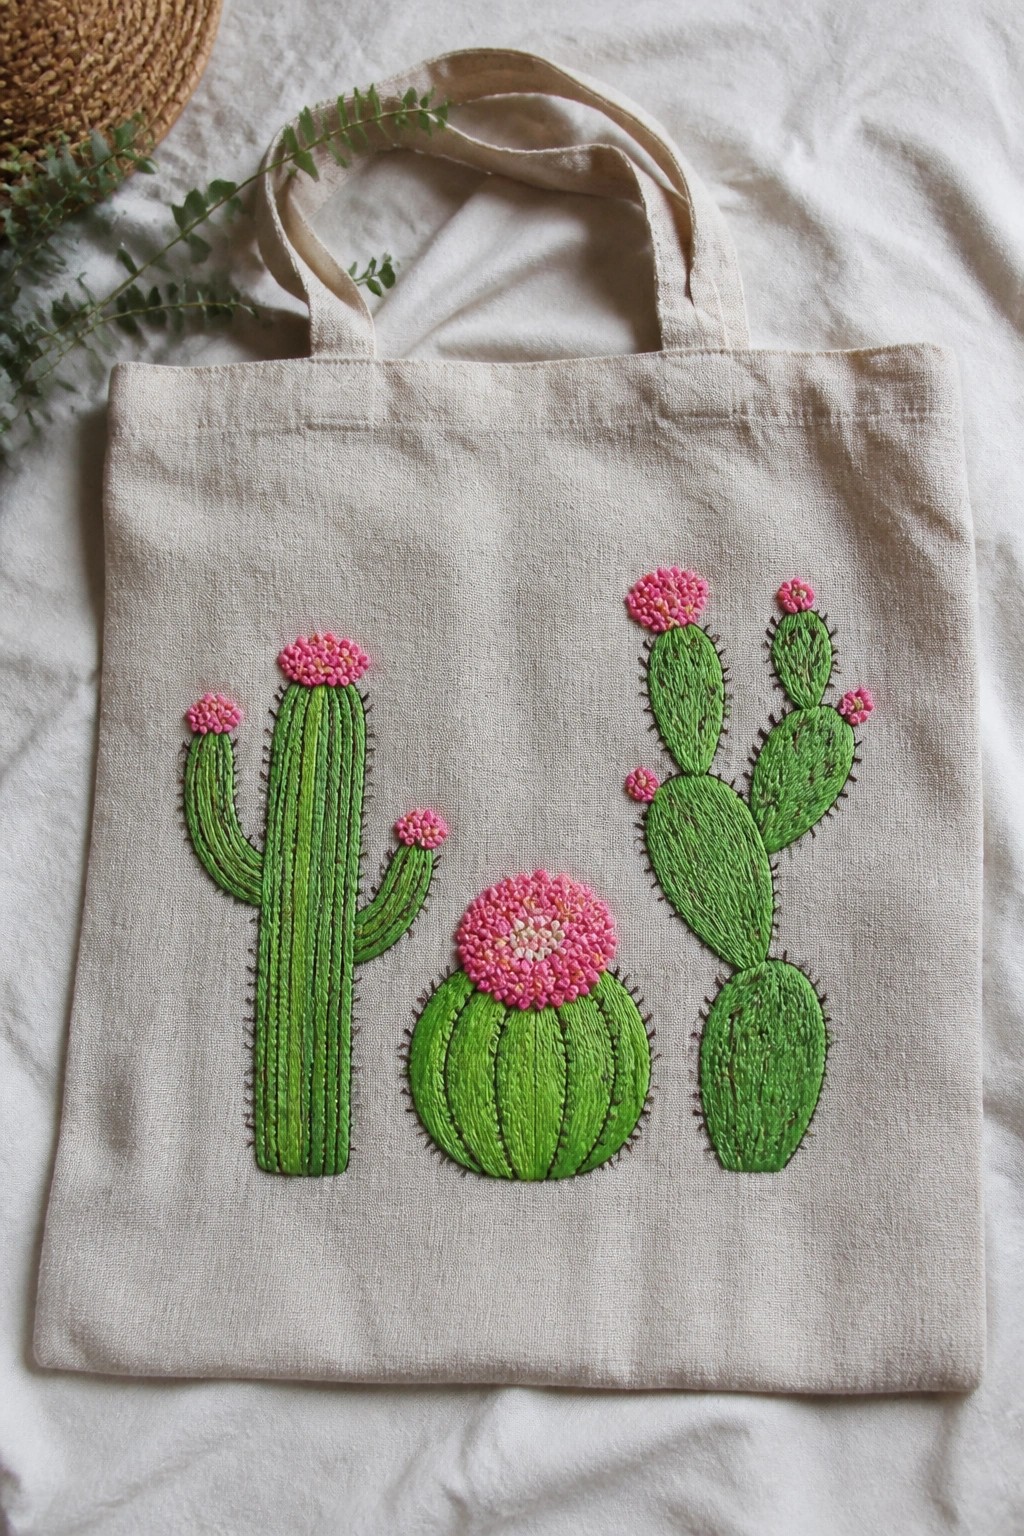
Embroider a row of three different cactus forms on the front of a plain canvas tote using green thread for the pads and stems plus pink for the flowers. The left cactus stands tall and narrow, the center one sits low and round, and the right one spreads with multiple lobes. The varied heights and widths keep the design from looking repetitive while still reading clearly from a distance. This layout suits tote bags or similar flat accessories where the fabric stays mostly visible during use.
What makes this idea useful is how simple it is to drop or add one cactus if the bag size changes. You could move the whole group lower for a shorter tote or repeat just the round shape in a smaller scale on a zip pouch. Switching the pink flowers to another color or spacing the cacti farther apart would shift the look without new stitches. Designs with clear, separate motifs like these tend to photograph well and get saved for later use.
Abstract Face Built from Large Color Blocks
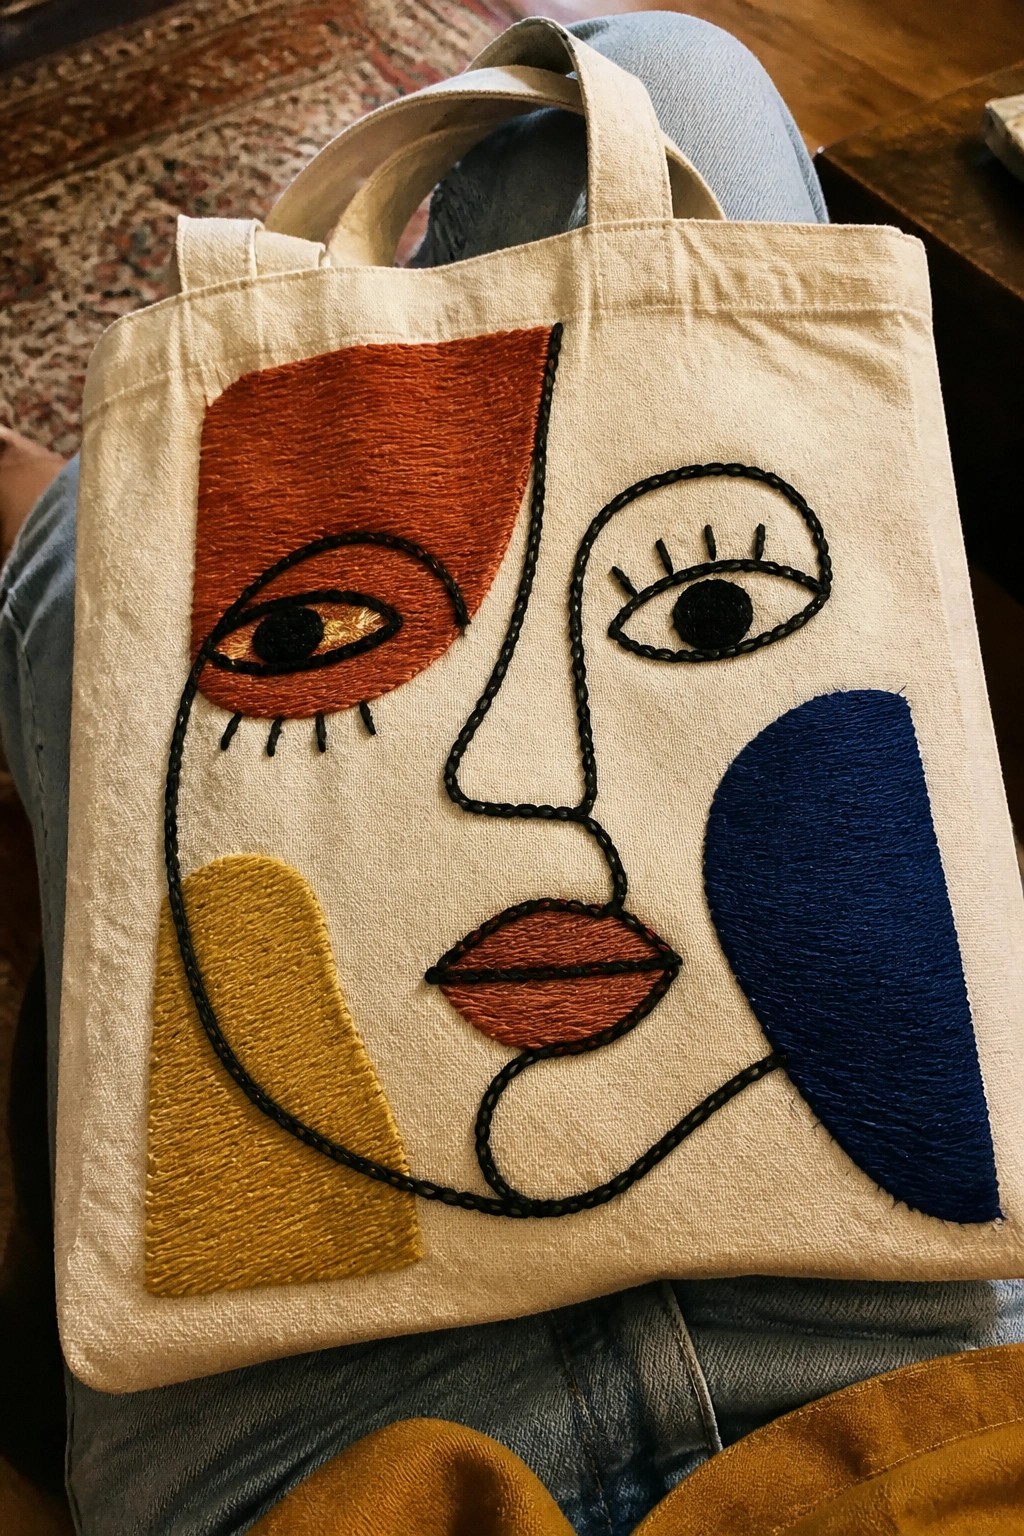
An abstract face design divides the features into large flat sections of solid color filled with thread, then outlined in black. The embroidery sits centered on the tote bag front, using blocks of orange, yellow, and blue to shape the forehead area, lower face, and side panel. Black lines pull the sections together to form the nose, eyes, and mouth while keeping the overall look graphic and simple. This approach works especially well on tote bags or other flat fabric items where the bold shapes stay visible during use.
What makes this idea useful is how the large filled areas let you cover space without dense stitching. The centered placement on a tote keeps the design prominent without crowding the handles or base. You could shift the same layout onto a jacket back or a cushion by scaling the whole face up or down. Swapping the orange and blue for other strong contrasts would change the look while keeping the same clean structure.
Checkered Patch With Two Pink Hearts
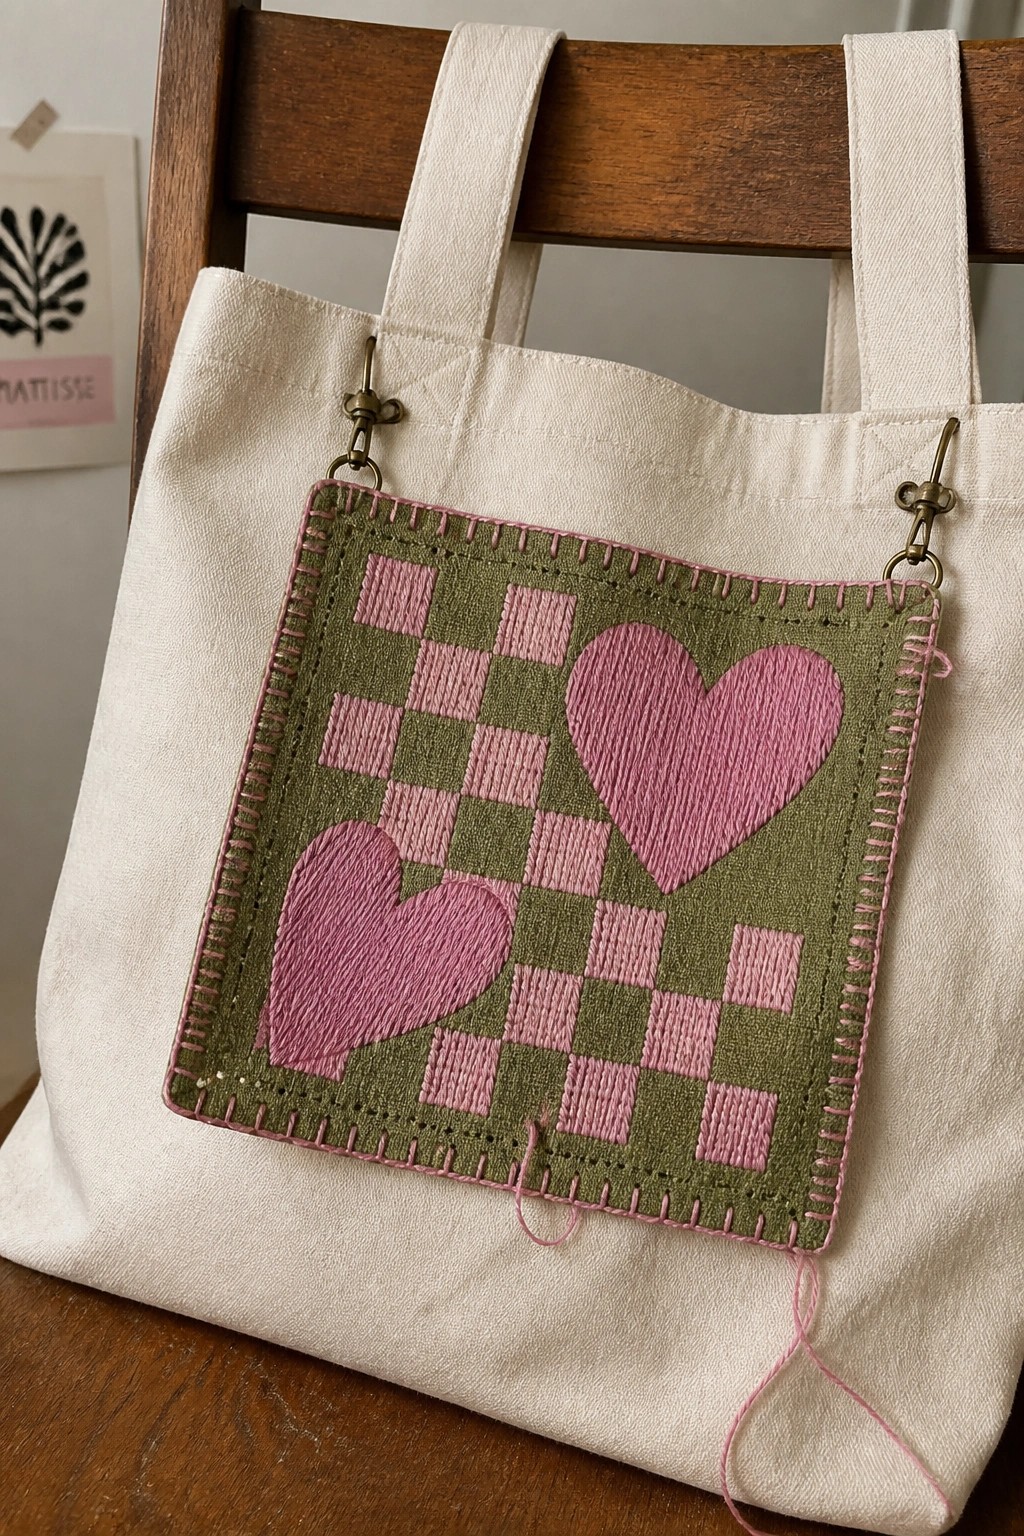
A green square filled with pink checkered blocks holds two hearts in different sizes on this tote bag. The patch sits on the front and fastens with metal clips at the top corners so it can be removed. The grid pattern gives the hearts clear edges to sit against while the pink border keeps the whole piece contained. This layout suits anyone making quick add-ons for bags or jackets instead of stitching directly onto the main fabric.
What makes this idea useful is the hardware attachment. You can finish the embroidery on a separate piece of fabric then move it between bags without redoing the work. Shrinking the checkers by half turns the same idea into a pocket accent or a coin purse cover. Swapping the green for navy or black keeps the pink hearts visible on darker totes.
Oversized Cherries for Canvas Totes

A pair of large filled cherries makes a strong focal point when placed low on the front of a tote bag. The red fruit shapes use dense stitching to create solid color blocks while the green stems add simple lines that connect the two cherries without crowding the space. White dots on each cherry provide quick contrast that keeps the design from looking flat. This approach suits market bags or everyday carryalls where the motif needs to stay visible during use.
What makes this idea useful is how the compact fruit layout fits neatly on the lower half of most tote panels. You can scale the cherries down for a smaller crossbody bag or stretch the stems longer to reach higher up the fabric. Swapping the red thread for a softer pink changes the look toward a lighter summer bag while keeping the same placement. The design translates well to other accessories like zip pouches because the shapes stay readable even when reduced in size.
Constellation Pocket on a Canvas Tote

A crescent moon with stars linked into a loose constellation pattern fits neatly on the front pocket of a canvas tote. The gold thread creates clear contrast against the light fabric while staying small enough to sit entirely within the pocket borders. This keeps the design visible whether the bag is open or folded over. The placement works especially well on totes meant for daily use like grocery runs or library trips.
The placement does a lot of the work here by giving the embroidery a ready-made frame that highlights the stitching. You could move the same motif to a smaller scale on a zip pouch or repeat just the moon and a few stars across multiple pockets. Swapping the gold for a darker thread color would make the design read more subtly on a dyed bag. This kind of contained layout photographs cleanly for sharing and finishes fast enough to complete in an evening.
Large Phoenix Wing on a Tote Bag
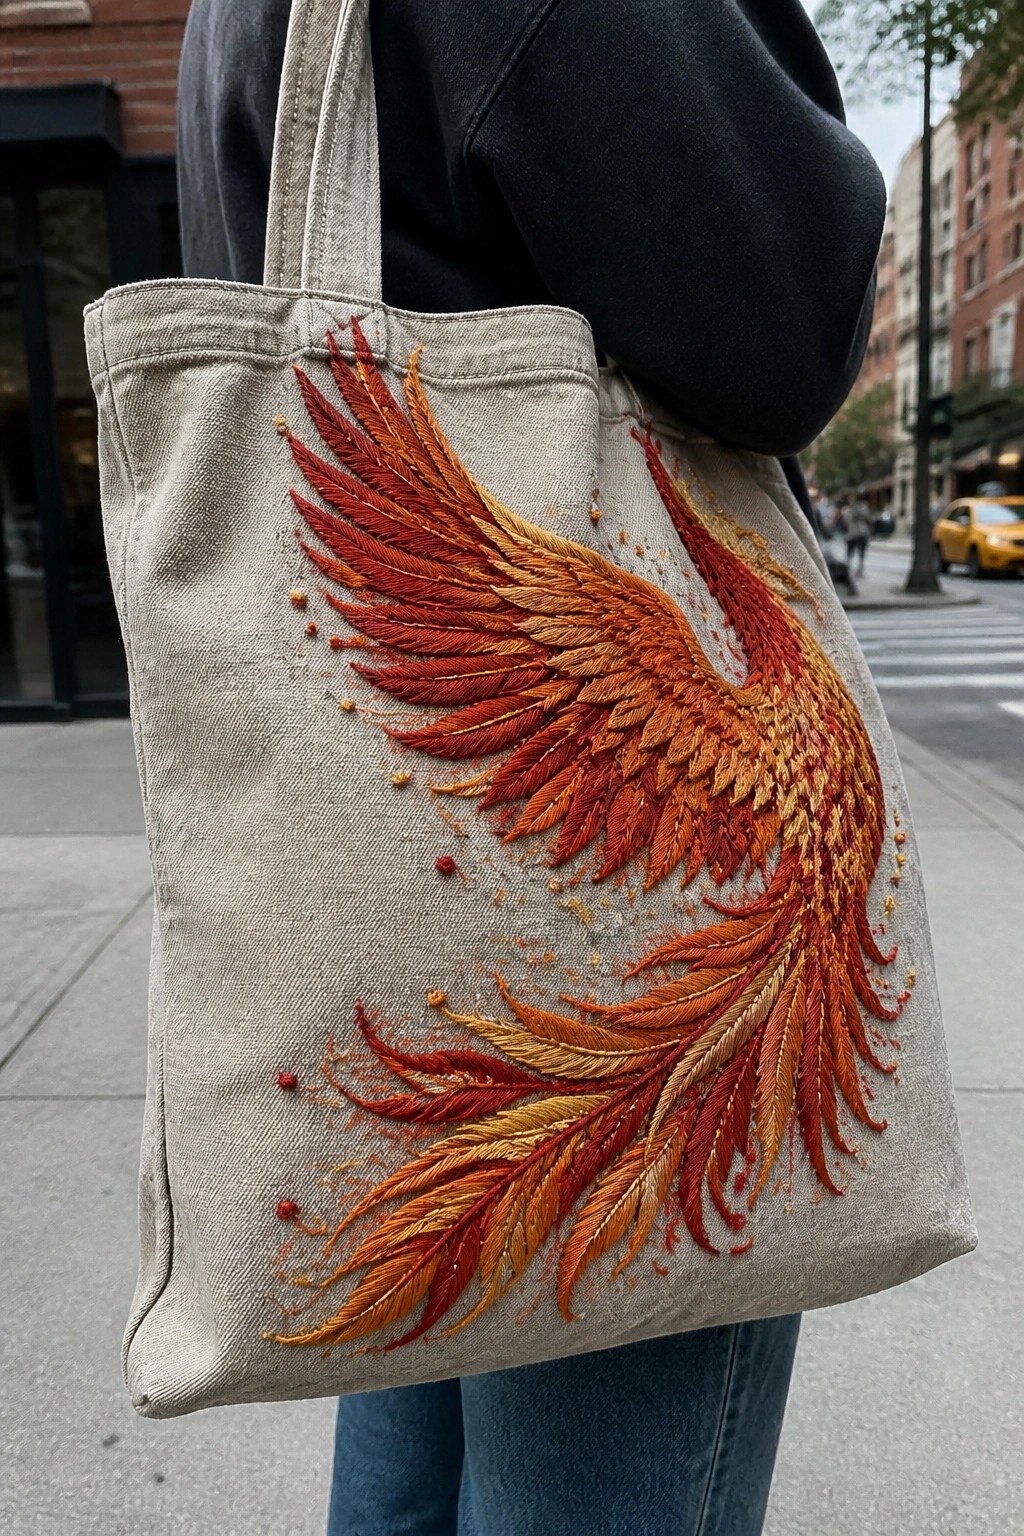
A phoenix wing motif placed across the front of a tote bag creates a strong focal point without extra elements. The design uses a color shift from red at the edges into orange and gold near the center to build depth in the feathers. Stitching follows the natural direction of each feather section so the wing appears to lift off the fabric. This layout fits tote bags and other carry items that benefit from a single bold image rather than scattered details.
What makes this idea useful is how the wing shape covers area efficiently while leaving room for the bag to function normally. You could shrink the same motif to fit a smaller pouch or change the thread colors to cooler tones for a different season. The side placement keeps the design visible when the bag is carried or set down. A design like this stands out in searches because the gradient and scale read clearly even in small preview images.
Central Mandala Embroidery on a Tote Bag
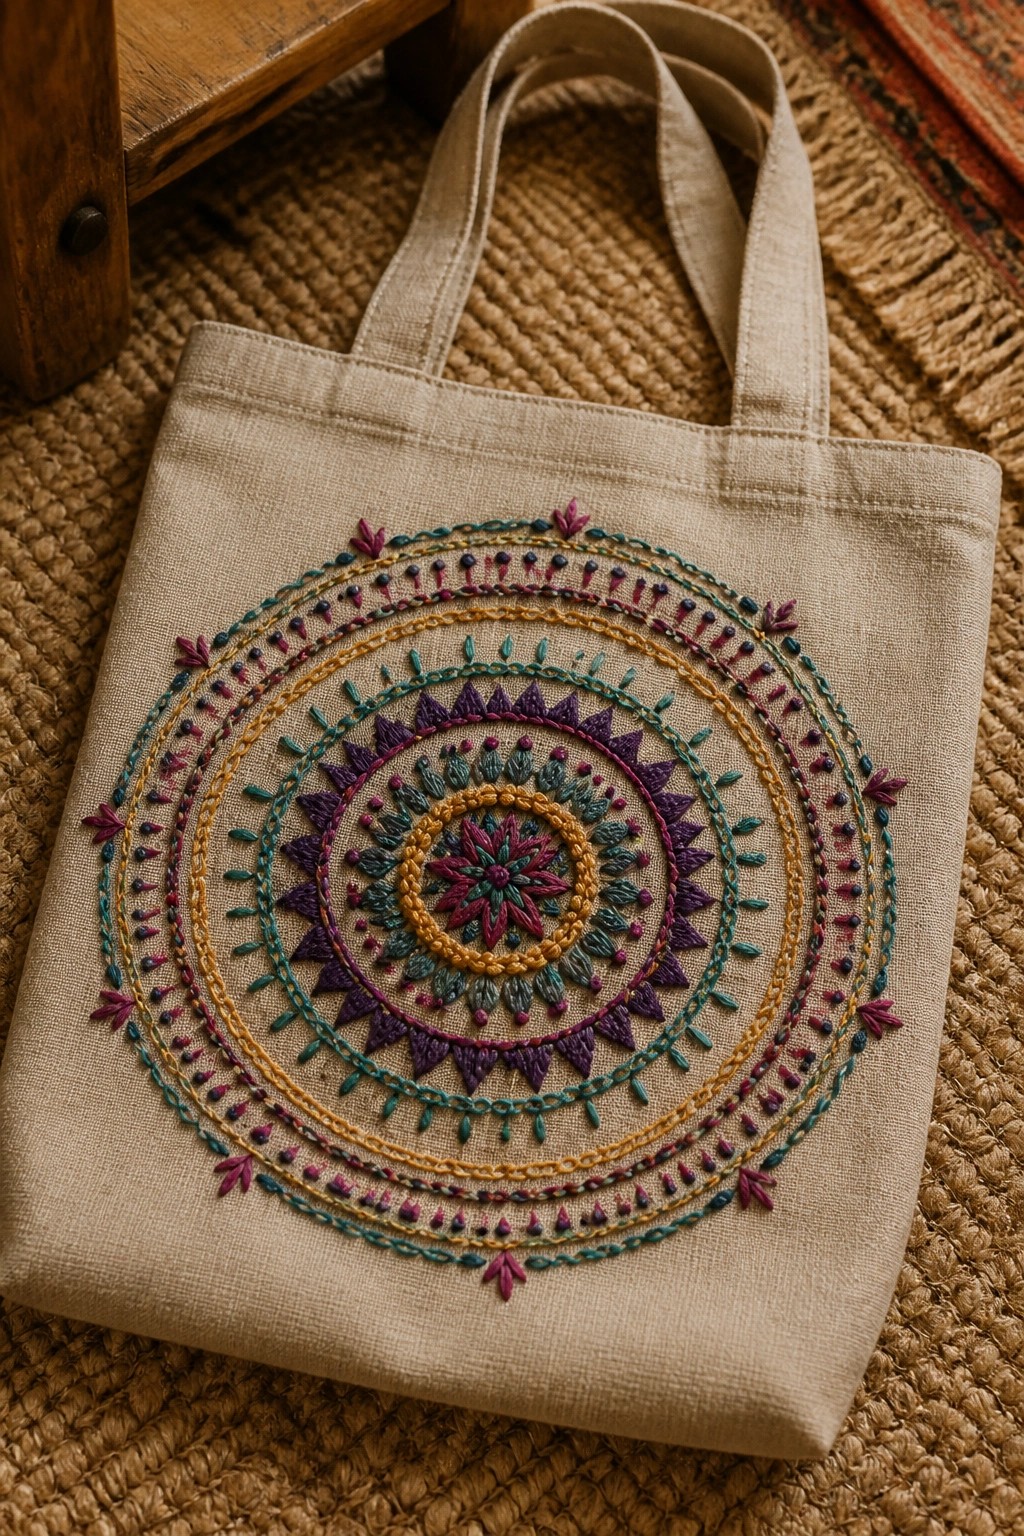
A circular mandala design works well when placed dead center on a plain tote bag. The pattern uses a small flower at the middle, then builds outward through several rings of repeating shapes and lines that gradually widen. This layout keeps the embroidery balanced on the flat fabric surface without needing extra borders or corners. It suits tote bags or similar carry items where the design stays visible when the bag is in use.
What makes this idea useful is how the rings let you adjust scale easily by dropping or adding layers. The same motif could shift to a smaller version for a pouch or pencil case if the outer rings get removed. Color changes between the rings help the pattern stay readable from a distance, which works better on bags than on clothing where movement might blur the details. On Pinterest this kind of centered layout shows up clearly in search results because the symmetry reads well even in a thumbnail.
Scattered Fruit Mix Across a Tote Bag
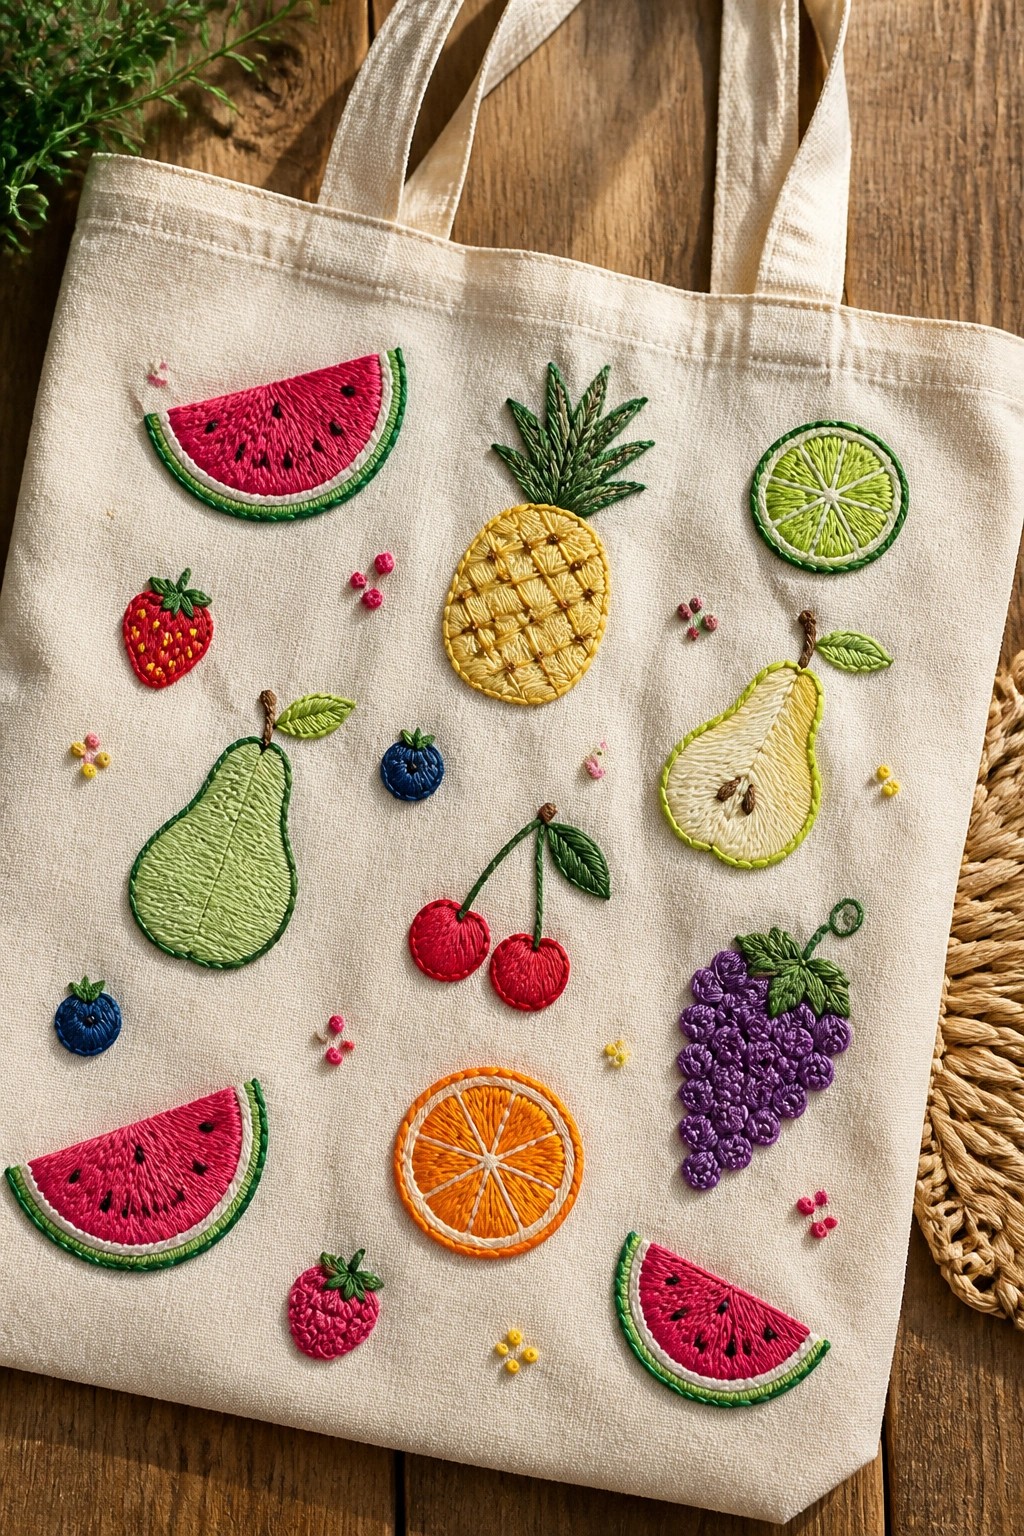
A collection of whole and sliced fruits scattered over the front of a tote bag forms the main design. The pieces sit at different angles and sizes, with larger items like the pineapple and pear balanced by smaller ones such as blueberries and strawberries. Bright thread colors stand out on the pale fabric, and tiny filler stitches fill gaps between the fruits so the layout feels full without crowding. This style suits tote bags or similar carry items that benefit from a casual, all-over pattern rather than a centered motif.
What makes this idea useful is how the random placement lets you add or remove fruits without reworking the whole design. You could shift the same fruits onto a smaller pouch or apron pocket by dropping a few pieces and tightening the spacing. Changing thread colors to match a favorite fruit or season keeps the look fresh while the varied shapes prevent the pattern from feeling repetitive. The approach also photographs clearly for sharing, since the mix of colors and sizes gives multiple angles to capture.
Gradient Mountain Layers on a Tote Bag

A row of overlapping mountain peaks in shifting earth tones and blues covers the front of a dark tote bag. The design places the tallest peaks near the top and steps the lower ones downward, using color changes to separate each ridge. This layout fills the rectangular space evenly and keeps the pattern bold enough to read from a distance. The approach fits tote bags or similar flat accessories where a wide, horizontal motif can sit without competing with handles or seams.
What makes this idea useful is how the stepped shape lets you adjust width or height by dropping or adding peaks. Swap the warm oranges for cooler grays to match a different bag color or season. The same layout works on a smaller scale for a zipper pouch or stretched across the bottom of a larger market tote. Dark fabric underneath makes the thread colors pop, which helps the finished piece stand out when shared online.
Wildflower Border on a Tote Bag
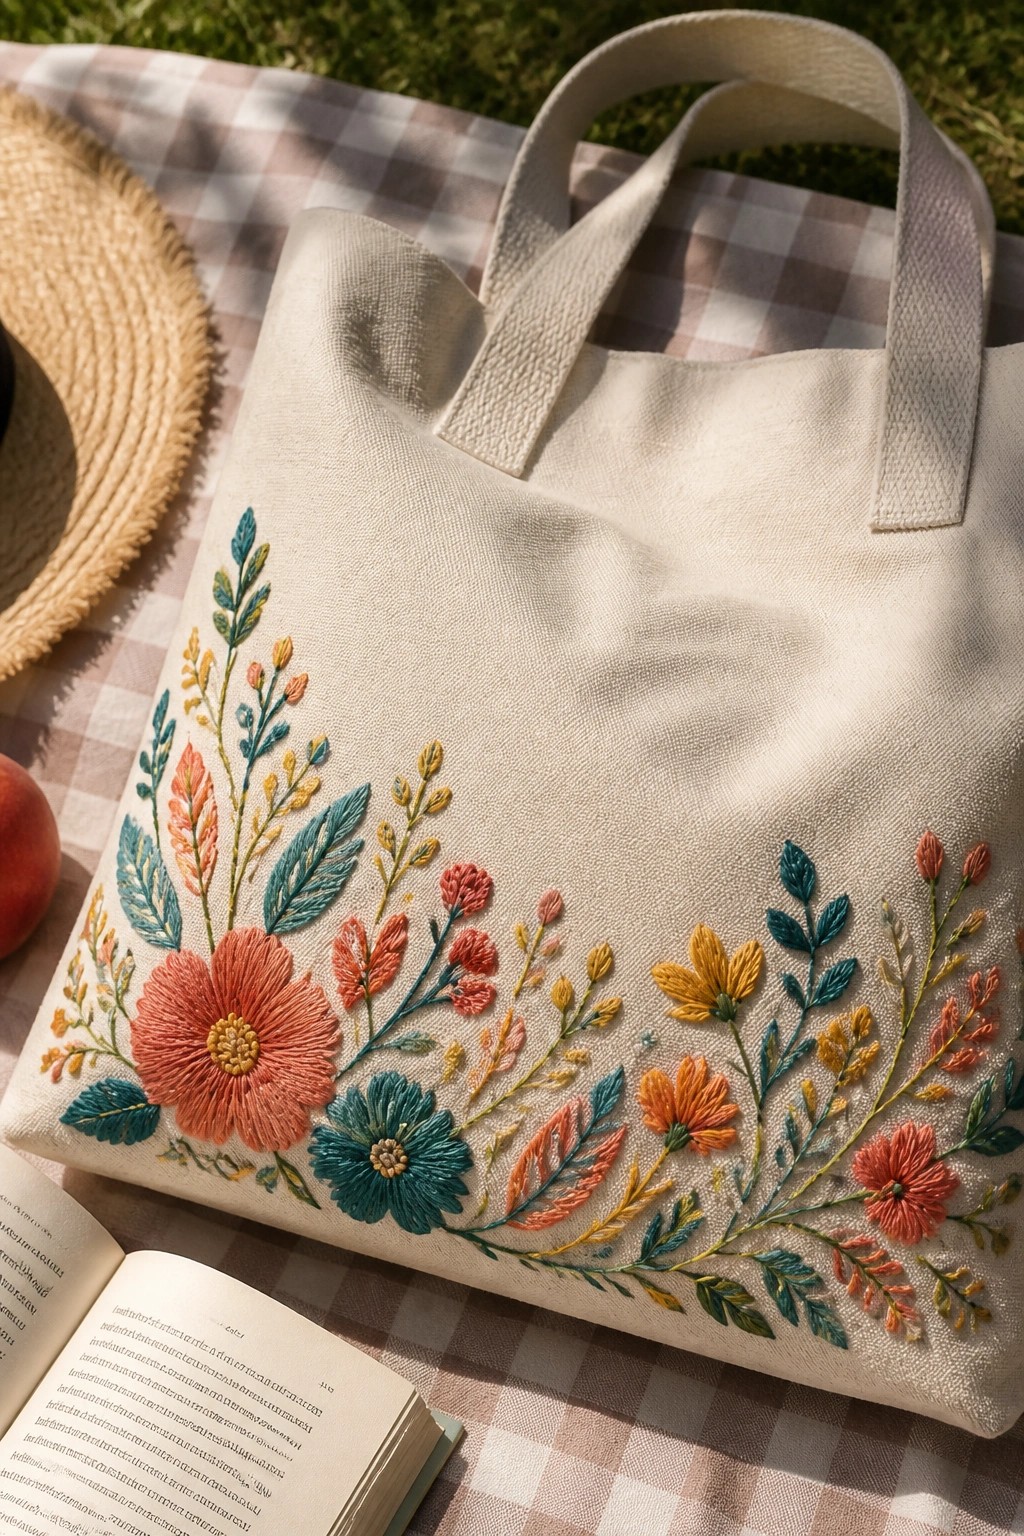
A row of mixed flowers and leaves forms a loose border along the lower portion of a tote bag. The design uses several flower shapes in varying sizes, arranged in a single flowing line that curves slightly with the bag’s shape. This placement adds color and detail without covering the main surface, so the bag stays practical for carrying things. The idea suits canvas totes or similar fabric bags that get regular use.
What makes this idea useful is how the border format keeps the stitching contained to one area, which shortens the overall project time. You could shrink the same row to fit the front of a smaller pouch or repeat it on both sides for balance. Switching the colors to a tighter palette would let the layout work on different bag fabrics without looking busy. The spacing between blooms also makes it simple to add or remove elements if the bag size changes.
Vertical Geometric Band on Canvas

A repeating sequence of black and gold diamonds and triangles fills a narrow vertical strip along the side of the tote. The design sits between two lines of black edge stitching that frame the pattern and keep the edges neat. High contrast between the threads and the light canvas makes the shapes stand out clearly even from a short distance. This layout suits tote bags or similar flat fabric items where a single strong line of pattern can run the full height without crowding the main surface.
The placement leaves the front and back open for other uses while still giving the bag a finished look. You could shrink the same repeat to fit a smaller pouch or stretch it across the bottom edge instead. Swapping the gold for a bright teal or keeping both colors but using a darker base fabric would change the overall weight of the design without altering the layout. The narrow width makes it simple to test on scrap fabric first before committing to the full bag.
Oversized Floral Bouquet on a Canvas Tote

A dense cluster of flowers in shades of magenta, rust, purple, and teal sits across the front of an olive tote bag. The design combines several large blooms with smaller filler flowers and scattered leaves to fill the space without looking sparse. This placement keeps the embroidery visible whether the bag hangs from a shoulder or rests on a surface.
What makes this idea useful is how the central grouping draws the eye without needing extra borders or text. You could shrink the whole cluster to one side of the bag or repeat a smaller version near the bottom corner for a different look. Changing the thread colors to cooler tones would shift it toward a calmer result while keeping the same layout. A design like this works especially well on plain totes that get daily use since the scale holds up after washing.
Frequently Asked Questions
What supplies do I need to start creating bold embroidery on a tote bag? Gather embroidery floss in vibrant colors for contrast, a sharp needle suitable for your fabric, an embroidery hoop to keep tension even, a water soluble fabric marker for tracing designs, and a stabilizer if your tote material is thin. These basics allow you to execute large motifs like oversized flowers or graphic letters that turn an ordinary bag into a standout accessory.
How do I transfer bold designs onto my tote bag without mistakes? Print or draw your chosen pattern on paper first then use a light box or carbon transfer paper to trace it directly onto the tote fabric. For dark colored bags opt for a white gel pen or chalk to mark outlines clearly. This method ensures precise placement of statement elements such as abstract shapes or quotes so the final embroidery looks intentional and eye catching.
Which stitches help achieve a bold statement look on tote bags? Satin stitch fills large areas with smooth color blocks while backstitch outlines create strong defined edges. Incorporate French knots or chain stitch for added texture in elements like eyes or patterns. These techniques make designs pop from a distance and withstand daily use better than delicate fills.
Should I embroider before or after assembling the tote bag? Embroider flat fabric panels before sewing the bag together whenever possible. This approach gives you full access to the surface without fighting seams or handles and reduces the risk of distorting finished stitches. If your bag is already made work in small sections with a hoop that fits around existing features.
How do I wash and maintain an embroidered tote bag? Turn the bag inside out and hand wash in cold water with mild detergent to protect the threads. Avoid machine drying since heat can shrink stitches instead lay it flat to air dry. Spot clean as needed with a gentle brush and store away from direct sunlight to keep colors bold over time.