
I like to keep a few embroidery projects ready for weekends when I have some free time.
These ideas are all simple ones that can be finished without spending the whole day on them.
I chose patterns that use basic stitches and don’t need much in the way of supplies.
Some of them are things I have tried myself and found easy to pick up again after a break.
They work well if you just want a small project to focus on for a bit.
Sunflower Hoop Embroidery

A sunflower motif sits centered on fabric held in a small hoop, built from short straight stitches that form overlapping petals in shifting yellows and golds around a dense brown center. The petals start wider at the outer edge and narrow toward the middle, which keeps the shape compact and readable from a distance. This layout uses only a handful of thread colors and fits neatly inside a standard hoop without extra borders or filler. The finished piece works as a quick hoop display or can be cut out later as a patch for bags or clothing.
What makes this idea useful is how the round shape and color steps let you finish the whole design in one or two sessions. You can swap the yellow range for other tones to match different seasons or rooms, or shrink the motif by half to place it on a jacket pocket or hat. The centered placement on plain fabric also means it photographs cleanly for sharing, which helps it stand out in project roundups. If you want more variety, repeat the same flower at different sizes across a larger panel instead of adding extra elements.
Whale Embroidery on a Jeans Pocket
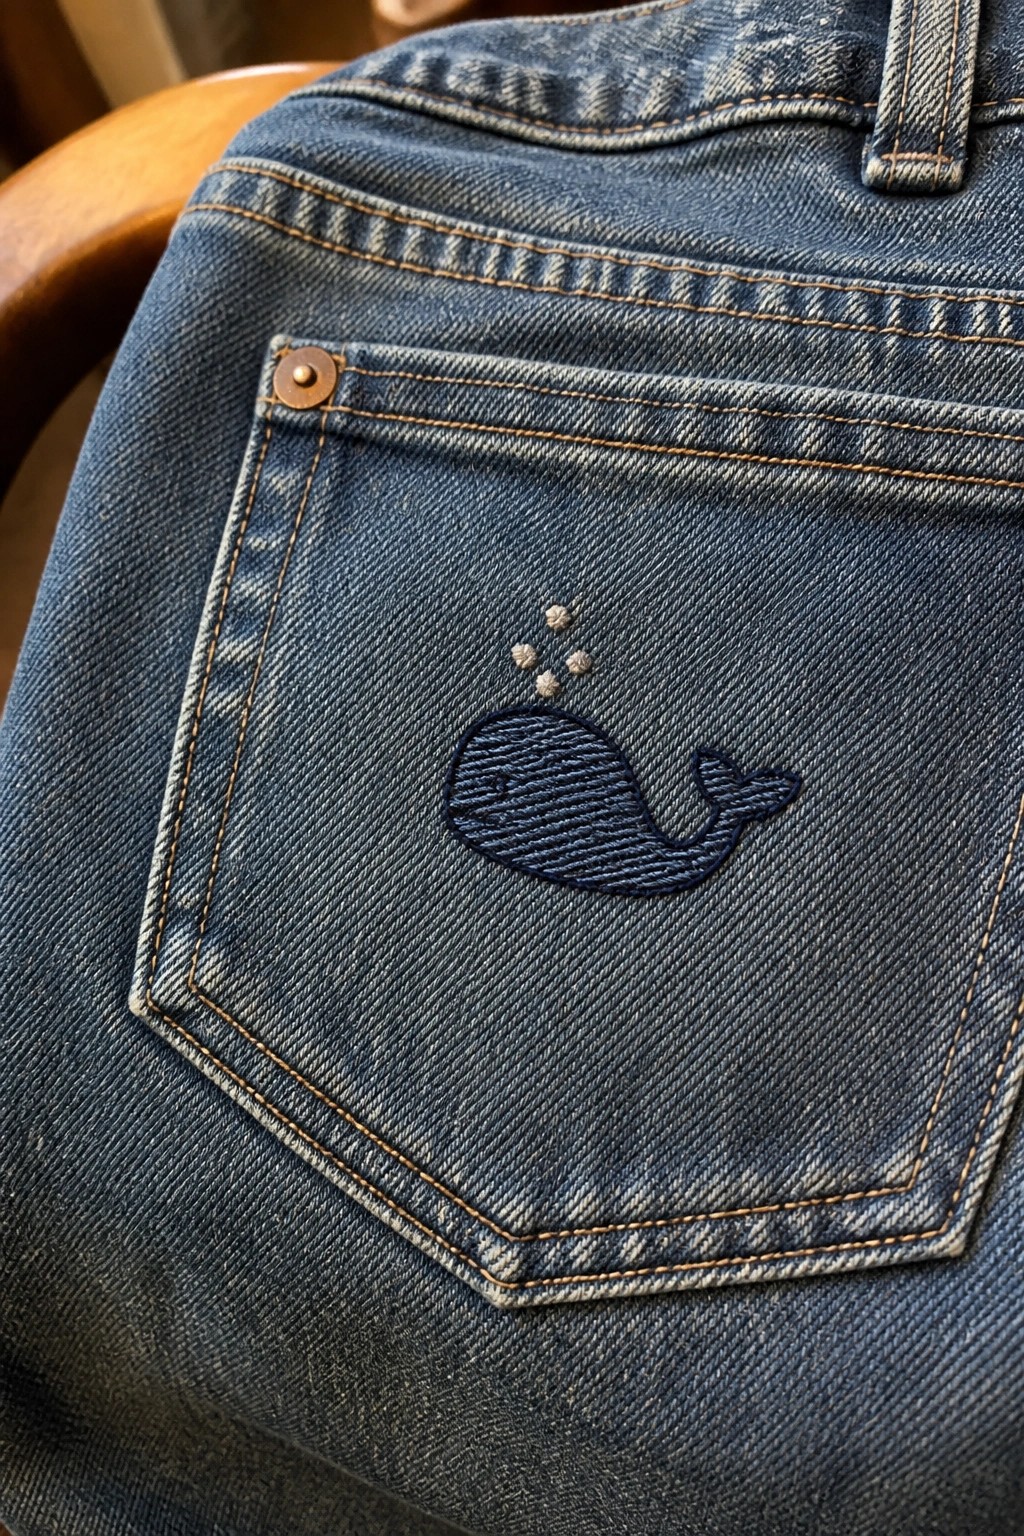
A small whale silhouette with a few bubbles works as a single motif on the back pocket of jeans. The design uses dark thread against the denim to create clear contrast without needing dense stitching or extra colors. Placing it slightly off-center on the pocket keeps the shape easy to see while it stays contained within the existing fabric area. This approach suits quick clothing updates like personalizing pants or jackets that already have pockets.
The placement does a lot of the work here because the pocket shape already frames the design. You can shift the same whale to a shirt cuff or tote bag corner by reducing the scale and skipping the bubbles. Changing the thread color to match or contrast with different denim washes gives quick variety without redrawing the motif. A design like this works especially well on Pinterest because the pocket location makes the finished result look intentional rather than added on.
Wildflower Bouquet on a Canvas Tote
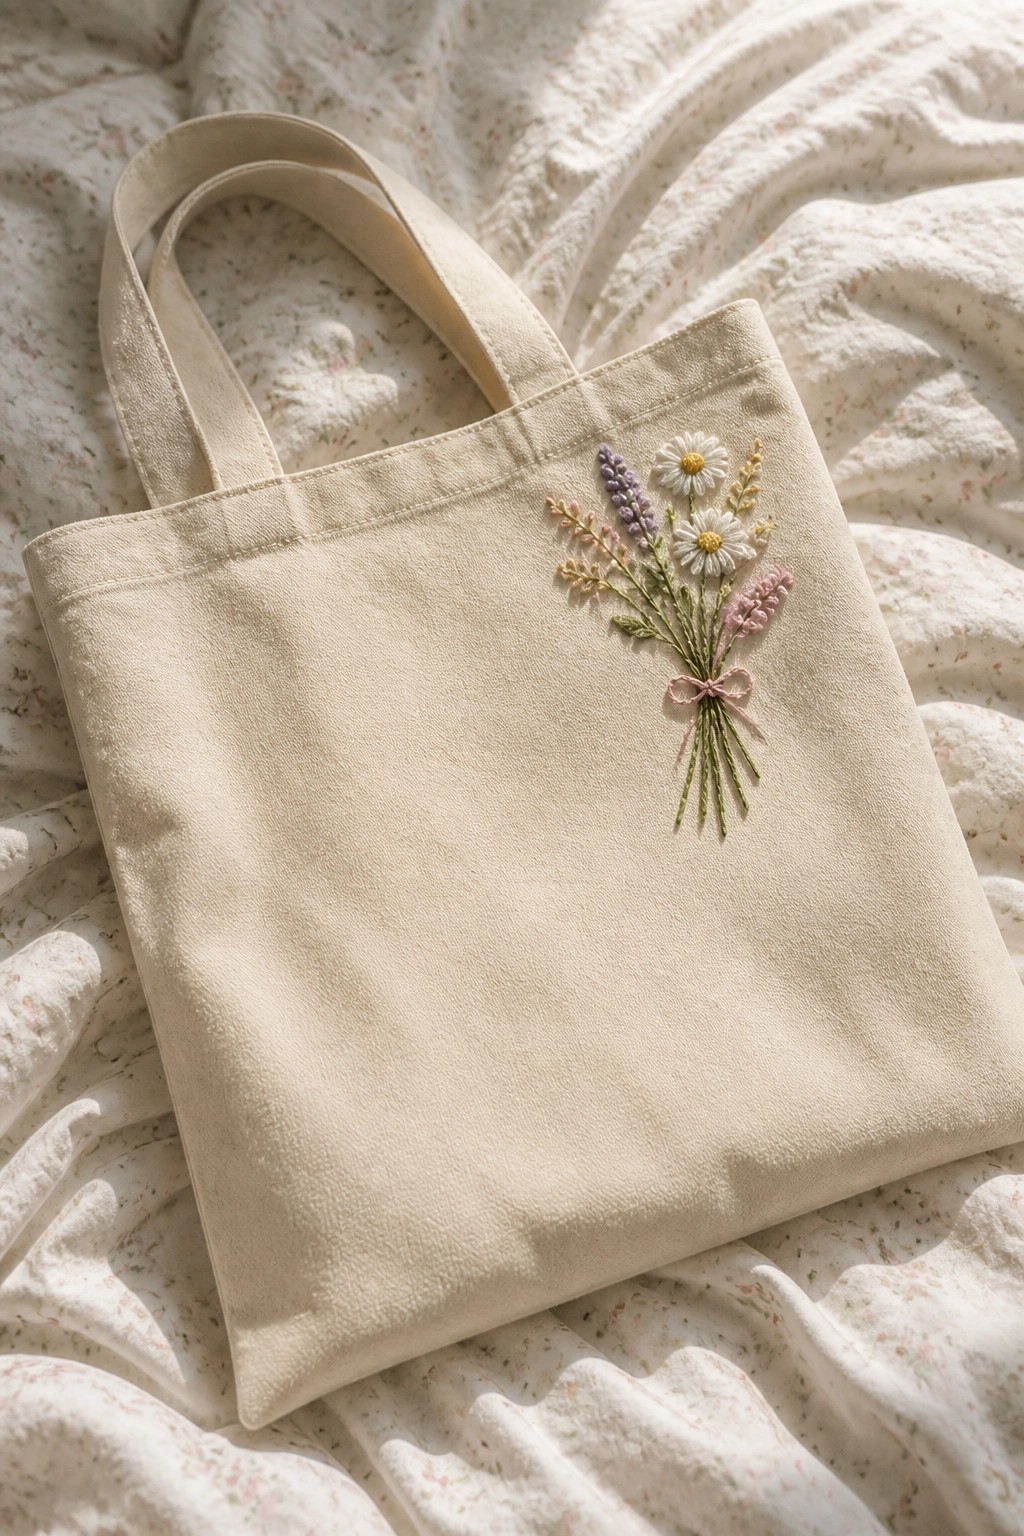
A small cluster of daisies, lavender, and filler stems stitched near the top corner of a canvas tote creates a simple focal point without covering much surface area. The stems are gathered at the base and finished with a single bow, which holds the loose arrangement together and gives the design a clear bottom edge. This motif suits accessories like totes, pouches, or market bags because it stays compact while still reading clearly from a distance.
What makes this idea useful is how the tied stems act as a built-in border, so the embroidery needs no extra frame or hoop shape to look complete. The same bundle scales down easily for a pocket or scales up slightly for a larger bag panel. Changing the flower colors to match the bag fabric keeps the look coordinated, while moving the placement lower or to one side shifts the balance without changing the stitching.
Tiny Daisies on a Scrunchie

Small daisy motifs embroidered directly onto a gathered scrunchie add detail without overwhelming the fabric. The flowers are spaced evenly around the outer edge so they remain visible once the scrunchie is scrunched and worn. This placement suits accessories because the stitches stay low-profile and do not interfere with the elastic function.
What makes this idea useful is how the small scale lets you repeat the same motif on other narrow items like headbands or bag straps. Switching the flower colors to match different fabric shades keeps the look consistent across multiple pieces. The design also works on a weekend timeline since only a few flowers are needed to finish one scrunchie.
Leaf Vine Embroidery on a Shirt Collar

A line of small leaves stitched along the outer edge of a shirt collar creates a delicate border that follows the fabric’s shape. The design uses a single repeating motif that starts wide at the collar base and tapers toward the points. This placement keeps the embroidery visible when the shirt is worn while staying contained to a small area. The idea works well for refreshing plain button-down shirts or similar garments.
The narrow width of the vine makes it fast to complete in a few hours. You can shift the same pattern onto sleeve cuffs, a dress neckline, or even the edge of a pocket. Using one main color keeps the stitching simple, but swapping in two close shades adds subtle variation without extra effort. The collar shape itself does most of the layout work, so you spend less time planning placement.
Mushroom Motif on a Zipper Pouch

Three mushrooms of different sizes form a compact design that fits neatly across the front of a small zippered pouch. The largest mushroom sits slightly off center with two smaller ones beside it and a row of tiny dots along the base to ground the group. Earthy thread colors on the light fabric keep the shapes distinct without needing dense stitching. This motif works well for pouches, small bags, or similar accessories that need a quick focal point.
The small scale makes this easy to adapt onto a card holder or the corner of a larger tote. Shifting the mushrooms into a single line or repeating the motif on the back of the pouch changes the balance without adding much work. A design like this stands out on Pinterest because the clear shapes read well even in small photos.
Pear Embroidery on Napkin Corners

A pear motif works well when placed in the corner of a hemmed white napkin or tea towel. The fruit is filled with soft yellow-green thread, outlined in a slightly darker shade, with a brown stem, one small leaf, and two tiny seeds added inside. This keeps the design compact and leaves the rest of the fabric plain so the hemstitch border stays visible.
The small scale makes this easy to finish in a weekend and repeat across a set of four or six napkins. You can swap the pear for another fruit shape or shift the placement slightly higher to work around different hem styles. On a gift set it stays practical because the motif does not interfere with folding or use.
Embroidered Bee Coaster

A compact bee design stitched in brown and yellow threads sits in the center of a small square of light fabric. The stripes on the body and the open wings create clear contrast against the plain background. This motif fits well on practical items like coasters, mug rugs, or small patches that can be added to bags or towels.
What makes this idea useful is how the small scale keeps stitching time short while still producing a finished object you can use right away. You could move the same bee onto darker fabric for stronger contrast or repeat it across a set of four coasters with slight color shifts in the stripes. The centered placement also works if you want to turn the square into a pocket or sew it onto the corner of a napkin.
Constellation Embroidery on a Denim Cuff

A simple constellation design made from small dots connected by straight lines sits along the edge of a denim cuff. The dots use white and light blue thread that contrasts with the dark denim while staying small enough not to interfere with the fabric’s texture or movement. This motif keeps the embroidery compact and linear, so it reads clearly from a short distance without needing dense stitching. It fits well on clothing that already has visible seams or edges, such as jackets, jeans, or shirt sleeves.
The placement on a cuff lets the design show during normal wear without covering large areas of fabric. You can repeat the same dot-and-line layout on a pocket, collar, or even a canvas bag by adjusting the number of stars to match the space. Changing thread colors to match other garments or shrinking the whole pattern makes the idea easy to move to different items. The clean lines also photograph sharply, which is useful if you want to share the finished piece.
Citrus Wedge on a Kitchen Towel

A citrus slice motif works well embroidered onto the corner of a plain kitchen towel. The design uses a few shades of orange thread to fill the segments and a single outline color to keep the wedge shape clear. This keeps the stitching contained to a small area so the towel remains functional. The idea suits any fabric item that lives in the kitchen or dining area.
What makes this idea useful is how the compact shape leaves most of the towel untouched while still adding a clear focal point. You could repeat the same wedge on a set of matching napkins or shift it to the edge of an apron. Changing the thread colors to yellow or pink would turn it into a lemon or grapefruit version without altering the layout. The motif also stays readable on both light and mid-tone fabrics, which makes it easy to test on whatever towels you already have.
Hot Air Balloon Felt Circle

A hot air balloon motif stitched onto a small round piece of felt creates a self-contained scene that works as a finished item on its own. The balloon is split into four vertical color blocks that keep the shape simple while adding interest, with a brown basket and dashed lines for the ropes below. Two basic white clouds sit on either side to fill the space without crowding it. This layout fits projects like bag patches, jacket accents, or small ornaments that can be finished in a weekend.
What makes this idea useful is the round border that turns the embroidery into a ready-to-use piece without extra framing. The same design adapts easily to a pocket on a shirt or the front of a small pouch by shrinking the scale and dropping the outer stitching. Changing the balloon colors to match existing fabric keeps the structure intact while shifting the look for different items. The contained size and limited elements make it a strong option for quick gifts or test pieces before committing to larger work.
Rainbow Motif on Ankle Socks

A small rainbow arc with cloud shapes at each end works well as an embroidery motif for plain ankle socks. The design sits on the outer side near the ankle so it remains visible above most shoes. The curved layout fits the sock’s shape without distortion, and the color sequence creates clear contrast on light fabric.
The placement does a lot of the work here because the motif stays visible even on worn socks. A design like this works especially well on other small accessories such as beanies or the corners of canvas pouches. Swapping the thread colors for pastels or bright primaries changes the look without altering the size or layout. The compact scale keeps the project quick enough to finish in one afternoon.
Mountain Outline on a Napkin

A line drawing of connected mountain peaks with a small solid sun works as a centered motif on a folded square of white fabric. The thin dark outline keeps the design light and quick to stitch while the single gold accent adds a clear focal point without extra layers. This approach fits small usable items like napkins, handkerchiefs, or tea towels where the fabric will be handled and washed.
The centered placement on the folded square leaves the edges clean for hemming or daily use. You can scale the same outline down for a pocket on a shirt or spread the peaks wider across a larger towel. Swapping the gold sun for a contrasting color lets the motif match different sets of linens without changing the pattern itself.
Cactus Design on a Small Canvas Backpack

A potted cactus motif works well when stitched onto the front flap of a mini canvas backpack. The design stays compact with the cactus body in layered greens, a brown pot below it, and small pink flowers on top to add color without crowding the space. This placement keeps the embroidery visible during use while staying clear of the zipper and straps. The idea suits fabric accessories like bags or pouches where a single centered motif can personalize an item without covering much surface area.
What makes this idea useful is how the contained shape fits easily on curved or flat bag surfaces and finishes quickly. You could move the same cactus onto a crossbody bag, a lunch sack, or the corner of a larger tote by shrinking or enlarging the scale. Swapping the pink flowers for yellow or using a brighter green would change the look to match different bag colors. The lower-center placement also leaves room to add a name or small text above it if you want to customize further.
Strawberry Hoop Keychain

A compact strawberry motif worked in red thread with scattered seed details and a cluster of green leaves sits centered on a small circle of white fabric. The fabric is held in a tiny wooden hoop fitted with a metal ring and screw hardware so the whole piece functions as a finished keychain or bag charm. The round shape of the hoop matches the rounded fruit, which keeps the design balanced without needing extra framing or background stitching.
What makes this idea useful is that the hoop serves as both the frame and the final object, so you finish the embroidery and have a usable item in one step. The same layout works on a zipper pull, a backpack clip, or even a necklace pendant if you swap the ring size. You could change the fruit to a blueberry or cherry and keep the same hoop and hardware without adjusting the scale. The high contrast between the red fruit and light fabric makes the shape stand out even when the piece is only a couple inches wide.
Scattered Tulip Clusters on a Pillow Cover
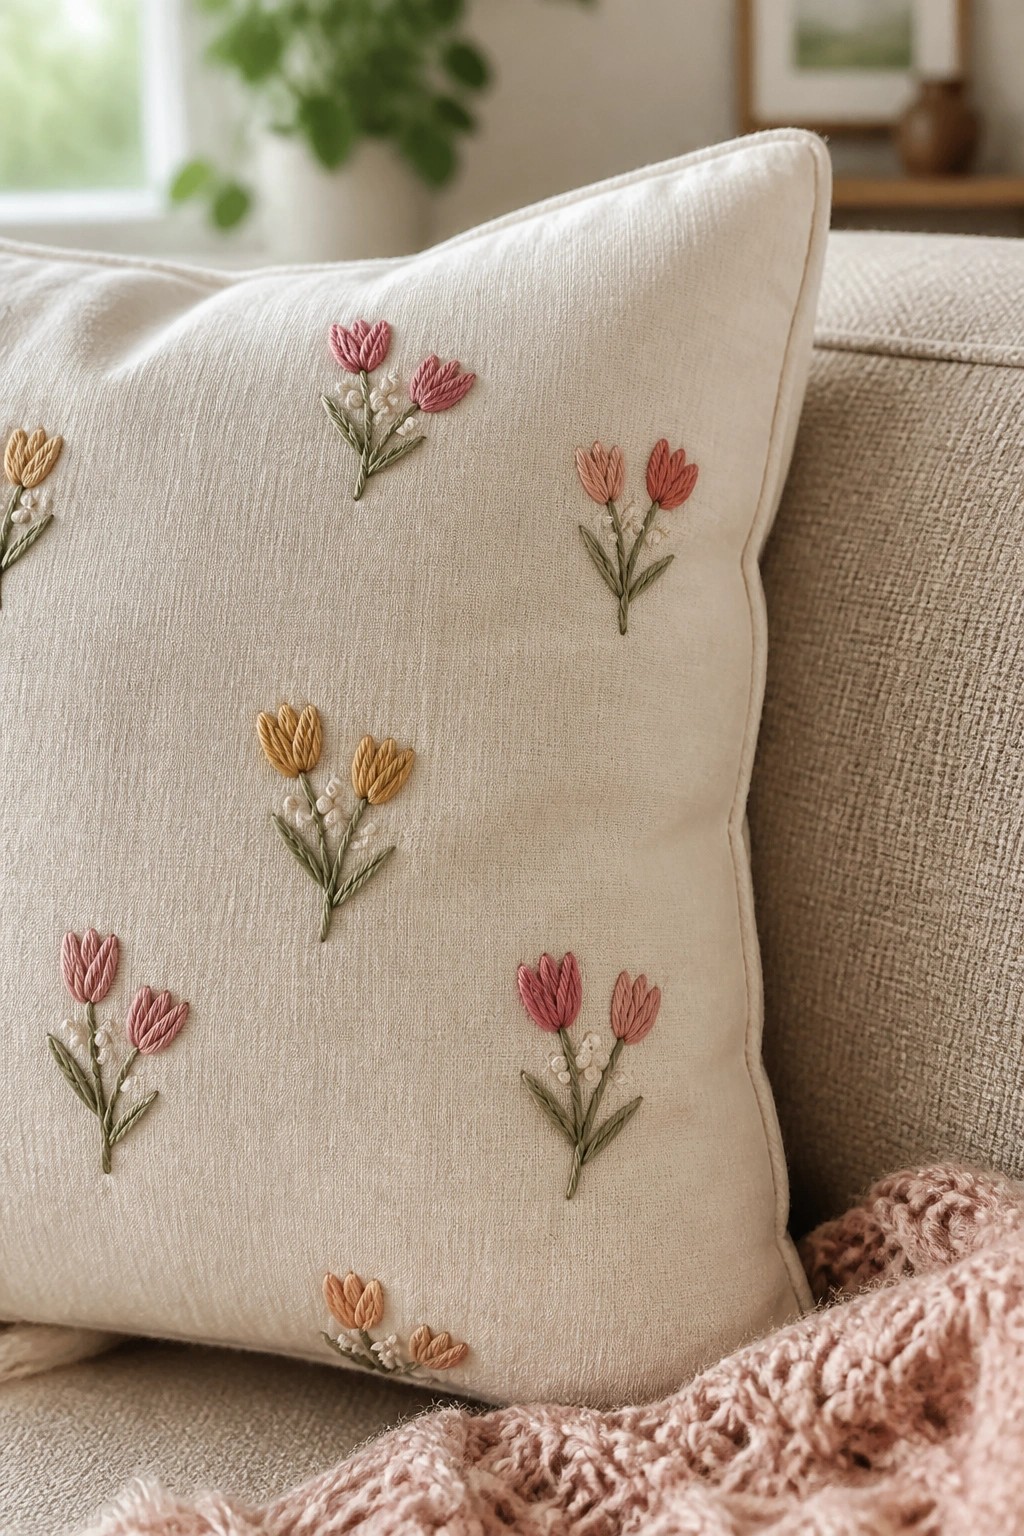
Small tulip and flower clusters are stitched directly onto a pillow cover in a loose, uneven arrangement. Each motif stays compact with a few stems and leaves, using soft pink, orange, and yellow tones against the light fabric. The varied spacing and slight angle changes prevent the design from looking too formal or centered. This approach works well for any fabric item that needs light decoration without heavy coverage, such as a throw pillow or seat cushion.
What makes this idea useful is how the small motif size lets you move the same pattern onto bags, jacket pockets, or table linens with almost no adjustment. You can add or remove a few clusters depending on the size of the item and still keep the same relaxed feel. Switching the thread colors to match existing decor updates the project quickly without changing the layout. The scattered placement also photographs clearly for sharing, which helps when pulling ideas from Pinterest boards.
Anchor Design on Canvas Sneakers

An anchor motif works well when stitched directly onto the side panel of a canvas sneaker. The compact shape fits neatly in that space without overwhelming the shoe. Two-tone thread keeps the lines readable against the dark fabric and gives the design enough contrast to show from a distance. This approach turns a basic pair of shoes into a quick customization project.
The placement does a lot of the work here because the side of a shoe already draws the eye. A design like this works especially well on other sturdy canvas items such as tote bags or hats. Scaling the anchor down makes it easy to move to a jacket pocket or backpack strap. Switching the thread colors to match different shoe shades keeps the same layout useful across multiple projects.
Coffee Cup Motif on a Kitchen Apron
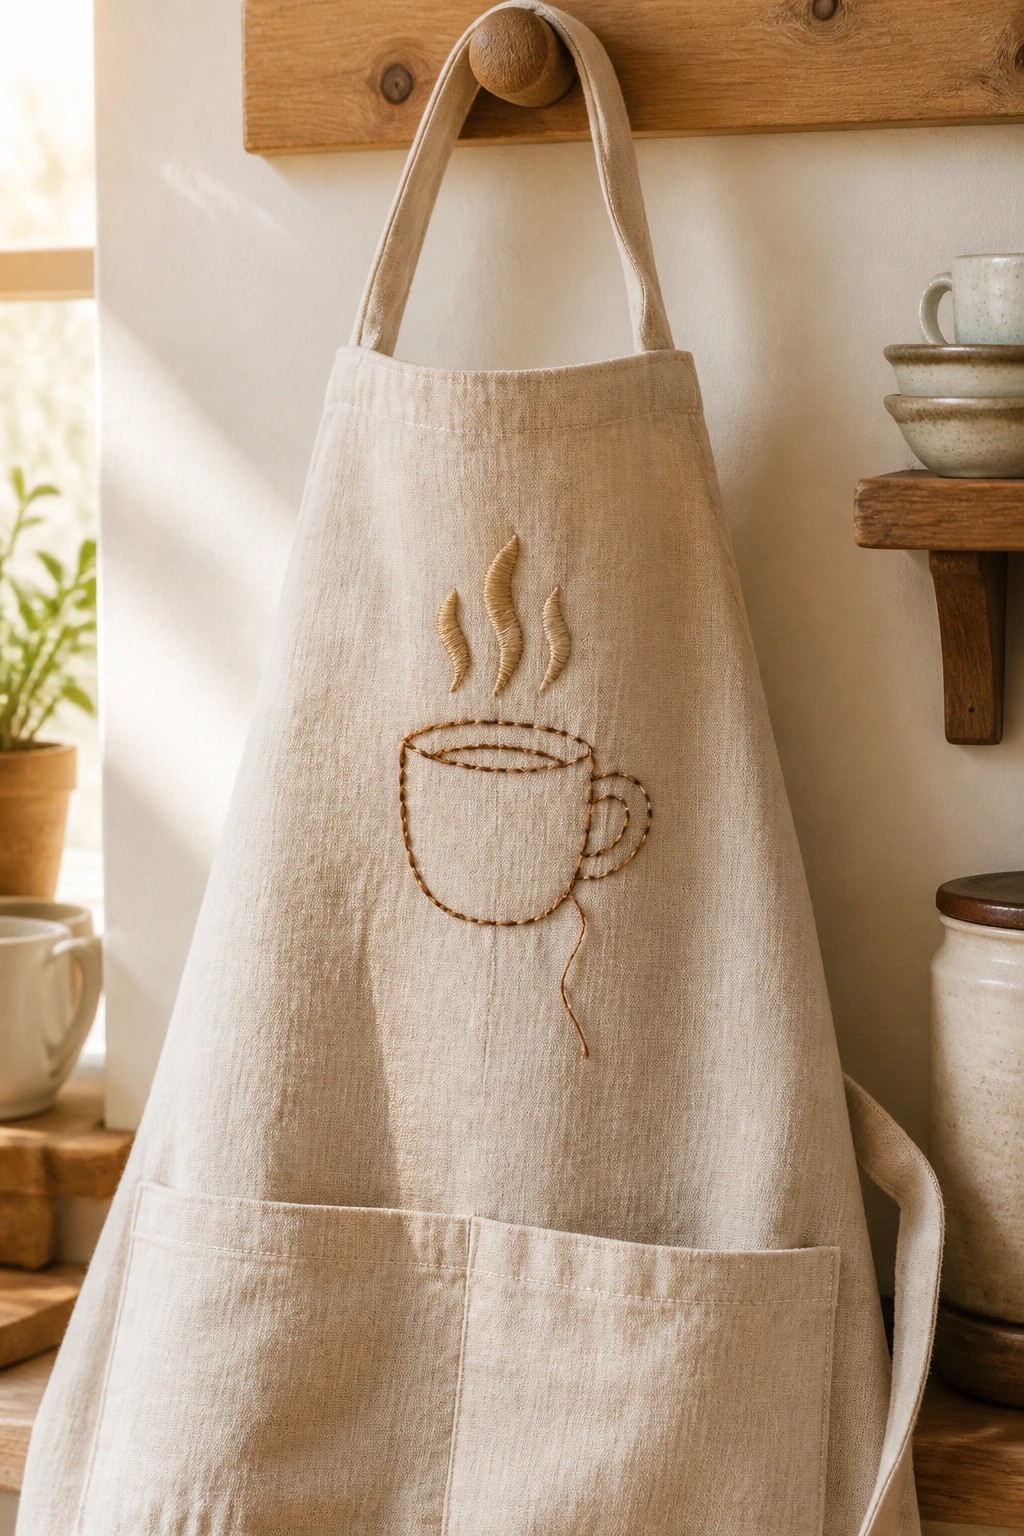
A simple outline of a coffee cup with three steam lines stitched above it fits neatly on the upper front of an apron. The design stays small enough to finish quickly while still reading clearly from a short distance. Using one thread color for the entire motif keeps the shape bold against the fabric without extra layers or fills. This works best on items that get daily use in the kitchen rather than on decorative pieces meant for display.
The placement on an apron puts the embroidery right in the center of activity without interfering with the pocket below. You could shrink the same cup to fit on a tea towel edge or enlarge it slightly for a canvas tote used for market runs. Swapping the thread to a darker shade on light fabric or a brighter one on navy makes the motif stand out more without changing the stitch work. Designs like this get shared often because they turn a plain functional item into something specific with very little fabric waste.
Rain Cloud Embroidery on Baby Onesies

A basic cloud outline sits centered on the chest of a baby onesie, with small blue dots placed below it to form scattered rain. The design stays compact so it fits the scale of infant clothing without crowding the fabric. Using dots instead of solid lines keeps the rain light and prevents the stitches from stiffening the knit. This motif works best on small garments like onesies, bibs, or sleepers where a single focal point is enough.
The placement does a lot of the work here because centering the cloud makes the whole piece readable at a glance. You can swap the blue dots for another color to match different outfits or shrink the entire design for a pocket on a toddler shirt. It also transfers well to gifts since the shape stays simple enough to finish in one session. On Pinterest this kind of clear, single-motif clothing project gets saved often because it reads clearly even in small preview images.
Lavender Stems Hoop Embroidery

A small cluster of lavender stems works as a simple botanical motif that sits centered in an embroidery hoop. The design stacks several stems at varying heights with purple flower heads on top and green stems below, leaving negative space around the edges. This approach keeps the project compact and quick to stitch while still filling the hoop enough to look complete. The same layout transfers easily to a fabric pouch, journal cover, or shirt pocket.
What makes this idea useful is how the stem grouping can be tightened or spread out to fit different hoop sizes without redrawing the pattern. You can change the flower color or shorten the stems to turn the same motif into a border for a tea towel or a single sprig for a gift tag. The open layout also means you finish the stitching in one or two sessions, which suits weekend projects. Scaling the whole thing down makes it a good candidate for a patch you can sew onto a bag later.
Frequently Asked Questions
Q: What materials are essential for starting these embroidery projects? A: You will need embroidery floss in various colors, a needle with a large eye, fabric such as cotton or linen, and an embroidery hoop to keep the fabric taut. Many projects also use scissors and perhaps a water soluble pen for marking designs.
Q: How long do these weekend projects typically take? A: Most of the ideas can be completed in two to four hours, making them perfect for a Saturday or Sunday afternoon. Simpler designs like basic flowers or initials might take even less time.
Q: Are there tips for making stitches neat and professional looking? A: Practice on scrap fabric first to get the tension right. Keep your thread length to about 18 inches to avoid tangling and use the stab method for even stitches rather than sewing continuously.
Q: What if I make a mistake during embroidery? A: Small errors can often be covered with additional stitches or beads. For larger mistakes gently remove the thread with a seam ripper and start over on that section. Patience is key for quick projects.
Q: How can I use or display my finished embroidery pieces? A: Turn them into patches for jackets, frame them as wall art, sew onto pillows or tote bags, or make them into bookmarks and coasters for practical use.