
I’ve been doing embroidery for a few years now and samplers have really helped me improve my stitches.
They give me a place to test things out without committing to a big project.
I put together these ideas because they focus on useful patterns that I actually use in other makes.
Some are good for beginners while others add a bit more challenge as you go along.
I hope they give you some easy ways to practice and get more comfortable with your needle.
Divide Fabric into Wedges for a Varied Stitch Sampler
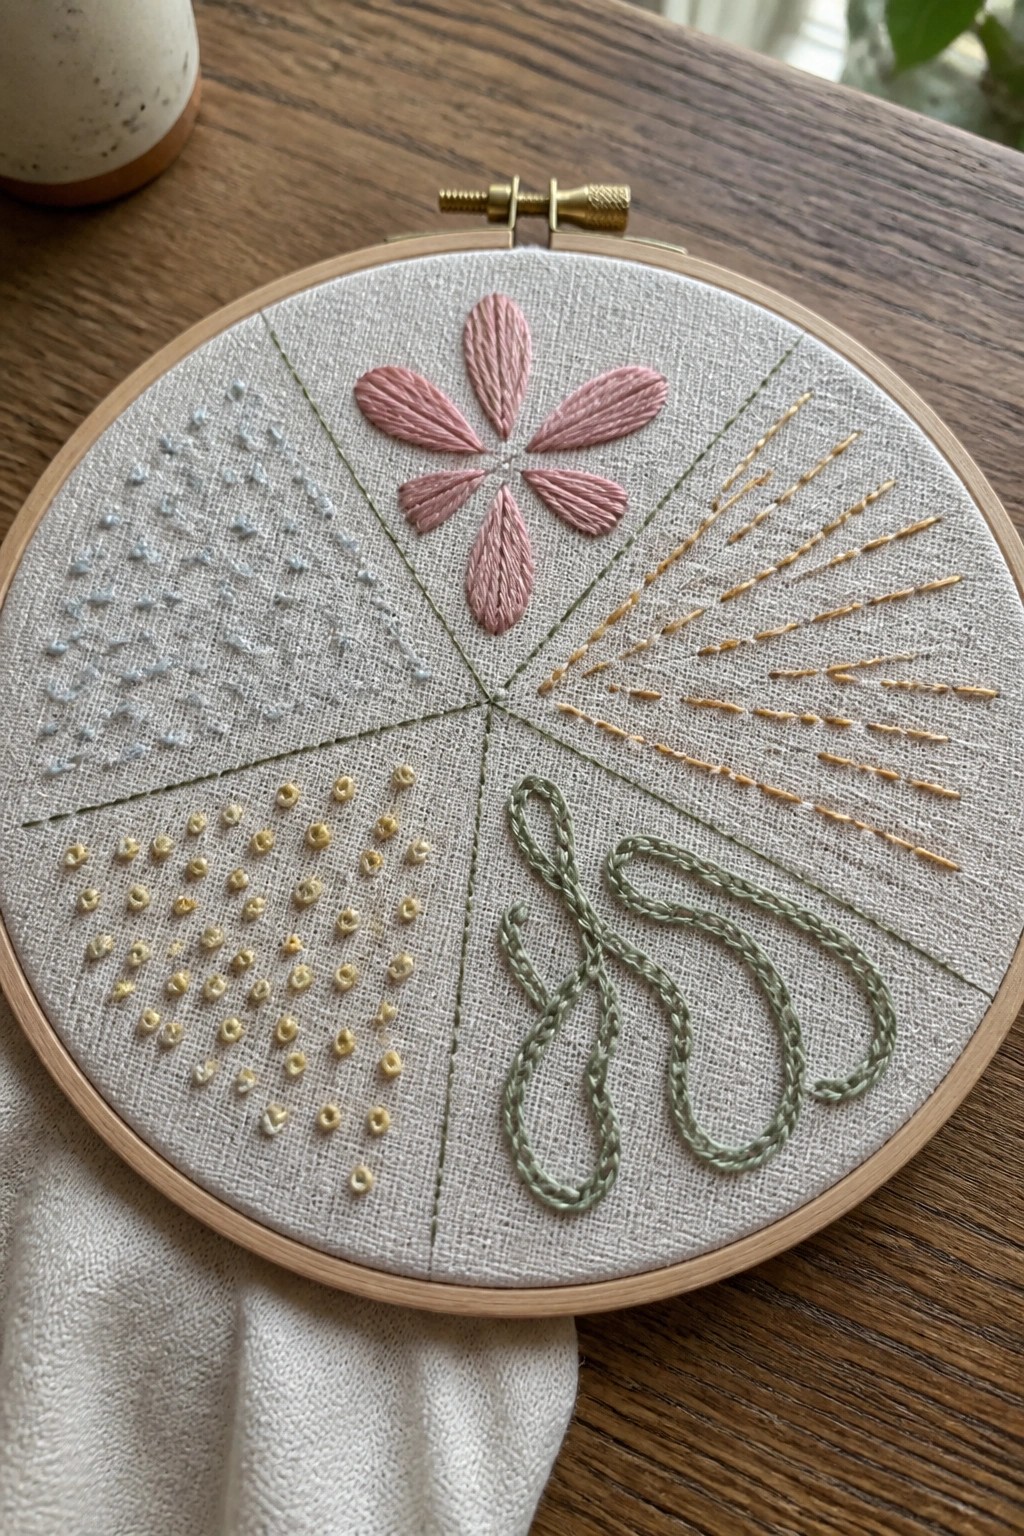
A circle split into sections gives you separate spaces to test different patterns without crowding them together. One wedge holds a basic flower worked in straight stitches, while the others show rows of dots, short radiating lines, and loose looped shapes. The lines between sections keep each sample distinct and make it simple to see how each pattern fills space. This layout suits a practice piece kept in the hoop or turned into a small finished item like a coaster or ornament.
The wedge format packs several techniques into one compact project so you can finish it without starting multiple hoops. Changing the thread colors or swapping the flower for a different shape lets you adjust the look for a bag patch or clothing accent. Keeping the sections small also makes it faster to complete and easier to photograph for tracking your progress.
Linear Stitch Samplers on Denim Pockets

A vertical stack of three different stitch patterns fits neatly down the front of a denim jacket pocket. The left column uses a branching stem with small leaves and flower clusters, the center runs a simple looped line, and the right side keeps a straight row of round stitches. This narrow format lets you test several techniques side by side without needing extra fabric. It works especially well on clothing because the pocket shape already limits the area and keeps the sampler contained.
What makes this idea useful is that the pocket itself becomes the sampler, so you practice while making something wearable. The same stacked layout could move to a sleeve cuff, a tote bag side, or a pair of jeans hems by shortening the height or swapping the middle line for a different basic stitch. Keeping each section narrow also makes it easy to try new color combinations without redoing a large area. On Pinterest it stands out because the denim texture shows the stitches clearly against a familiar background.
Shirt Collar Sampler with Parallel Stitch Rows

Line up several different border stitches side by side along the length of a shirt collar to practice multiple techniques on one small piece of fabric. The layout keeps each row narrow and evenly spaced so the stitches stay readable while still covering a useful area of the garment. This placement works because the collar already has straight edges and visible seams that guide the rows without extra marking.
What makes this idea useful is that the same row format can move straight onto cuffs, plackets, or hems without redesigning anything. You can change the thread colors to match the shirt fabric or widen the spacing if you want fewer rows on a smaller collar. The narrow vertical format also photographs cleanly for reference, which explains why similar collar samplers show up often when people search for wearable stitch practice.
Floral Bouquet on a Canvas Tote Bag
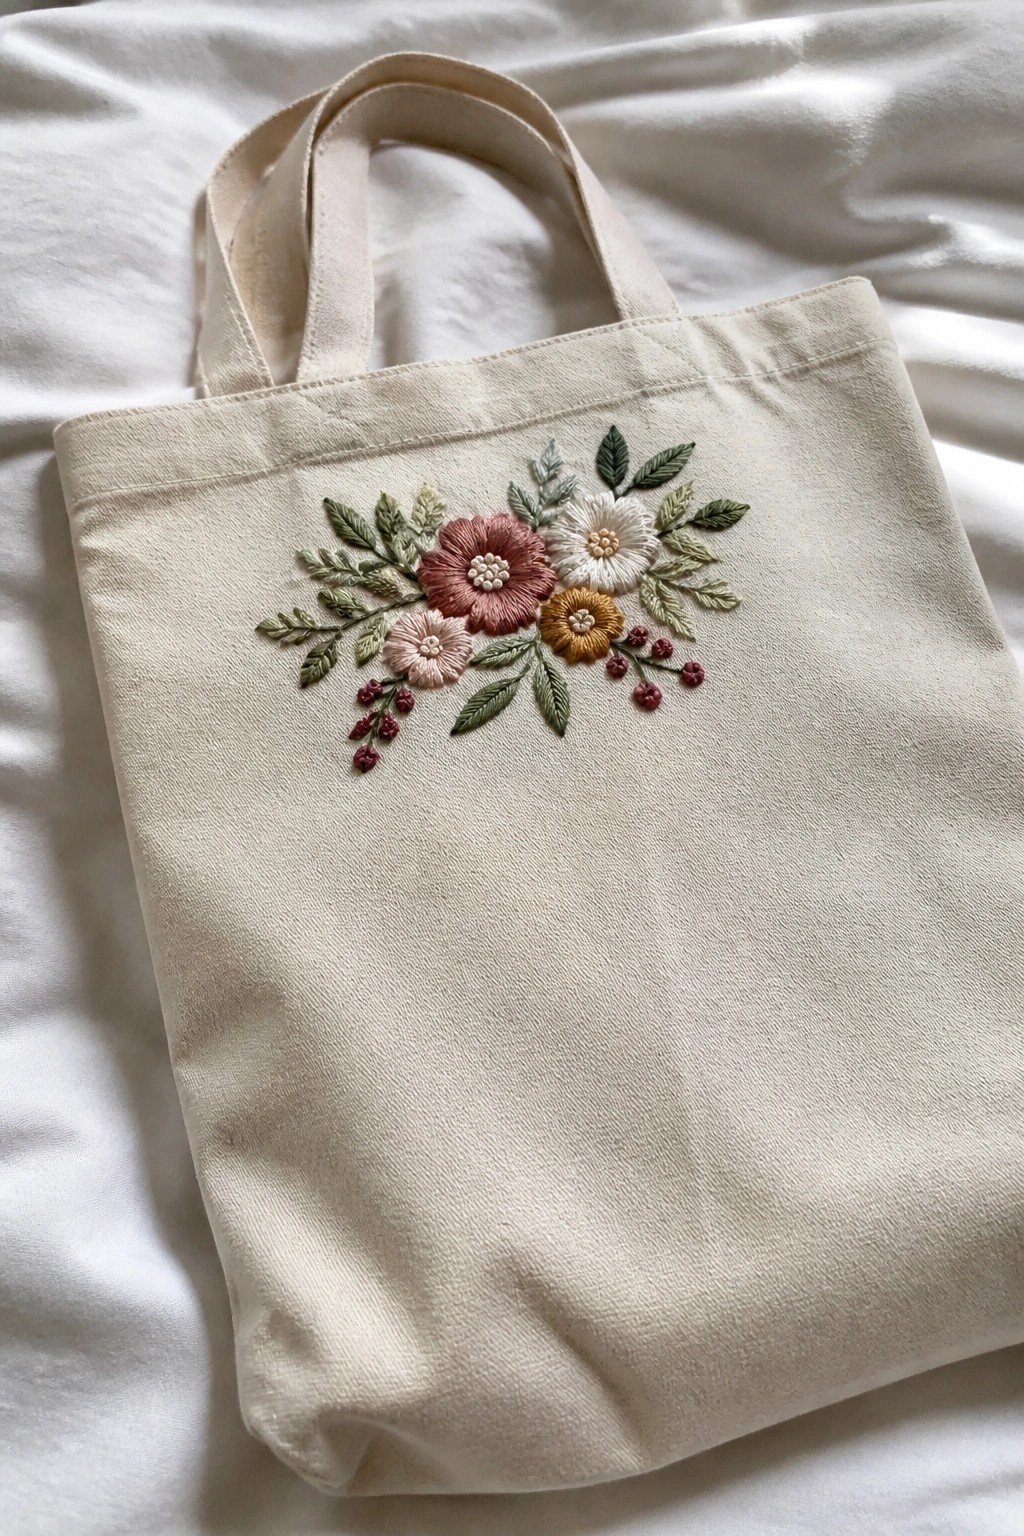
A compact floral bouquet makes an effective focal point when stitched directly onto the front panel of a canvas tote. The design groups several flowers in different sizes with leaves and small berry clusters around them to create a balanced shape that fits neatly within the bag’s rectangular space. This keeps the embroidery practical since it avoids the handles and bottom edges that see the most wear. The placement works especially well on bags because it adds detail without changing how the tote carries or folds.
What makes this idea useful is how the same bouquet can shift to a smaller scale for a zip pouch or a book sleeve. Adjusting the colors to a single palette or two tones lets it match different fabrics without redesigning the layout. On a tote the central spot stands out in photos and makes the bag easy to spot in a pile, while moving the motif to one corner instead keeps the surface mostly plain for everyday use.
Grid of Sampler Squares on a Zippered Pouch
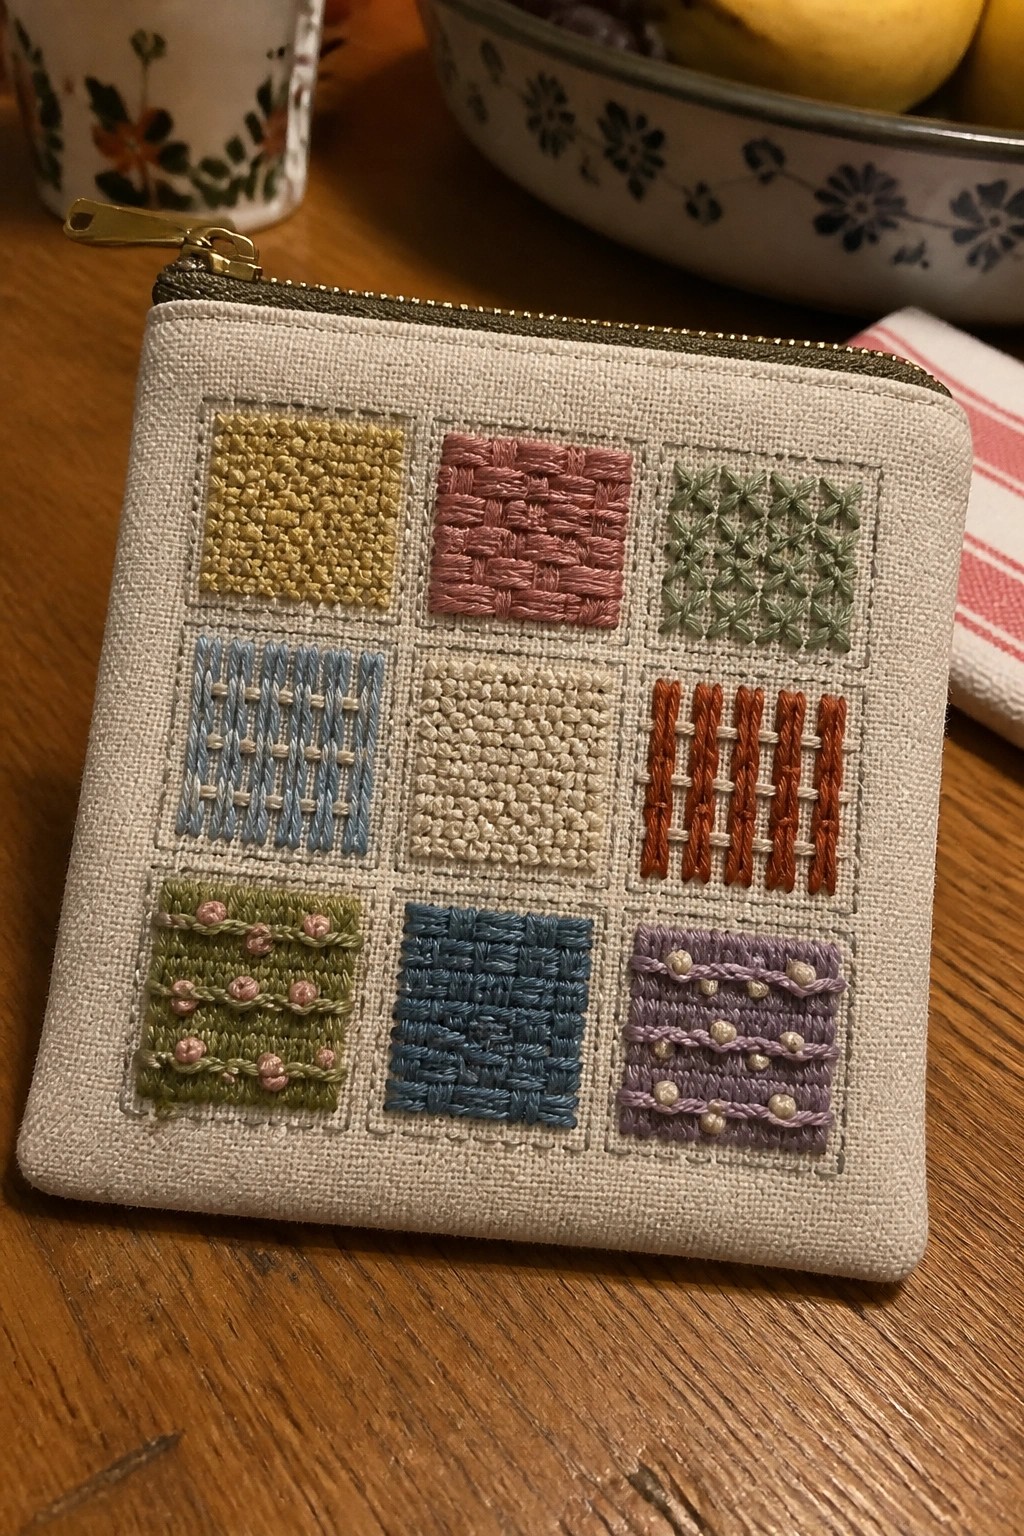
A 3×3 grid of contrasting stitch samples covers the front of a small zippered pouch, with each square using a different thread color and texture to fill its space. The layout keeps the samples contained and readable while turning the whole front panel into the main design element. This approach works especially well on small accessories because the grid fits neatly within the pouch dimensions and gives a finished look without needing a large fabric area.
What makes this idea useful is how easily it translates to other small items like coin purses, makeup bags, or even a notebook cover. You can swap the thread colors to match a specific palette or change the number of squares if your project surface is a different size. The contained squares also make it simple to practice new stitches without worrying about how they connect to each other across the fabric.
Mini Motif Squares for Quick Stitch Practice
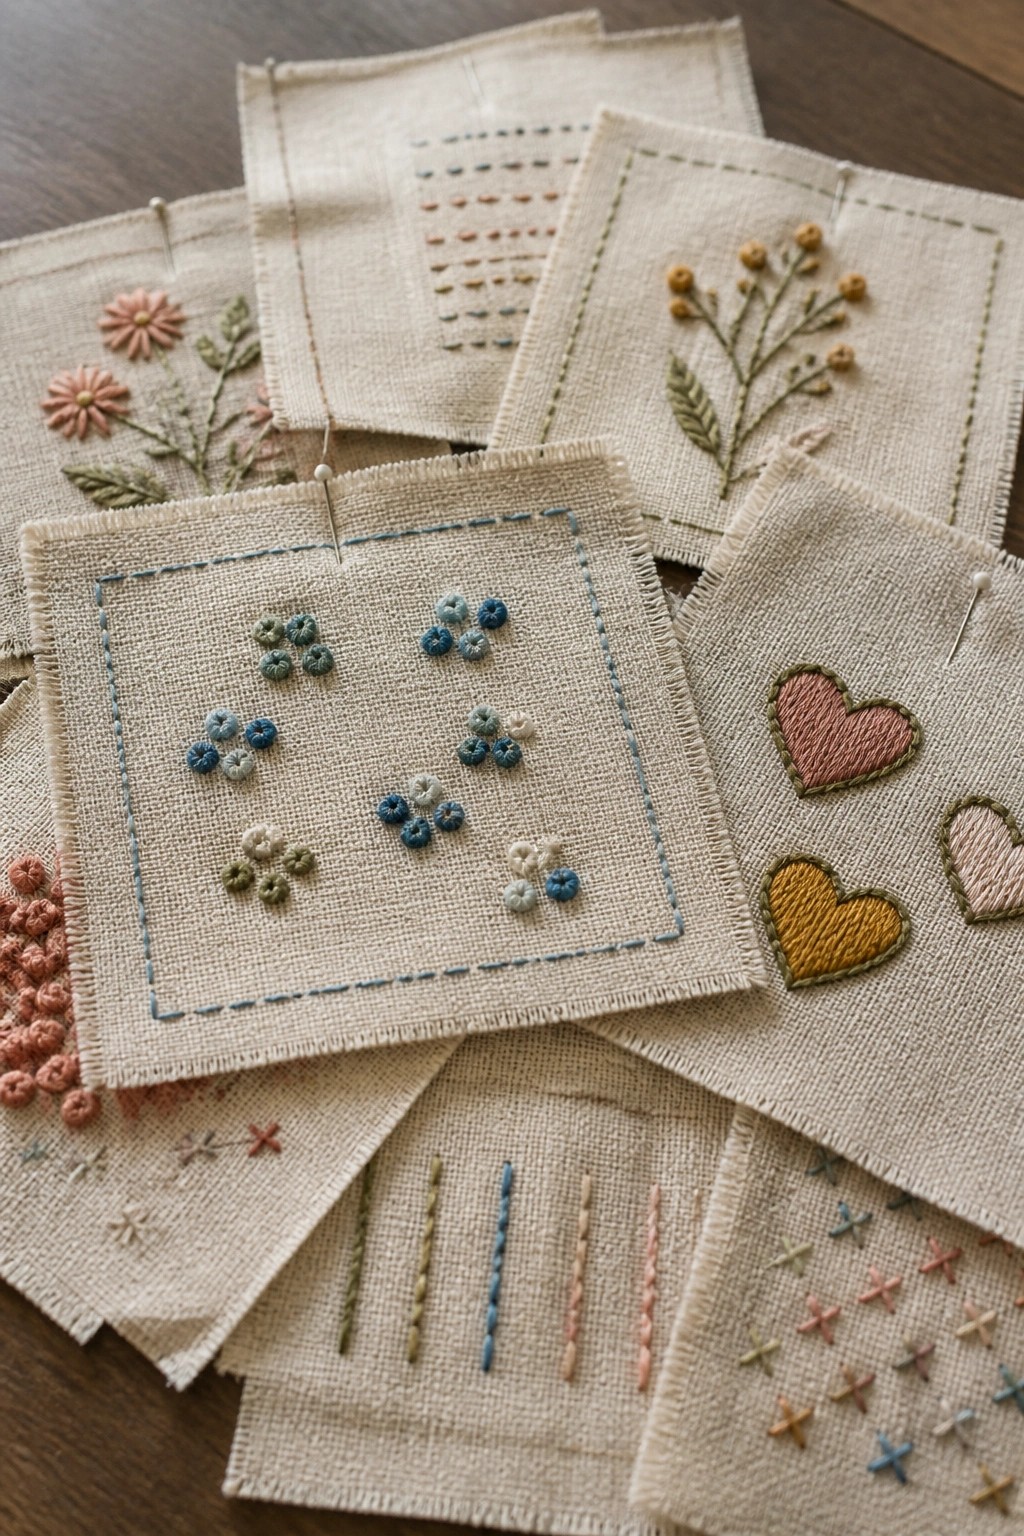
Small fabric squares each hold one focused motif such as a single flower stem, a cluster of dots, a row of hearts, or a short line of basic stitches. The designs sit centered with a simple border stitch on some pieces, keeping the layout clean and easy to repeat. This setup works well for testing new thread colors or stitch variations without starting a full project. The squares can be turned into patches, bag tags, or small inserts for larger items like journals or clothing.
What makes this idea useful is how the limited space forces you to keep motifs compact and balanced. A design like this works especially well on clothing or accessories because each square can be cut out and appliqued wherever needed. You can swap the color palette on the same layout to match different fabrics or change the motif scale to fit a pocket versus a larger panel. The separate squares also make it simple to photograph progress or swap pieces in and out of a sample ring.
Border Rows in Multiple Colors on Napkins

Work a band of parallel decorative rows right along the hem of a napkin or towel to practice several stitches in one project. Each row follows a different pattern such as a scalloped line, connected ovals, and a twisted braid, placed close together so the colors sit side by side. The straight fabric edge keeps the rows aligned without extra guides. This layout suits table napkins, kitchen towels, or apron hems where the stitching stays visible during use.
What makes this idea useful is how the fabric edge itself acts as the starting line so spacing stays consistent. You can drop one row or change the thread colors without redrawing anything. The narrow band still shows when the item is folded or stacked, which helps on gifts or everyday linens. Shift the same rows onto a pillowcase cuff or the bottom of a tote for a wider or taller version.
Scattered Mini Motifs on a Scrunchie

Small embroidered shapes placed at intervals around a scrunchie add detail without crowding the fabric. A tight group of dots, a radiating circle, and a simple flower sit on separate sections of the gathered band so each one shows when the scrunchie is worn. The compact size of the designs leaves plenty of plain fabric between them, which keeps the elastic stretch intact. This layout suits hair accessories or other stretch items that need light decoration.
What makes this idea useful is how quickly the same three shapes can be rearranged or recolored for different fabrics. The same spacing works on a headband or the corner of a small pouch if the scrunchie shape feels too narrow. Switching the thread colors to match an outfit keeps the project fast while still making each piece distinct. The scattered placement also shows up clearly in photos when you want to share finished samples.
Repeating Chevron Border on Pillow Seams
A row of connected chevron shapes runs along the edge of a pillow cover right beside the seam. Small dots placed at intervals break up the line and keep the pattern from looking too rigid. The design stays narrow so it frames the fabric without taking over the main surface. This approach fits pillow covers, cushion wraps, or any project where you want a clean finish along an existing edge.
What makes this idea useful is how the seam itself guides the stitching line and keeps everything straight. You could shift the same repeat onto napkin edges or the hem of a simple tote by adjusting the spacing between each chevron. A darker thread on light fabric would increase visibility while keeping the same narrow width. The small scale also means you can finish a full side in one sitting without committing to a large area.
Patch Embellishments on Denim Cuffs
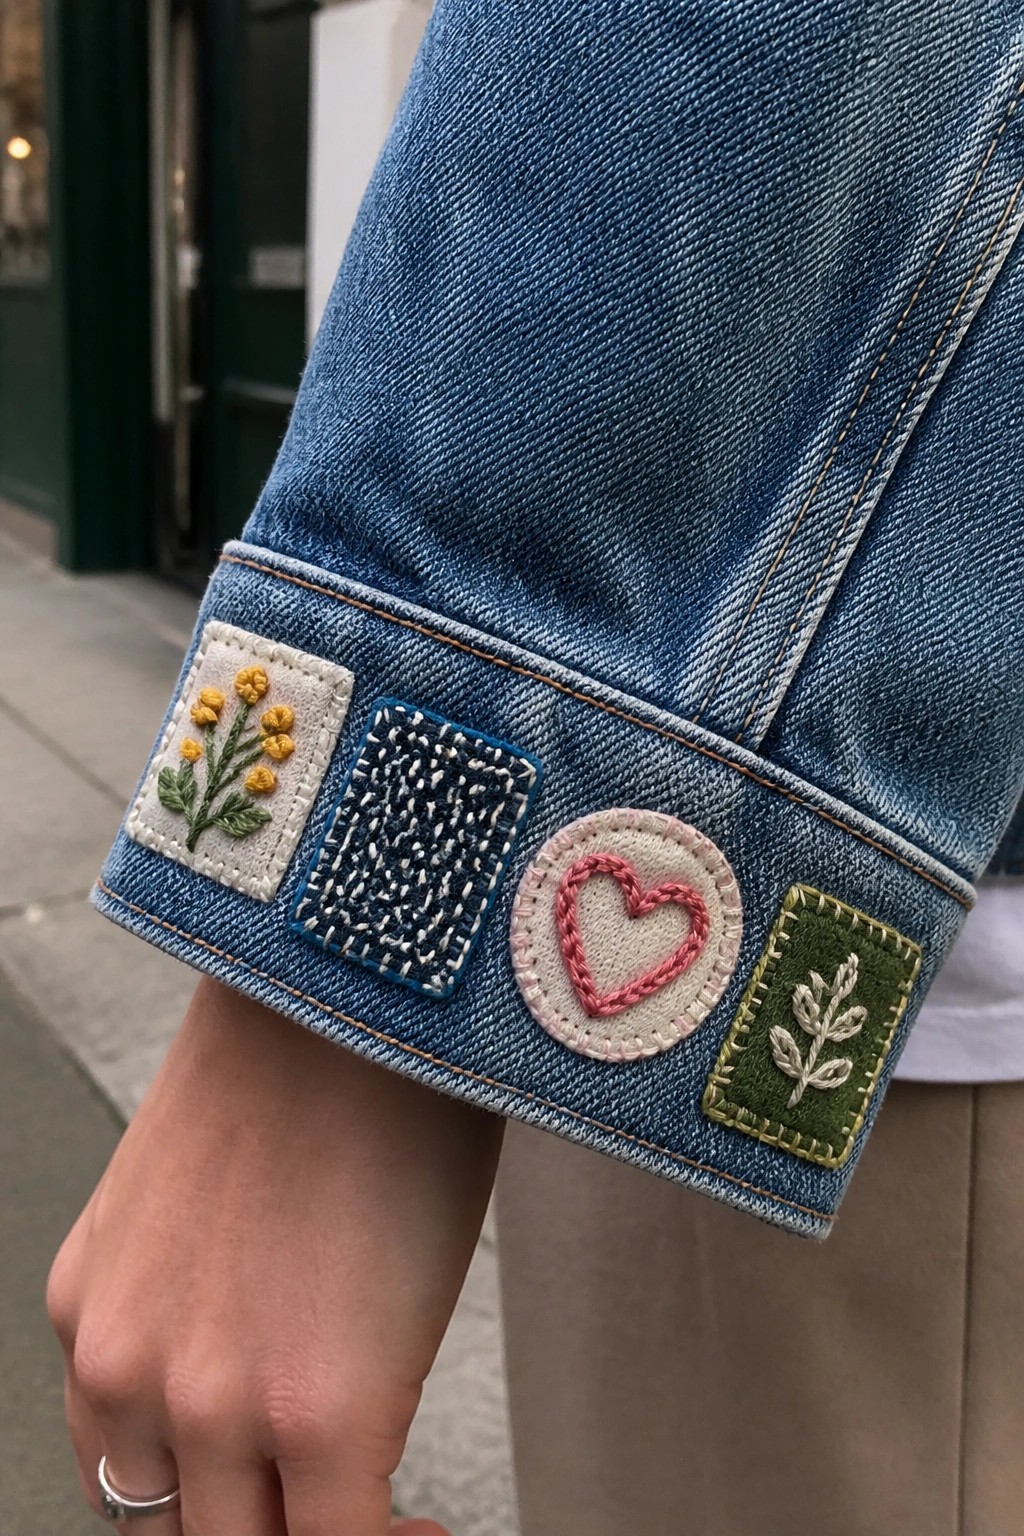
Small embroidered patches in varied shapes and motifs can be lined up along the cuff of a denim jacket to create a custom detail. The patches here include a square floral design, a textured blue square, a round heart, and a rectangular leaf motif, all stitched on different base fabrics before being attached. This approach keeps the embroidery concentrated in one visible area while letting each patch stand out through shape and color contrast. It works especially well on clothing where the wearer can see the work up close during daily use.
What makes this idea useful is that each patch can be made separately, so you can try different stitches or colors without committing to one large piece. The cuff placement means the embroidery stays protected from heavy wear yet remains noticeable when the sleeves are rolled. You could adapt the same patches onto the hem of a skirt, the front pocket of a shirt, or even a canvas bag by adjusting the spacing between them. Changing the thread colors to match existing clothing keeps the result cohesive without extra planning.
Arrange Stitch Samples in a Straight Horizontal Line

A horizontal row of stitch samples placed across plain fabric lets you test solid fills next to delicate line work in one compact section. Blocks of dense stitching sit beside leafy branches, outlined leaves, a simple flower, and scattered dots, making the differences in texture and coverage easy to compare. This layout suits a practice cloth, the flap of a small bag, or a wide bookmark where multiple techniques need to stay organized.
The straight line keeps the samples easy to measure or trim apart later if you want separate patches. Changing the thread colors or swapping the flower for another motif updates the whole row without changing the basic structure. A design like this works especially well on a narrow strip of fabric that can later become the edge of a pouch or a page in a stitch journal.
Circular Landscape Sampler Patches
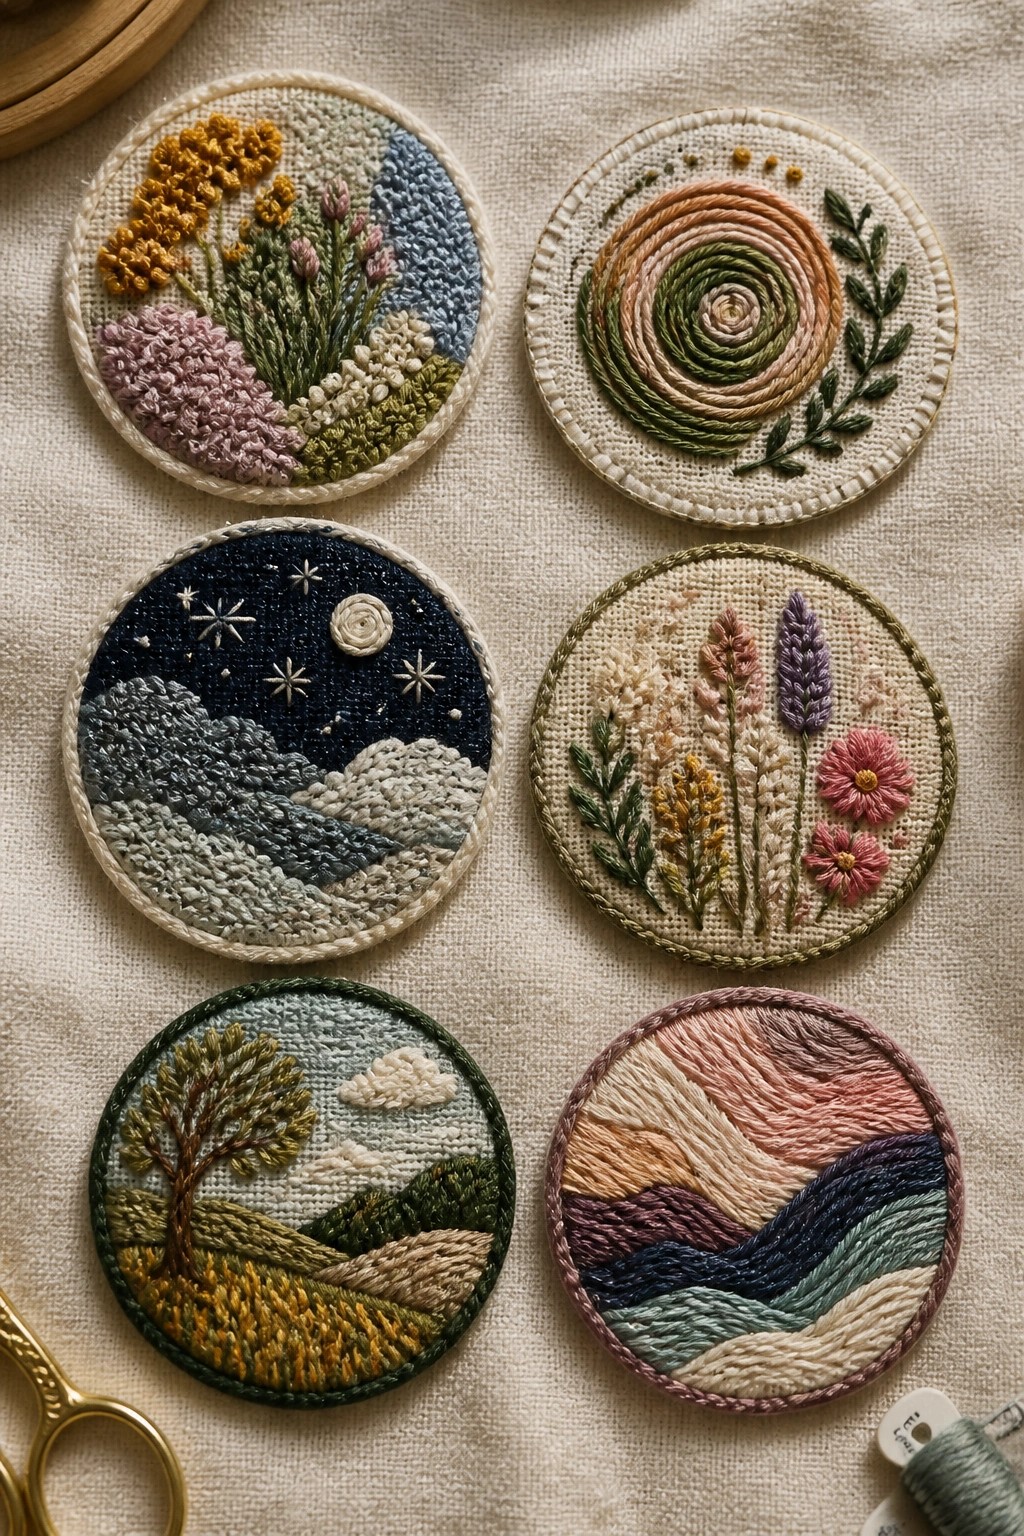
Small round fabric pieces hold miniature landscape scenes stitched with layered blocks of color and simple line work. Each circle contains its own motif such as rolling hills at dusk, a field with a single tree, or a cluster of wildflowers, keeping the full design contained within a fixed boundary. The round format forces tight color placement and texture changes instead of large open areas, which makes the finished pieces easy to move from hoop to project. These patches suit bags, jackets, or small fabric items where a compact scene adds interest without covering much space.
What makes this idea useful is how the fixed circle size lets you finish one motif in a single sitting while still practicing different stitch directions and density. You can swap the color story on each patch to test new combinations or match a specific item you want to decorate. Scaling the same layout smaller turns it into a badge or key fob, while keeping the current size works for jar lids or gift tags. The self-contained shape also photographs cleanly, which is why similar sets appear often in saved project boards.
Shirt Sleeve Stitch Sampler

A rectangular block of assorted stitches fills the upper sleeve on a button-down shirt, turning a plain area into a visible sampler. The design sits above the cuff where fabric gets extra wear, using dense rows and textures to build up coverage without adding bulk. This approach works well for reinforcing elbows or forearms on everyday shirts while practicing new stitches in one contained spot. The off-white thread on light fabric keeps the focus on the stitch variety rather than bold color.
What makes this idea useful is how the placement turns a practical mending spot into a skill-building project. You could shift the same rectangle onto the knees of pants, the front of an apron, or the corner of a tote bag. Scaling it down to a smaller patch lets you test stitches quickly on scraps before committing to a garment. Changing thread color to match or contrast with the base fabric changes the look from subtle texture to clear accent without altering the layout.
Constellations Scattered on Denim Bag Flaps
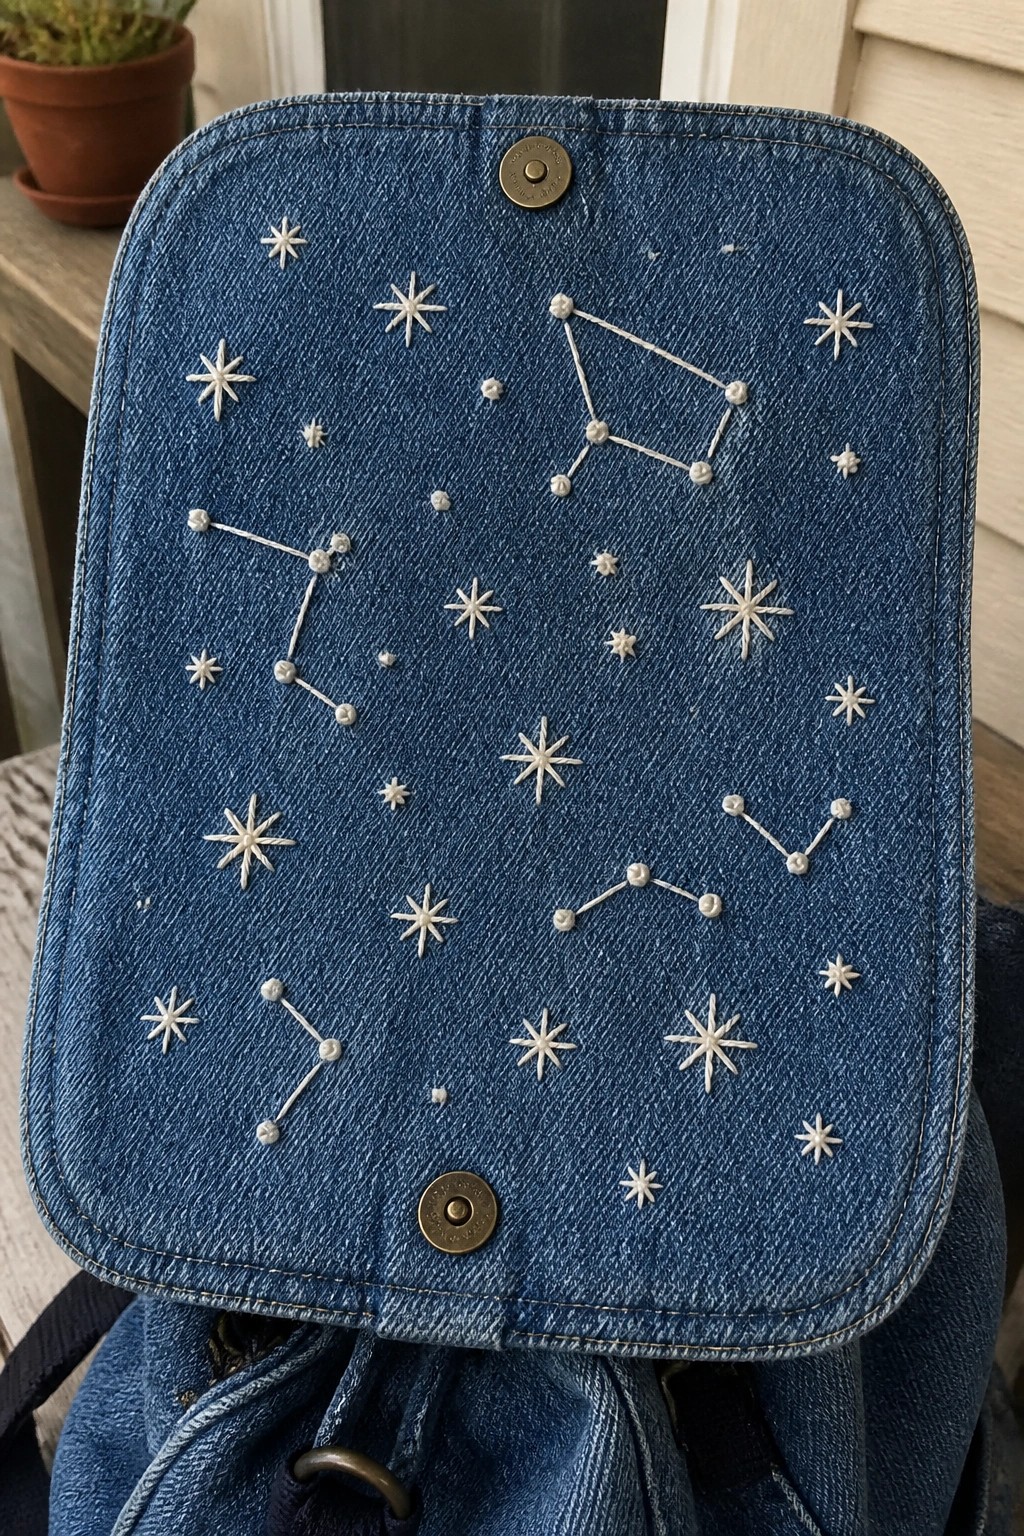
Scatter small connected star clusters across the flap of a denim backpack or tote to fill the surface without needing a single focal point. The lines between dots create simple shapes that read clearly from a distance while the different star sizes keep the pattern from feeling too uniform. This approach works especially well on accessories because the fabric already has texture and the white stitches stand out against the blue ground. You can stop at a few clusters or keep adding until the space feels balanced.
What makes this idea useful is how the loose placement removes pressure to center anything perfectly. You could move the same clusters onto a jacket shoulder, a smaller pouch, or even a notebook cover by adjusting the spacing. Switching the thread to a darker color on light denim or keeping it bright on dark fabric changes the contrast level fast. The connected lines also make the design hold up better to wear than isolated stars would.
Daisy Cluster on a Handkerchief Corner

A tight cluster of three daisies with yellow centers and a few small pink buds sits in the corner of a white fabric piece, with thin stems and leaves spreading out along the edge. The design uses the corner space efficiently by letting the stems guide the layout rather than filling the whole area. This keeps the embroidery contained while still giving it presence on the fabric. The idea suits handkerchiefs, napkins, or any small linen item where the stitching stays near the border.
The corner placement does a lot of the work here because it leaves the center of the fabric free for use. You could scale the same cluster smaller for a shirt pocket or repeat it on all four corners of a table napkin. Switching the bud colors to match other linens would help it coordinate without much extra effort. A design like this photographs cleanly for sharing because the stems create simple lines against the plain background.
Horizontal Sampler Band on a Bag Pocket
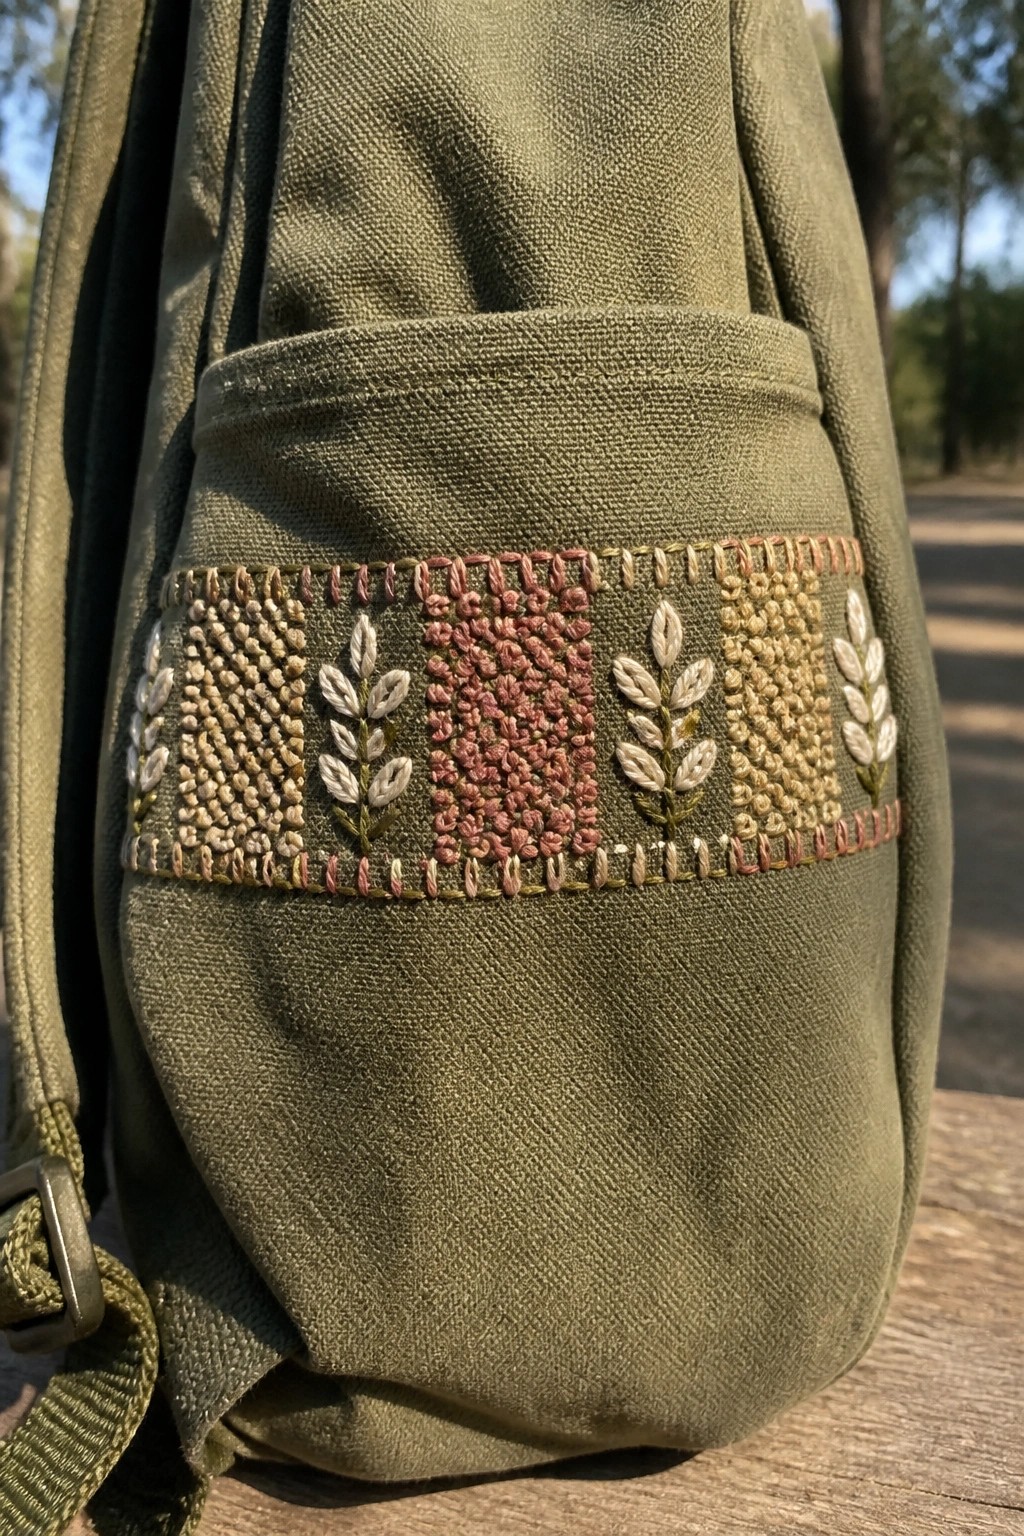
A narrow band of mixed embroidery textures runs across the top edge of a bag pocket, using small leaf sprigs and blocky filled sections to create a repeating pattern. The design places lighter leaf motifs next to denser stitched areas so the eye moves along the strip without any single section dominating. This approach works well on accessories like backpacks or totes because the band stays narrow enough to avoid interfering with the bag’s main function. It gives a practical way to practice several fill patterns and border stitches in one contained line.
What makes this idea useful is how the fixed width forces you to focus on contrast and spacing rather than overall size. You could shift the same layout onto a jacket cuff or the edge of a pencil case by shortening the repeat and picking thread colors that match the base fabric. Changing the central square motif to a different fill would let you swap the look without redesigning the whole band. The format also photographs clearly for sharing because the horizontal line stays easy to read at small sizes.
Cloud and Rain Motif on a Baby Bib

A simple cloud outline stitched on the left side of a bib pairs with a solid raindrop and scattered dots to suggest light rain without filling the whole space. The design sits low on the bib front so it stays visible when the bib is worn. The outline keeps the cloud airy while the denser raindrop and dots create a clear focal point through contrast in fill and color.
What makes this idea useful is how the small scale lets you finish it quickly on pre-made bibs or adapt the same elements to a burp cloth corner. You can swap the blue tones for pastels or change the number of dots to suit different fabrics or seasons. The layout also transfers easily to a onesie chest or small pocket since the elements stay balanced even when reduced in size.
Scattered Motifs Along Knit Sock Cuffs

Small clusters of hearts, short vertical lines, and tiny round flowers sit along the top edge of knitted socks. The motifs stay grouped in one section rather than wrapping all the way around, so the embroidery shows clearly when the socks are rolled or folded down. Simple shapes in soft colors keep the look balanced against the textured knit without crowding the surface. This approach suits accessories like socks, cuffs, or the hems of sweaters where you want light decoration on a usable item.
What makes this idea useful is how the small scale lets you test a few different stitches in one spot before moving on. The same cluster could shift to a beanie brim, mitten cuff, or even a fabric headband with almost no changes. Switching the thread colors to match the base fabric softens the effect, while using brighter shades on a darker knit makes the shapes stand out more. The layout works well for quick projects because it needs only a few inches of space and leaves room to adjust spacing if the first try feels too tight.
Berry and Leaf Border on a Headband

A berry and leaf motif placed along the front edge of a fabric headband creates a clean repeating pattern that fits the narrow shape without crowding. Small leaf branches flank clusters of berries on both sides, with a single line of connecting stitches running through the center to tie the elements together. The design stays effective because the elements are spaced evenly and kept small enough to follow the curve of the band. This approach suits accessories like headbands, belts, or bag straps where the embroidery needs to remain visible but contained.
What makes this idea useful is how the linear format translates easily to other narrow surfaces such as jacket cuffs or pillow edges. You could shorten the repeat to fit a smaller area or extend it by adding more berry clusters if the fabric allows. Changing the berry color against the background fabric shifts the contrast level without altering the layout. The central connecting stitches also help the design read as one unit rather than scattered pieces, which works well when the project will be handled or worn often.
Concentric Circles on a Zippered Pouch Flap

A series of concentric circles makes a compact motif that fits neatly on the curved flap of a small fabric pouch. The rings vary in color and stitch density to create visual layers without crowding the limited space. This placement keeps the design centered and balanced while the pouch shape itself frames the embroidery.
What makes this idea useful is how easily the same ring layout transfers to other small accessories like coin purses, makeup bags, or even the corner of a tote pocket. You could shrink the whole circle to fit a jeans pocket or swap the thread colors to match a different fabric. The design stands out in photos because the repeated rings give instant structure even when the colors stay muted.
Vertical Stitch Bands on an Apron Front
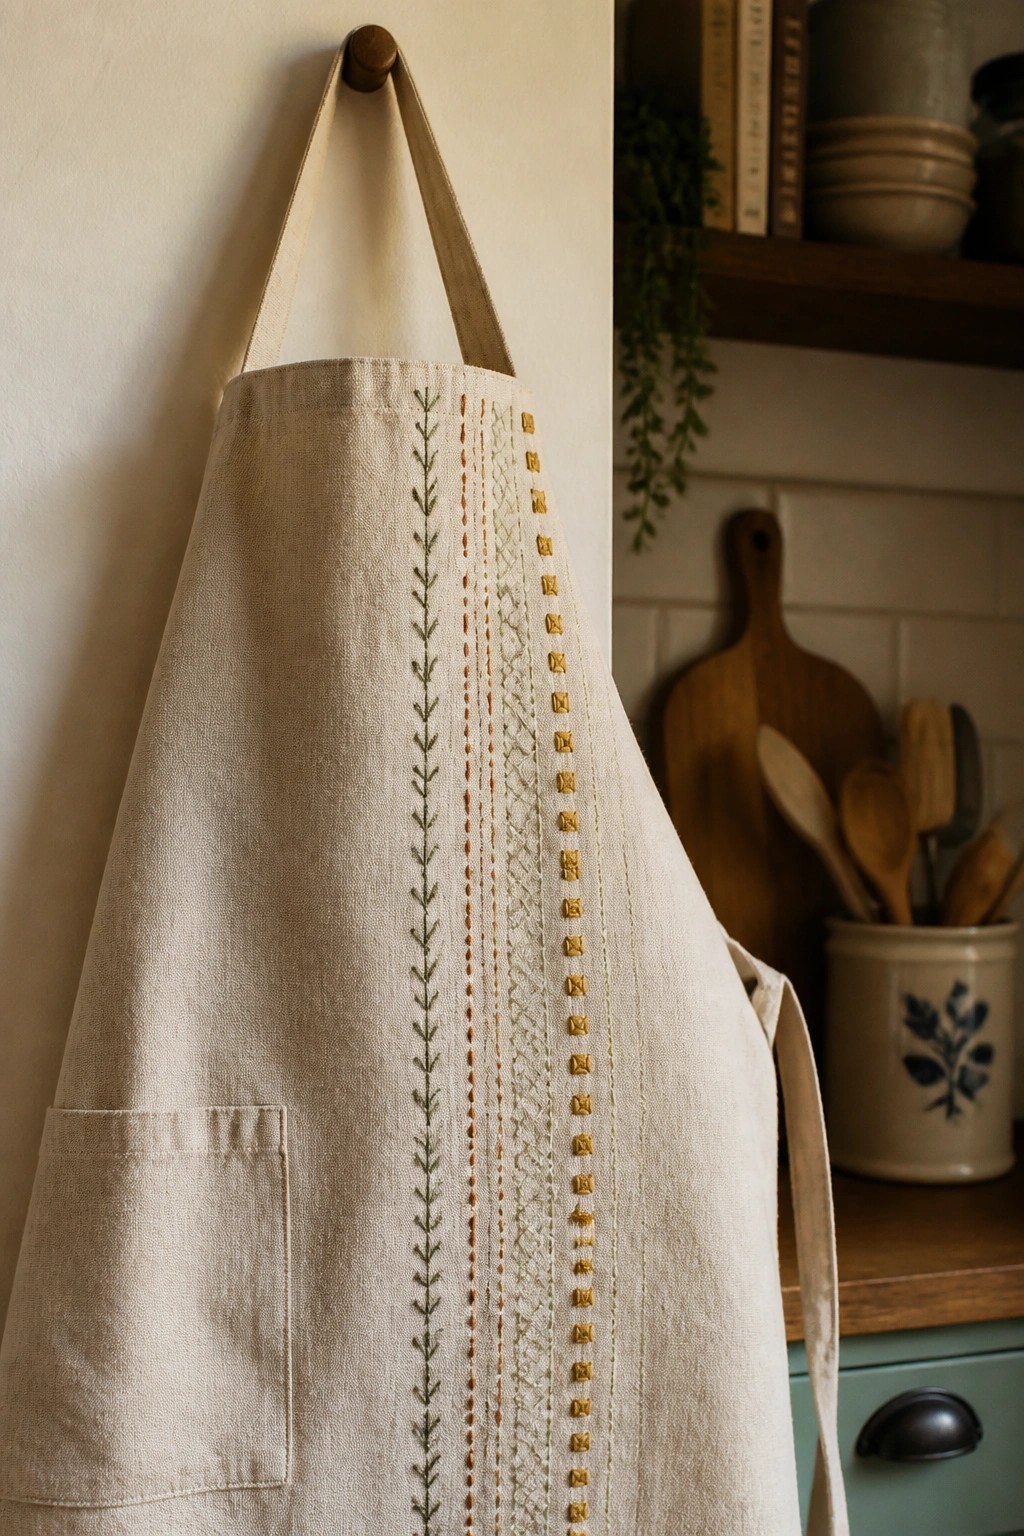
A set of narrow vertical stitch columns running down one side of an apron lets you practice several patterns in one project without covering the usable fabric area. The bands include a leafy vine, a dashed line, a small lattice fill, and rows of box shapes, each kept separate so the eye moves easily from one to the next. Keeping the columns thin and aligned along the edge turns the side of the apron into a built-in sampler while leaving the center plain for daily wear. This approach works on aprons, tea towels, or the front panel of a market bag.
What makes this idea useful is that the narrow format fits along almost any straight seam or hem without needing extra fabric. You can repeat the same bands on a set of kitchen towels or shorten them to fit a pocket edge. Swapping the thread colors to match existing linens keeps the focus on learning the stitches rather than the palette. The stacked layout also makes it easy to add one new pattern at a time as your skills grow.
Scattered Motifs Along Napkin Borders

Small repeating motifs such as leaf sprigs or tight flower clusters work well when placed at regular intervals down one edge of a napkin or similar flat linen. The design stays functional because the stitching sits close to the hem and leaves most of the fabric plain. Using just one or two colors per piece keeps the look balanced and lets the motifs read as quiet accents rather than busy patterns. This approach fits everyday items like napkins, tea towels, or guest towels where you want light decoration without covering the whole surface.
The placement does a lot of the work here because the motifs follow the existing edge and require no extra framing. You could shift the same clusters onto pillowcases or a table runner by tightening or widening the spacing to match the new size. Changing the thread color to match different fabric tones lets the idea repeat across a whole set without looking repetitive. A design like this also photographs cleanly for sharing because the simple layout shows up clearly against the plain linen.
Centered Floral Medallion on a Cushion Cover
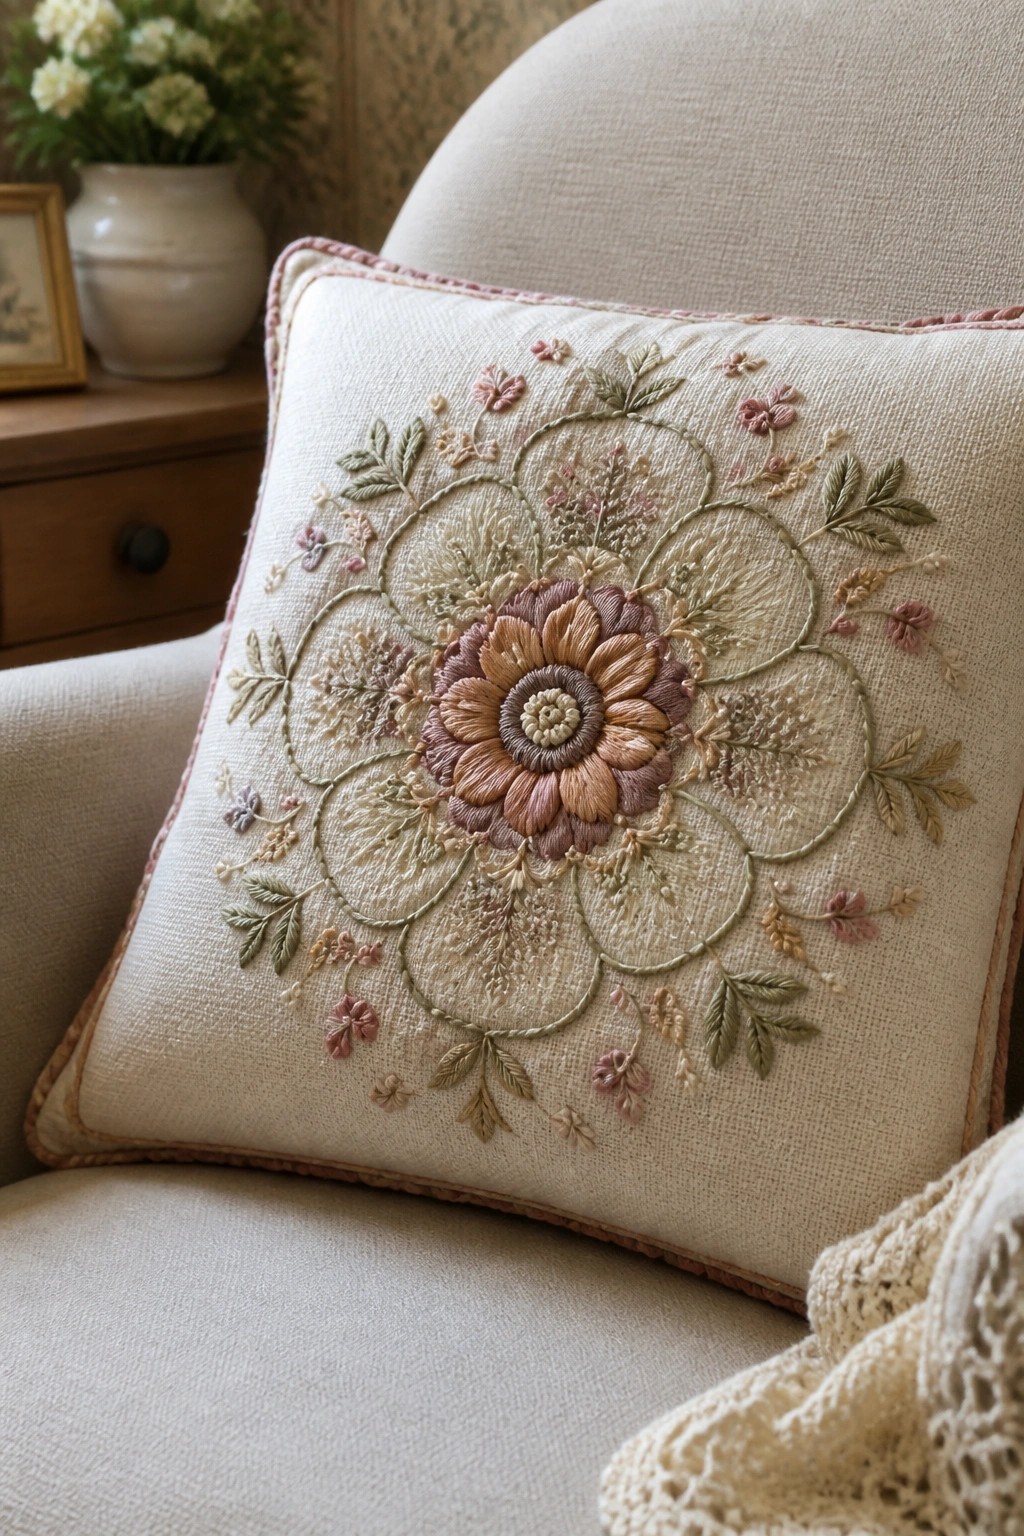
A large circular floral design placed right in the middle of a pillow cover gives you one main motif to build around. The center flower sits inside several rings of smaller leaves, buds, and filler stitches that radiate outward to fill the space evenly. This arrangement works well on flat fabric surfaces because the symmetry keeps the eye moving around the whole circle instead of getting stuck in one spot. It suits beginner-to-intermediate samplers that still need to look finished on a usable item.
What makes this idea useful is how cleanly it adapts to different sizes. You can shrink the same layout to fit a zip pouch or enlarge the outer rings to cover more of a larger cushion. Switching the thread colors to match existing room textiles turns the same pattern into quick seasonal decor without starting over. The even spacing also makes it simple to test new stitch combinations on the outer rings while keeping the center flower as the main focus.
Vertical Repeat Strip for Clothing Details
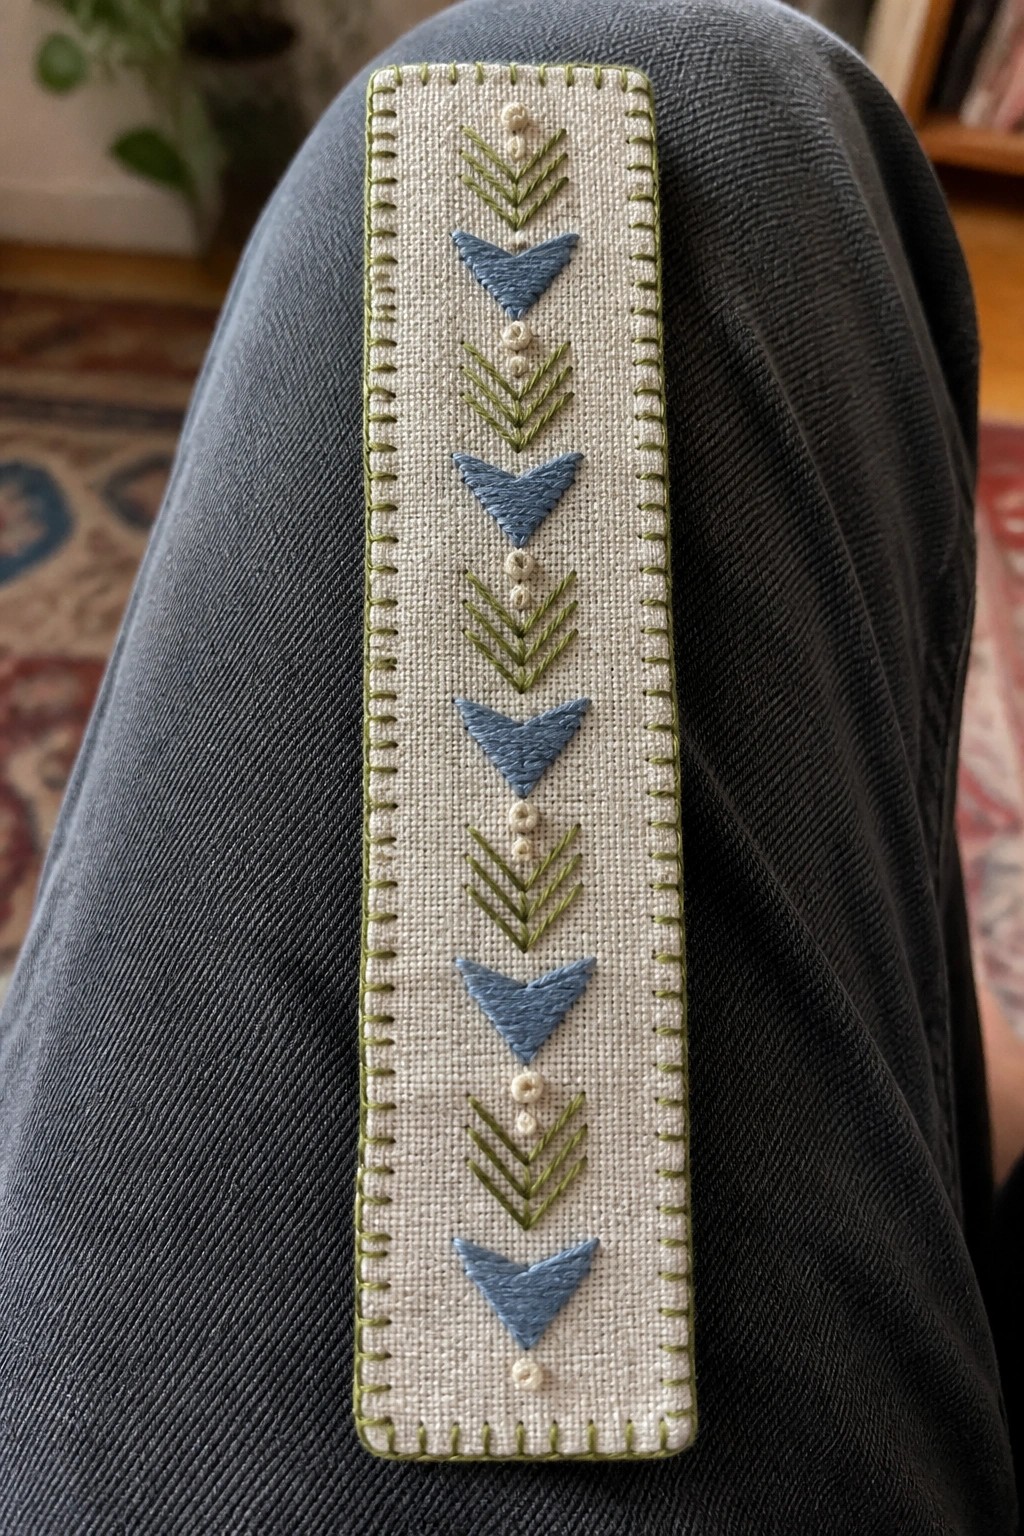
A narrow fabric panel holds a stacked sequence of blue downward triangles, green chevron rows, and small neutral dots, all framed by a simple border stitch. The design is worked on a separate rectangle that can be sewn onto pants, jackets, or bags along a seam or hem. The repeating vertical order creates a clear rhythm that stays readable even on darker base fabrics. This format works especially well for adding a single accent line without covering large areas.
The placement does a lot of the work here because the long, thin shape fits naturally along pant legs or sleeve edges. You can repeat just three or four units for a pocket detail or stretch the full sequence for a longer front panel. Swapping the blue for a neutral thread would make the whole strip subtler on casual clothes, while keeping the color contrast helps it read clearly from a distance. This kind of layout saves well as a template since the spacing between motifs is easy to adjust for different fabric widths.
Frequently Asked Questions
What are some good ways to organize stitches in a sampler for steady skill building? Group stitches by category such as straight stitches, loops, and filling techniques, then dedicate one small section of fabric to each group. Work in rows or blocks so you can compare similar stitches side by side. Leave a small margin between sections so later additions like borders or labels do not crowd the work.
How do I choose fabric and supplies that support repeated practice without frustration? Select an even-weave cotton or linen with a clear grid so counting is easy. Pair it with stranded cotton floss in a few basic colors and a size 7 or 8 embroidery needle. Keep a small hoop or frame handy and change to a fresh needle when the point dulls. These choices let you stitch and rip out mistakes many times before the fabric shows wear.
What should I do if a stitch in the sampler does not look right? Stop and check thread tension first. Pull the working thread gently until it lies flat but not tight, then re-stitch the same motif on a scrap of the same fabric. If the problem continues, switch to a different needle size or shorten the strand length to reduce twisting. Note the adjustment beside the sample so you remember what worked.
How can I turn finished samplers into useful reference tools instead of leaving them in a drawer? Stitch a narrow border around each completed piece and add a simple label with the date and stitch names. Sew several samplers together into a small book or mount them on a ring so you can flip through them quickly when planning a new project. Photograph the pages as well so you have a digital backup you can zoom in on for close-up details.
How often and for how long should I practice to see real improvement? Aim for two or three short sessions each week, each lasting fifteen to twenty minutes. Focus on one new stitch or variation per session and repeat it until the motion feels automatic. Keep a simple log of which stitches you practiced and any notes about tension or spacing. Over several weeks this steady rhythm builds muscle memory without causing hand fatigue.