
I like working on embroidery projects that include flowers because they give me a chance to practice different stitches.
Texture is something I try to build in by mixing thread weights and techniques.
Fine details can make a piece feel more finished without needing a lot of extra elements.
I’ve gathered some ideas that center on these things.
They might give you some inspiration for your own work.
Layered Pastel Rose Cluster in a Hoop

A tight grouping of roses in blended peach and pink shades forms the center of this design, with smaller open flowers and closed buds placed around the edges to balance the composition. Green leaves and thin stems fill the gaps between blooms and extend outward in a loose, natural way. The round hoop frame keeps the entire bouquet contained while leaving empty fabric space around the edges. This approach works well for a standalone hoop piece or as a focal motif on a small pouch or journal cover.
What makes this idea useful is the compact scale that fits inside a standard hoop without extra borders or framing stitches. You could shrink the cluster for a shirt pocket or stretch it slightly wider for a tote bag front. Swapping the soft pinks for deeper reds or adding a few yellow accents would change the mood while keeping the same petal layering. The scattered buds and leaves make it simple to adjust the shape if you want to fit it onto an oval or rectangular item instead.
Mixed Wildflowers on a Denim Pocket
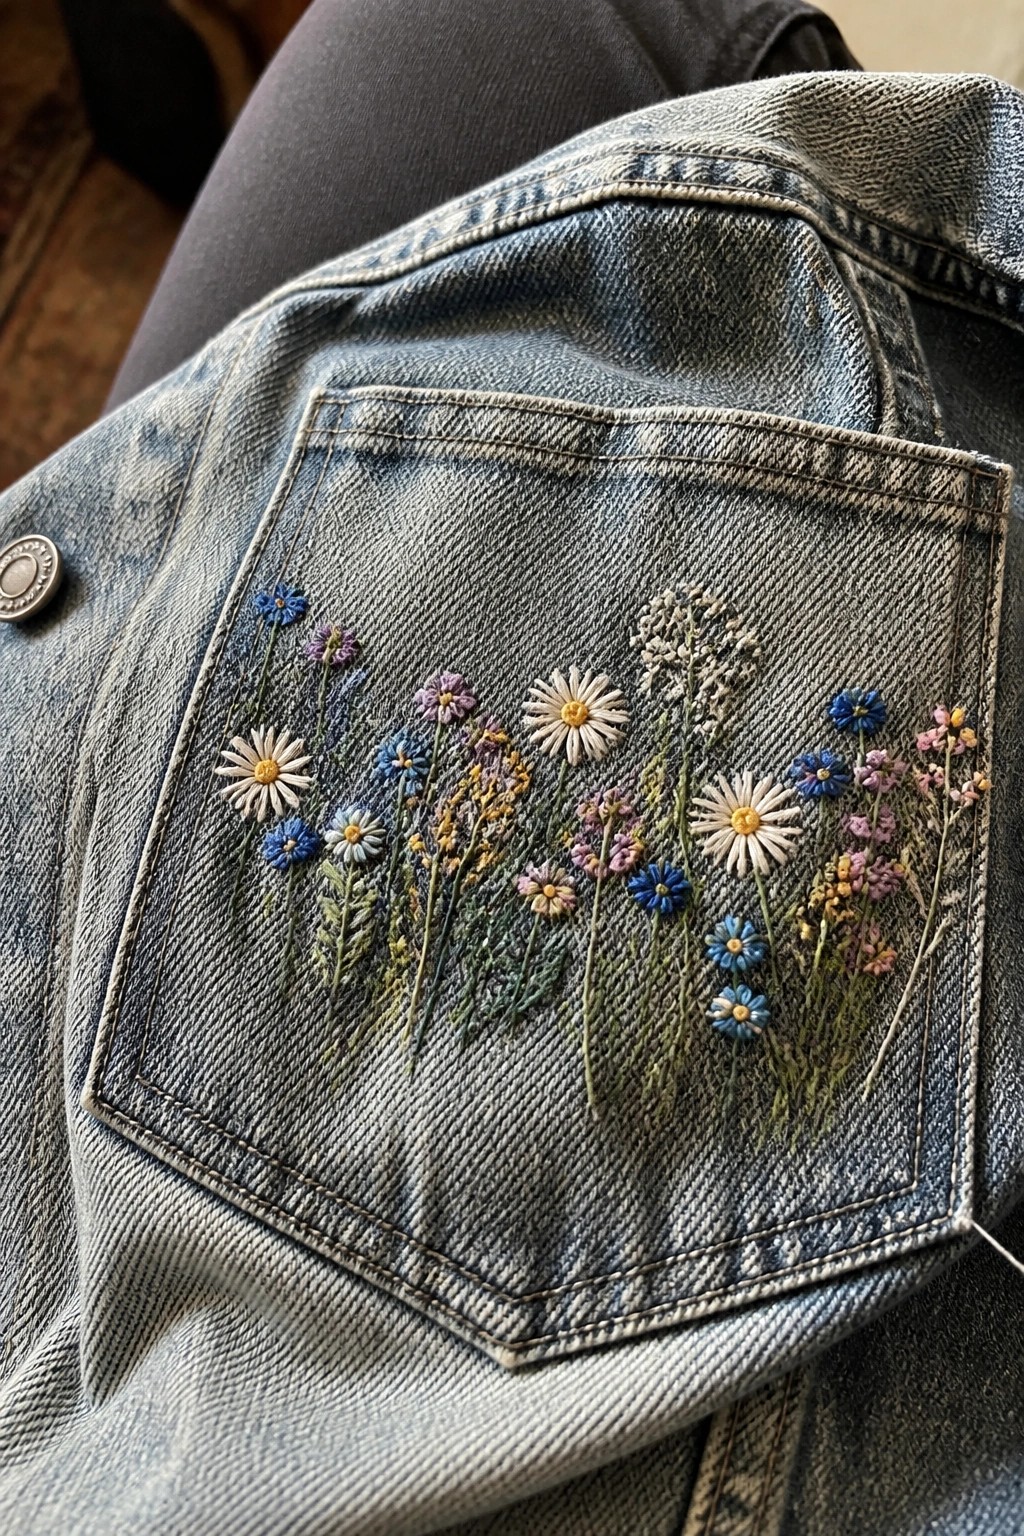
A scattered mix of small wildflowers in white, blue, purple, and yellow creates a natural meadow effect when placed across the front of a denim jacket pocket. The stems vary in height and angle so the flowers fill the rectangular space without crowding it. This approach works especially well on clothing because the denim provides a sturdy base that holds the threads in place during wear.
What makes this idea useful is how the pocket already gives the design clear boundaries. You can shrink the same layout to fit a smaller pocket on jeans or expand it slightly for the back of a canvas bag. Switching to fewer colors or softer shades would tone down the look for a subtler result on lighter fabric. The loose spacing also makes it simple to copy by eye without needing a full pattern.
Peony Cluster on a Canvas Tote
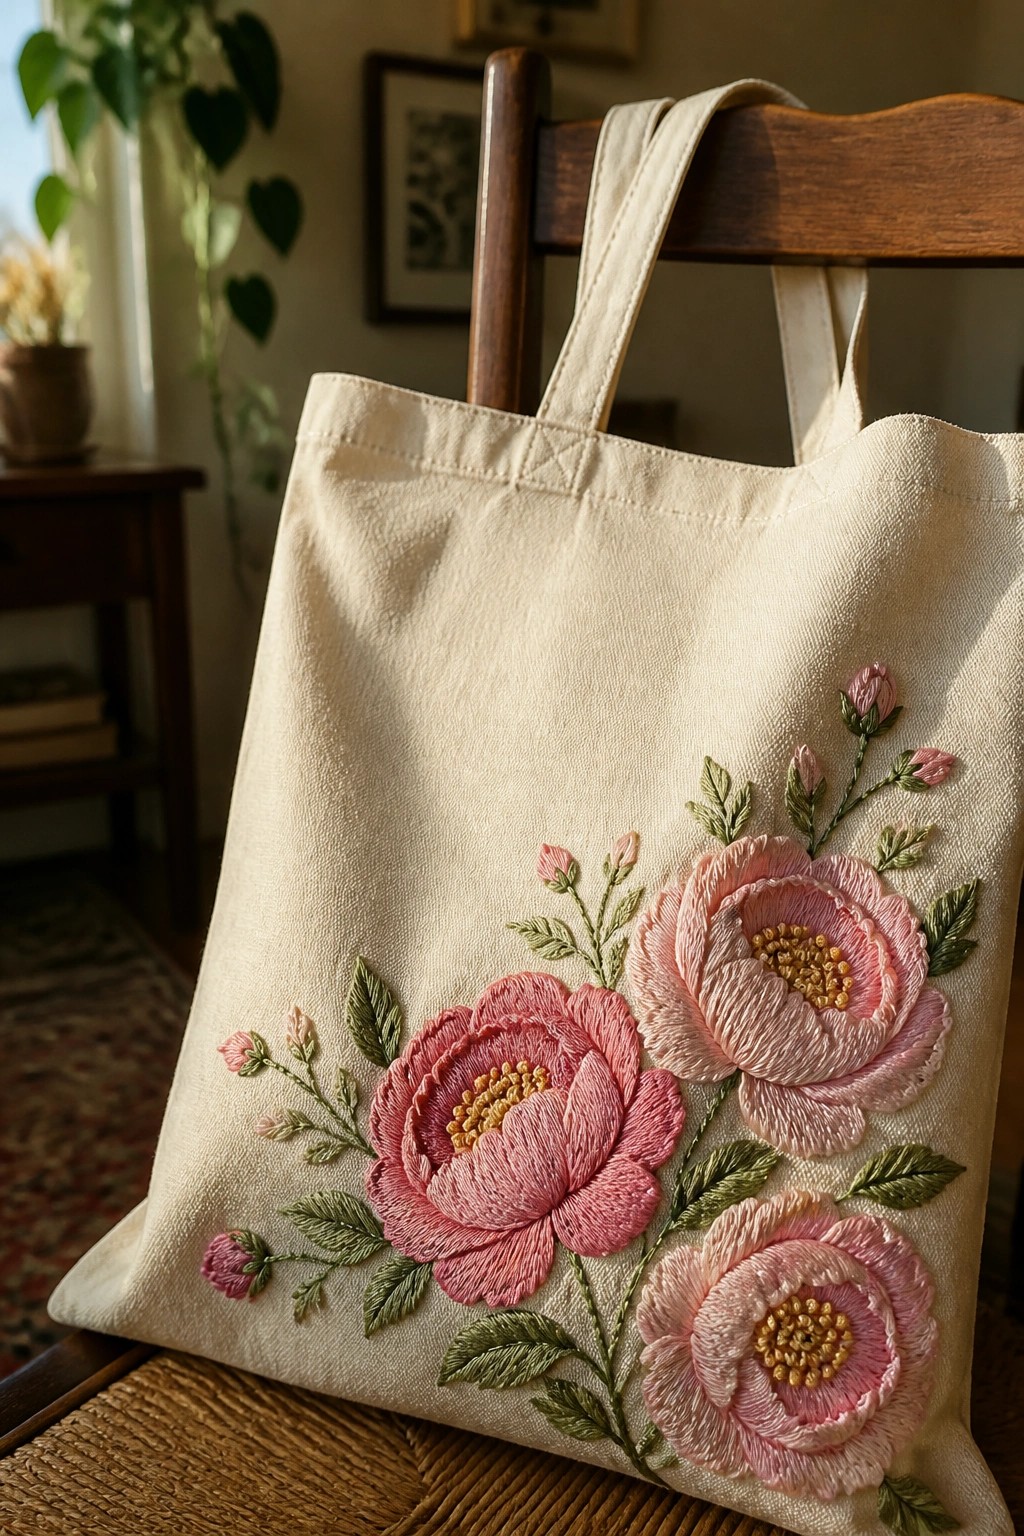
A group of pink peonies with varying bloom sizes and scattered buds creates a compact floral arrangement that sits across the lower half of a canvas tote. The design uses overlapping petals and layered foliage to build depth without spreading too wide, leaving the upper portion of the bag clear for practical use. This layout suits accessories like totes or pouches because the motif stays contained while still showing texture from the thread work.
What makes this idea useful is how the offset placement keeps the bag functional while highlighting the flowers near the bottom edge. The same cluster could move to a jacket back pocket or the corner of a throw pillow by dropping one or two blooms to reduce scale. Switching the pinks to a single color family or tightening the spacing between flowers would help the design fit narrower surfaces without losing its natural shape.
Circular Floral Wreath on a Pillow Cover

A ring of flowers embroidered in cream thread forms a wreath that sits centered on a pillow cover made from sage green fabric. Small clusters of leaves connect the blooms and fill out the circle while keeping the overall shape balanced. The design uses a limited palette so the motif stays visible without competing with the background fabric. This approach suits pillow covers and other flat home textiles where a contained pattern can be completed in sections.
The circular layout fits the shape of a square pillow without needing to reach the edges. You can shrink the same wreath for a smaller pouch or enlarge it for a throw by adding more flowers around the ring. Changing the flower color to match the base fabric creates a subtler version while keeping the contrast high makes the motif pop on darker linens. This contained wreath format shows up often in saved images because it reads clearly even at thumbnail size.
Poppy Border for Towels and Napkins

A row of small red poppies with green stems stitched along the outer edges creates a clean repeating border on a towel or napkin. The flowers sit close to the hem and follow the shape of the fabric, leaving the center open for everyday use. This approach works because the narrow band of color frames the item without adding bulk or interfering with function. It fits kitchen towels, tea towels, or cloth napkins where a light floral detail is wanted.
The narrow scale lets you shorten or lengthen the border easily for different fabric sizes. You can drop the flower count to just one side on a pillowcase or repeat it around a small coaster set. Switching the red to another color keeps the same layout while changing the season or room style. This edge treatment photographs clearly on Pinterest because the flowers stay visible even when the fabric is folded or hung.
Scattered Florals on a Fabric Scrunchie

Embroidering a few small, separate flower motifs onto a plain scrunchie gives a basic hair or wrist accessory extra detail without covering the whole surface. A rolled rose, a tight cluster of tiny purple blooms, and a single leaf sprig placed at intervals let the gathers of the fabric stay functional while the stitches remain visible. This layout works especially well on items that move and bunch because the motifs stay small enough not to fight the stretch.
What makes this idea useful is how quickly the same three motifs can be repeated on other narrow fabric bands like headbands or soft cuffs. Shifting the colors keeps the same scattered placement but changes the look for different seasons or outfits. The white background helps the threads stand out even when the stitches stay light, which makes the finished piece photograph clearly for pattern sharing or selling.
Flower Sprigs Along a Shirt Collar

A small branch of pink flowers with buds works well when stitched directly onto a shirt collar. The design uses a narrow vertical layout that fits the shape of the pointed collar without overwhelming the fabric. Soft pink petals paired with thin green stems create enough contrast to show up on light-colored shirts while keeping the overall look simple. This approach suits button-down shirts or blouses where the embroidery sits near the face and stays visible during wear.
The placement does a lot of the work here because the collar already draws the eye. You can repeat the same branch on both sides of the collar or shift it to a cuff for a matching set. Scaling the motif down even smaller lets it fit on a pocket edge or neckline facing. Changing the flower color to a deeper shade or using a single color for the whole branch makes the design adapt easily to different shirt fabrics without needing extra layers.
Protea Flower Embroidered on Denim Jeans
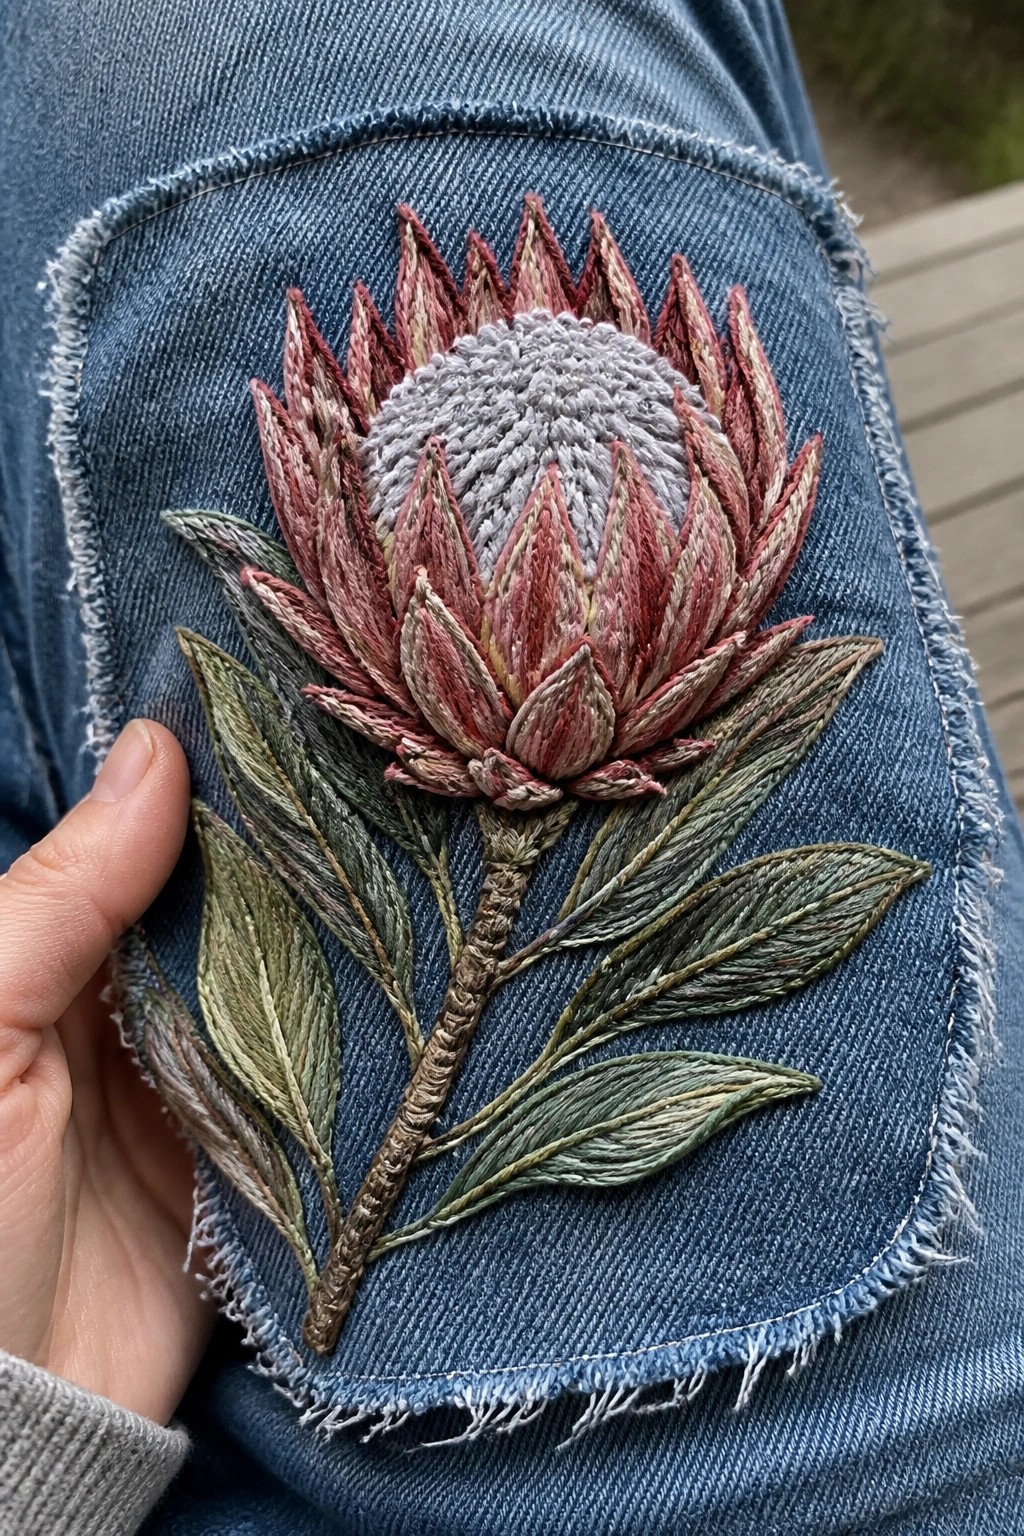
A large protea-style flower with layered petals and long leaves makes an effective focal point when stitched directly onto the back pocket area of jeans. The design uses dense stitching in the center and directional threads in the petals to create visible texture that contrasts with the flat denim weave. This approach suits clothing repairs or updates, especially where you want to cover faded spots or frayed edges on pants and jackets. The size works for medium areas without needing a hoop once the base fabric is stable.
What makes this idea useful is how the motif fills an existing pocket shape while turning a repair into a feature. You could shift the same layout onto a canvas bag or a denim jacket sleeve by shortening the stem and grouping the leaves tighter. Swapping the petal colors to cooler tones would help it blend on lighter wash denim, while keeping the current muted palette prevents it from competing with other patches. The placement on a curved surface like a pocket also shows how the design holds up on garments that get regular wear.
Lily of the Valley Sprig on a Small Pouch

A simple cluster of lily of the valley stems with hanging white flowers and a few green leaves at the base creates a compact motif that fits neatly on a linen pouch. The design stays centered on the front surface, keeping the flowers stacked vertically so the overall shape remains tall but narrow. This approach works well on small fabric accessories because the motif fills the space without needing extra borders or filler.
The placement does a lot of the work here since the pouch shape already gives the design clear edges to work within. You could move the same layout onto a zippered bag or a jacket pocket by shortening a couple of the outer stems. Switching the thread color on the flowers to a pale blue would change the look while keeping the same stem arrangement and scale.
Corner Bouquet on Hemmed Fabric
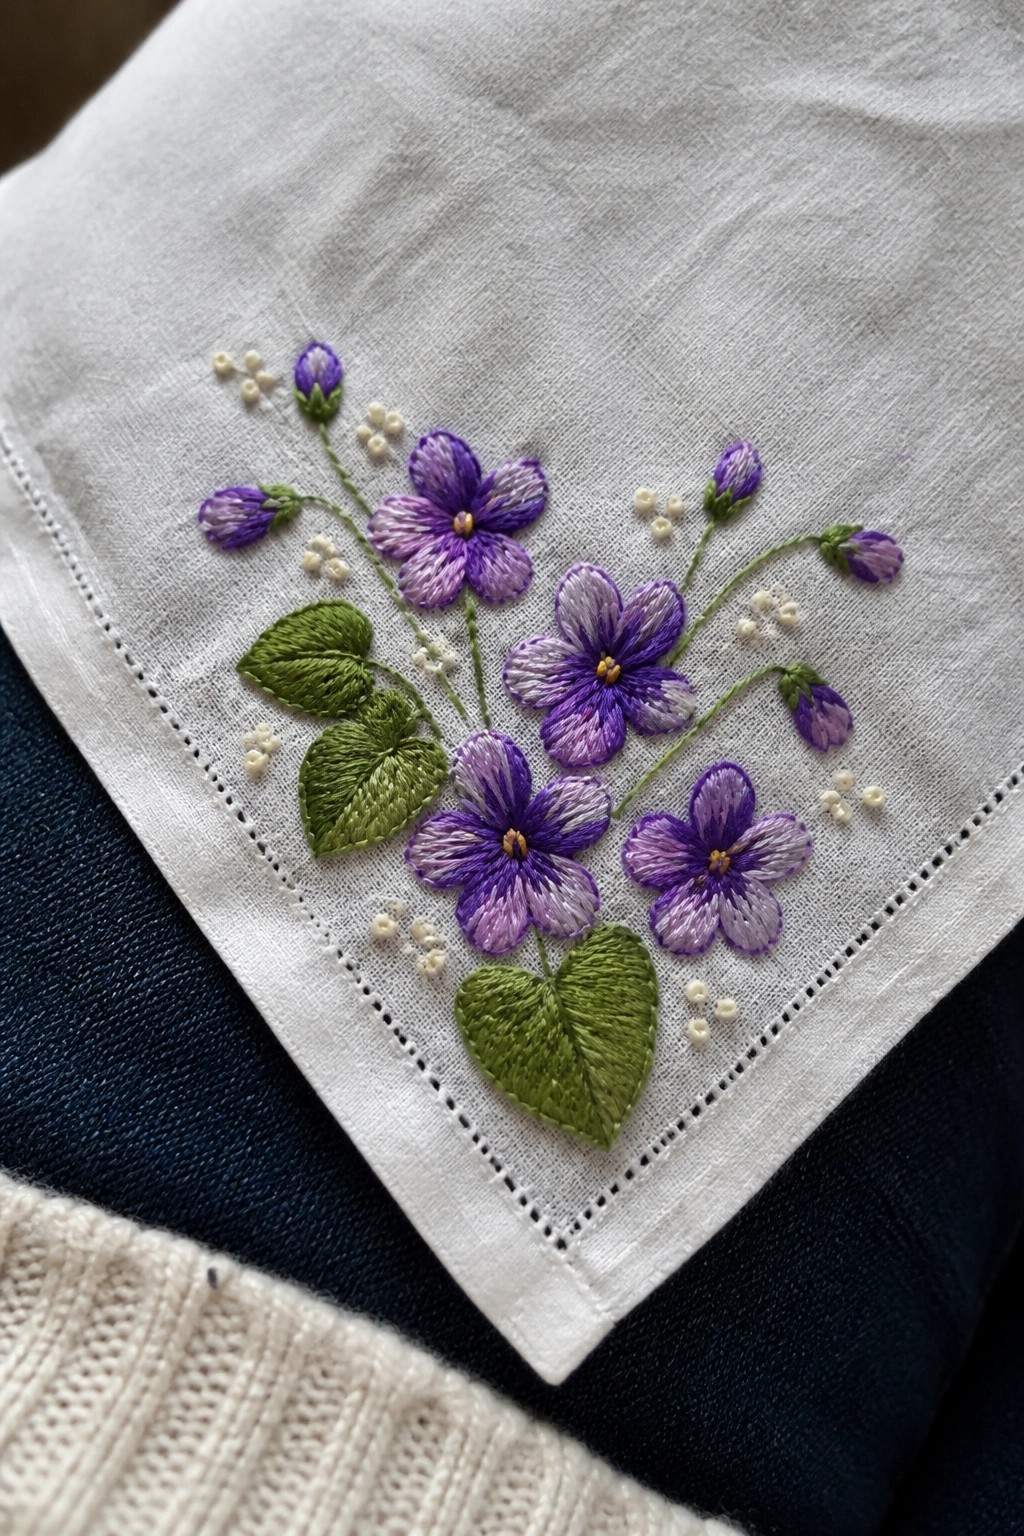
A tight cluster of purple flowers with layered petals sits in the corner of a white hemmed fabric piece, surrounded by green leaves at the base and small white bud clusters scattered along the stems. The design stays compact so the rest of the fabric remains usable. This approach suits handkerchiefs, napkins, or the corners of scarves where the embroidery needs to stay out of the main working area.
The corner placement leaves the center open while still showing the motif when the item is folded or held. You can shrink the whole group to fit on a shirt cuff or pocket, or stretch the stems slightly for a longer scarf edge. Swapping the purple tones for softer pastels changes the look without altering the layout, and the small scale keeps stitching time short for gifts or sets.
Circular Thistle Motif on a Canvas Backpack
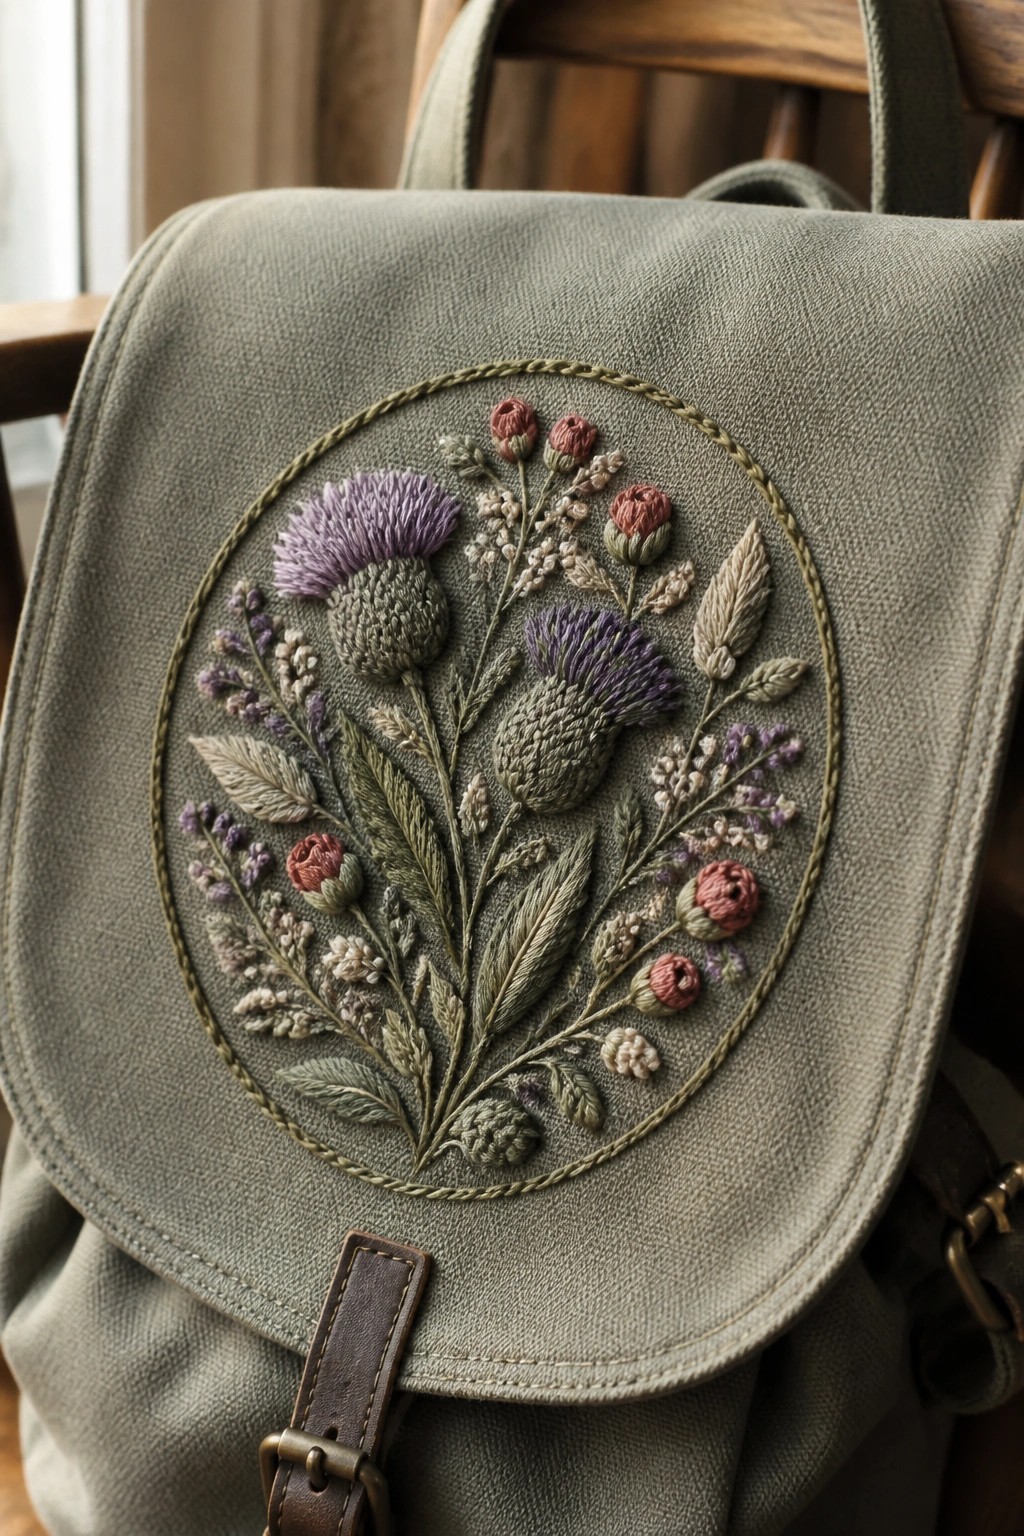
A round medallion filled with thistles, small red buds, and mixed foliage sits centered on the front flap of a canvas backpack. The design stays contained inside a simple braided border that keeps the edges clean against the fabric. Layered stitching on the larger flower heads creates texture while the surrounding stems and leaves stay flatter so the piece does not bulk up the bag surface. This layout suits bags, totes, or any accessory that needs a single focal point without covering the whole item.
What makes this idea useful is how the circular frame lets you drop the same motif onto different surfaces without redesigning it. You could reduce the scale for a jacket pocket or stretch the border slightly for a larger messenger bag. Changing the thread palette to cooler blues and grays would shift it toward a winter look, while brighter pinks would work for spring projects. The contained shape also transfers easily to smaller items like a makeup pouch or a notebook cover.
Daisy Garland on a Baby Onesie

A horizontal row of small daisies connected by thin stems and leaves forms a simple band across the chest of a baby onesie. The design sits centered on the garment so it remains visible when worn without covering too much surface area. Light thread on the pale fabric keeps the look soft while the fine scale matches the size of infant clothing. This placement works best on bodysuits, rompers, or other baby basics where the embroidery stays flat and wearable.
The placement does a lot of the work here because centering the band avoids awkward cropping on small garments. You could repeat the same width on a bib, a pocket, or the hem of a toddler shirt for quick coordination. Switching the flowers to a single color or tightening the spacing would make the motif faster to stitch for last-minute gifts. Short horizontal designs like this show up often in searches because they fit neatly into limited spaces without needing a large hoop.
Shaded Peony with Overlapping Petals

A peony worked in flat satin stitches across the petals creates a smooth surface that shows off the shift from pale pink at the edges to deeper magenta near the center. The flower sits centered on the fabric with some petals left partially outlined, letting you build the full bloom in stages. This approach works well for a finished hoop or as a single motif on a larger piece of fabric like a cushion cover or tote.
What makes this idea useful is how the color changes within one flower give it depth without extra stitches or outlines. You could scale the same layout down for a pocket on a shirt or repeat it along the edge of a table runner. Switching the pinks for softer pastels or stronger reds changes the look enough to match different rooms or seasons while keeping the same petal arrangement.
Cosmos Cluster on Linen Napkins

A small group of cosmos flowers in varying shades of pink and white works as a repeating motif on napkins or placemats. The stems and leaves run along one side of the fabric so the main surface stays clear for use. Different flower sizes and a single bud prevent the layout from looking rigid while still keeping the whole design contained. This approach suits table linens because the scale stays practical and the placement shows when the item is folded or in use.
The placement does a lot of the work here by anchoring the flowers near the edge where they remain visible during meals. You could move the same loose arrangement onto a tea towel by shortening the stems or onto a bread basket liner by spreading the flowers farther apart. Switching to cooler tones would let the design fit seasonal table settings while keeping the same flower shapes. A design like this works especially well on lighter fabrics where the thread colors stand out without extra outlining.
Rolled Flower Bouquet on a Denim Circle
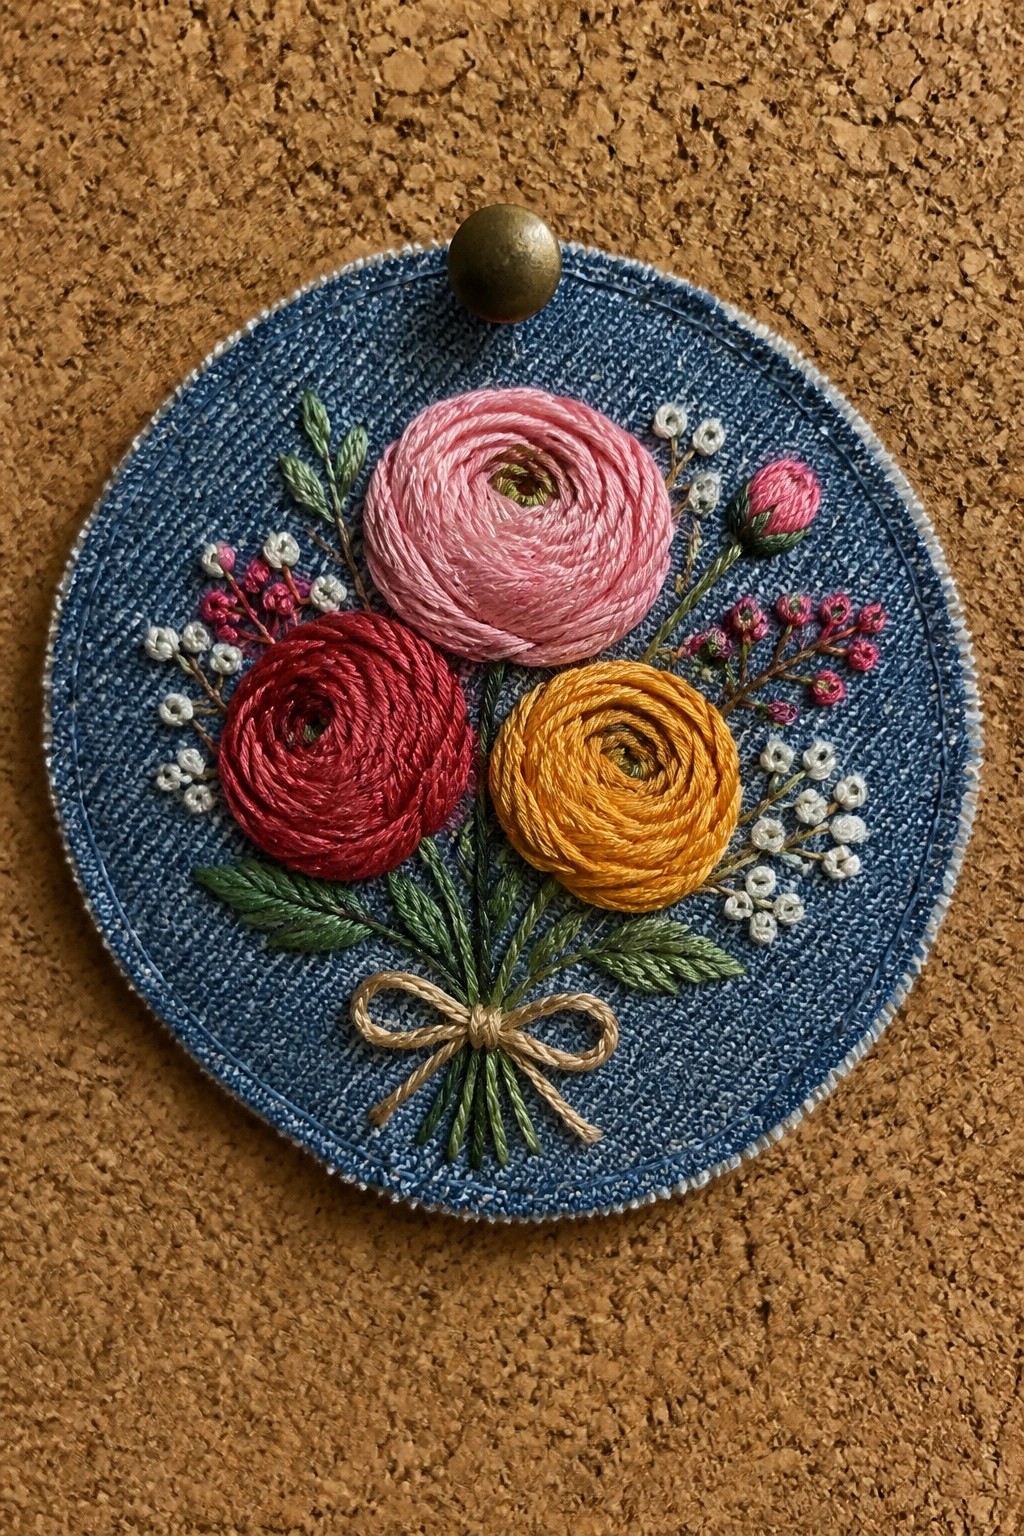
A cluster of three rolled flowers in pink, red, and yellow forms the main motif on a small denim circle, with stems pulled together at the base and secured by a tied bow. Green leaves and scattered small blooms fill the space around the main flowers without crowding them. This layout works as a standalone patch that can be stitched onto clothing, bags, or hats rather than left in a hoop.
The tight circular format makes it easy to adapt by swapping fabric colors or resizing the whole piece for different items. Shifting the bow color or reducing the number of filler blooms changes the look quickly while keeping the same structure. A design like this transfers well to ready-made denim pieces because the base fabric already matches common casual clothing.
Vertical Nasturtium Trail on an Apron Front

A trailing vine of nasturtium flowers works well as a central motif on the front of an apron. The design runs vertically from the bib down toward the hem, with flowers and leaves spaced to follow the fabric shape. Bright orange and yellow blooms paired with rounded green leaves give the pattern enough contrast to stand out against the neutral linen while leaving room for a pocket below.
What makes this idea useful is how the narrow vertical layout fits tall surfaces without crowding the fabric. You could shorten the vine for a smaller apron or move it to one side to keep both sides of a tote bag clear. The same flower cluster would also transfer to a tea towel border or the edge of a table runner if you adjust the spacing. Changing the flower colors to softer tones keeps the structure but shifts it toward lighter linens.
Pansy Cluster on a Velvet Headband

A row of embroidered pansies in layered shades of purple, mauve, and soft pink runs along the front curve of a velvet headband, with small leaves and stems filling the spaces between them. The flowers sit low on the band so the embroidery stays visible when worn, and the matte velvet background makes the stitched petals stand out through simple color contrast. This approach works best on accessories that sit close to the face, where the raised stitching adds interest without needing a large surface area.
What makes this idea useful is how the compact flower group fits the curved shape of a headband without crowding. You could shift the same layout onto a velvet scrunchie, a narrow belt, or the edge of a cuff by shrinking the scale and dropping one or two flowers. The velvet texture already supplies depth, so the embroidery only needs basic color changes in the petals to feel finished. On Pinterest this kind of project shows up well in flat lays because the fabric catches light differently than the thread.
Floral Border on a Linen Clutch
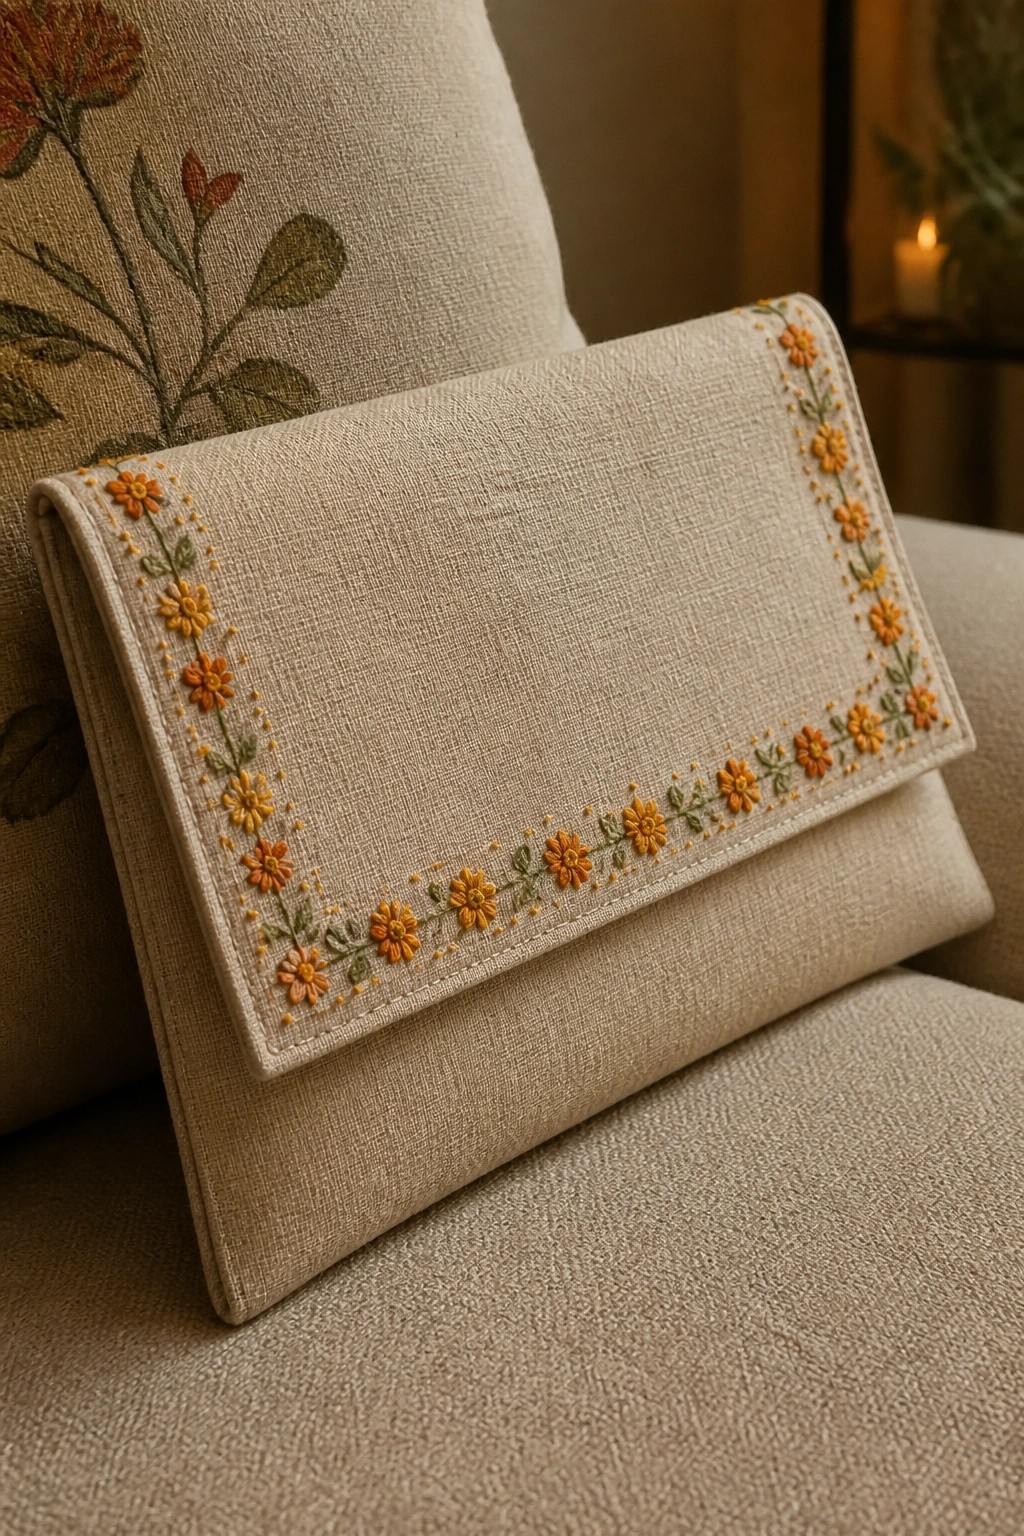
A repeating border of small orange and yellow flowers with green leaves and scattered dots runs along the outer edges of a fold-over clutch. The design sits right on the perimeter, leaving the center of the fabric plain so the stitching acts as a frame. This placement keeps the embroidery compact and lets the flowers define the shape without covering the whole surface. The same border works on any small fabric accessory where you want a clean finished edge.
What makes this idea useful is how the narrow border can stretch or shrink to fit different clutch sizes or even shift onto a makeup bag or notebook cover. Switching the flower colors to match a bag lining or seasonal palette changes the look without redrawing the layout. The open center also makes the piece faster to finish than a fully filled design. A design like this photographs cleanly on neutral fabric, which helps it perform well when shared online.
Purple Flower Clusters on Canvas Shoes

Cluster several small purple flowers with branching green stems and leaves across the toe area of slip-on canvas shoes. The design uses a loose, natural arrangement that follows the curve of the shoe without overcrowding the space. This placement keeps the embroidery visible when the shoes are worn while leaving the sides and heel plain. The idea suits accessories or footwear that benefit from a small, contained motif rather than full-surface coverage.
What makes this idea useful is how the compact scale fits neatly on curved surfaces like shoe toes or bag fronts. You could shift the same cluster to a jacket pocket, a denim cuff, or a linen tote by enlarging the stems slightly for better balance. Changing the flower color to a single shade or adding a few extra leaves lets the motif adapt to different fabrics without redesigning the layout. The simple grouping also photographs clearly for pattern sharing or project boards.
Floral Patches Added to Denim Jeans
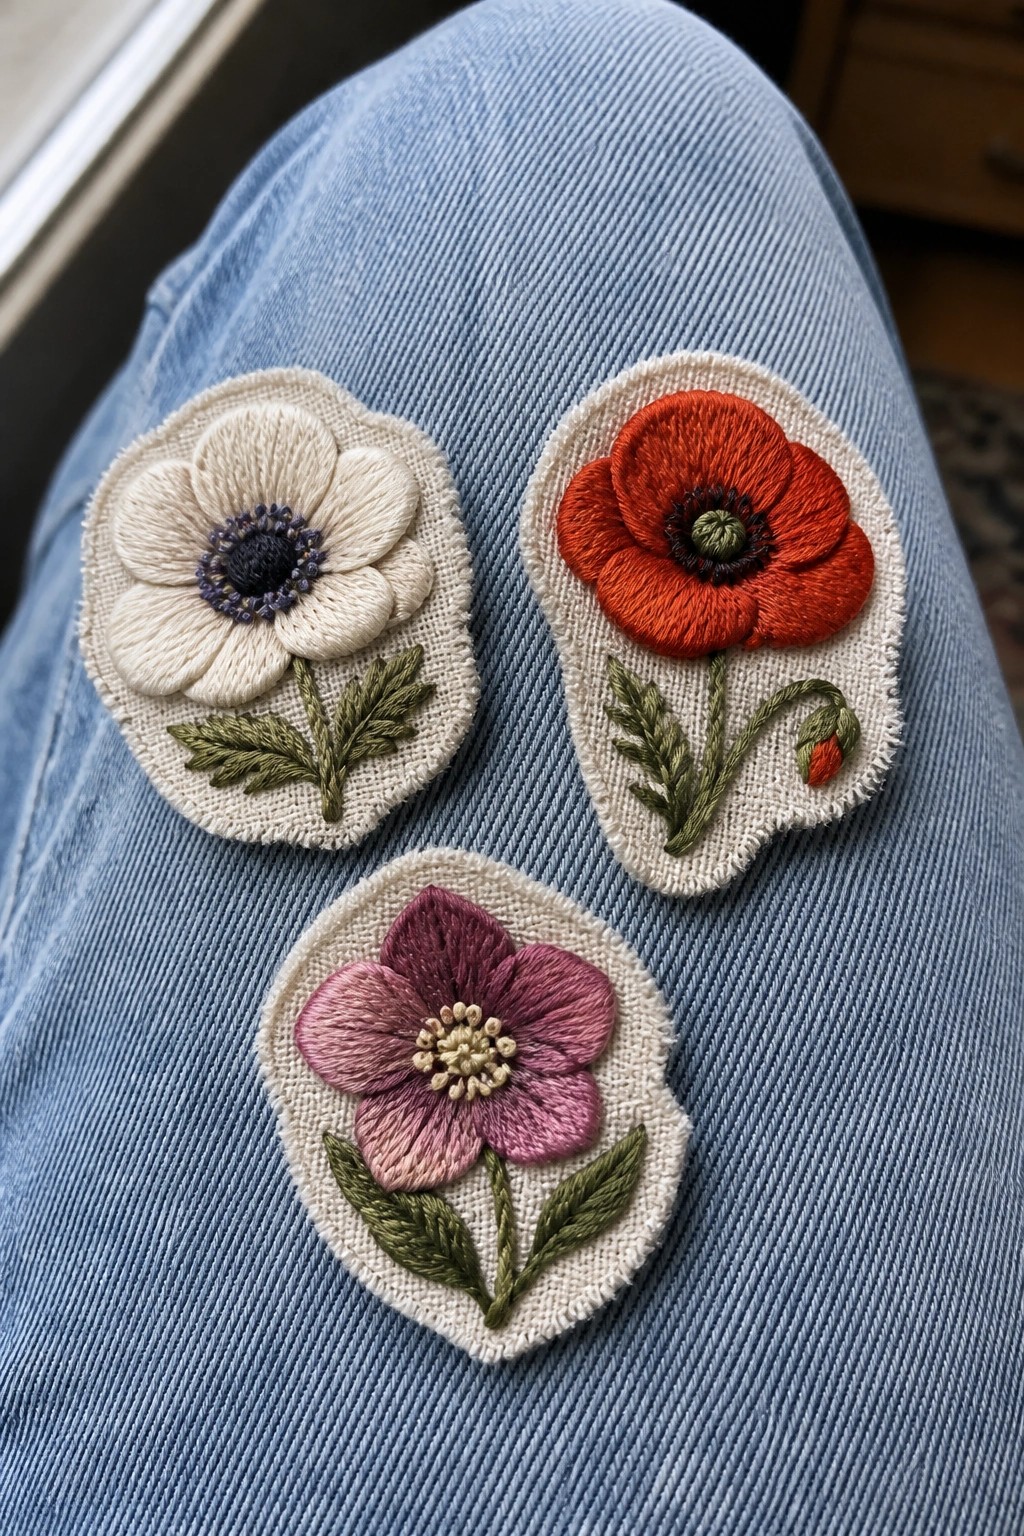
Separate flower motifs stitched onto small fabric ovals create ready-to-attach patches that sit on the thigh area of jeans. Each patch holds one bloom with simple leaves and stems against a light base fabric, so the design stays contained and easy to position without working directly through heavy denim. This format suits clothing updates since the patches can be stitched or ironed on after the embroidery is finished.
What makes this idea useful is the flexibility to test placement before committing to the garment. You can repeat the same patch shape on a jacket pocket or tote bag, or swap in different flower colors to match seasonal clothes. The contained size also keeps the stitching manageable on a hoop before the final attachment step.
Tall Bluebell Stem on a Bookmark

A single vertical stem of bell-shaped flowers gives this design its structure. The flowers run in a loose line down the center of a narrow fabric strip, with the largest blooms near the middle and smaller buds toward the top. Green leaves sit only at the base so they do not widen the overall shape. This keeps the piece slim enough to function as a bookmark while still showing a complete plant.
What makes this idea useful is how the narrow vertical format translates to other small items like journal covers or zip pouches. Shorten the stem and it fits a pocket or corner accent on a bag. Lengthen it slightly and the same flowers work on a longer ribbon bookmark or a thin wall hanging. Changing the flower colors to one solid shade makes the piece faster to stitch while keeping the same clean layout.
Vertical Iris Row on a Table Runner
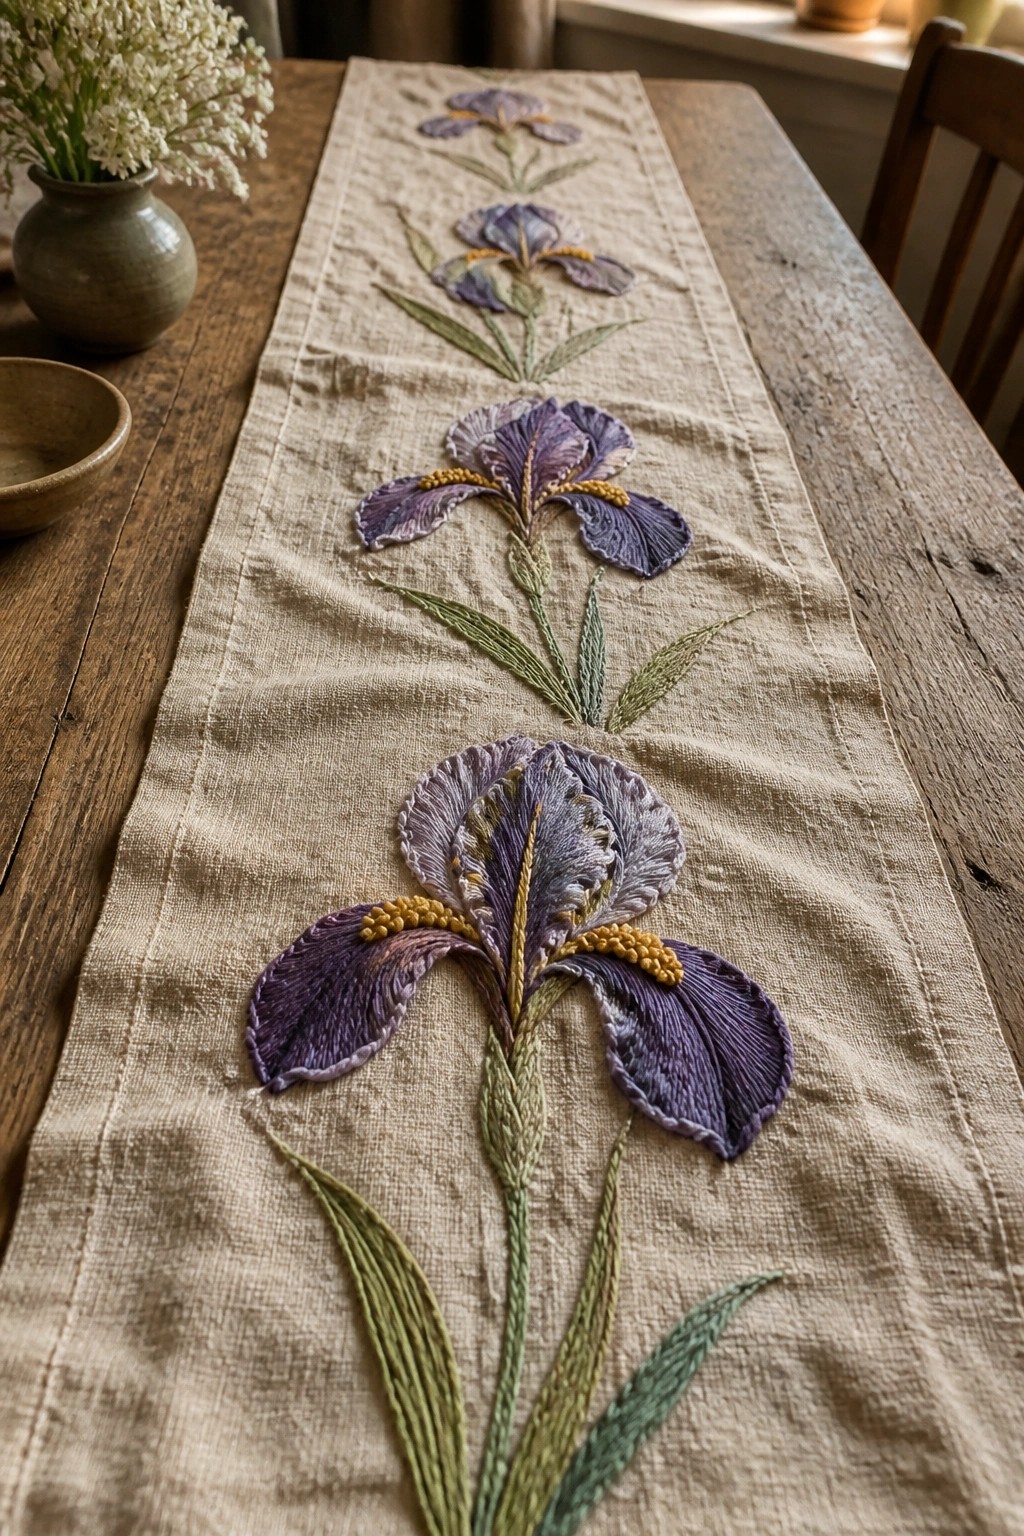
A single column of iris blooms running down the center of a narrow fabric piece creates a clean, repeating motif that fits long surfaces. The flowers vary slightly in scale and angle while the leaves and stems continue the line downward in layered greens. This placement works best on items like table runners, scarf ends, or wide bookmarks where the vertical flow has room to develop without needing a wide background.
What makes this idea useful is how the narrow format lets you use one continuous stem line instead of scattered motifs. You could shorten the whole row for a placemat edge or stretch the spacing for a longer runner on a dining table. Changing the purple tones to softer pastels would shift it toward spring linens while keeping the same layout. The centered placement also makes it simple to adapt onto fabric bags or curtain panels if you keep the width consistent.
Protea Flower with Scattered Berry Stems
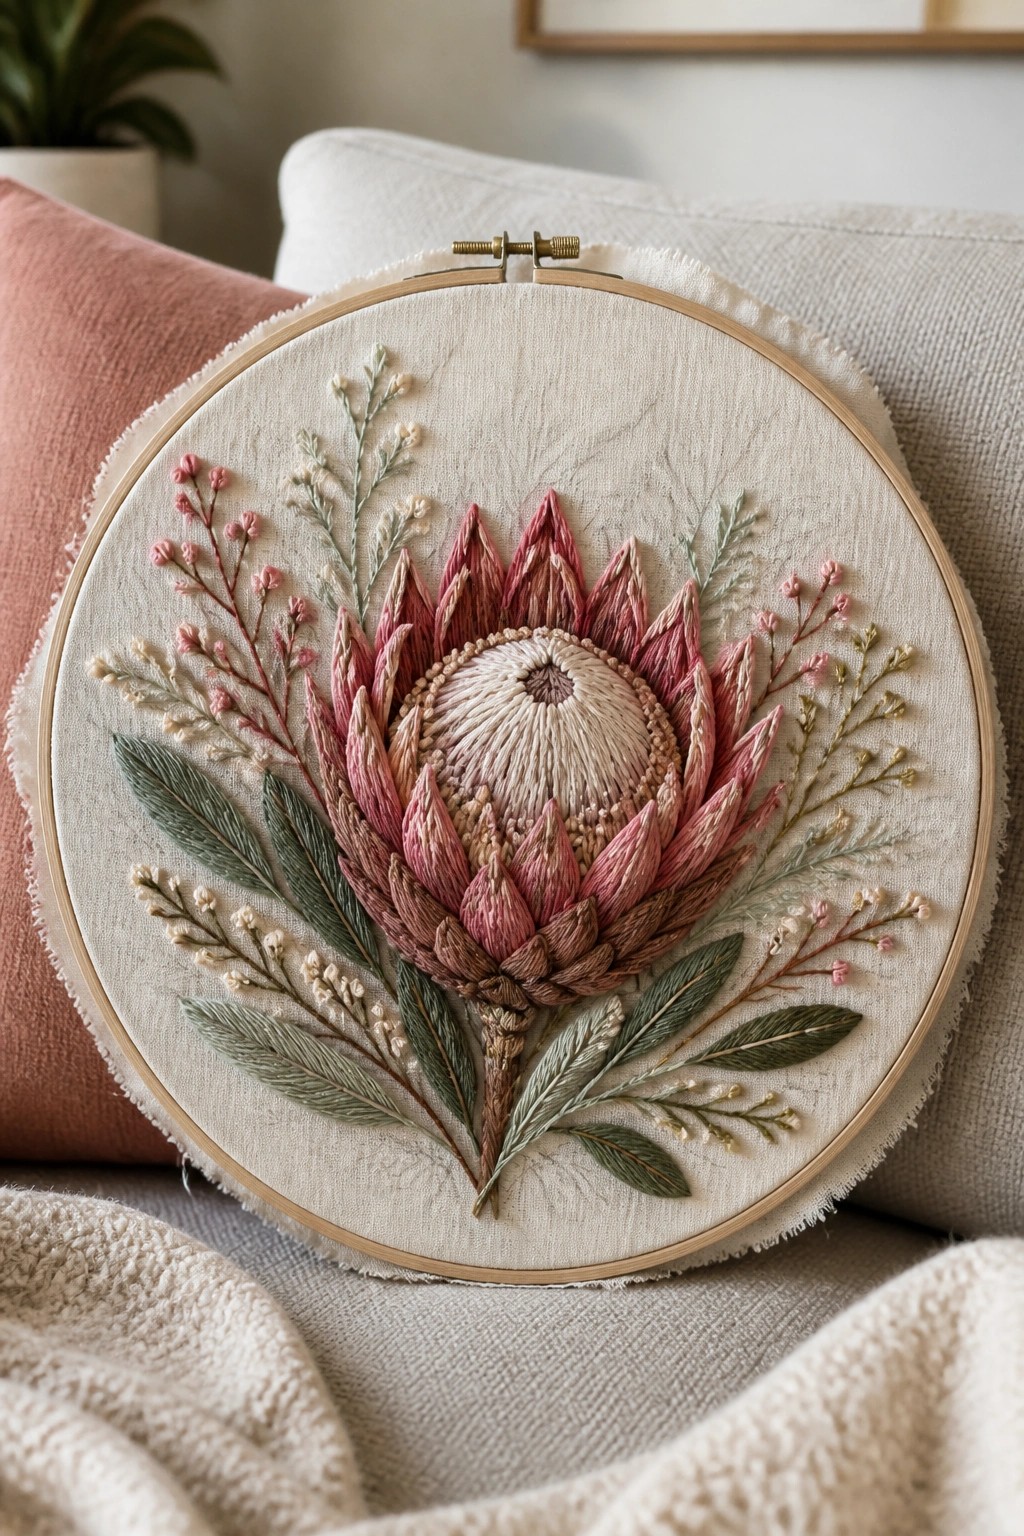
A large central flower with layered, pointed petals in pink and brown tones forms the main focus, while thinner stems carrying small berries and narrow leaves fill the space around it on all sides. The design sits centered in a round hoop, with the outer elements kept lighter in scale so they do not compete with the flower. This layout works well for a finished hoop piece or for transferring onto a round cushion cover or tote bag front. The strong center gives the eye an easy place to land while the surrounding stems add balance without crowding the fabric.
The placement does a lot of the work here because the circular hoop shape already matches the radiating petals. You could shrink the whole motif to fit on a jacket pocket or enlarge just the center flower for a pillow. Switching the petal colors to cooler tones or brighter pinks would change the mood without needing new stitches. The mix of one bold element and several fine ones also shows up clearly in search results when people look for flower embroidery patterns.
Floral Bouquet on a Clasp Purse

A compact cluster of mixed wildflowers forms the main motif here. The design sits centered on the front panel of a small fabric pouch fitted with a metal clasp frame. Stems radiate from the bottom center while blooms fill the upper space to match the curved shape. This approach suits small accessories like coin purses, makeup bags, or zip pouches where space is limited.
What makes this idea useful is how the rounded layout matches the purse shape without extra borders. You could move the same cluster onto a larger tote panel or shrink it for a key holder. Switching the blues and yellows to a single color family would let the piece match different fabrics or outfits. The dense fill makes the design read well in photos even when the item itself stays small.
Frequently Asked Questions
1. What supplies do I need to try these hand embroidery ideas? You will need an embroidery hoop to maintain fabric tension, needles in sizes 3 to 10 for different thread thicknesses, and threads such as stranded cotton, silk, or wool to build texture. Choose base fabrics like linen or cotton that grip stitches securely. Add beads or metallic threads for extra detail in flower centers and consider a thread organizer to keep colors sorted during complex projects.
2. How can I create realistic textures in flower embroidery? Layer multiple stitch types such as French knots for bumpy centers, bullion stitches for raised petals, and couching for dimensional stems. Vary thread weights by using thicker wool for bold textures and finer silk for subtle shading. Build depth by stitching over existing layers and experiment with knot clusters to mimic the natural unevenness of real flower surfaces.
3. What stitches work best for fine details on petals and leaves? Satin stitch provides smooth coverage for petal shapes while split stitch creates delicate outlines and veins in leaves. Use backstitch for crisp edges and seed stitches to fill small areas with texture. For extra precision on fine lines, separate thread strands and work slowly with a sharp needle to avoid puckering the fabric.
4. Are these embroidery projects suitable for beginners? Many of the simpler flower motifs can be adapted for beginners by starting with basic stitches like straight stitch and lazy daisy before advancing to textured elements. Focus on one idea at a time and practice on scrap fabric first. More intricate designs with fine details may require intermediate skills but can be broken into sections to build confidence gradually.
5. How should I finish and display my completed embroidered pieces? Trim excess fabric leaving a one-inch border then secure the edges with a running stitch or fabric glue. Stretch the piece over a mounting board and frame it behind glass to protect from dust. For wearable items wash gently by hand in cool water and air dry flat to preserve stitches and colors.