
I like using flower embroidery for hoops because it brings a bit of nature indoors without needing much space.
Over time I’ve collected some designs that feel classic and work for gifts too.
My favorites are the ones with simple petals and leaves that anyone can try.
They don’t require fancy threads or tools.
I think these options give a good starting point for making something personal.
Pastel Floral Arc Hoop

A ring of flowers in soft pink and cream shades, mixed with smaller buds and green leaves, forms a loose arc across the fabric inside a standard wooden hoop. The design uses varied flower sizes and an open center to keep the layout balanced rather than dense. This approach suits a finished hoop display or can be scaled to fit the corner of a tote, the front of a pouch, or a jacket yoke.
What makes this idea useful is the flexible arc shape that leaves room for fabric texture to show through. You can repeat just the lower cluster on a smaller hoop or stretch the full curve across a larger one for different impact. Shifting the palette to deeper tones or adding one extra bloom changes the weight without redrawing the layout. The spacing also makes it simple to stitch on pre-cut fabric circles for quick gifts.
Denim Pocket with a Single Flower Motif

A large open flower worked in light thread sits centered on the back pocket of a pair of jeans, with a short stem and a few leaves trailing downward. The motif fills most of the pocket space without crowding the edges, and the light bloom creates strong contrast against the indigo fabric. This approach turns a plain pocket into a focal point while keeping the rest of the garment untouched. It suits everyday clothing projects where you want visible detail without covering large areas of fabric.
The placement does a lot of the work here because the pocket already provides a clean rectangular frame. You can shrink the same layout to fit a smaller pocket or swap the thread colors to match a different pair of pants or a jacket. For gifts, the idea translates easily to a canvas tote or a denim shirt, and the contained size means it finishes quickly. The contrast between the flower and the dark ground also helps the design photograph clearly for pattern sharing.
Lavender Sprigs on a Canvas Tote
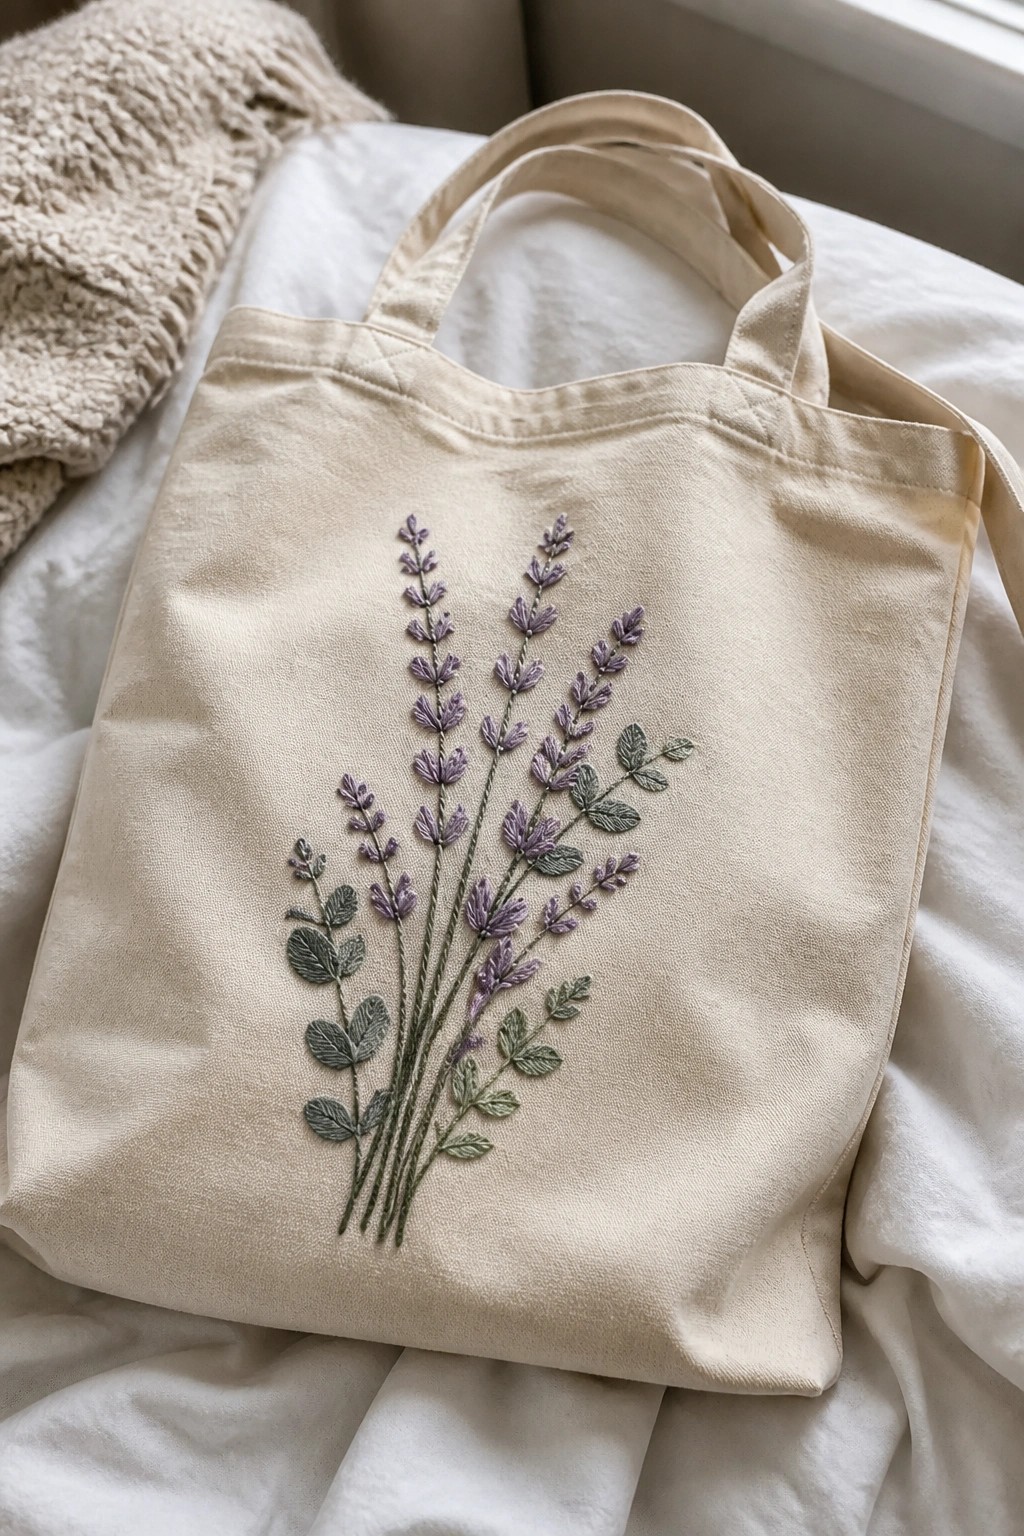
A cluster of lavender stems with purple blooms and green leaves makes up the main motif here. The embroidery sits centered on the front panel of a plain canvas tote bag, with the stems grouped tightly at the bottom and fanning out toward the top. The vertical layout and mix of two thread colors keep the design readable from a distance while staying compact enough for the bag size. This approach turns an everyday carry item into a finished project without needing extra framing or finishing steps.
A design like this works especially well on tote bags because the sturdy fabric supports dense stitching and the bag sees regular use. You could move the same motif to a smaller scale on a linen napkin set or stretch the height slightly for the corner of a tea towel. Switching the purple to a deeper shade or keeping everything in one green tone would change the look without altering the stitch layout. The simple stem grouping also photographs cleanly for project roundups, which helps it get saved for future bags or pouches.
Corner Floral Cluster on Linen Napkins

A compact cluster of pink and red flowers with green leaves and a few buds creates a simple motif that fits into the corner of a hemstitched napkin. The arrangement layers a larger bloom over a smaller one and tucks leaves around the stems so the design stays balanced and contained. This approach keeps the embroidery from competing with the fabric’s texture and works best on flat items meant for use or gifting rather than display hoops.
The placement does a lot of the work here because the motif sits away from the main surface area yet still shows when the napkin is folded or laid out. You can repeat the same cluster on a set of matching napkins or shrink it further for handkerchiefs and small gift wraps. Swapping the pinks for softer tones or deeper reds changes the look without altering the layout, and the tight grouping makes the design easy to finish in a few sessions.
Mixed Anemone Bouquet on a Linen Pillow

A cluster of anemone-style flowers in navy, cream, and lavender sits in the center of a square pillow cover. The blooms overlap at different heights with green leaves and stems tucked underneath to create a compact bouquet shape. Beaded centers give each flower a defined focal point against the flat petals. This arrangement suits a removable pillow cover that can be swapped out with other seasonal pieces.
What makes this idea useful is how the contained bouquet fits neatly on a standard 16-inch or 18-inch pillow without spilling over the edges. You could scale the whole design down for a zip pouch or the front of a book sleeve by dropping one or two flowers. Swapping the navy blooms for a rust tone would shift the palette toward autumn while keeping the same leaf placement and layering order. The neutral background also makes it simple to match the pillow to existing sofa fabrics.
Floral Border on a Kitchen Towel

A straight row of small flowers stitched along the hem turns an ordinary towel into a finished piece. Each bloom sits on its own stem with a few leaves, and the colors shift from peach through pink to yellow so the line feels varied without becoming busy. The design stays low on the fabric, leaving most of the towel plain for actual use. This approach fits kitchen linens, hand towels, or small fabric gifts that need a neat edge detail.
The border layout works especially well on towels because the stitching stays visible when the cloth is folded over a handle or drawer. You can move the same row to pillowcases or napkins by shortening the repeat or spacing the flowers farther apart. Switching to a single color family keeps the structure but makes the result quieter. The scale stays small enough that the whole border finishes in a few evenings, which is why similar edge designs get saved often for quick gifts.
Floral Embroidery Accent on a Shirt Collar

A compact bouquet of pink and magenta flowers with green leaves and small pale buds fits neatly onto the pointed section of a shirt collar. The motif follows the triangular shape of the collar, letting the stems and leaves trail toward the tip while the larger blooms sit higher up. This approach keeps the embroidery visible when the shirt is worn but contained enough to avoid interfering with buttons or seams. It suits everyday clothing like button-down shirts or blouses where you want a bit of detail near the neckline.
The small scale makes this easy to adapt to other garments such as lightweight jackets or linen tops. You could change the flower colors to coordinate with different shirt shades or mirror the design on the opposite collar for symmetry. For gifts, this motif turns a plain shirt into something more personal without requiring a large time commitment. The contained layout also photographs cleanly for project sharing since the collar itself provides a natural frame.
Floral Vine Border on Denim Cuffs

A trailing vine of small flowers makes an effective border when stitched along the inner edge of a rolled cuff. The design uses thin green stems with scattered blossoms in soft pink, lavender, and cream to follow the curve of the fabric. This placement keeps the embroidery visible only when the sleeve is turned up, turning a functional detail into a quiet accent. The same vine works on shirt hems, pocket edges, or the top of a tote bag.
What makes this idea useful is how the narrow width fits almost any straight or slightly curved edge without needing much fabric space. Shorten the vine to cover just part of a cuff or repeat it around a full collar for a different result. Switching the thread colors to match or contrast with the base fabric changes how bold the finished piece looks. For clothing, this kind of motif stays practical because it avoids large solid areas that can stiffen the denim.
Protea on a Zippered Pouch

A protea worked in soft pink, cream, and brown threads sits centered on the front of a small linen zip pouch. The rounded bloom takes up most of the space while the stem and leaves angle downward to keep the design balanced on the square shape. The layered petals give the flower depth even though the overall piece stays small. This layout suits a makeup bag, gift pouch, or small accessory you can finish in a few evenings.
What makes this idea useful is how the compact size of the pouch limits the amount of stitching needed while still showing off a bold flower. You could swap the protea for a different bloom like a dahlia and keep the same stem-and-leaf placement without changing the scale. The design also works as a patch you could cut out and sew onto a tote or jacket if you prefer fabric over a finished pouch. A tighter color palette like this stays readable even when you reduce the size for a coin purse.
Blue Floral Spray with Outline Contrast

A vertical cluster of small blue flowers with green stems runs down one side of the fabric, using filled petals and centers on the finished blooms. Matching outlines sit to the right, showing how the same motif can continue or vary without filling every section. The light scale keeps the hoop balanced and leaves room around the edges. This layout suits a display hoop but also transfers easily to fabric pieces like bags or clothing.
What makes this idea useful is the built-in option to stop at outlines or fill more in later. The placement along one side leaves the rest of the fabric open for other uses or additions. You could move the same spray to a sleeve edge or scale it smaller for a bookmark. Switching the blue thread to another shade would change the mood without altering the structure.
White Flowers on a Navy Velvet Pillow

A small bouquet of white flowers with green leaves sits centered on a square navy velvet pillow, with two white satin ribbons crossed and tied over the top. The high contrast between the pale stitching and the dark fabric keeps the design clear without extra outlines or dense fills. This layout suits gift projects like ring pillows or small decorative cushions where the embroidery shares space with functional elements such as ties or trims.
The compact size of the bouquet makes it simple to move onto other square or rectangular items without crowding the edges. You can change the background fabric to linen or cotton for a softer gift and swap the ribbon color to match different occasions. Dark bases like this velvet help light threads read well even when the overall piece stays small, which is useful for quick projects that still need to photograph clearly.
Branching Sprigs on a Baby Bib

A motif of fine branching stems with small clustered blossoms fits neatly across the front of a baby bib. The design spreads from a central point to fill the rounded shape while leaving space around the neck opening. Light thread on textured white fabric keeps the stitches subtle and lets the bib’s material show through. This placement works for small wearable items where the embroidery needs to stay proportionate to the finished piece.
What makes this idea useful is how the compact branch layout transfers easily to other baby accessories like hats or burp cloths. You can shorten the stems or use a single cluster if the fabric area is smaller. Changing the thread to a pale sage or dusty rose shifts the look without altering the scale. The contained size also makes it simple to hoop quickly for gifts.
Iris on Napkin Corners

An iris worked in blended blue and purple threads sits in the corner of a white linen napkin, with the petals showing a gentle color shift from light to dark and a small yellow center. The stem and leaves extend downward in muted greens, keeping the overall size compact so the rest of the fabric stays plain. This placement turns a basic napkin into a finished piece without covering much surface area, which suits table linens, guest towels, or small fabric gifts.
The placement does a lot of the work here because a single corner motif repeats easily across a set of napkins and still leaves room for the fabric to show. You could move the same flower to the edge of a handkerchief or the hem of a small pouch by shrinking the scale a bit. Swapping the blues for softer pinks would change the look for different seasons while keeping the same simple layout and thread density.
Lavender Bouquet on a Drawstring Sachet

A small bouquet of lavender stems mixed with rose buds creates a compact floral motif that fits neatly on the front of a fabric pouch. The stems are gathered at the base so the design stays balanced and contained within a small area. Purple blooms on one side and pink buds on the other give the arrangement visual weight without needing extra elements. This layout works well for drawstring bags used as sachets or small gift pouches.
The tight grouping at the bottom keeps the motif readable even when the fabric is gathered. You can move the same design onto a larger linen bag or shrink it for a coin purse by dropping one or two stems. Changing the pink buds to a second shade of purple would make the whole piece feel more uniform while keeping the same shape. The drawstring format turns the embroidery into something people actually use instead of just display.
Magnolia Branches on a Felt Pouch

Branching magnolia flowers in white and pink sit across the front of a gray felt pouch, with brown stems running vertically and smaller buds scattered around the main blooms. The design uses a gentle color fade in the petals and small filler dots to keep the surface from looking empty while staying balanced on the rectangular shape. This layout suits small accessories like glasses cases or slim pouches because the vertical flow matches the form without needing a hoop or frame.
What makes this idea useful is how the loose branch structure can shift to fit different sizes of flat fabric items. You could drop the same motif onto a makeup bag or a notebook cover by shortening the stem and moving the buds closer together. The soft palette also gives room to swap in stronger pinks or add a second color to the stems if the base fabric changes. On Pinterest this kind of clean accessory embroidery often gets saved because it shows a finished project that people can copy directly onto something they already carry.
Mini Flower Clusters on a Fabric Scrunchie

Small daisy-style flowers worked in a short row along one section of a gathered band give the fabric a light, scattered pattern without overwhelming the surface. The three flowers sit close together with small leaves and dots tucked between them, so the motif stays readable even when the fabric bunches. This kind of placement suits accessories that move and fold, since the embroidery stays visible on the outer curve. It fits projects like scrunchies, headbands, or narrow fabric ties where full coverage would feel too heavy.
The small scale makes the design quick to finish on a ready-made base or a simple sewn band. You can shift the same cluster onto a pocket edge or the front of a small pouch by adjusting the spacing slightly. Using one shared color palette across the flowers keeps the look coordinated while still letting each motif stand out. This layout works especially well for gifts because it turns an everyday item into something more personal without adding much time.
Stacked Pink Cosmos on a Fabric Bookmark
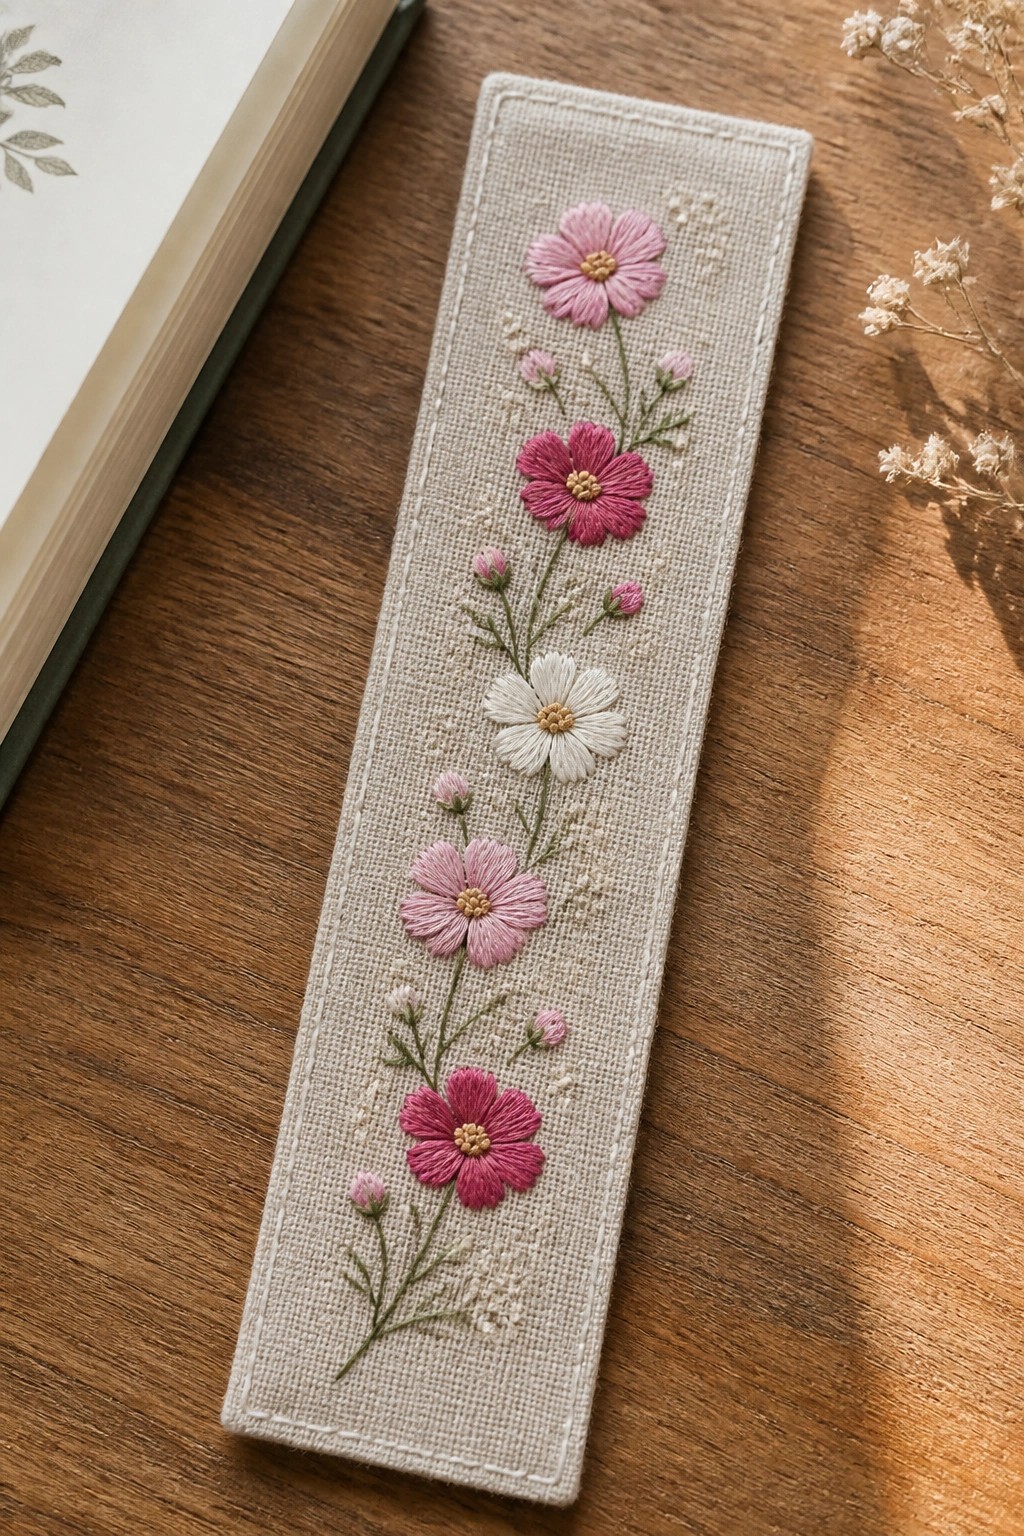
A vertical row of cosmos-style flowers in varying pinks and white creates a bookmark when worked down the center of a narrow linen strip. The design spaces the blooms at different heights with small buds and thin green stems filling the gaps between them. This keeps the piece balanced while using the full length of the fabric without crowding any section. The result fits projects that need a finished item under six inches wide.
The narrow vertical layout works especially well on bookmarks but translates directly to a bag strap or the edge of a journal cover. Swapping the pink tones for blues or keeping everything in one shade changes the mood without altering the spacing. A design like this is easy to resize by dropping one or two flowers if the fabric gets shorter.
Daisy Vine Border on a Felt Beret

A simple row of small white daisies connected by thin green stems creates a curved border that follows the edge of a beret. The flowers sit close to the rim with even spacing so the line stays visible when the hat is worn. This placement keeps the embroidery narrow enough to avoid interfering with the beret’s shape or fit. The design works well on any soft, structured accessory where you want a light floral detail without covering large areas.
The placement does a lot of the work here because the curve of the hat already gives the vine its shape. You could move the same border to the edge of a scarf, the cuff of a sleeve, or the front of a small pouch with almost no changes. Shifting the flower color to match the fabric or tightening the spacing would make the line look more delicate or more bold depending on the item. This kind of narrow repeat shows up well in photos because the contrast stays clear even at small sizes.
Poppy Trail on a Linen Runner

A repeating line of coral poppies and rounded green leaves runs lengthwise down a plain linen runner. The flowers sit at different heights and angles so the design looks scattered rather than rigid. Extra space on either side of the motif keeps the fabric usable as a table covering instead of turning it into a framed piece. This approach suits any long narrow item where the embroidery needs to stay visible when the fabric is spread flat.
What makes this idea useful is how the same elements can be spaced tighter for a table mat or stretched farther apart for a longer cloth. Shortening the trail turns it into a border for napkins or a scarf end without redrawing anything. Changing the poppies to a single color or swapping the leaves for a different foliage shape alters the look quickly while the basic layout stays the same. The design also translates well to a tall hoop if the flowers are stacked vertically instead of spread horizontally.
Anthurium Circle Patch for Bags and Jackets

An anthurium works well as a single bold motif on a small round fabric base. The design places the red bloom front and center with its yellow spadix running down the middle and one green leaf tucked to the side of the stem. This tight composition keeps the shape readable even when the whole piece stays under four inches across, so it fits neatly as a patch rather than a full hoop project.
What makes this idea useful is how the round boundary lets you move the finished piece onto a tote, backpack, or denim jacket without extra framing. You can drop the leaf for a simpler version or swap the red for deep burgundy if you want it to match cooler tones. The strong color contrast between the main bloom and the spadix keeps the shape clear from a distance, which helps when people save the design for their own projects.
Wisteria Clusters on Scarf Corners

A trailing wisteria vine with several drooping flower clusters makes a strong corner motif on lightweight fabric. The design sits neatly in one corner of a scarf or handkerchief, with stems angled to follow the edge rather than centering on the piece. Shaded purple threads on the petals give the flowers dimension while the thinner gray stems keep the overall look light and balanced. This approach suits accessories and small gifts better than large hoops because the scale stays contained.
What makes this idea useful is how the corner placement leaves most of the fabric plain so the embroidery does not compete with the material itself. The same vine can shift easily to a blouse hem, a table napkin set, or even a small pouch by shortening the longest stem. Changing the purple tones to softer pastels or deeper blues alters the mood without changing the layout. On Pinterest this kind of clean corner design gets saved often because it translates quickly to different fabric weights and item types.
Rose Cluster on a Zipper Pouch

A compact group of layered roses in pink, cream, and soft green sits centered on the front of a zippered pouch. The petals vary in size and shade to build depth while the leaves fill gaps and guide the eye across the fabric. This layout keeps the design contained so it reads clearly on a small, functional item like a cosmetic bag or travel pouch.
What makes this idea useful is how the rounded motif fits neatly on curved surfaces without needing extra borders. You could shrink the same cluster for a coin purse or stretch the leaf placement to cover more area on a larger tote. Changing the pinks to deeper tones or the greens to gray would shift the look from light to bold while keeping the same structure. The neutral fabric lets the embroidery stand out, which makes the design easy to adapt for quick gifts.
Three-Bloom Floral Cluster in a Hoop

A central arrangement of three main flowers in soft pink and cream tones, surrounded by smaller filler blooms and scattered leaves, creates a balanced bouquet motif. The design sits directly in the middle of the hoop fabric, with the largest bloom positioned slightly off-center to guide the eye through the composition. Varying flower sizes and leaf directions add depth without overcrowding the space. This layout works well as a finished hoop or transferred to the front of a tote or cushion cover.
What makes this idea useful is the way the compact cluster fits neatly inside a standard hoop size while leaving room for simple borders if needed. You could shift the same motif to a jacket pocket or linen napkin by reducing the overall scale and trimming some of the outer leaves. Changing the main blooms to deeper reds or blues would make the piece feel more seasonal without altering the structure. The mix of large and small elements also helps the design read clearly even when stitched in a single thread weight.
Frequently Asked Questions
What basic supplies will I need to recreate these flower embroidery designs at home? Start with a sturdy embroidery hoop sized between four and eight inches for most designs, along with cotton or linen fabric that holds stitches well without puckering. Choose stranded cotton embroidery floss in soft pastels or rich jewel tones to achieve an elegant look, and keep a set of needles in sizes seven through ten on hand. Add small scissors, a water soluble fabric marker for transferring patterns, and an embroidery stabilizer if your fabric is lightweight. These items allow you to work through all twenty three designs without frequent trips to the store.
How do I choose which of the twenty three designs suits a beginner versus an experienced stitcher? Look for designs that rely mainly on satin stitch, backstitch, and French knots if you are new to embroidery, as these build basic skills quickly. More advanced options often include layered petals, seed beads, or metallic accents that require greater control over tension. Begin with simpler single flower motifs before moving to bouquets or wreaths. Practicing each stitch on a scrap piece first helps you finish projects neatly and builds confidence for the full collection.
What fabrics and finishing steps make these embroidered hoops last for years as gifts? Select tightly woven natural fabrics such as linen or quilting cotton that resist fraying. After completing the stitching, trim excess fabric to about one inch around the hoop, then secure it with a running stitch or fabric glue on the back. Add a felt circle to cover the reverse side for a polished appearance. Store finished hoops away from direct sunlight and humidity to preserve thread colors. These steps turn each piece into a durable keepsake that recipients can display indefinitely.
How can I adapt the designs into thoughtful handmade gifts beyond simple wall hoops? Transfer smaller flower motifs onto linen napkins, handkerchiefs, or the corner of a tea towel using the same patterns. For wearable gifts, embroider a single bloom on a shirt pocket or scarf edge with finer thread. Create ornaments by finishing tiny hoops with ribbon hangers, or frame multiple designs together in a shadow box for a larger present. Personalize each item by adding the recipient’s initial in a coordinating color to make the gift feel unique and heartfelt.
What care routine keeps the finished embroidery looking fresh after it is given or displayed? Dust hoops gently with a soft brush or lint roller rather than wiping with liquids. If a piece becomes soiled, spot clean with a mild soap solution on a cotton swab and allow it to air dry flat. Avoid machine washing or harsh detergents that can fade threads. Rotate displayed pieces occasionally to prevent uneven sun exposure. Following this routine ensures the elegant flowers remain vibrant whether the item stays in your home or travels to a new owner.