
I have always enjoyed stitching floral designs because they feel calming and do not require too many fancy techniques.
Hoop art is a simple way to frame these pieces and hang them around the house.
Over time I have collected various patterns that use soft threads and basic flowers.
Some of my favorites include small bouquets or single blooms that fit nicely in different sized hoops.
These ideas work well if you want something handmade without spending too much time on it.
Large Peony with Tonal Petals and Leaf Stem
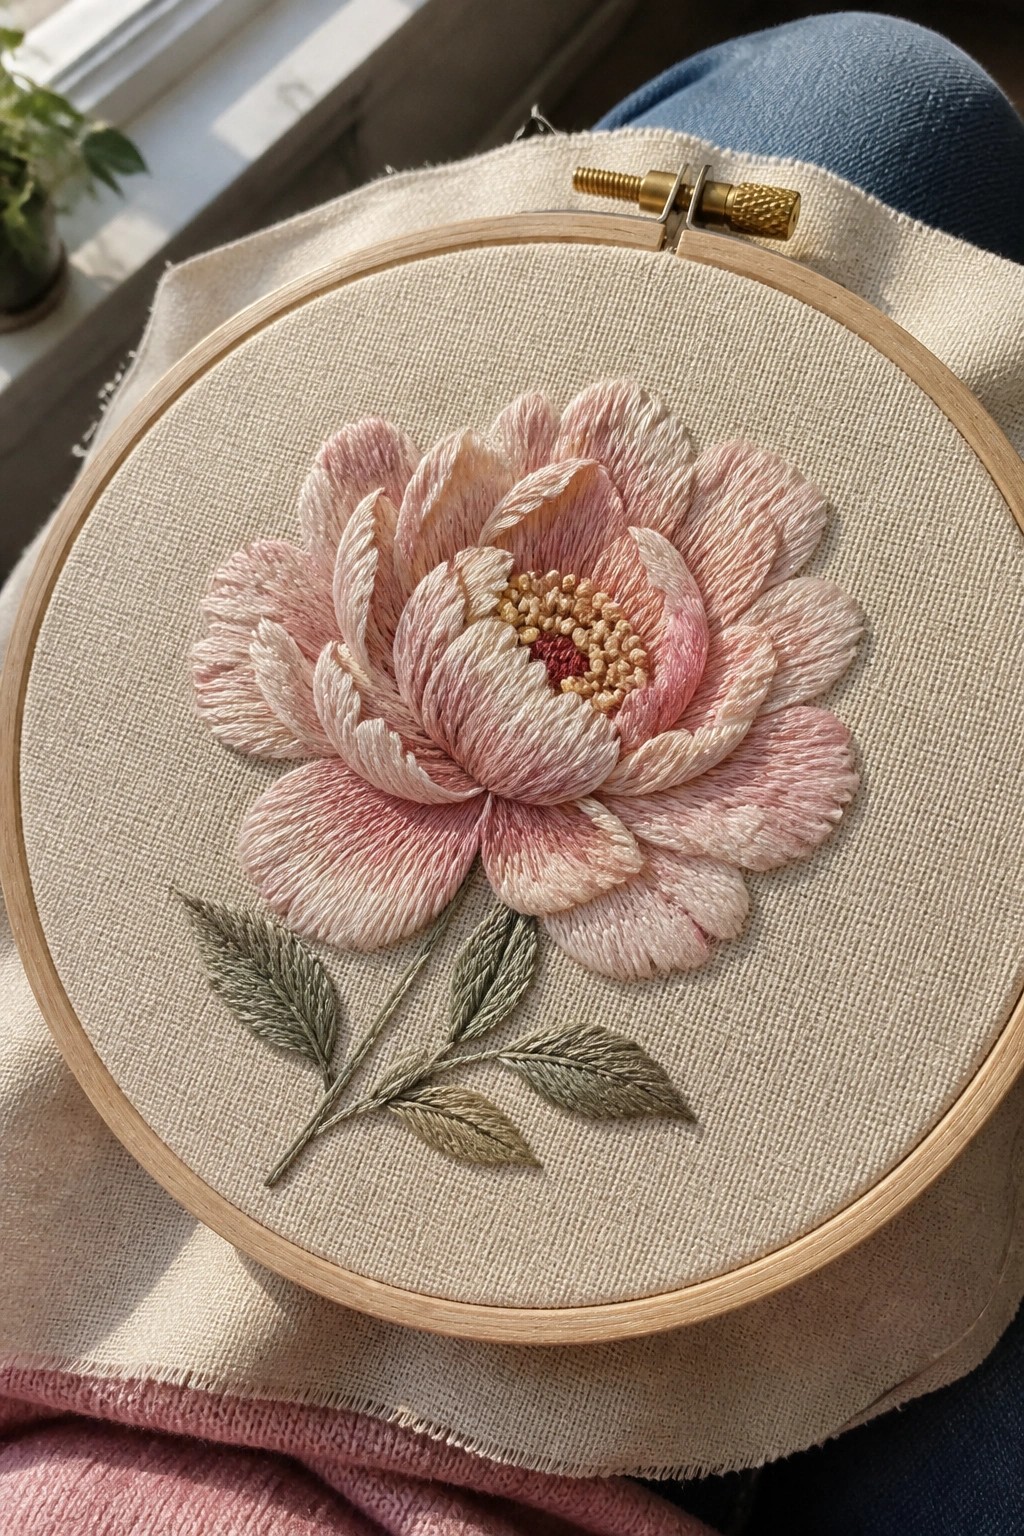
A large peony-style flower forms the main motif, placed right in the center of the hoop fabric with petals built up in shifting pink tones. The stem and leaves extend downward to anchor the design and fill the lower space without competing for attention. This layout suits a standalone hoop project or a fabric panel meant to stand on its own.
The centered motif leaves room to adapt the same flower onto a tote bag or cushion cover by trimming the fabric after stitching. Changing the petal colors to cooler tones would shift the feel for different seasons while keeping the same scale. A design this size stays balanced in a medium hoop and works as a quick project when you want one strong element instead of scattered details.
Wildflower Border on a Denim Cuff

A strip of mixed wildflowers stitched along the folded edge of denim gives an old pair of jeans or a jacket a fresh update. The flowers sit at different heights with simple stems and small clusters of leaves, so the line looks like a natural row rather than a rigid pattern. Because the design follows the existing cuff seam, it stays neat and contained without extra fabric or hoops. This approach works best on clothing you already wear, turning a basic hem into something more noticeable.
The placement does a lot of the work here since the cuff keeps the embroidery in a narrow band that is easy to finish in a few sittings. You can copy the same flowers onto the hem of a skirt or the pocket edge of a shirt by shortening the stems and tightening the spacing. Swapping the thread colors to match other pieces in your closet lets the idea move from casual denim to lighter fabrics without much extra planning. Small repeats like this also photograph well for project boards because the contrast against blue shows up clearly.
Peony Bouquet on a Linen Tote Bag
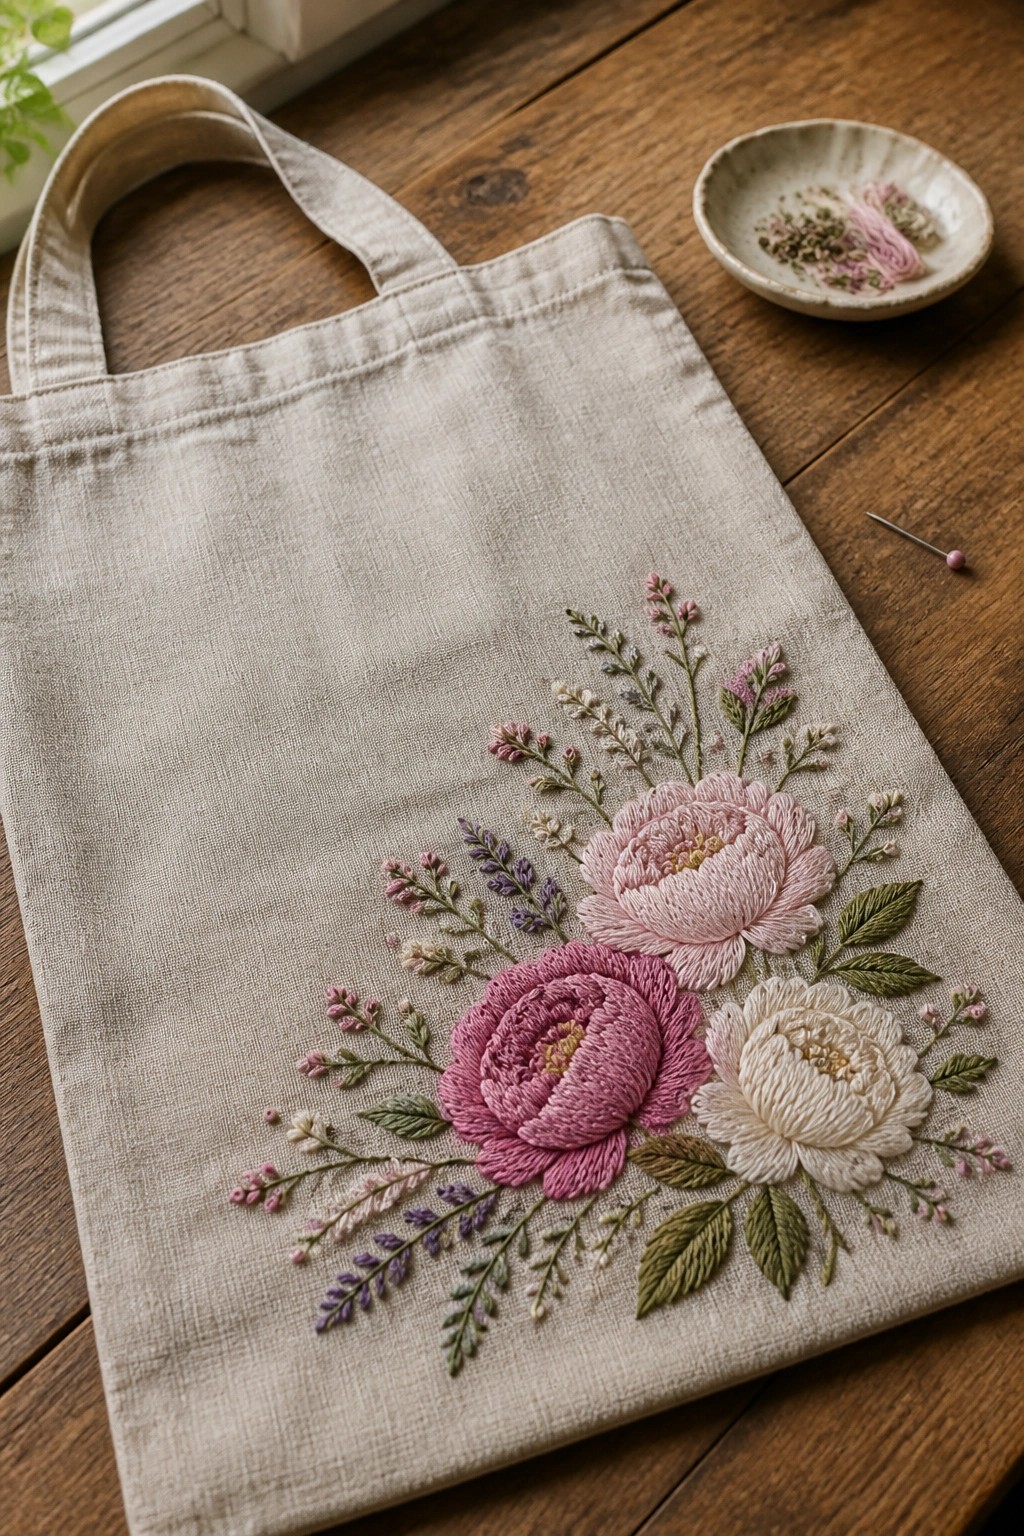
A group of peonies in pink, rose, and cream fills the lower right section of a plain tote bag, with stems and leaves spreading outward in a loose cluster. The flowers vary in size so the larger blooms anchor the design while smaller buds and foliage fill gaps around them. This layout suits bags and other accessories that get carried rather than displayed.
The placement keeps the embroidery away from the handles and main stress points on the bag. You could move the same cluster to a jacket back or shrink it for a smaller pouch by dropping one of the larger flowers. Swapping the pinks for soft yellows would give a different seasonal feel without changing the overall shape or density.
Loose Floral Wreath on a Hoop Pillow

A circular arrangement of flowers stitched around the edge of the fabric creates a wreath shape with an open center. Different bloom sizes and muted colors are spaced to leave breathing room between clusters while small leaves and buds connect the gaps. The design sits directly on a pillow cover held inside the hoop so the embroidery becomes part of the cushion rather than a separate wall piece.
The placement does a lot of the work here because the hoop itself frames the wreath and turns the pillow into the finished project. You can repeat the same layout on a smaller scale for a zip pouch or shift the flower colors to match bedding you already own. The open center keeps the stitching time reasonable while still giving a full look that photographs cleanly for sharing.
Floral Vines on a Satin Scrunchie

A simple vine of small flowers and leaves stitched along the length of a satin scrunchie creates a soft pattern that moves with the gathers. The design uses three or four tiny blooms in pale pink and white spaced at intervals, with thin green stems and leaves filling the gaps between them. This placement works because the embroidery sits on the outer surface where it stays visible once the scrunchie is worn. The idea suits hair accessories or similar gathered fabric items that need light decoration without bulk.
What makes this idea useful is how easily the same vine can shift to other narrow fabric pieces like headbands or ribbon ties. Changing the flower colors to match different fabrics keeps the motif fresh without changing the layout. The small scale also means it finishes quickly on a single strip of material before you gather it into the final shape. For accessories, this scattered line stands out more than a solid band of stitching because it leaves breathing room on the satin.
Scattered Wildflower Meadow Hoop

A loose mix of small daisies, lavender spikes, and colorful blooms with stems of different heights fills the center of the fabric. The flowers sit at varying angles with open space between them, creating an unplanned field effect rather than a tight bouquet. This layout works best in a medium hoop where the scattered placement can stay visible without crowding the edges.
What makes this idea useful is how easily the individual flowers can be moved or removed to fit a smaller hoop or a shirt pocket. Switching the palette to two or three colors keeps the same layout but changes the mood for different seasons or rooms. The design also translates well to a fabric pouch or journal cover since the open spacing leaves room for the background fabric to show through.
Crescent Moon of Clustered Flowers
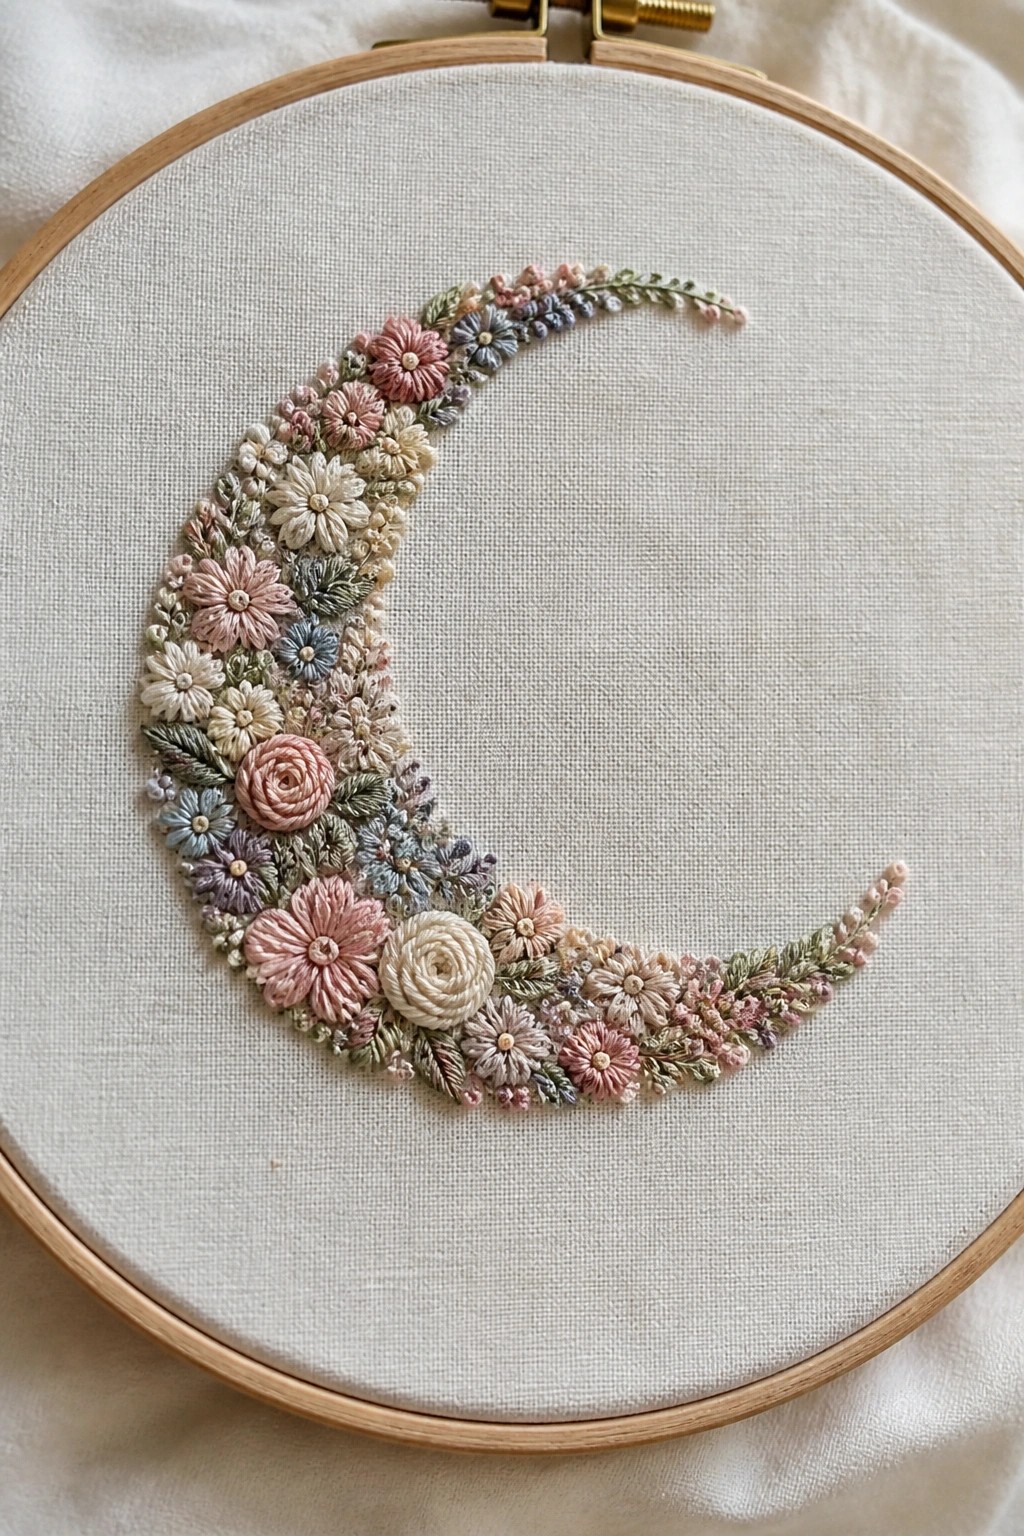
A crescent moon shape formed by dense clusters of small flowers makes a clean focal point inside a standard embroidery hoop. The flowers vary in size and sit tightly along the curve, with leaves and buds filling gaps to keep the outline readable. This approach uses the empty center as negative space, so the stitched area stays compact and balanced on the fabric.
The curved layout transfers easily to a smaller hoop or a pocket on a jacket without losing its shape. Switching the thread palette to deeper tones would suit a bag or pouch, while the current soft mix keeps it light for a shelf or gift. The scattered scale of the blooms also helps the motif stay distinct even when the hoop is viewed from across a room.
Scattered Blue Flower Sprigs on Napkin Corners

A loose cluster of small blue flowers with yellow centers and thin green stems creates a simple motif that sits along the hemmed edge of a white napkin or tablecloth. The design spreads outward from one corner in a natural branching shape rather than a rigid line. This keeps the embroidery from interfering with the fabric’s main use while still showing on the folded edge.
The small scale makes it easy to repeat across a set of napkins without using much thread or time. You could move the same cluster to a shirt cuff, tea towel, or pillowcase border and get a different result just by changing the fabric color. The light blue and yellow combination stands out clearly on white but would soften further on pastel or natural linen.
Circular Cottage Garden Patch for Everyday Bags

A small cottage with a green roof and wooden door forms the center of this round design, with a path leading up to it and clusters of tulips, daisies, and lavender filling the sides. The whole scene sits on the flap of a canvas bag as a finished patch, framed by a simple stitched border that keeps the elements from spilling out. The compact layout works because the flowers and tree are sized to balance the house without crowding the circle.
What makes this idea useful is how easily the patch format moves to other items like backpacks, jackets, or even a pencil case. You can shrink the same house-and-path arrangement to fit a smaller hoop or enlarge the flower beds if you want more open space around the edges. Changing the roof color or swapping the tulips for different blooms keeps the structure intact while matching new fabric. The contained circle also photographs cleanly for project boards, which helps when you need quick reference shots later.
Row of Mixed Wildflower Stems Along a Hem

A straight line of small wildflower stems creates a simple border when stitched across one edge of a flat fabric piece. Each stem varies slightly in height and flower shape, with threads kept in soft greens, blues, and neutrals to keep the line from looking too busy. This layout suits table linens, tea towels, or napkins where the embroidery stays visible during use but does not cover the whole surface.
The placement does a lot of the work here by turning the hem into the focal point. You can shift the same row onto a scarf end or pillowcase border by adjusting the spacing between stems. Changing the thread colors to brighter tones or shrinking the whole row makes the design easier to move onto clothing cuffs or small gift bags without crowding the fabric.
Cherry Blossom Branches on a Baby Onesie

A row of cherry blossom branches stitched across the front of a onesie creates a simple, balanced motif that follows the natural curve of the fabric. The design uses several short branches with open flowers and buds to fill the space without crowding the center. This placement works well on baby clothing because the horizontal layout sits neatly between the neckline and snaps while staying clear of seams.
What makes this idea useful is how easily the branch length and flower count can be adjusted to fit different sizes of onesies or shirts. The same motif translates to a pocket on a toddler jacket or a small tote without needing major changes. Switching the thread colors to softer pastels or deeper pinks shifts the look from spring to a more neutral tone while keeping the same structure.
Crescent Rose Arc on Open Fabric

A cluster of soft pink roses with sage green leaves forms a gentle arc along the lower left side of the hoop, leaving the rest of the fabric empty. The flowers sit close together while the leaves stretch upward and outward to create a natural curve. This placement keeps the design from feeling heavy and works especially well on a medium hoop where the blank space becomes part of the look. The same arc can move onto a jacket back, a cushion corner, or the front of a makeup bag without needing major changes.
What makes this idea useful is how the open curve lets you adjust the size easily for different projects. Tightening the arc makes it fit a small pouch or pocket, while stretching the leaves longer fills a larger hoop without adding more flowers. The muted palette stays calm on light fabric but can shift to deeper greens and dusty rose for contrast on denim or canvas. This off-center layout shows up often in saved images because it feels balanced without being perfectly symmetrical.
Clustered Rose Bouquet Hoop

A group of three roses in graduated pinks and reds forms the main motif, placed as a tight central cluster inside a medium wooden hoop on plain fabric. Smaller buds and scattered leaves fill gaps around the roses without extending to the hoop edges, which keeps the design compact and balanced. This layout suits a finished hoop project or a fabric panel that could later be turned into a cushion cover or bag front.
The centered placement leaves room to change hoop size or drop one rose for a smaller version without losing the overall shape. Swapping the thread shades to cooler tones or adding more buds around the edges gives quick variety while keeping the same structure. A design like this stands out on Pinterest because the color shift inside the flowers creates depth without needing extra elements.
Wildflower Pocket on Denim
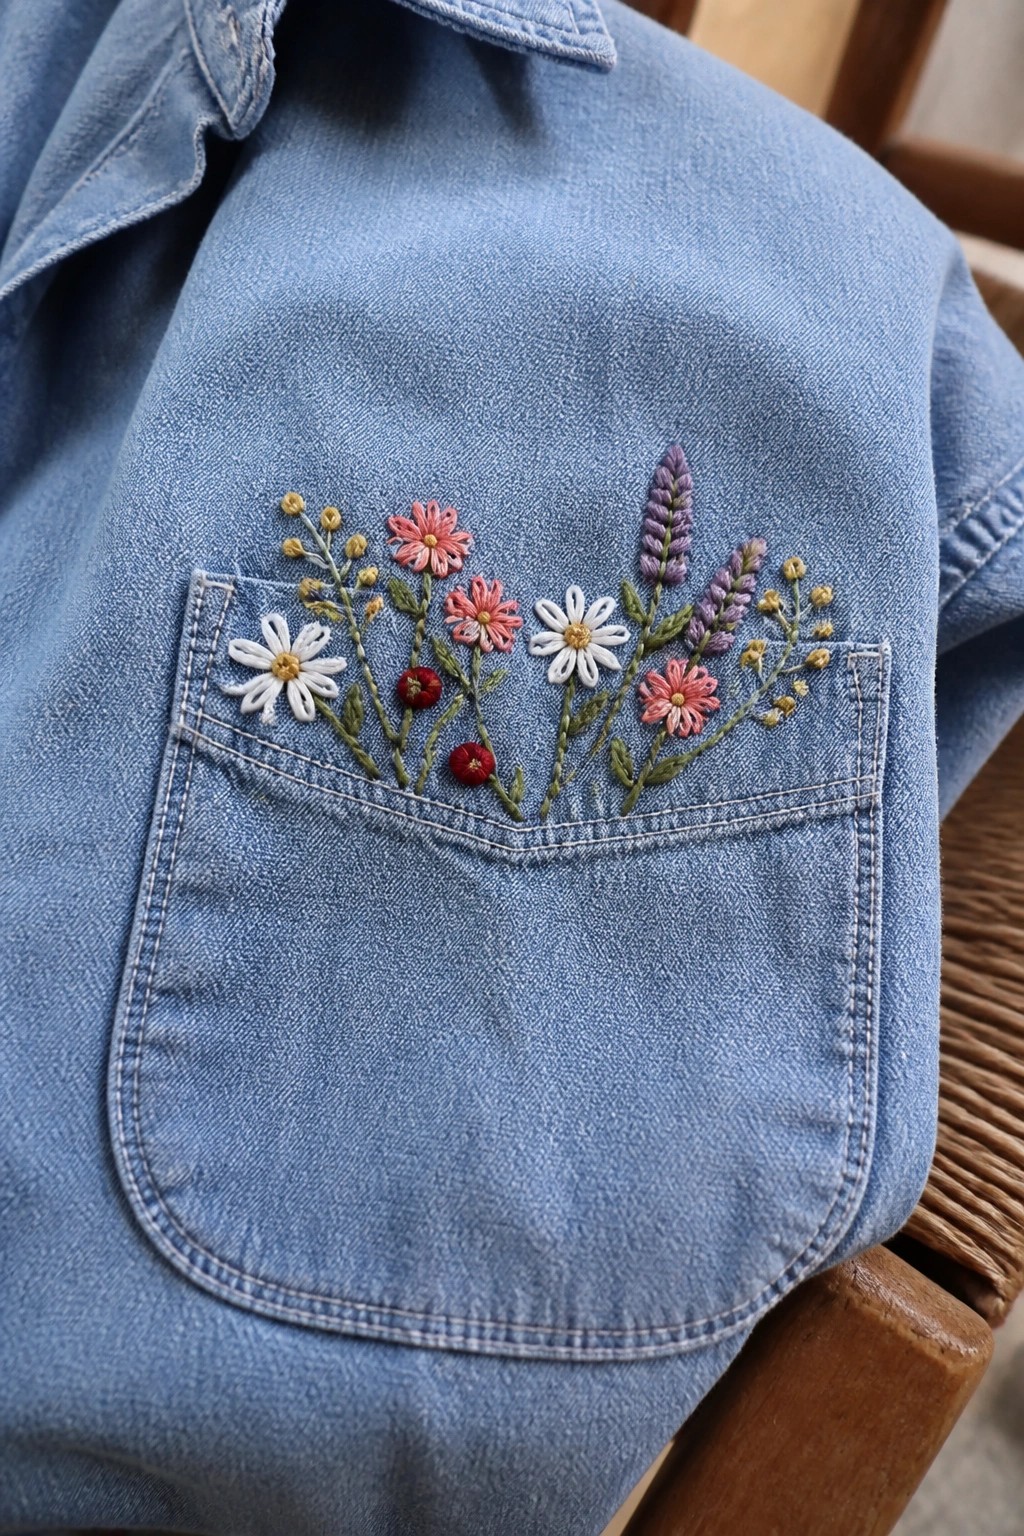
Embroidering a loose mix of daisies, pink blooms, lavender spikes, and tiny yellow buds across a denim pocket creates a casual floral accent without overwhelming the garment. The design spreads across the top edge of the pocket so the stitching sits right where it shows when the jacket is worn or photographed. Different flower heights and a few small red accents keep the cluster from looking flat or overly planned. This approach works best on clothing like jackets, shirts, or even overalls where the pocket already provides a defined space.
The placement does a lot of the work here because the pocket edge naturally frames the flowers and keeps the stitching contained. You could shrink the same layout for a smaller pocket on a child’s jacket or stretch it slightly wider across the back pocket of jeans. Swapping the pink and red threads for blues or greens would shift the look toward cooler tones while still reading as wildflowers. A design like this performs well on Pinterest because the denim texture makes the colors stand out in a way that plain fabric or hoops do not.
Wildflower Row on a Zipper Pouch

A horizontal band of mixed wildflowers stitched across the front of a zippered pouch gives the piece a garden border without covering the whole surface. Different stem heights and flower shapes create movement along the line while leaving plain fabric above and below. The design suits flat accessories like pouches, small bags, or even the front of a makeup case where you need something decorative but still practical to use.
What makes this idea useful is how the single row fits neatly around the zipper and still leaves room for the pouch to function. You could shrink the same band to fit a jeans pocket or stretch it longer for a tote bag side panel. Switching to a tighter color palette or spacing the flowers farther apart would change the look without redrawing the layout.
Poppy Cluster with Scattered Dot Background

Three poppies in blended pink and peach tones sit at staggered heights inside an embroidery hoop, with their green stems and leaves crossing near the bottom. Small dots in soft shades are scattered around the flowers to fill the open fabric without competing for attention. The color shifts within each petal keep the design from looking flat, and the loose arrangement leaves breathing room between the blooms. This layout suits a finished hoop or a fabric panel that could be turned into a cushion cover or bag front.
What makes this idea useful is how the dots handle background texture so the flowers stay the main focus. You could drop the hoop entirely and stitch the same cluster onto a jacket or tote by keeping the scale similar. Changing the pink tones to cooler shades or shrinking the whole group would make it fit a smaller hoop or a single corner of a scarf without losing the balance.
Trailing Vine Along a Cuff Edge
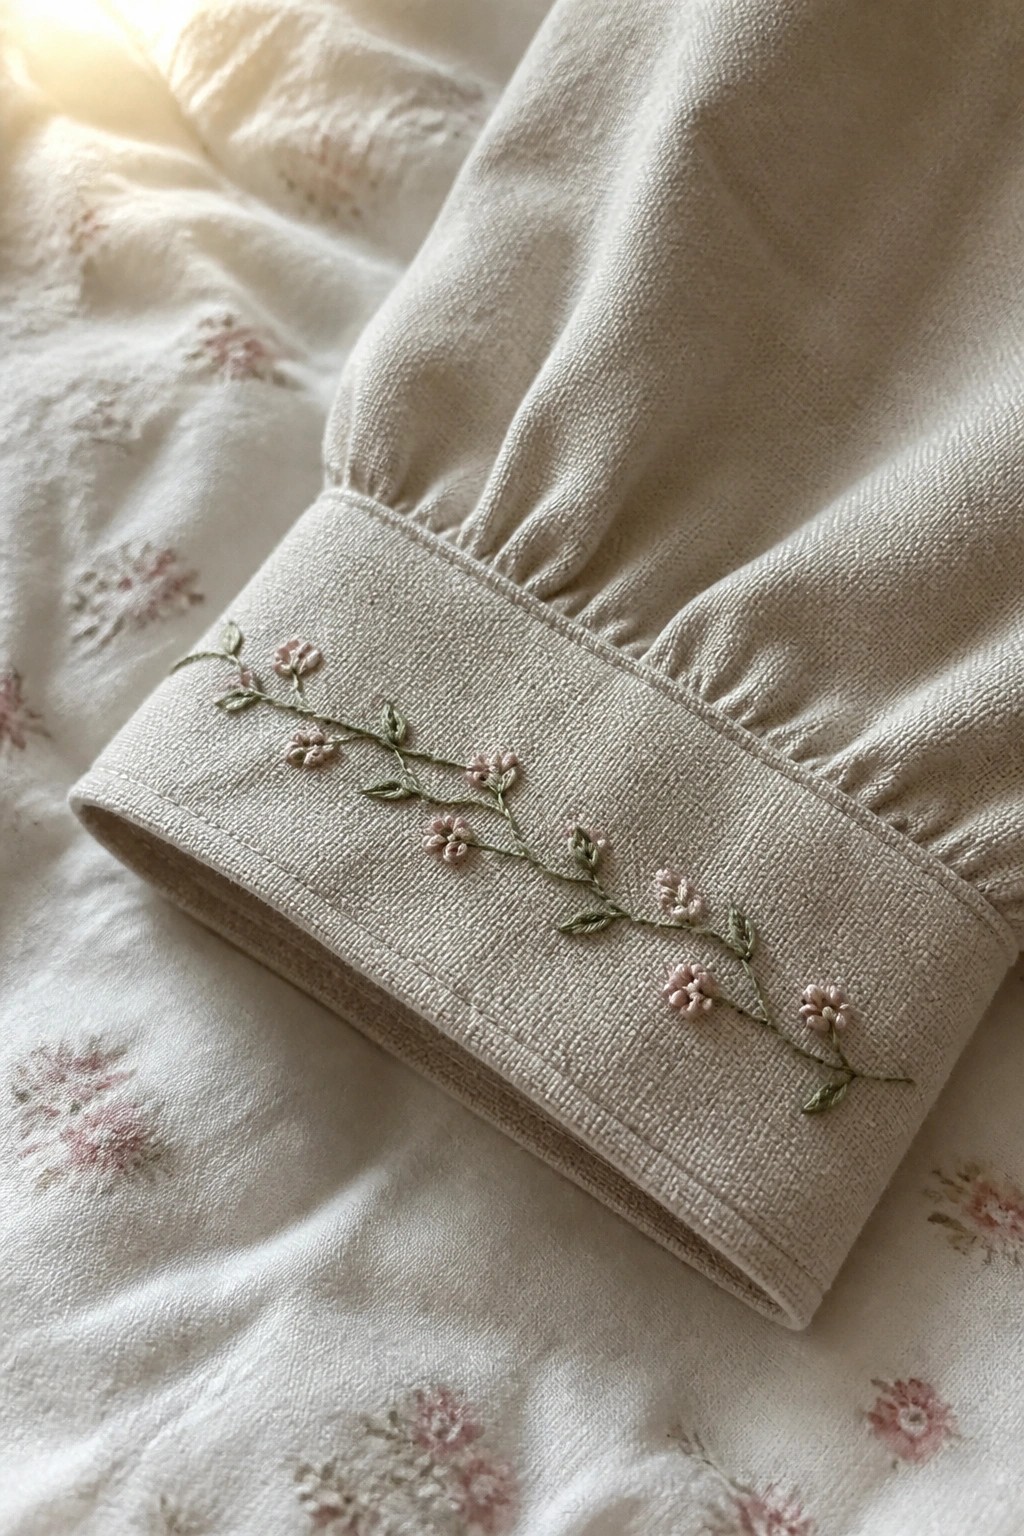
A narrow floral vine stitched along the finished edge of a cuff adds a quiet detail to a shirt or blouse. The design uses small flowers spaced unevenly along a curving stem so the line feels natural rather than rigid. Soft pink blooms and green leaves keep the embroidery light against the pale fabric, letting the cuff remain functional while gaining a finished look. This placement works best on sleeves, hems, or pocket edges where a full motif would be too much.
What makes this idea useful is how the linear format can stretch or shrink to match any cuff width without redesigning the whole pattern. You can move the same vine to a collar, a dress yoke, or even a pair of linen shorts for a matching set. Changing the flower color to match the main fabric keeps the detail subtle, while a brighter thread makes the cuff stand out on a solid garment. The simple repeat photographs cleanly, which is why similar sleeve details often get saved for everyday clothing projects.
Lavender Stems on a Round Pincushion

A cluster of lavender stems worked in purple and green threads sits centered on a round, padded fabric piece. The stems spread upward from the base to fill the circle evenly while leaving breathing room around the edges. This layout keeps the focus on the flowers themselves rather than background fabric. The idea fits small functional items such as pincushions, drawer sachets, or soft ornaments.
The compact scale makes this easy to finish in an evening and turn into something you can actually use. You could move the same stem group onto a linen bag pocket or the corner of a napkin by shrinking the overall size and using fewer stems. Switching the purple threads to soft blue or dusty rose changes the flower type without altering the structure. Because the motif stays self-contained, it works on both solid and lightly textured fabrics.
Large Peony on a Canvas Bag Flap

A single oversized peony with open pink petals fills most of the flap on a canvas bag, while green leaves extend along the stem and a small bee sits in the open space above. The flower is centered on the flap so the buckle sits below it, and the bee placement keeps the upper area from looking empty. This layout suits bags, totes, or other flat accessories where the embroidery needs to stay visible when the item is carried or worn.
What makes this idea useful is how the flower size matches the flap shape without extra borders or frames. You could shift the same proportions onto a jacket pocket or a larger tote by scaling the bee down or moving it closer to the petals. The contrast between the solid flower and the small bee keeps the design from feeling too heavy on pale fabric. If the flower color is changed to one or two shades, the whole piece still reads clearly from a short distance.
Mixed Pastel Blooms Arranged in a Compact Cluster

A circular group of eight small flowers in cream, blush, coral, and mauve sits at the center of the hoop, surrounded by scattered green leaves that fill the gaps without crowding the design. The flowers vary slightly in size and are stitched close together so they read as one unified bouquet rather than separate motifs. This layout works well for a finished hoop or as a motif that could be moved onto a tote, jacket pocket, or small pillow front.
What makes this idea useful is the contained scale that lets you finish the piece quickly while still showing variety through color shifts. You can swap the thread colors for brighter or darker tones without changing the layout, or shrink the whole cluster to fit a smaller hoop or patch. The same arrangement also translates easily to the corner of a tea towel or the front of a zip pouch if you want something other than wall art.
Vertical Florals on Fabric Bookmarks
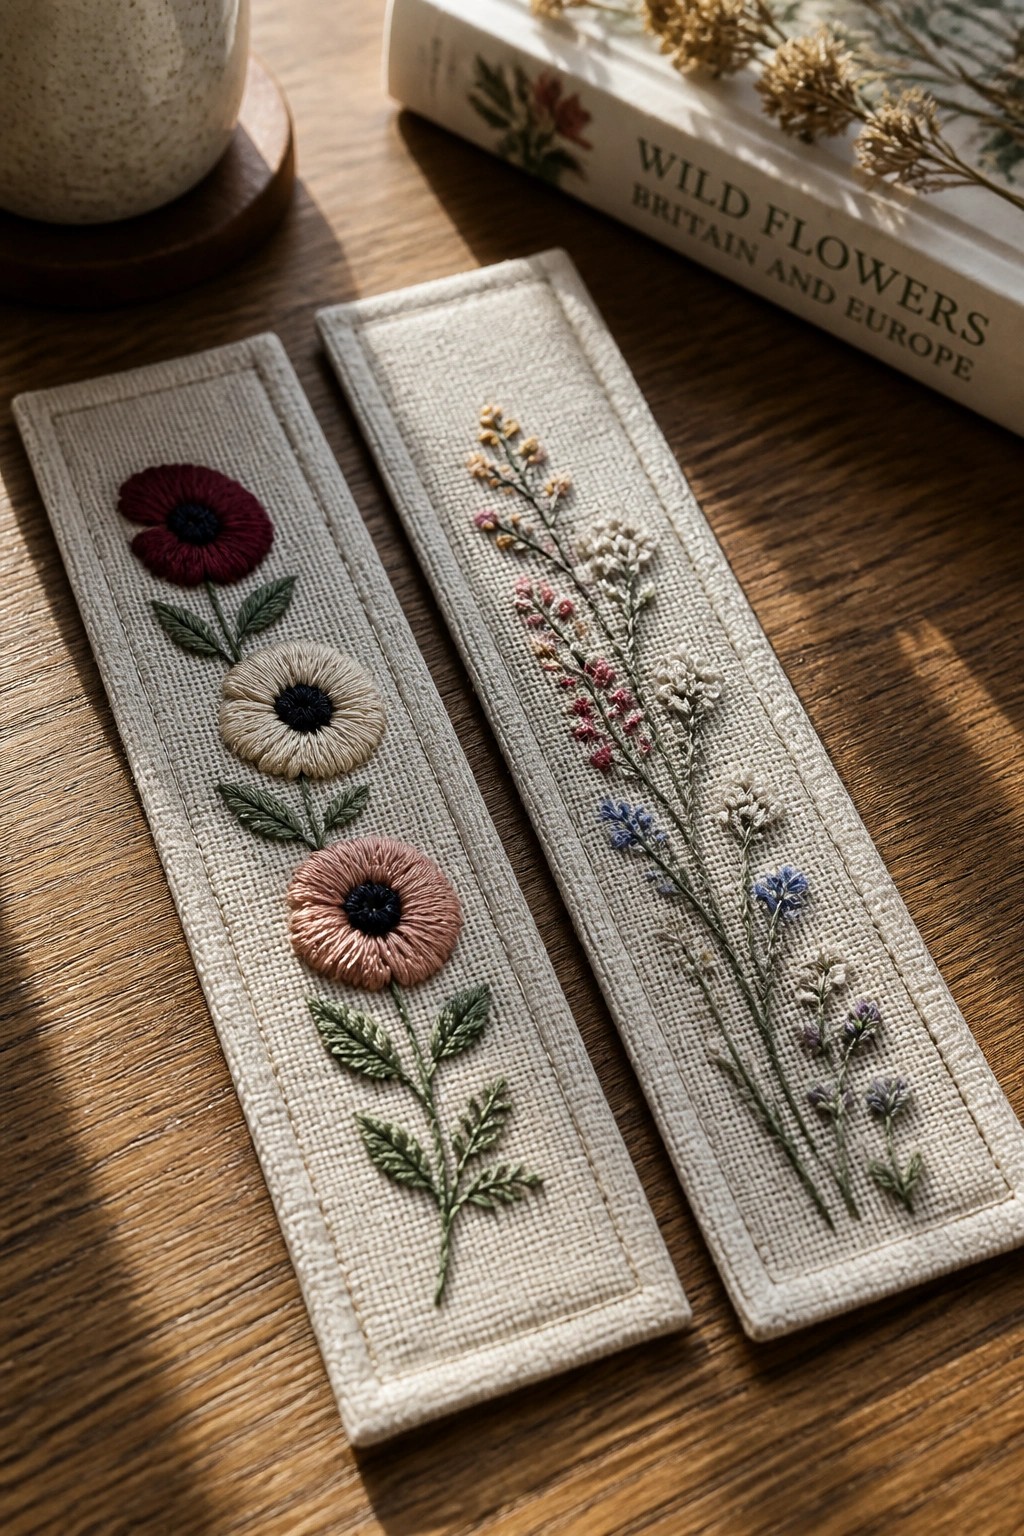
Embroider a column of three distinct flowers down the center of a narrow linen strip, using one bold bloom at the top, a medium one in the middle, and a smaller one near the bottom with leaves filling the spaces between. The second version uses several thin wildflower stems of varying heights scattered across the same narrow shape. Both approaches keep the embroidery compact so the finished piece slips easily between book pages without adding bulk.
What makes this idea useful is how the narrow vertical format forces you to simplify the design while still showing variety in flower shapes and colors. These work well as quick gifts since the fabric size stays small and the stitching stays contained. You can swap the color palette for seasonal tones or shorten the stems to fit a different book size without losing the overall look. The same layout also translates to a patch for a journal cover or a small bag if you want to move it off bookmarks.
Corner Wildflower Arc on Linen
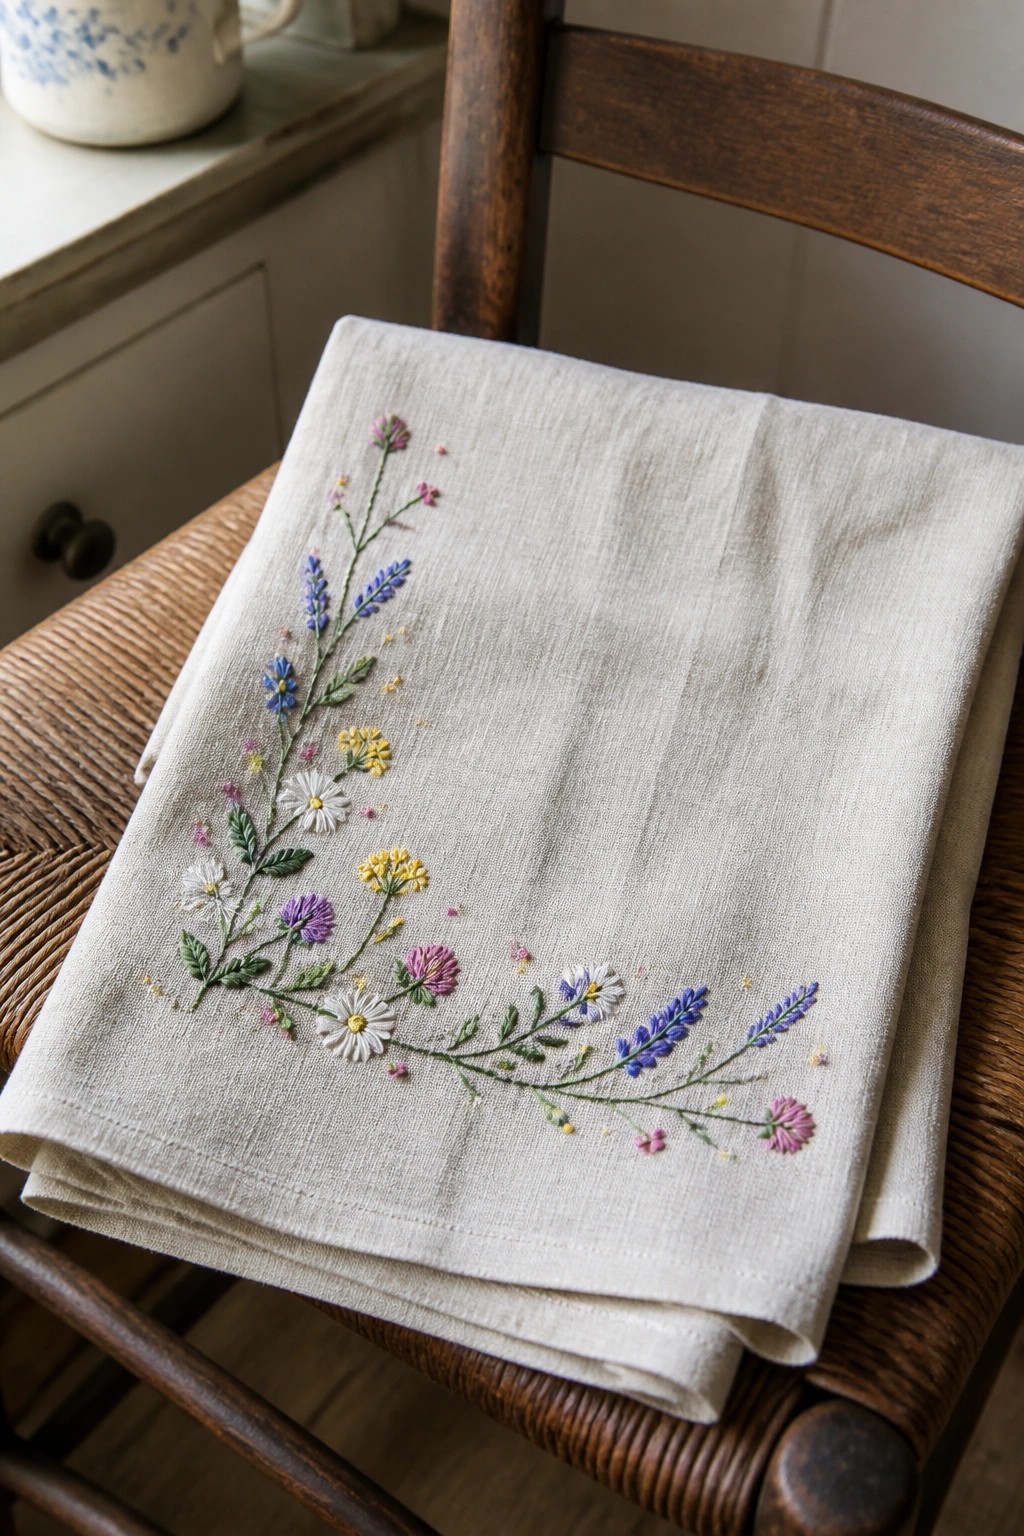
A curving line of mixed wildflowers stitched along the corner of a flat linen piece creates a soft border without filling the whole surface. Small daisies, lavender stems, and clusters of yellow blooms sit at different heights along thin green lines that follow a gentle arc. The scattered placement leaves plenty of empty fabric around the stitches so the design reads as light rather than heavy.
What makes this idea useful is how easily it transfers to napkins, tea towels, or the edge of a table runner. You can shrink the same arc to fit a single corner or stretch it longer for a wider hem. Switching the colors to two tones only keeps the look cleaner for everyday items while keeping the loose spacing that prevents the stitches from feeling crowded.
Pastel Daisy Ring on Neutral Linen

A loose ring of small daisy flowers stitched in soft pastel threads forms a simple wreath on plain linen inside a small hoop. The flowers are spaced evenly around the edge with the center left empty, which keeps the design light and balanced. This layout suits a standalone hoop or a small fabric piece where you want a gentle border without filling the whole surface.
The small scale makes it quick to finish and easy to move to other projects like a pouch front or a linen napkin corner. Changing the thread colors to a single shade or two tones would shift the look from soft to more graphic while keeping the same placement. On a hoop this ring gives you a clean finished piece that works as a gift or a quick sample before scaling the idea up.
Geometric Terrarium Hoop with Mixed Plants

A polygon outline forms a terrarium shape that contains several stitched plant varieties, two pink flowers, and a row of textured pebbles along the base. Some stems extend slightly beyond the lines while others stay contained, and the ground layer uses shorter, denser stitching to separate it from the foliage above. The straight frame lines give the scattered plant shapes a clear structure without crowding them. This approach works as a finished hoop piece or as a motif you can move onto a larger fabric panel.
The placement does a lot of the work here because the frame lets you adjust plant height and density while keeping the design balanced. You could shrink the polygon and use it on a pouch or notebook cover, or drop the flowers and keep only the greenery for a simpler version. Changing the thread colors in the leaves would shift the mood without altering the layout. A design like this shows up clearly in search results because the contained shape reads as one complete unit even at small sizes.
Frequently Asked Questions
What fabric is ideal for achieving a soft look in floral hoop embroidery projects? Lightweight linen or cotton muslin works best because these materials allow stitches to sink gently into the surface without puckering. Choose a natural fiber with a tight weave to keep the dreamy floral details crisp while maintaining an overall soft drape when the hoop is displayed.
How can a beginner adapt the 24 floral ideas if they have limited embroidery experience? Start by selecting simpler designs from the list that use only three or four basic stitches such as backstitch for stems, satin stitch for petals, and French knots for flower centers. Practice each stitch on a small scrap before transferring the full pattern, and follow the article suggestions for pastel color palettes to keep the project forgiving and visually soft.
What size embroidery hoop works well for most of these dreamy floral designs? A six to eight inch hoop provides enough space for the majority of the ideas without overwhelming the delicate floral elements. This size also makes it easy to hold the work comfortably during stitching and creates a balanced finished piece that can be hung or placed on a shelf.
How do I finish the back of the hoop so the artwork looks polished and stays secure? After completing the embroidery, trim the excess fabric to about one inch around the hoop, then use a running stitch to gather the fabric edges tightly at the back. Secure the gathers with a few knots and add a circle of felt glued in place to cover the raw edges, which also protects the stitches and gives the hoop a soft finished appearance.
Which color combinations create the softest dreamy effect in floral hoop art? Pastel shades such as blush pink, sage green, lavender, and pale blue produce the gentlest look described in the article. Layer two or three close tones within the same flower to add subtle depth without harsh contrast, and consider using one strand of floss instead of two for an even lighter, airier result.