
I have tried a few embroidery borders on my clothes and kitchen items over the past year.
Some patterns worked better than others depending on the fabric.
I put together a list of the ones that came out looking clean and simple.
These might be useful if you want to add a bit of detail to plain edges.
I hope they give you some easy options to try at home.
Wavy Two-Tone Edge Border

A wavy border stitched along the fabric edge uses two thread colors to create a repeating scalloped line. The coral thread forms the main undulating shape while the mint green adds smaller accents that follow the same curve. This placement works along hems on napkins, table linens, or lightweight garments where the edge needs a finished look without heavy decoration. The contrast between the two colors keeps the wave visible even from a short distance.
What makes this idea useful is how the wave can be stretched or tightened to match different fabric widths. Scale the curves smaller for a shirt hem or keep them wider for a napkin or towel edge. Switching both colors to shades that already appear in your fabric prevents the border from overpowering the base material. The two-color setup also makes it simple to mark spacing evenly before stitching.
Two-Color Star Border on Denim Hems

A repeating row of small stars stitched in two thread colors forms a clean border right along the finished edge of denim. The stars alternate between yellow and navy, sitting close together so the pattern reads as a continuous trim without gaps. This approach keeps the embroidery narrow enough to follow curves on cuffs, hems, or pocket edges on pants and jackets.
The placement along an existing seam means you can add it to ready-made clothing without much extra prep. Changing the thread colors to match a different fabric lets the same motif move easily to shirts or skirts, while shrinking the scale works for narrower edges like sleeve openings. The two-tone repeat stands out in photos because the contrast makes the shape clear even from a distance.
Floral Vines Along a Detachable Collar

A narrow vine with spaced flowers makes an effective border when stitched along both long edges of a fabric collar or scarf. The design leaves the center area plain so the embroidery acts as a frame rather than a full pattern. Small flowers in soft pink tones paired with green leaves keep the scale balanced for a wearable piece. This approach suits collars, cuffs, or long scarf ends where you want decoration that follows the shape without covering the whole surface.
What makes this idea useful is how the placement turns the edges into the focus while the middle stays clean for wear. The same vine can be shortened for a pocket edge or repeated around a napkin border by adjusting the spacing. Switching the flower colors to one shade gives a more modern look, while keeping the vine narrow prevents it from feeling heavy on lightweight fabrics. This layout also photographs cleanly for project sharing because the symmetry shows up clearly.
Geometric Chevron Border for Towel Edges
A row of angular chevrons runs along the hem of a striped fabric piece, each shape filled with solid blocks of color that alternate between teal, yellow, and orange. The design sits right at the edge, using the fabric’s existing stripes as a simple backdrop so the border becomes the main focus. The repeating arrow-like shapes give the edge a clean, graphic finish that works especially well on kitchen towels or napkins where you want something structured but not fussy.
What makes this idea useful is how the border placement turns a plain hem into the decorative element without needing extra fabric or trim. You can scale the chevrons smaller for shirt cuffs or a table runner, or swap the bright colors for two tones if you want it to feel more understated. The strong contrast between the filled shapes and the neutral background also helps the pattern read clearly in photos, which is why similar borders perform well when shared online.
Floral Clusters Along a Scalloped Border

A repeating pattern of small flowers and leafy sprigs placed along a scalloped line creates a finished edge without covering the whole fabric. The motifs sit close together so the curve stays visible and the design reads as one continuous border. This layout works especially well on napkins, table linens, or the hem of a skirt where only the outer edge needs decoration. Keeping the center plain lets the fabric itself remain the main surface.
The placement does a lot of the work here because the scalloped shape already follows most fabric edges without extra measuring. You can stretch or compress the same cluster sequence to fit a longer runner or a smaller handkerchief. Swapping the thread colors for ones that match your existing dishes or clothing makes the border blend in rather than stand out. On a napkin set this kind of edge detail photographs clearly for sharing and still leaves plenty of blank space for everyday use.
Two-Color Repeating Border for Tote Bag Tops

A border built from small floral clusters and vertical lines creates a clean finish along the top edge of a tote bag. The design alternates dense clusters with open stitched lines in two colors, which keeps the pattern balanced across the width. This placement draws attention to the bag opening while leaving the rest of the fabric plain. The same idea works on napkin edges, shirt hems, or any straight fabric border where you need a light repeating detail.
The small motifs make it easy to shorten or extend the border to match different widths. Changing the color pair lets you match the fabric without redesigning the pattern itself. This layout stands out because it fills the edge without dense stitching, so it works on thicker materials like canvas. You could shift the same border onto a jacket cuff or the rim of a fabric basket with only minor spacing adjustments.
Corner Strawberry Cluster on Napkins

Small red strawberries worked in one corner create a simple fruit motif on plain white fabric. The three berries sit close together with short green stems, leaving the rest of the surface untouched. This placement keeps the design compact and prevents the embroidery from interfering with the napkin’s main function. The idea suits table linens, tea towels, or any fabric item where you want a light accent rather than a full border.
What makes this idea useful is that the corner spot works on both folded and open pieces without extra planning. You can repeat the same small group on the opposite corner or stretch it into a short row along one edge for more coverage. Swapping the red thread for another color turns the berries into different fruit without changing the scale or layout. The compact size also moves easily to clothing hems or the edge of a pocket.
Floral Vine Border for Pillow Edges

A narrow vine of small flowers and leaves creates a clean border when worked along the hem of a pillowcase or similar linen item. The pattern uses a continuous green stem with tiny leaves and scattered mustard yellow flowers to follow the fabric edge and turn the corner without extra planning. This keeps the stitching light on the neutral ground while still defining the finished edge. The same approach works on napkins, table runners, or the lower edges of lightweight shirts and aprons.
What makes this idea useful is how the simple repeat scales easily to shorter or longer edges. You can tighten the spacing on a cuff or loosen it on a wide tablecloth without changing the basic vine. Switching the flower color or using a single color for the whole motif gives quick options for different fabrics. The layout also photographs clearly for project sharing because the corner treatment stays consistent.
Repeating Snowflake Motifs Along a Scrunchie Edge

A straight row of small snowflake shapes worked in gold thread forms a narrow border that runs along one edge of the scrunchie fabric. The motifs are spaced evenly so the pattern stays readable once the fabric is gathered. This layout suits narrow or curved edges on accessories where a wider border would crowd the space.
What makes this idea useful is that the same line of motifs transfers easily to cuffs, headbands, or napkin edges. You can change the thread color to match or contrast the base fabric, or stretch the spacing to cover a longer seam. On small items like this, the border adds detail without requiring much fabric or time.
Wavy Border on Denim Cuffs
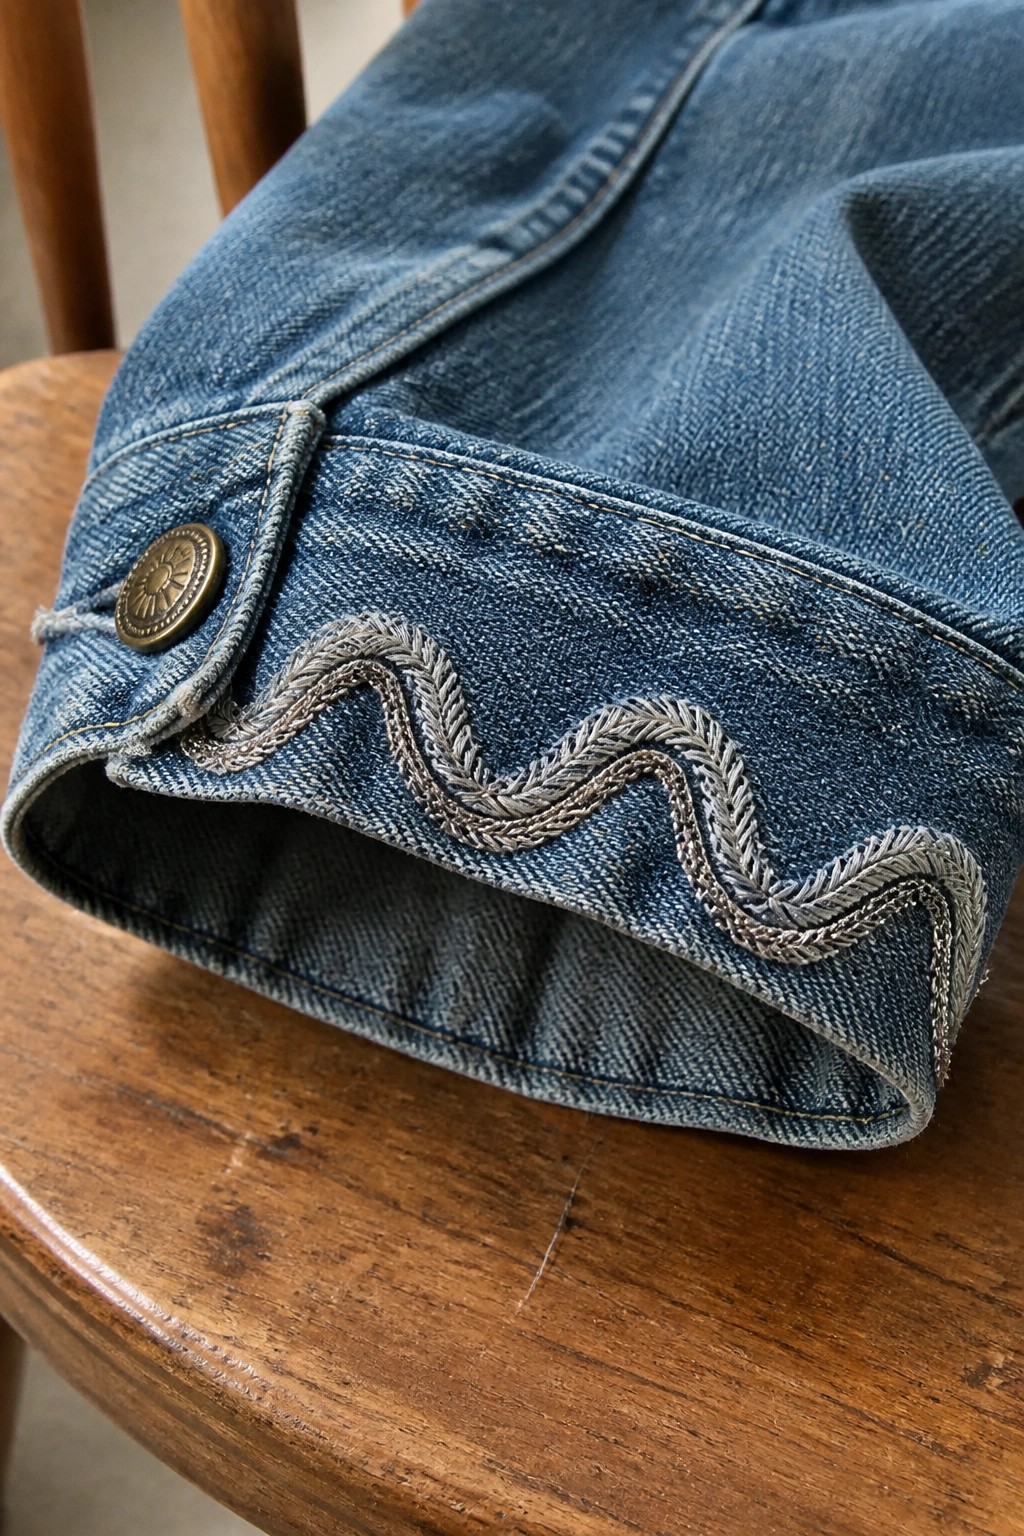
A repeating wave pattern stitched along the edge of a denim cuff turns the hem into a simple decorative border. The design follows the curve of the fabric and uses a single line of embroidery in a contrasting shade to create movement without covering much area. This approach keeps the focus on the garment’s existing shape while adding detail exactly where the fabric folds and shows.
The placement does a lot of the work here since cuffs already get noticed when pants are worn or rolled. You could scale the waves smaller for shirt sleeves or larger for a jacket hem, and swapping the thread color lets it match light or dark denim easily. The contained width also makes it simple to finish in a few short sessions if you want to update thrift store jeans.
Mushroom Border for Round Fabric Edges

A ring of small mushrooms stitched end to end forms a clean border around the outside of a circular fabric piece. Red and brown caps alternate with beige stems, while tiny scattered stitches fill the spaces between each motif. The repeating pattern keeps the center open and draws the eye to the edge without covering the whole surface. This layout works well on round napkins, placemats, or the hem of a small bag.
What makes this idea useful is how the compact size of the mushrooms lets the design wrap evenly around a curve. You can change the cap colors to match existing table linens or shorten the row and run it along a straight edge instead. The loose dots between motifs also hide small gaps if your spacing shifts during stitching. This kind of border stands out on Pinterest because the shape stays simple while still reading clearly from a distance.
Scattered Birds and Foliage Along an Apron Hem

A line of small embroidered birds with surrounding leaves and berries forms a loose border across the lower edge of an apron. Each bird sits at a slightly different height with plant clusters filling the spaces between them so the design flows without looking stiff. The blue running stitch just above the scalloped hem adds a clean boundary that keeps the whole row in place. This approach works well on any fabric edge where you want decoration that stays visible during use, such as aprons, skirts, or tea towels.
What makes this idea useful is how the spacing lets you add or remove motifs to fit the width of your project without redrawing the whole pattern. You could repeat just the birds on a narrower border or stretch the foliage clusters farther apart on a wider hem. The same layout translates easily to napkins if you reduce the size of each bird by half. Changing the thread colors to match your fabric keeps the design from competing with prints already on the material.
Cloud Raindrop Border Along a Neckline

A line of small embroidered clouds with short vertical stitches for raindrops forms a repeating border that follows the curve of a neckline. The clouds sit at even intervals across the front, and the raindrops hang just below each one to create a consistent lower edge without filling the whole area. This keeps the design light while turning the neck opening into a clear decorative feature. The approach suits baby onesies, kids’ shirts, or any garment where the neckline gets regular visibility.
What makes this idea useful is how the curved placement already matches the shape of most necklines, so you can trace and space the clouds without extra measuring. The same motif adapts easily to sleeve cuffs or the edge of a pocket by shortening the row. Using a single thread color keeps it simple to stitch, while changing the raindrop length or spacing lets you fit larger or smaller garments without redrawing the pattern. On Pinterest this stands out because the vertical raindrops add movement that flat borders often lack.
Vertical Leaf Branch Border for Napkins and Linens

A single leafy branch stitched vertically creates a clean border when placed along one edge of the fabric. The design uses layered green threads for the leaves and a fine metallic line for the stem, keeping the overall width narrow. This setup leaves most of the fabric plain while still marking the edge clearly. It suits napkins, guest towels, or the side of a table runner where the border will show when the item is folded or laid flat.
What makes this idea useful is how the straight vertical layout adapts to different lengths without extra planning. You can shorten the branch for smaller napkins or extend it for longer runners by repeating leaf clusters. Switching the thread colors to match the base fabric tone keeps the look subtle on clothing hems, while brighter greens stand out more on kitchen towels. The narrow scale also makes it simple to add to ready-made items without much fabric prep.
Wheel Motif Fringe for Fabric Edges

Small wheel shapes with spokes are stitched separately then attached along the edge with short lengths of wrapped thread so they hang down like fringe. The wheels repeat at irregular intervals and different drop lengths, which keeps the line from looking too even. Bright thread colors on a light base fabric make each wheel stand out without needing extra stitching around them. This border style suits scarves, shawls, napkin edges, or the hem of a lightweight curtain panel.
What makes this idea useful is that the wheels can be made in batches ahead of time and added to any finished edge later. You can shrink the motif for a shirt hem or space the drops farther apart on a wider table runner. Switching to two or three colors instead of a full rainbow changes how busy the border looks while keeping the same structure. The hanging placement also works on items that move, like bags or clothing, where a flat border would be less noticeable.
Scalloped Fan Border on a Zipper Pouch

A row of small fan shapes stitched in repeating scallops creates a clean border just below the zipper on this pouch. The design alternates between lavender and mint threads, with each fan sitting inside a curved outline and accented by tiny dots at the base. This keeps the embroidery narrow enough to sit neatly along any straight fabric edge without overwhelming the piece. The same border would translate well to the hem of a skirt, the edge of a napkin, or the flap of a larger bag.
What makes this idea useful is how the tight repeat fits small accessories without needing much space. You could swap the two colors for a single shade or shift the whole row lower on a garment hem to change the look. On a pouch it frames the opening nicely, but the scale also works on clothing cuffs or even as a patch you sew on later. The color contrast helps the border read clearly from a distance, which is why similar versions perform well in saved project photos.
Moon and Star Border on a Shirt Pocket

A repeating line of crescent moons and small stars stitched along the top edge of a pocket forms a compact border. The motifs sit directly on the pocket flap of a denim shirt and connect with a simple running stitch that keeps the pattern even. This placement uses the existing pocket shape as a frame so the embroidery stays contained and balanced. The idea suits shirts, jackets, or any garment with a visible pocket edge where you want a narrow decorative strip.
What makes this idea useful is how it adds detail without needing much space or time. You could shift the same border to a cuff, the front of a bag, or the edge of a tea towel by keeping the motif spacing consistent. Changing the thread color to match or contrast with the fabric changes how bold the line looks, while stretching the pattern wider works for larger hems. On clothing this motif stays practical because it follows a straight edge that already exists.
Linear Fruit Motifs on Napkin Hems

Embroider a single row of small pears or cherries directly above the hem on fabric napkins so the design sits neatly along the edge. Alternate the two fruits across multiple napkins or keep one motif per piece for a coordinated set. The tight spacing and limited color palette keep the border simple while still adding clear detail without overwhelming the fabric.
What makes this idea useful is how the straight-line placement works on any straight edge from towels to apron hems. You can swap in different fruits or change the thread colors to match existing kitchen textiles without redesigning the layout. Scaling the motifs smaller lets the same pattern move onto cuffs or placemats while keeping the repeat easy to stitch by eye.
Trailing Vine Border with Berries

A repeating vine pattern with small leaves and clustered berries creates a clean border when placed directly along the hem of lightweight fabric. The design sits low on the edge so the rest of the material stays plain, which keeps the look balanced on sheer or loosely woven cloth. This approach suits napkins, table linens, or the lower edge of a skirt where a narrow strip of detail is enough.
The placement does a lot of the work here because the motif follows the finished edge without extra framing. Scale the vine down for cocktail napkins or stretch it out longer on a table runner by repeating the same leaf and berry sequence. Switching the berry color to match existing dish towels or clothing makes the same pattern fit multiple projects without starting over. The narrow width also means you can transfer it with a simple template and stitch it flat on most fabric edges.
Repeating Paw Prints Along a Cuff Edge
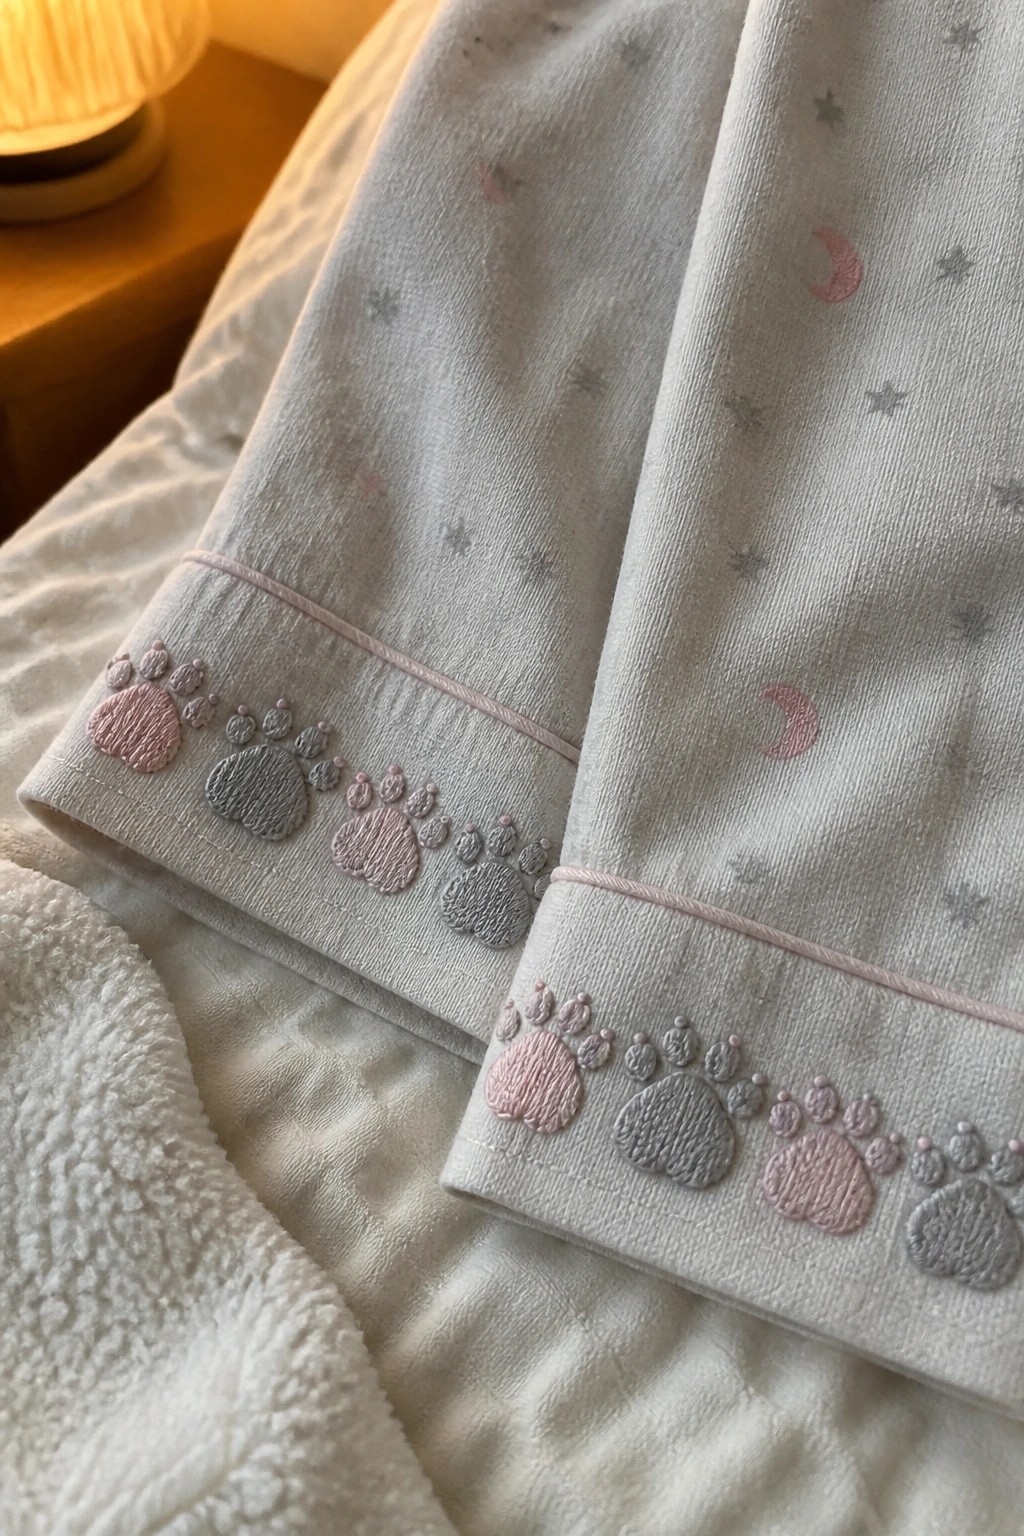
A simple line of paw prints works as a border when placed directly along the finished edge of pants or sleeves. The prints repeat in two colors and stay tucked below a thin trim, which keeps the whole row neat and contained. This layout fits pajama sets or kids’ clothing where a small repeating motif can run around the full hem without looking crowded. The scale stays consistent so the pattern reads clearly even on curved edges.
What makes this idea useful is how easily it transfers to other straight hems like sleeves, shorts, or even towel borders. You can swap the paw prints for stars or hearts and keep the same spacing if the fabric changes. Adjusting the colors to match the main print lets the border blend in on adult loungewear or stand out more on baby items. The compact repeat also works well for machine stitching on longer edges.
X-Stitch Rows Along a Quilt Border

Small X stitches in orange and teal run in parallel rows right along the cream border of this quilt, paired with short dashed lines in the same colors. The stitches sit close to the folded edge and follow its curve without any extra framing. The two thread colors break up the line so the pattern reads as both simple and structured. This works especially well on napkins, table linens, or any straight fabric edge that needs a finished look without heavy embellishment.
What makes this idea useful is how the narrow width lets you add it to existing seams without much extra planning. You could swap the orange and teal for colors that match your fabric or reduce it to a single row on smaller items like tea towels. On clothing, the same spacing would fit along a hem or facing where a wider design would feel too much. The high contrast between the stitches and the background fabric is what helps it show up clearly in photos, which is why versions of this border often get saved for quick edge projects.
Spaced Dots Along Stitched Felt Edges

A row of small raised dots placed at regular intervals just inside a simple edge stitch gives round felt pieces a finished border without filling the whole surface. The dots break up the line of stitching and keep the center area open for use. This approach suits small fabric items like coasters, patches, or the corners of napkins where the edge needs light decoration.
What makes this idea useful is how the spacing between dots can stretch or tighten depending on the size of the circle. The same pattern works on clothing cuffs or pocket edges by switching to a matching thread color instead of contrast. Scaling the dots larger or grouping them in pairs changes the look without adding new stitches.
Frequently Asked Questions
What embroidery stitches are most suitable for creating durable borders on clothes and napkins?
Use simple running stitches or backstitches for clean edges on lightweight fabrics like cotton napkins. For clothes, try chain stitches or satin stitches to add texture without bulk. These options hold up well during wear and washing while allowing you to follow creative patterns such as floral vines or geometric lines along hems and edges.
How do I adapt border ideas for different fabric types without puckering or distortion?
Choose a stabilizer like fusible interfacing for stretchy materials such as jersey knits on t-shirts. On stiff fabrics like linen for napkins, hoop the material tightly and use shorter stitches. Test your chosen design on a scrap first to adjust tension and scale the pattern to fit the edge evenly.
What thread and needle sizes work best for embroidery borders on various projects?
Select embroidery floss with two to three strands for delicate napkins and finer details. Switch to four strands or perle cotton for bolder looks on clothing edges. Pair these with a size 7 or 8 embroidery needle for most cottons, ensuring the eye is large enough for the thread but the shaft does not leave holes in the fabric.
How can beginners personalize the 22 border ideas to match their skill level and style?
Start with basic repeating motifs like dots or waves on napkins before moving to complex ones such as intertwined leaves on garments. Trace designs lightly with a water-soluble pen and practice on small sections. Combine ideas by mixing colors or adding beads to simple outlines for a custom touch without overwhelming new stitchers.
What steps ensure embroidered borders remain vibrant and intact after washing?
Hand wash items in cold water with mild detergent and avoid wringing to prevent thread fraying. Lay flat to dry and iron on the reverse side using a pressing cloth. For machine washing, turn garments inside out and use a gentle cycle in a mesh bag to protect the edges on both clothes and napkins.