
I like flower embroidery because the designs stay soft and do not feel dated after a while.
I have picked out twenty four ideas that use basic stitches and gentle colors.
These patterns work on hoops or fabric projects without much trouble.
I often return to flower motifs when I want something familiar to stitch.
They give a quiet charm that fits many different styles.
Clustered Rose Bouquet in Soft Pinks

A tight grouping of roses in several shades of pink sits at the center of a standard hoop, surrounded by smaller buds and simple leaf clusters. The design stacks full blooms of different sizes so they overlap slightly, which keeps the overall shape compact and round. Thread colors stay within a narrow range of dusty pinks, creams, and muted greens, letting the layering create depth instead of relying on many separate hues. This motif suits hoop display but also transfers easily to the corner of a pillow cover or the flap of a small pouch.
The placement does a lot of the work here because the flowers fill the hoop space without reaching the frame, leaving room for the fabric to show around the edges. You could shrink the whole bouquet for a single motif on a jacket pocket or stretch it into an oval for a larger tote. Swapping the soft pinks for stronger rose tones or adding a few more leaf branches would make the same layout feel more graphic. The contained size also means the pattern fits on most printable transfer sheets, which helps when people save it for later projects.
Daisies Along a Denim Pocket
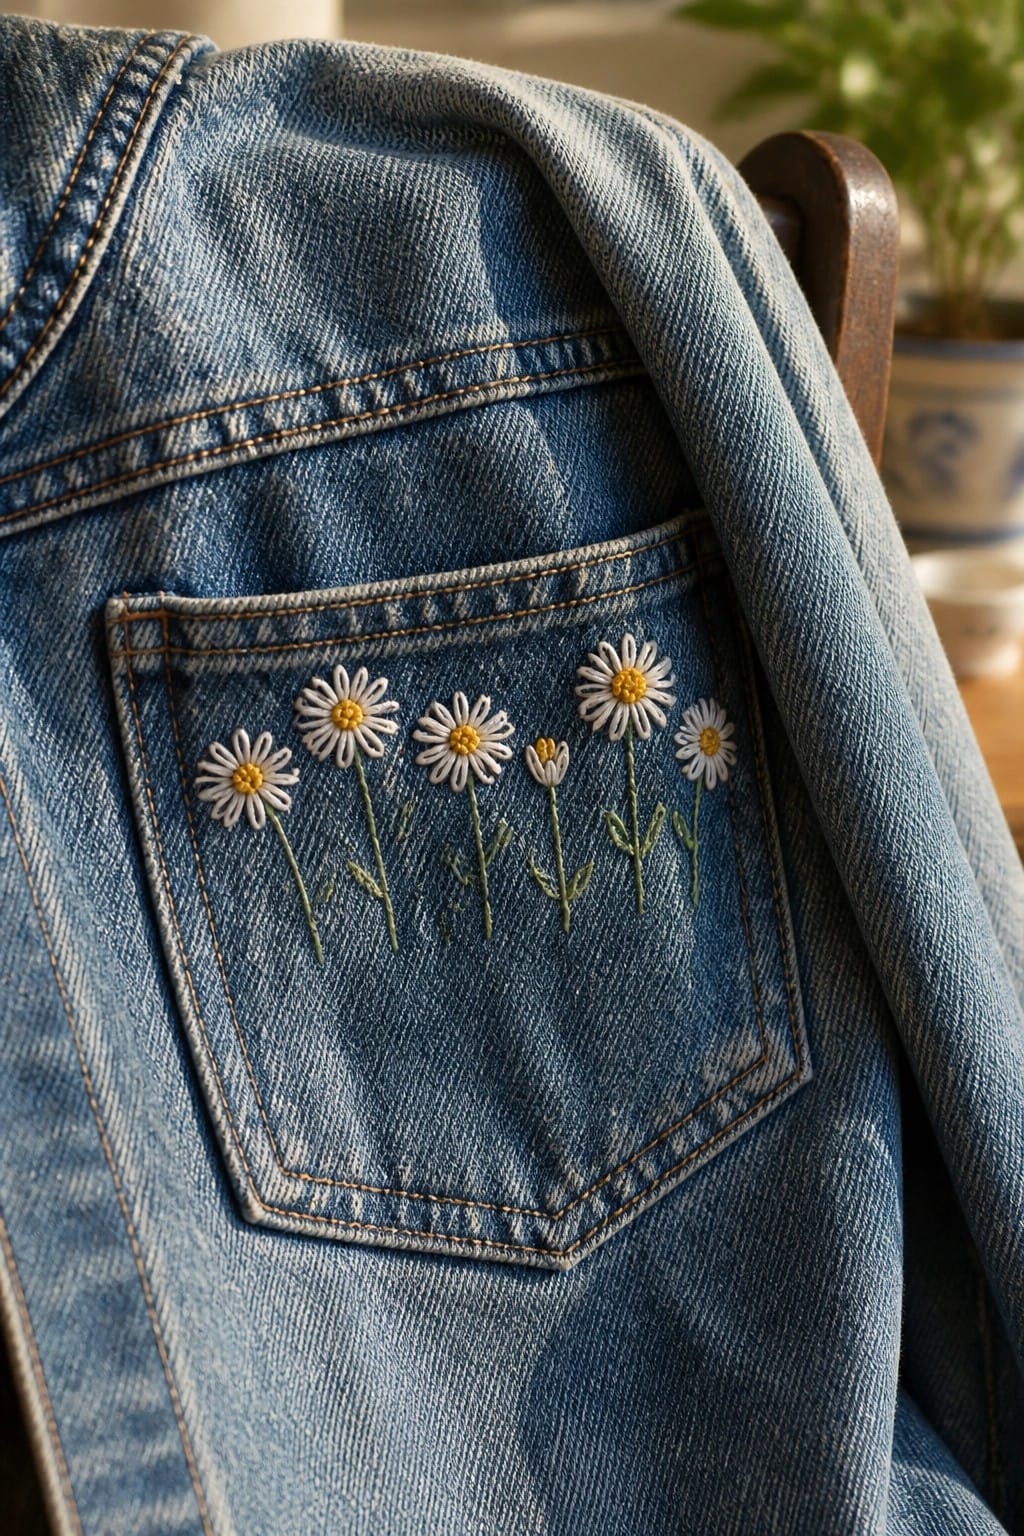
A line of small daisies stitched across a denim pocket gives a basic garment an easy floral detail. The flowers sit at slightly different heights with short green stems, keeping the layout loose rather than perfectly even. White petals and yellow centers stand out on the blue fabric without needing extra layers or dense stitching. This approach suits jackets, jeans, or any denim piece where you want the embroidery to stay contained to one small area.
The placement does a lot of the work here because the pocket already creates a clear boundary for the design. You can copy the same row onto a different garment like a shirt hem or a canvas bag by adjusting how far apart the flowers sit. Short stems prevent the thread from catching on textured denim during wear. A design this size also photographs cleanly for pattern sharing since the contrast between the flowers and the fabric stays strong even in simple photos.
Bouquet with Bow on a Canvas Tote
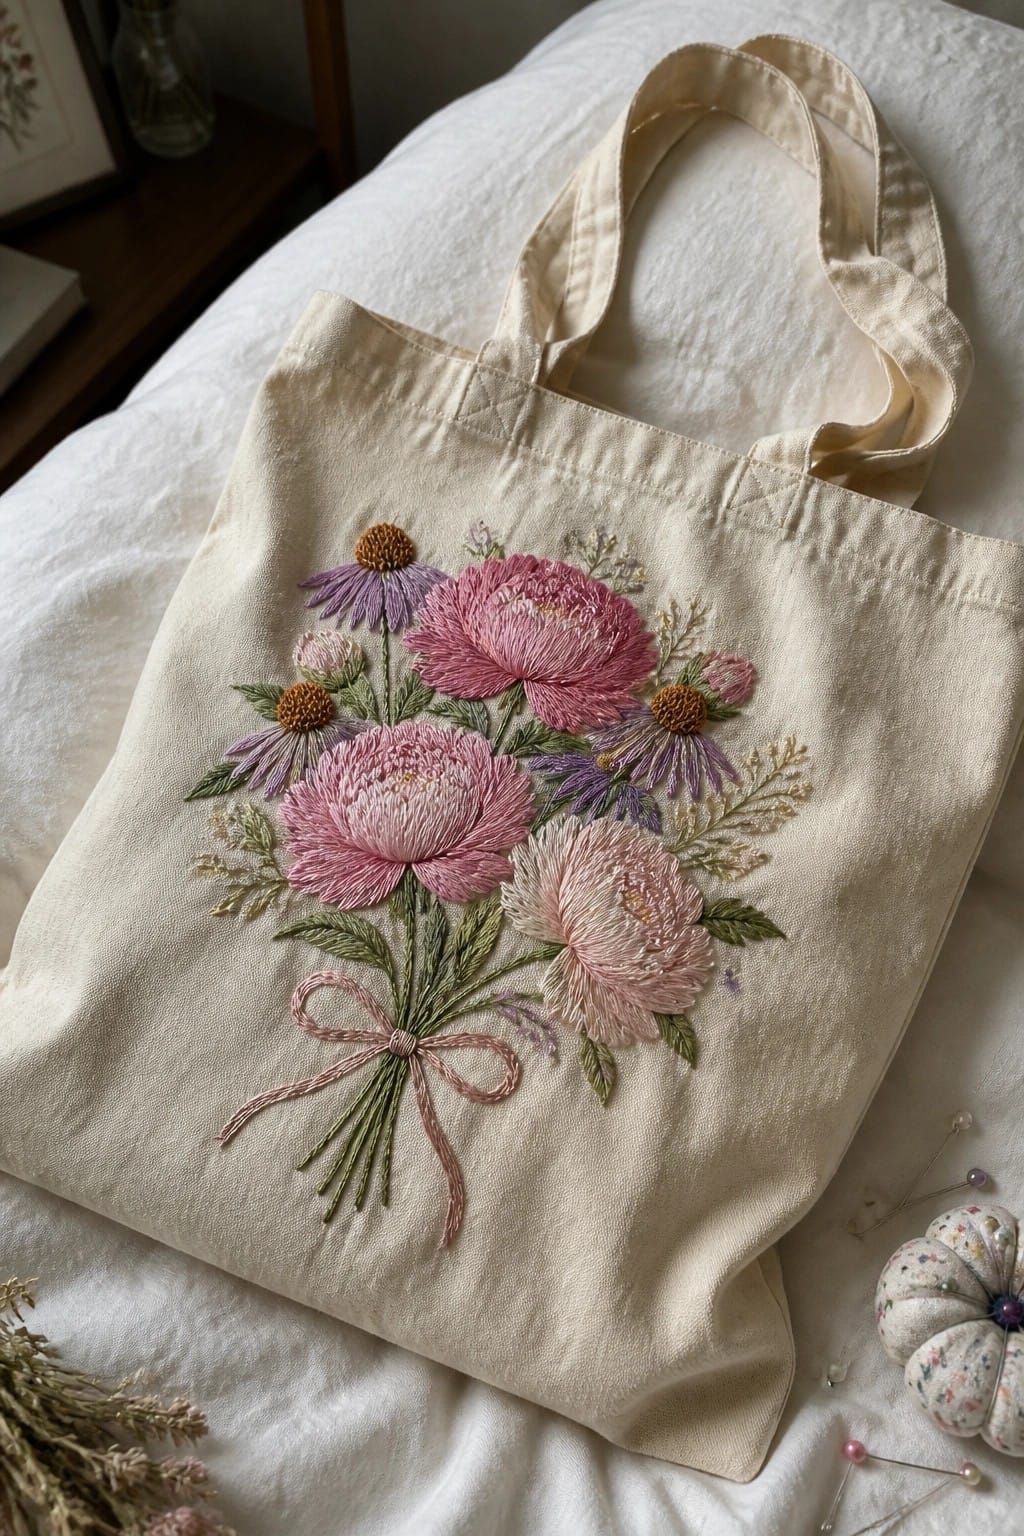
A bouquet of several different flowers gathered at the base with a bow creates a complete, self-contained motif that sits neatly on the front of a tote bag. The stems are grouped together below the bow so the design stays compact while still filling the space with layered blooms and leaves. This works especially well on fabric bags because the flat surface lets the full shape show without the distortion that happens on curved clothing.
What makes this idea useful is how the bow gives the eye a clear starting point and lets you adjust the height of the bouquet to fit different bag sizes. The same layout transfers easily to a jacket pocket or a zippered pouch if you shorten the stems and keep the flowers tighter. Swapping in fewer blooms or a different color for the bow changes the weight of the design without needing new stitches. On Pinterest the bow helps the image read clearly even when the photo is small.
Blue Flower Border Along a Fabric Hem

A simple row of small blue flowers stitched along the hem creates a clean border on white linen or cotton fabric. The stems link the blooms lightly so the design stays narrow and follows the edge without spreading inward. This works especially well on napkins, handkerchiefs, or the edges of table linens where you want a finished look that still leaves most of the fabric plain. The scale stays small enough that the embroidery does not compete with the item’s main use.
What makes this idea useful is how quickly the border can be repeated or shortened to fit different widths of fabric. You could shift the same row onto pillowcase edges or the bottom of a tea towel for a coordinated set. Switching the blue to another color lets the design match existing dishes or room colors without changing the layout. The narrow placement also keeps the stitching light so it holds up through regular washing on practical items.
Tulips Stitched Across a Scrunchie Front

Three small tulips spaced in a row along the lower edge of a fabric scrunchie create a repeating floral accent that stays visible once the band is gathered. The flowers sit close together so the design reads as a single cluster rather than scattered motifs. Soft pink and peach threads on the blooms with muted green leaves keep the scale balanced against the gathered fabric.
What makes this idea useful is how easily the same row of tulips transfers to other narrow surfaces like headbands or the edge of a pocket. You can stretch the spacing if the fabric is wider or reduce it to two flowers for a smaller band. Switching the thread colors to match an outfit turns the motif into a quick matching accessory without changing the layout.
Purple Flowers on Shirt Collar Points

Small purple flowers with yellow centers sit at the tips of a shirt collar, each paired with a short green stem and a couple of leaves. A few tiny white stitches add a bit of extra detail next to the main bloom. The compact size keeps the embroidery from looking busy while still making the collar stand out on a plain button-up. This approach works best on shirts, blouses, or lightweight jackets where the collar gets regular visibility.
The placement does a lot of the work here because the flowers sit exactly where the fabric turns. A design like this transfers easily to other collar shapes or even to the edge of a pocket. Switching the purple to a different shade lets the same layout match multiple garments without extra planning. On Pinterest, this kind of simple collar motif gets saved often because it looks finished with minimal stitching.
Circular Wildflower Wreath on a Pillow Cover
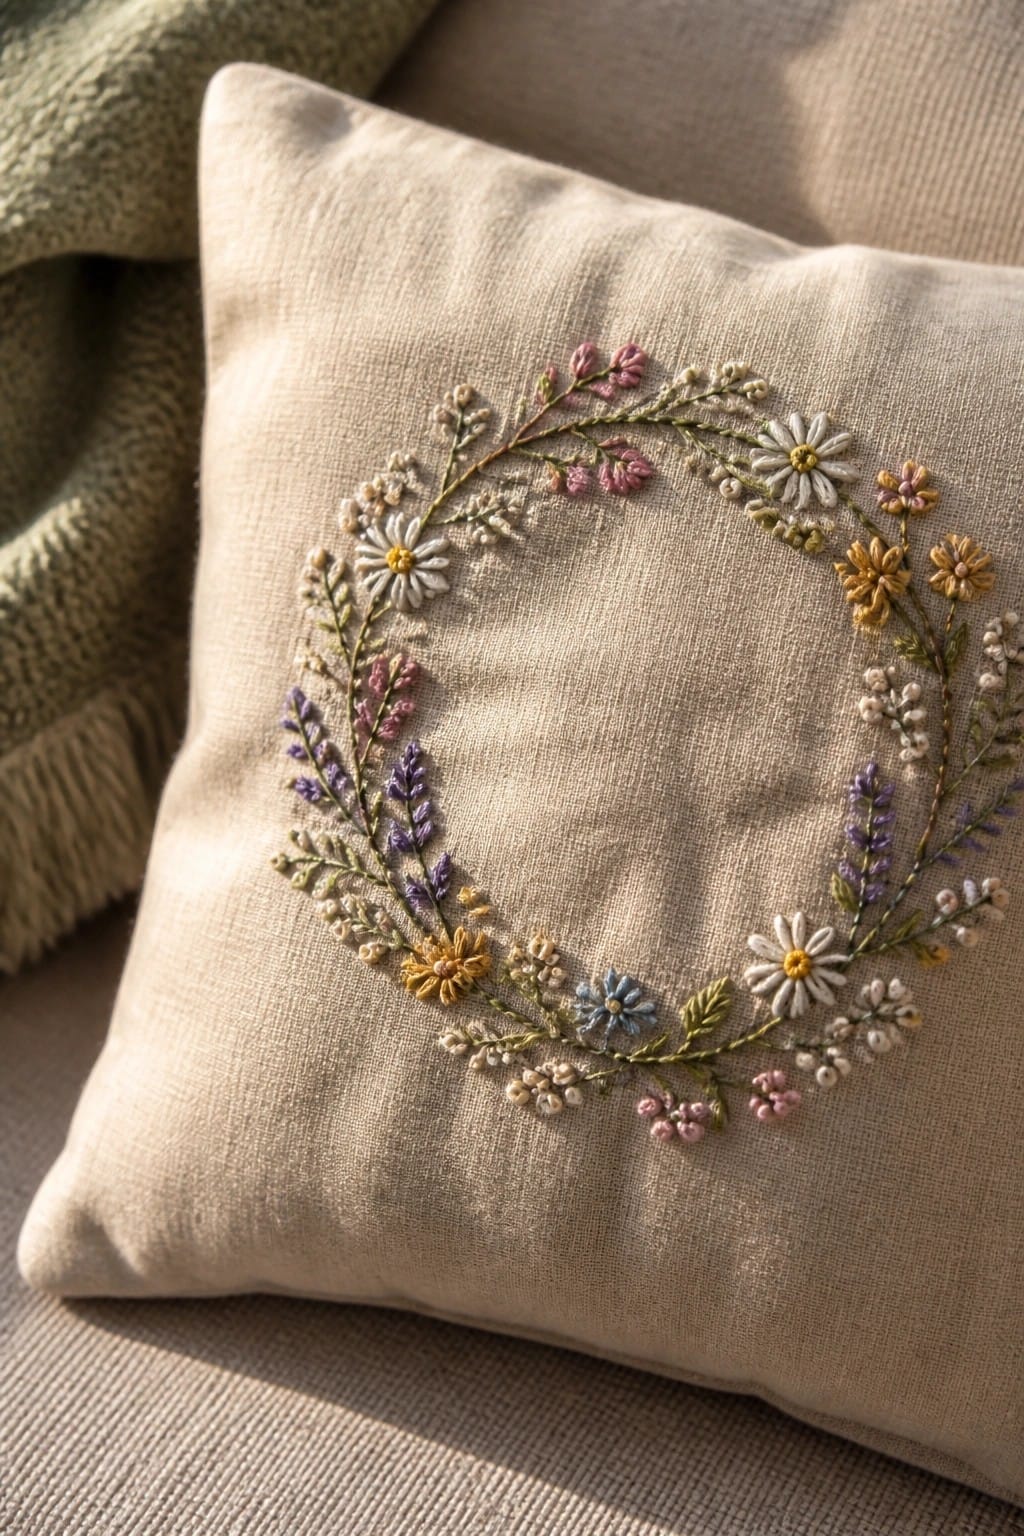
A ring of mixed small flowers and foliage creates the main design on a neutral pillow cover. The flowers include daisies, clusters of tiny blooms, and sprigs of lavender arranged in a loose circle that leaves the center plain. This keeps the embroidery contained to a single hoop-sized area while the varied heights and colors prevent the ring from looking too uniform.
What makes this idea useful is how the circular layout fits neatly on square or rectangular items without needing extra borders. You can adapt the same wreath for a smaller scale on a makeup bag or shift the color mix toward cooler tones for a different season. The contained shape also means it transfers easily from a practice hoop to the final project with minimal measuring.
Daisy Border on Kitchen Towels

A row of daisies stitched across one edge creates a simple repeating border on a flat piece of fabric. Each flower uses white petals around a yellow center with green stems and leaves dropping below, while small scattered dots fill the gaps between them. The even spacing and limited color palette keep the design balanced without overwhelming the fabric. This layout works best on towels, napkins, or table linens where the pattern sits along a hem or lower edge.
The placement along the bottom edge leaves the rest of the fabric free for actual use. You can shorten the stems or reduce the number of flowers to fit narrower items like coasters or bread bags. Switching the yellow centers to another shade or moving the row to a side hem changes the look without altering the basic repeat. This style of border also transfers well to aprons or pillowcases if you keep the scale consistent.
Lavender Bouquet on a Denim Bag Pocket
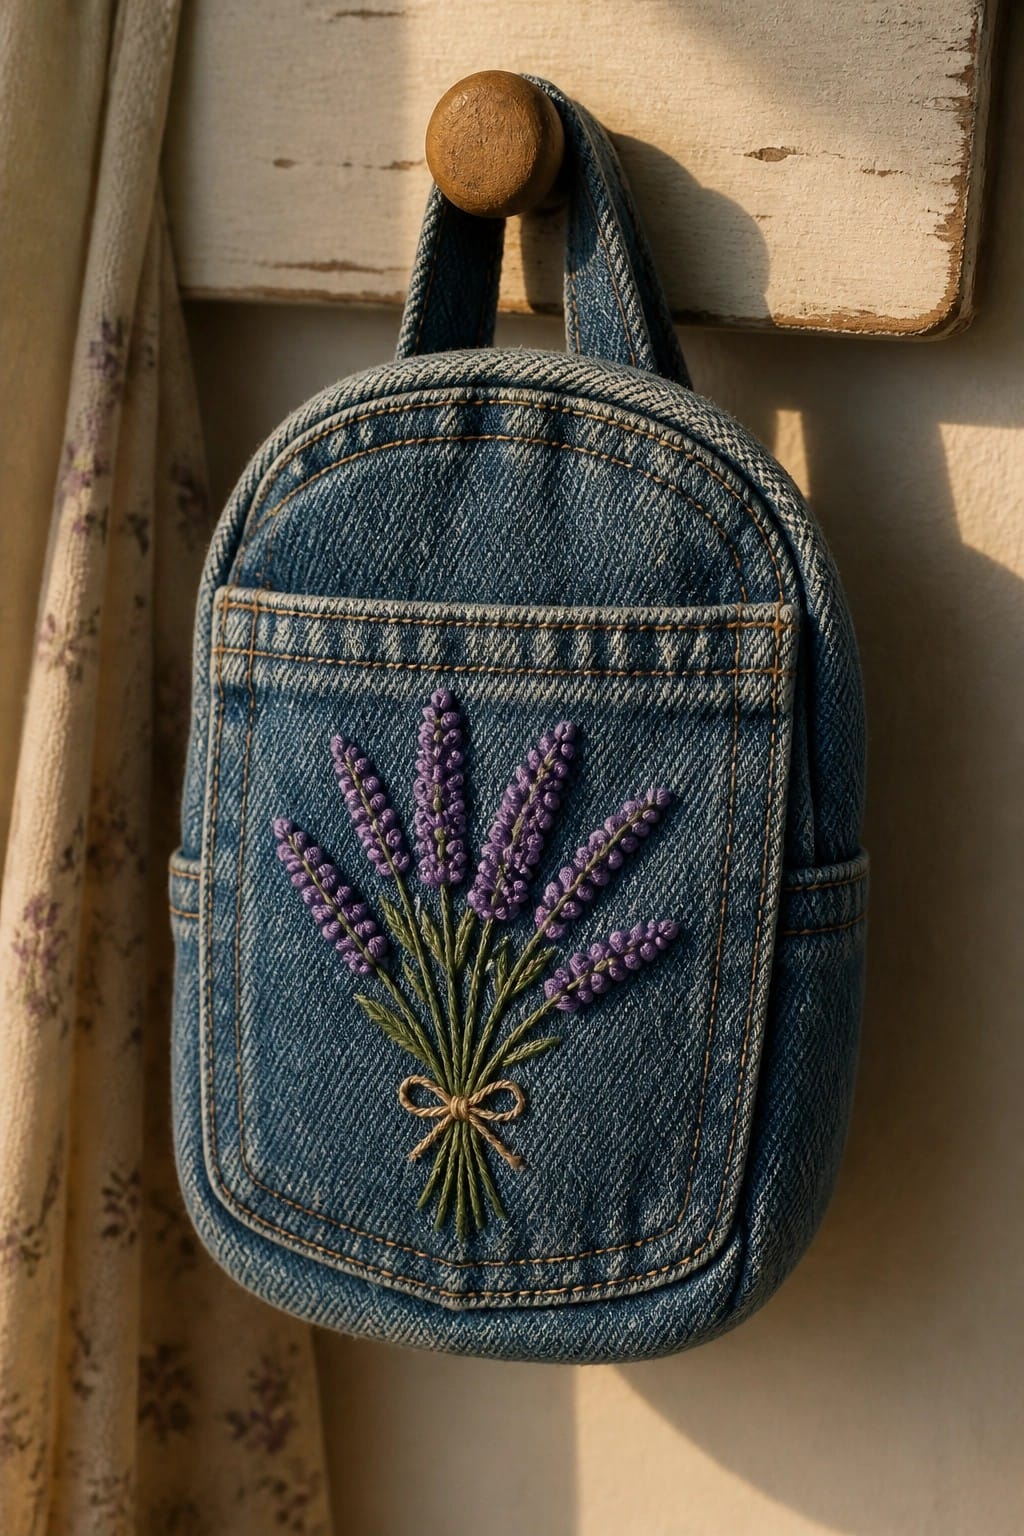
A compact bouquet of lavender stems works as the main motif here, with the flowers fanned out and the stems gathered into a small bow at the base. The design sits centered on the front pocket of a small denim backpack, using the rectangular shape of the pocket to frame the embroidery neatly. Straight stems and rounded flower heads create a balanced shape that stays contained without needing extra borders or fills. This approach suits bags, pouches, or jacket pockets where a single floral accent fits the available space.
What makes this idea useful is how the tied base keeps the whole motif compact and simple to resize. The same layout could move to a tote bag corner or a shirt pocket by shortening the stems or tightening the fan. Switching the purple to softer tones would change the overall feel while the basic bouquet structure stays the same. On Pinterest this type of design performs well because it reads clearly even at small sizes and translates directly to other fabric items.
Flower Embroidery on a Fabric Coin Purse
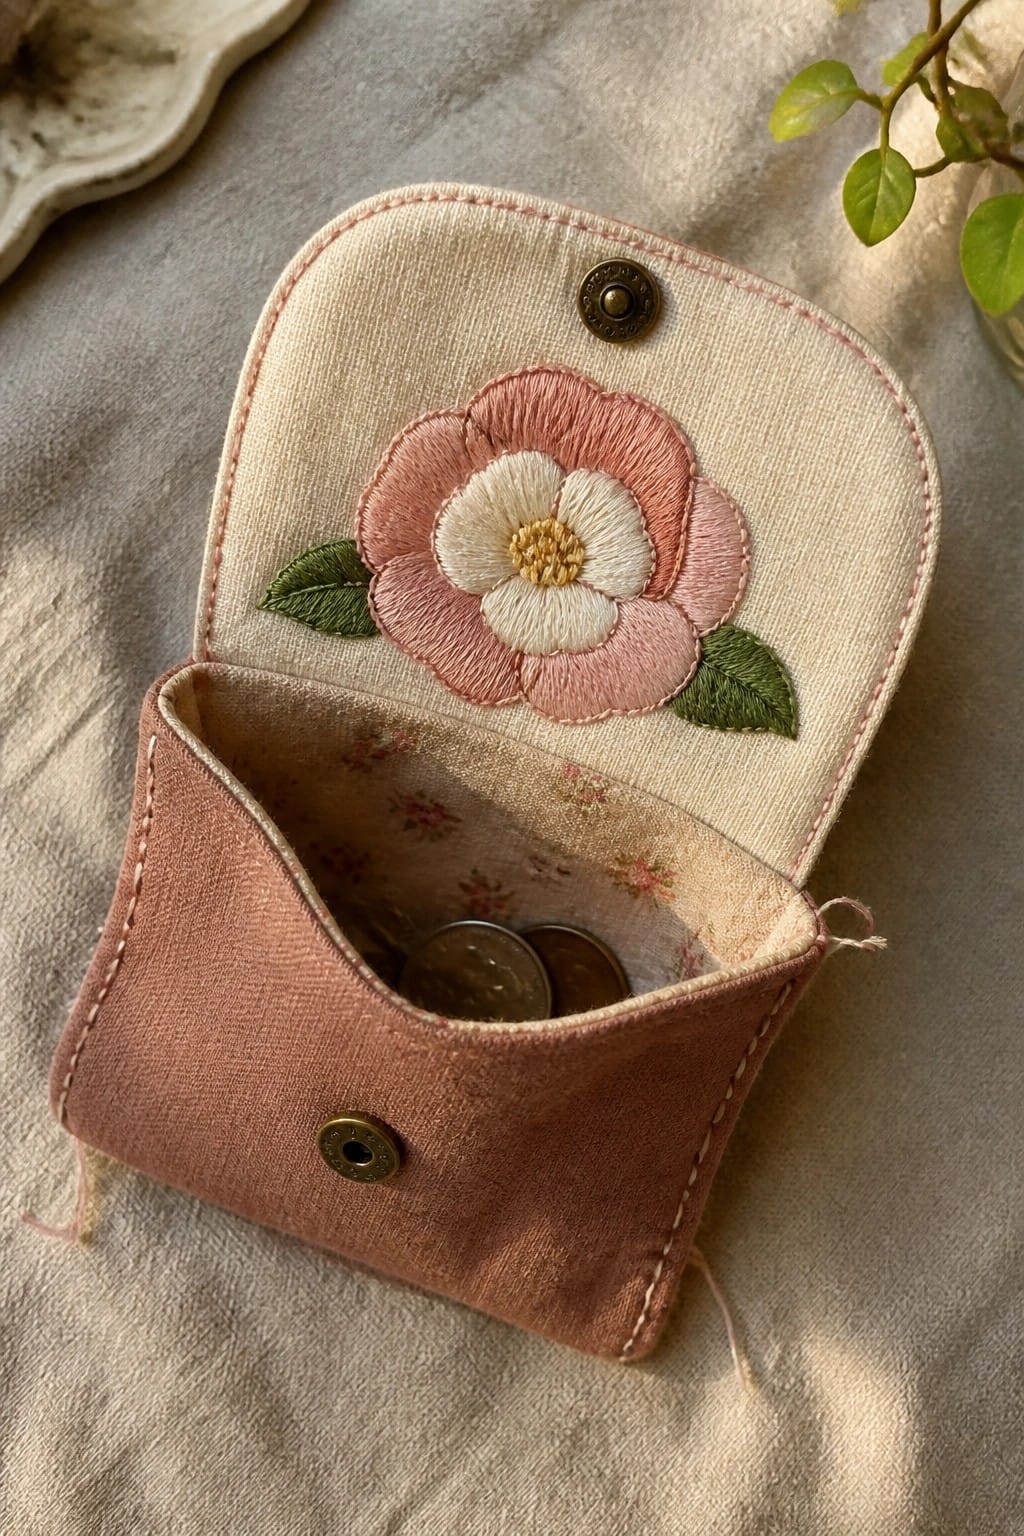
A single flower motif centered on the flap of a small fabric pouch gives the project a finished look without extra borders or fills. The petals are worked in graduated pinks with a white inner ring and green leaves set low on each side so the design stays balanced on the curved shape. This placement keeps the stitching on the visible exterior while the lower section remains a plain pocket for coins or small items. The idea works best on accessories like coin purses, card holders, or small gift bags where the flap stays in view.
What makes this idea useful is how the motif scale fits the flap without crowding the snap closure. You can repeat the same flower on larger or smaller pouches by adjusting petal width, or change the pink family to match different linen or cotton bases. The flap location also protects the stitches when the pouch snaps shut. This layout photographs clearly for project sharing because the open position shows both the embroidery and the usable pocket at once.
Clustered Ranunculus Bouquet in a Hoop

A small group of three rounded flowers in peach, rose, and cream sits at the center of the fabric with leafy stems in several green shades. The blooms are spaced closely together so the stems overlap slightly and create a natural bouquet shape. This layout works well for a finished hoop or as a motif that can be moved onto a small pouch or jacket pocket.
What makes this idea useful is the compact size that fills a hoop without extra background stitching. You can swap the thread colors for bolder tones or shrink the whole design to fit a cuff or collar. The open space around the flowers also leaves room to add a name or date if you want to turn it into a gift.
Mini Floral Arc on a Baby Onesie

A curved row of three small flowers with thin leafy branches creates a centered chest motif on a baby onesie. The compact scale keeps the design from interfering with snaps or everyday wear while still reading clearly from a short distance. Soft purple blooms against the light fabric give enough contrast without overpowering the garment. This approach works best on infant clothing where space is limited and the embroidery needs to stay flat.
What makes this idea useful is how simply the same arc can shift onto a bib, hat, or blanket edge with almost no adjustment. Shrinking the flowers even smaller lets the motif fit on a pocket or sleeve without crowding the fabric. Swapping the purple for soft blue or staying in one color family changes the look for different seasons. On clothing, this centered layout stays balanced even when the item gets worn and washed repeatedly.
Tulip Cluster on Napkin Corners

A small cluster of tulips worked in soft pink, peach, and mustard threads sits near the corner of a folded linen napkin, with slender green leaves anchoring the stems. The design stays compact so it remains visible whether the napkin is stacked or opened on a table. This approach suits table linens, tea towels, or small gift sets because the scale stays practical for repeated stitching without taking up too much fabric.
What makes this idea useful is how the corner placement lets you finish one piece quickly and repeat it across a set. You can change the thread colors to match existing dishes or shift the whole cluster lower for a different look on placemats. The same motif also transfers easily to a shirt hem or pocket if you reduce the number of flowers by one.
Rose Wreath Border in an Embroidery Hoop

A ring of roses in soft pinks, deep reds, and creams sits along the outer edge of the fabric, with small clusters of leaves and buds filling the spaces between them. The flowers vary in size and angle so the circle feels full without looking rigid, while the open center keeps the focus on the border itself. This layout works best as a finished hoop piece or as a template for repeating the same border on a larger fabric circle for a cushion cover or bag flap.
What makes this idea useful is how the open center lets you adjust the hoop size without changing the motif. You can shrink the whole wreath to fit a 4-inch hoop for a gift tag or stretch the spacing to cover more ground on a jacket back. Swapping the red roses for all one shade turns it into a cleaner, more modern look, while keeping the mixed tones gives it more depth on neutral fabric. The curved layout also transfers easily to round patches or the edge of a pocket.
Poppies Along a Denim Jacket Cuff

A row of red poppies with black centers and green stems can be stitched directly onto the cuff of a denim jacket. The flowers are worked in different sizes and spaced unevenly so the line looks natural rather than rigid. This placement keeps the embroidery visible when the cuff is rolled and works on any garment with a turned edge. The contrast between the bright red thread and the blue denim makes the small motif stand out without needing extra detail.
What makes this idea useful is how easily it transfers to other clothing. You could place the same scattered poppies on shirt collars, jean hems, or the edge of a tote bag by changing the curve to match the seam. Using fewer flowers or switching the thread color to softer shades keeps the look simple on lighter fabrics. The narrow width of the design also means it finishes quickly and fits inside a standard hoop if you want to test it first on a scrap.
Bouquet Embroidery on an Apron Bib

A clustered bouquet of larger and smaller blooms stitched onto the upper front of an apron gives the piece a clear focal point without covering the whole surface. The stems are gathered at the bottom so the flowers spread naturally upward, and the mix of full blooms with lighter filler keeps the shape from looking too stiff. This works best on kitchen or garden aprons made from linen or cotton where the fabric stays flat enough for the stitches to sit evenly.
What makes this idea useful is how simply the same bouquet can be moved lower onto the pocket or scaled down for a child-size apron. Switching the main flowers to one color family while keeping the greenery makes it fit different fabric shades without redesigning the whole layout. The gathered-stem style also translates easily to a tea towel or tote bag if you want the same motif on something smaller.
Tied Bouquet Patch on Fabric

A bouquet of three flowers in lavender, white, and pink sits above a small cluster of leaves, with the stems gathered and finished by a narrow bow. The design stays compact because the flowers are arranged in a slight triangle and the bow pulls the stems together at the base. This layout suits fabric patches that can be sewn onto bags, jackets, or hats rather than stretched in a hoop.
The small overall size makes it simple to repeat across multiple items without taking up much fabric. You could shift the same bouquet onto a pocket corner or scale the whole thing down for a set of matching bookmarks. What makes this idea useful is how the bow creates a natural stopping point for the stems so the design reads clearly even when reduced.
Floral Vine Border on a Sun Hat
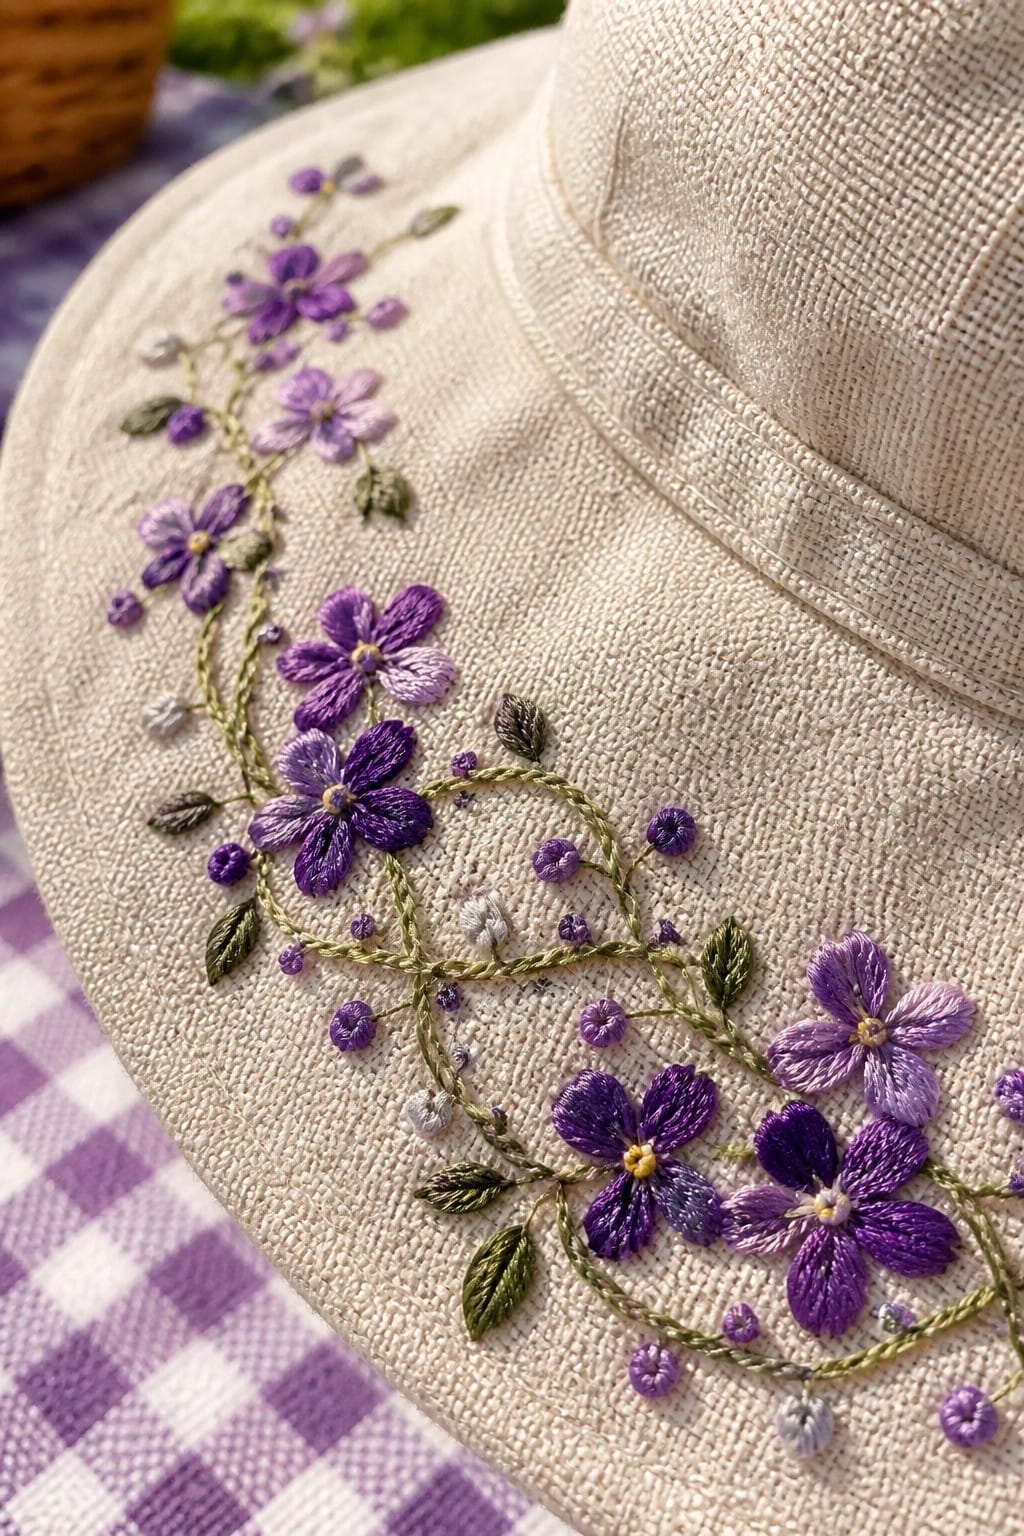
A trailing vine of purple flowers and small leaves stitched along the brim of a hat creates a repeating border that follows the curve of the fabric. The design uses a mix of darker and lighter purple blooms with green stems to build a natural flow without dense coverage. This approach suits accessories like hats or bags where the embroidery stays visible during use but leaves most of the base fabric untouched.
What makes this idea useful is how the placement turns an everyday item into something more personal. You could shorten the vine to fit the edge of a jacket cuff or stretch it into a longer band on a tote handle. Switching the purple tones to a single color family would make the pattern quicker to stitch while keeping the same curved layout. The scale also works well for Pinterest because it reads clearly even in small preview images.
Tiny Flower Cluster on Canvas Sneakers

A small cluster of orange flowers with green stems and leaves makes a simple motif that sits on the toe of a canvas sneaker. The design stays compact and slightly off-center, which keeps it clear of the laces while still showing up when the shoe is worn. This approach works best on clothing items that get daily use, since the scale stays small enough to avoid bulk or stiffness.
What makes this idea useful is how the tight grouping fits curved surfaces without needing much fabric space. You could shift the same cluster onto the side of a tote or the cuff of a jacket by shrinking it even further. Warm orange tones against a light base stand out in photos, which helps the design get noticed when shared online. For best results, test the placement on scrap fabric first to match the curve of whatever item you choose.
Rose Cluster on a Zipper Pouch

A compact bouquet of three main roses in soft pink and peach tones, surrounded by smaller blooms and layered green leaves, sits centered on the front of a canvas zippered pouch. The design uses the natural width of the pouch to spread the foliage outward without crowding the edges. This placement turns a plain accessory into a finished project that still leaves room for the zipper and tassel hardware. The idea suits small fabric items like makeup bags, tech cases, or gift pouches where a contained floral motif adds detail without needing a hoop.
What makes this idea useful is how the rounded flower shapes fill the rectangular space evenly. You can shrink the whole cluster to fit a coin purse or stretch the side leaves to cover more of a larger tote. Switching the thread colors to one main pink with cream accents keeps the same layout but changes the mood for different seasons. The design also transfers easily to a jacket pocket or notebook cover if you want the same bouquet on something you carry daily.
Tiny Flower Row on a Fabric Pouch
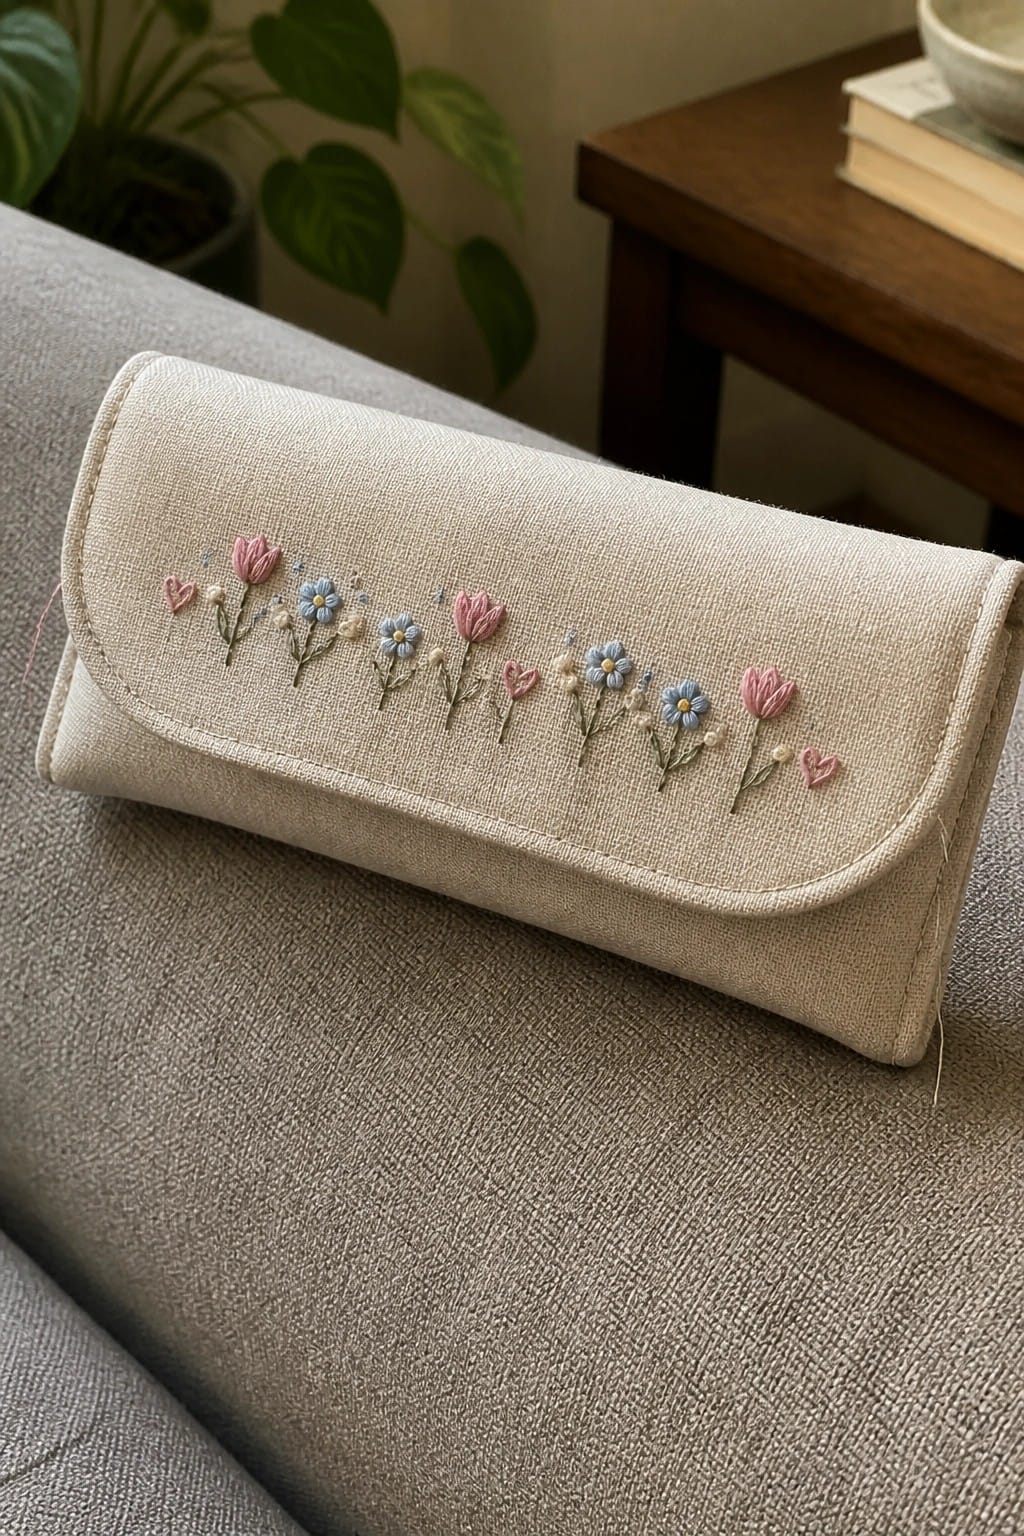
A straight row of small flowers and hearts works well as a border across the flap of a fabric pouch. The design alternates pink tulips, blue daisies, and tiny hearts with scattered dots filling the gaps between them. Keeping the elements small and evenly spaced lets the pattern sit neatly on a curved edge without crowding the fabric. This layout fits accessories like glasses cases, small wallets, or zip pouches where a single band of stitching adds detail without taking over the whole surface.
What makes this idea useful is how the narrow repeat adapts easily to other curved or straight edges. You can move the same sequence onto a pocket flap, the brim of a hat, or the front of a makeup bag by shortening or stretching the spacing. Switching the thread colors to two tones only keeps the look cleaner while the mix of flower shapes and hearts prevents the row from feeling too uniform. The compact size also makes it a quick project to finish on leftover fabric scraps.
Curved Floral Border on a Knit Cuff

A curved garland of mixed flowers and leaves runs along the edge of a sweater cuff in a gentle arc. The design mixes small clustered blooms with a few larger ones and simple leaves to fill the curve without crowding the ribbed texture. Placement right at the hem edge lets the embroidery follow the natural shape of the garment. This approach suits cardigans, pullovers, or any knit piece where the cuff or hem needs a soft accent.
What makes this idea useful is how the arc shape matches rounded edges like cuffs or hems without extra planning. You could shift the same layout to a pocket flap or neckline by tightening the curve to fit the new area. Using fewer flowers or a narrower color range would make it quicker for smaller projects like hats or mittens. The design stands out because the border treatment keeps most of the knit fabric plain while still adding detail.
Clustered Flower Bouquet in a Small Hoop

A compact bouquet of mixed flowers works well when arranged inside a small round hoop. The design places a larger rose slightly off center with smaller blooms and leaves filling the remaining space to create balance without overcrowding. This layout suits projects that need to stay portable, such as pendants, ornaments, or patches that can later be sewn onto bags or clothing.
What makes this idea useful is how the tight circular frame keeps the scale manageable for quick stitching sessions. You can easily shift the same cluster onto a jacket pocket or the corner of a linen napkin by dropping the hoop and stitching directly onto the fabric. Changing the color palette to brighter tones or shrinking the overall size lets the motif adapt to different items without losing its shape.
Trailing Floral Vines on Fabric Gift Wraps

Small flowers in muted pink, peach, and white follow thin green stems that run along the folded edges of a light green cloth. Tiny yellow dots sit between the blooms to fill gaps and keep the pattern from looking too sparse. The design stays concentrated near the corners so it remains visible once the fabric is tied into a wrap or bundle.
What makes this idea useful is how well the scattered vine works on reusable fabric wraps or table linens. You can shorten the vine to fit a napkin edge or repeat it along the border of a small pouch. Switching the background fabric to a deeper tone would make the soft flower colors pop more, while stretching the same layout across a larger scarf keeps the light, open feel without adding much extra stitching.
Frequently Asked Questions
What materials work best for creating soft and timeless flower embroidery projects? Natural fabrics like linen, cotton, or muslin provide the ideal base because they hold stitches evenly and age gracefully over time. Pair them with cotton or silk embroidery floss in muted tones such as dusty rose, sage green, and cream to keep the overall feel gentle and classic. A good embroidery hoop, sharp needles sized 7 to 9, and small scissors complete the setup without overwhelming a beginner workspace.
How can a complete beginner start with flower embroidery ideas? Begin by choosing one simple design from a collection of classic flower patterns, such as a single daisy or rosebud. Trace the outline lightly onto fabric with a water-soluble pen, secure it in a hoop, and practice basic stitches like backstitch for stems and satin stitch for petals. Work in short sessions to build confidence, and keep the color palette limited to three or four soft shades so the result stays cohesive and timeless.
Which stitches create the softest appearance in flower embroidery? French knots and lazy daisy stitches produce delicate centers and layered petals that feel light rather than stiff. Outline leaves with stem stitch or split stitch for subtle texture, then fill larger areas with long and short satin stitches to blend colors smoothly. These techniques avoid heavy lines and let the fabric show through slightly, preserving the soft, vintage quality that defines timeless designs.
What color choices keep flower embroidery looking classic rather than trendy? Stick to muted, nature-inspired hues such as blush pink, powder blue, warm ivory, and faded sage. Layer two or three shades of the same color family within a single flower to add depth without brightness. This approach mirrors vintage textiles and ensures the finished piece continues to feel gentle and enduring even after years of display or use.
How should finished flower embroidery be cared for to maintain its softness over time? Hand wash items gently in cool water with a mild soap, then roll them in a towel to remove excess moisture instead of wringing. Air dry flat and press from the back with a low iron if needed, using a pressing cloth to protect stitches. Store pieces away from direct sunlight to prevent fading, which helps the soft colors and delicate details remain beautiful for generations.