
I’ve been trying out embroidery on my shirts and jackets for a few years now.
It started as a way to fix up some plain pieces I already had.
I have tested a handful of designs on collars and sleeves and kept the ones that felt practical.
These are the ideas that came out looking decent without needing too much time or skill.
Most of them use basic stitches and everyday supplies I keep on hand.
Trailing Floral Embroidery on a Shirt Collar

A simple vine of small five-petaled flowers connected by stems and leaves runs along the outer edge of a pointed shirt collar. The design follows the shape of the collar itself, placing the flowers and greenery so they sit right where the fabric folds and turns. This keeps the embroidery narrow and contained while still making it noticeable when the shirt is worn. The idea suits button-down shirts or similar collared tops where you want a bit of detail without covering large areas of fabric.
The placement does a lot of the work here since the collar already creates a natural boundary for the design. You could repeat the same vine on the cuffs or along the edge of a pocket to tie the look together across one garment. Changing the thread colors to match the rest of your wardrobe or shortening the vine to just a few flowers makes it easy to adjust for different shirt styles. This kind of narrow border also works on lightweight jackets or blouses if you want the motif on something other than a basic button-down.
Bee and Honeycomb Embroidery on Denim Cuffs

Embroidering bees linked by honeycomb lines along a jacket cuff turns the narrow band into a repeating border that follows the curve of the sleeve. The design keeps the bees small and evenly spaced so the pattern reads clearly without crowding the fabric edge. Placing the embroidery right above the hem stitching makes the cuff the main focal point while the rest of the jacket stays plain. This approach suits denim jackets, work shirts, or any garment with a visible rolled or turned cuff.
What makes this idea useful is how the straight honeycomb lines help keep the bees aligned even on a curved edge. You can shorten or extend the row to match different cuff sizes or move the same motif to a shirt collar or pocket flap. Switching the thread colors to match a different jacket shade keeps the contrast strong while changing the overall look. The small scale also means the design finishes quickly and stays practical for everyday wear.
Vertical Floral Spray on Denim Shirt Front
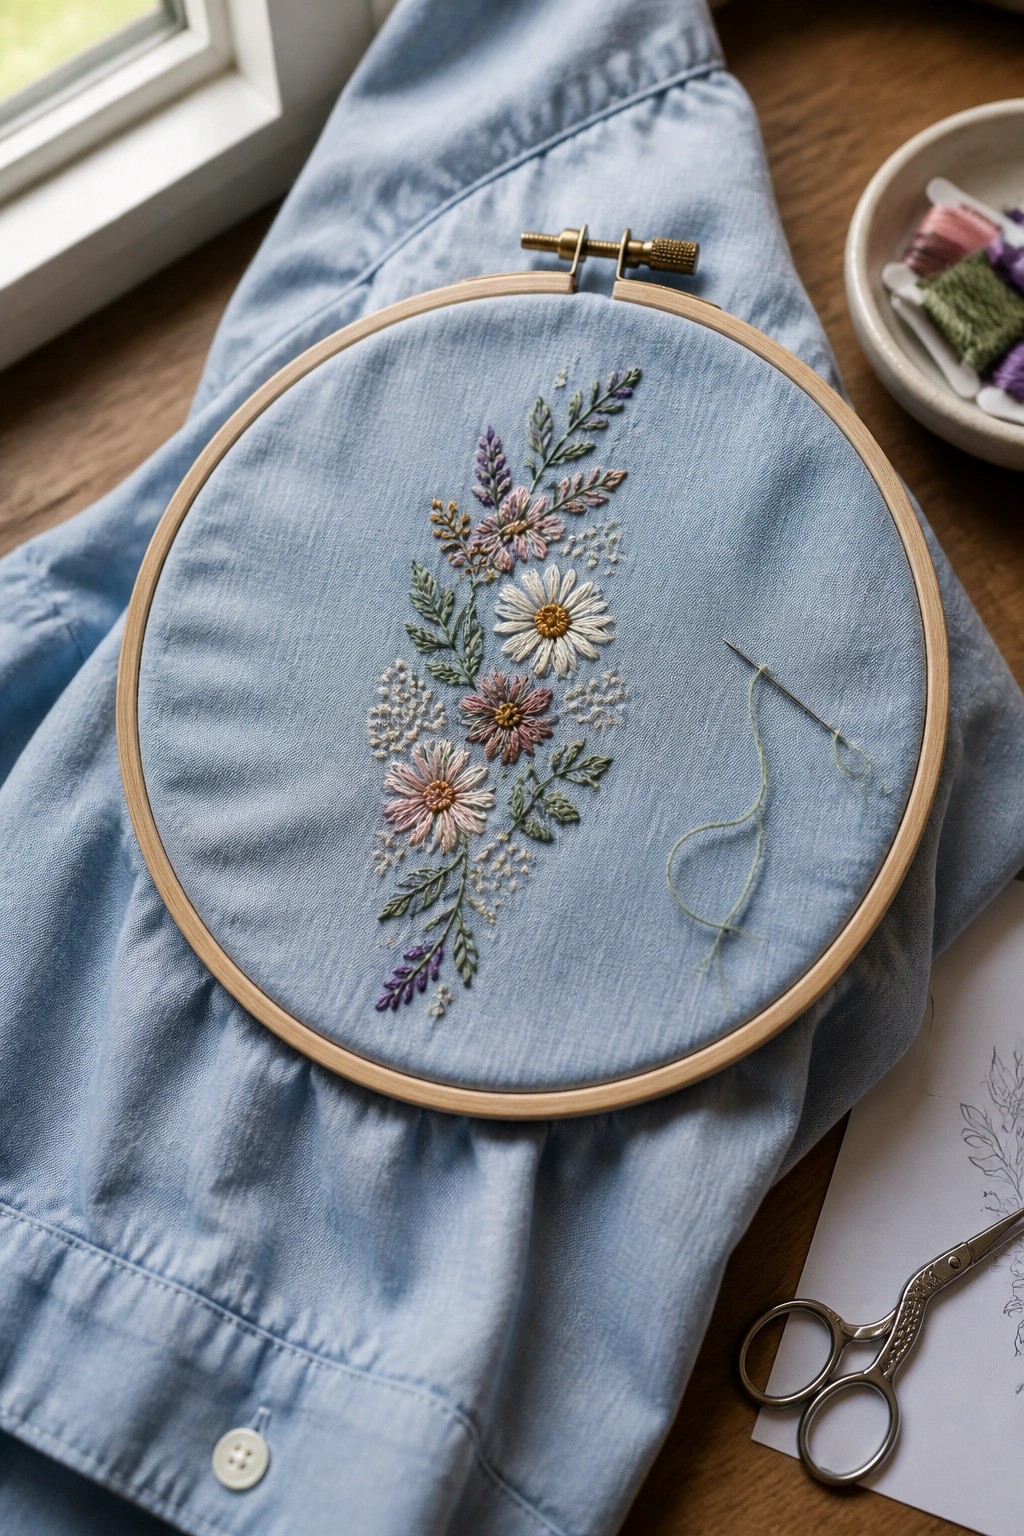
A tall, narrow arrangement of mixed daisies, smaller blooms, and leafy sprigs works well running down the front of a button-up shirt. The design sits centered on the fabric so it follows the line of the placket without spreading too wide. Varying flower sizes and soft color shifts keep the strip interesting while staying balanced. This layout suits shirt fronts, jacket panels, or even the side of a tote where a vertical line of stitching can show.
The placement does a lot of the work here because the shape already matches the natural fall of a shirt. You could shorten the spray for a smaller garment or swap the pink and purple tones for brighter shades if the base fabric is darker. A design like this stands out on Pinterest when people search for shirt embroidery because it looks finished without covering the whole chest. Try testing the length on scrap denim first so the bottom flower does not hit a pocket or button.
Scalloped Fan Border on Sleeve Cuffs
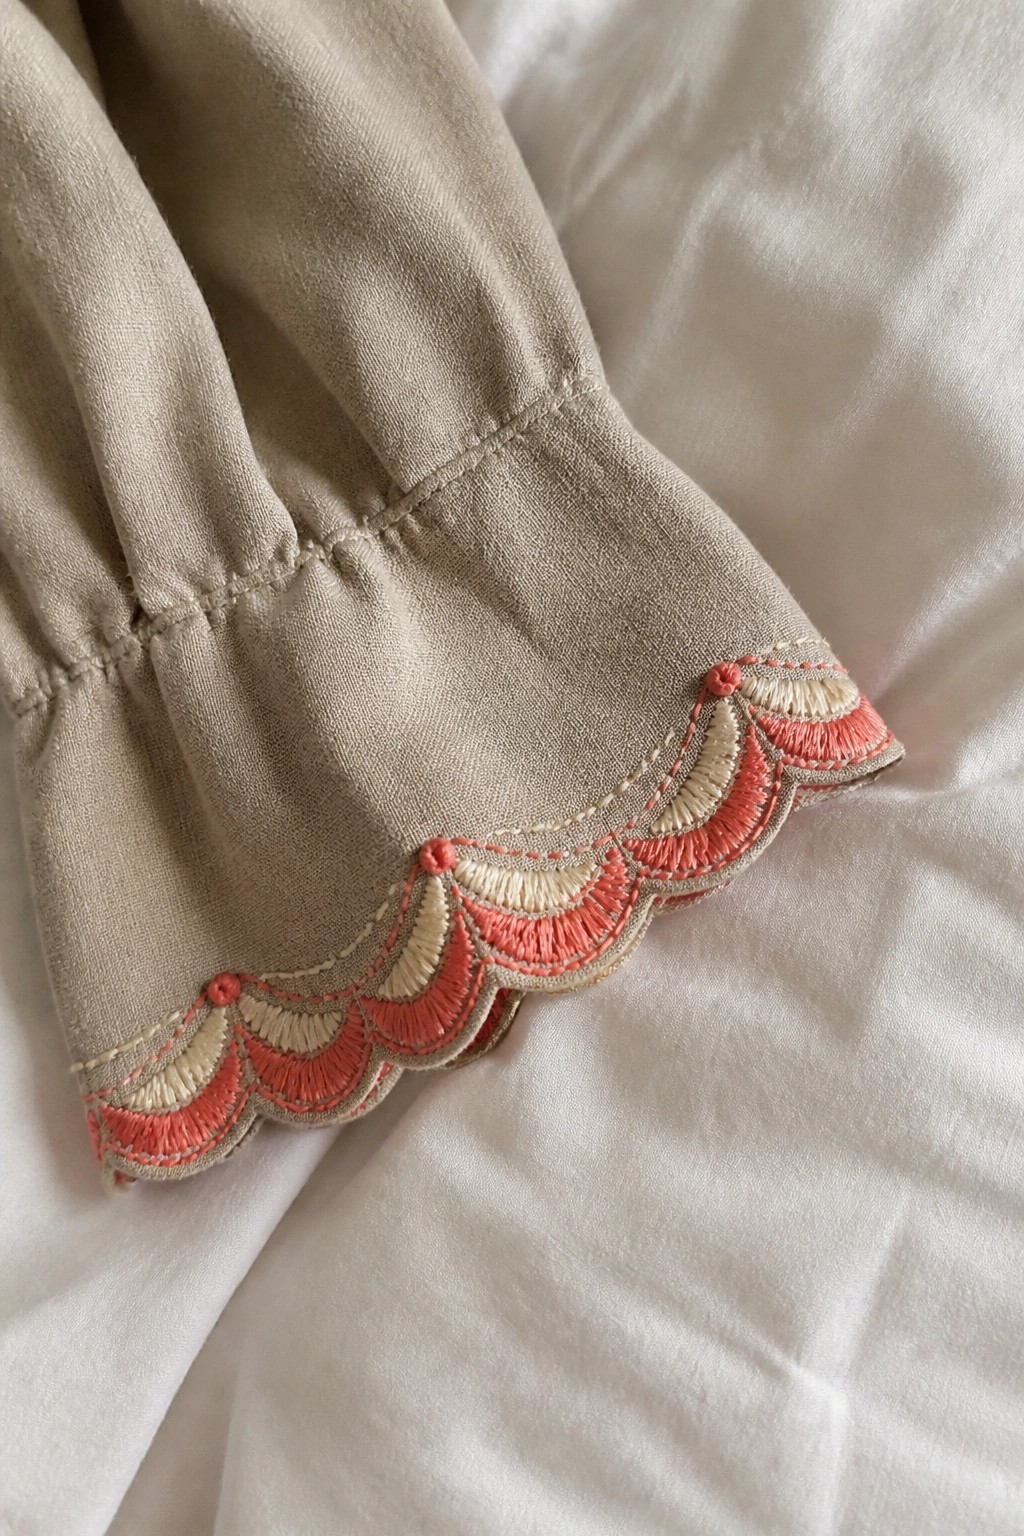
This design uses a repeating row of fan-shaped motifs to create a scalloped edge along the bottom of a sleeve cuff. The placement follows the natural curve of the hem, turning a plain gathered cuff into a finished detail that draws the eye. The layered colors give the border depth without needing dense stitching, so the fabric still moves naturally. It works best on lightweight shirts or blouses where the cuff gets some visibility.
What makes this idea useful is how the curved placement already does most of the design work. You can shift the same fan row onto a skirt hem, pajama pants, or the edge of a collar with almost no changes. Switching the coral to navy or the cream to a matching fabric tone keeps the look clean while still showing the scallop shape. The narrow width also means you can finish both cuffs in a weekend without committing to a full garment project.
Sunray Motif on Shirt Shoulders

A half-circle sun base with straight rays fanning outward in two thread colors sits on the shoulder of a dark shirt. The alternating light and gold threads create clear separation between the rays while the compact size keeps the whole design from dominating the garment. This placement turns a plain top into a customized piece without needing a lot of fabric space or complex stitching. The motif suits t-shirts, hoodies, or lightweight jackets where a small geometric accent adds interest near the neck or upper chest.
The small scale makes this easy to finish in one sitting on an existing shirt. You can change the thread colors to match other garments or stretch the rays slightly longer for a sleeve version. Moving the same design to a pocket or near the hem would give a different look while keeping the stitching simple. The high contrast on dark fabric helps the pattern show up clearly in photos, which is useful if you want to share the finished result.
Hummingbird Flying Out of a Shirt Pocket
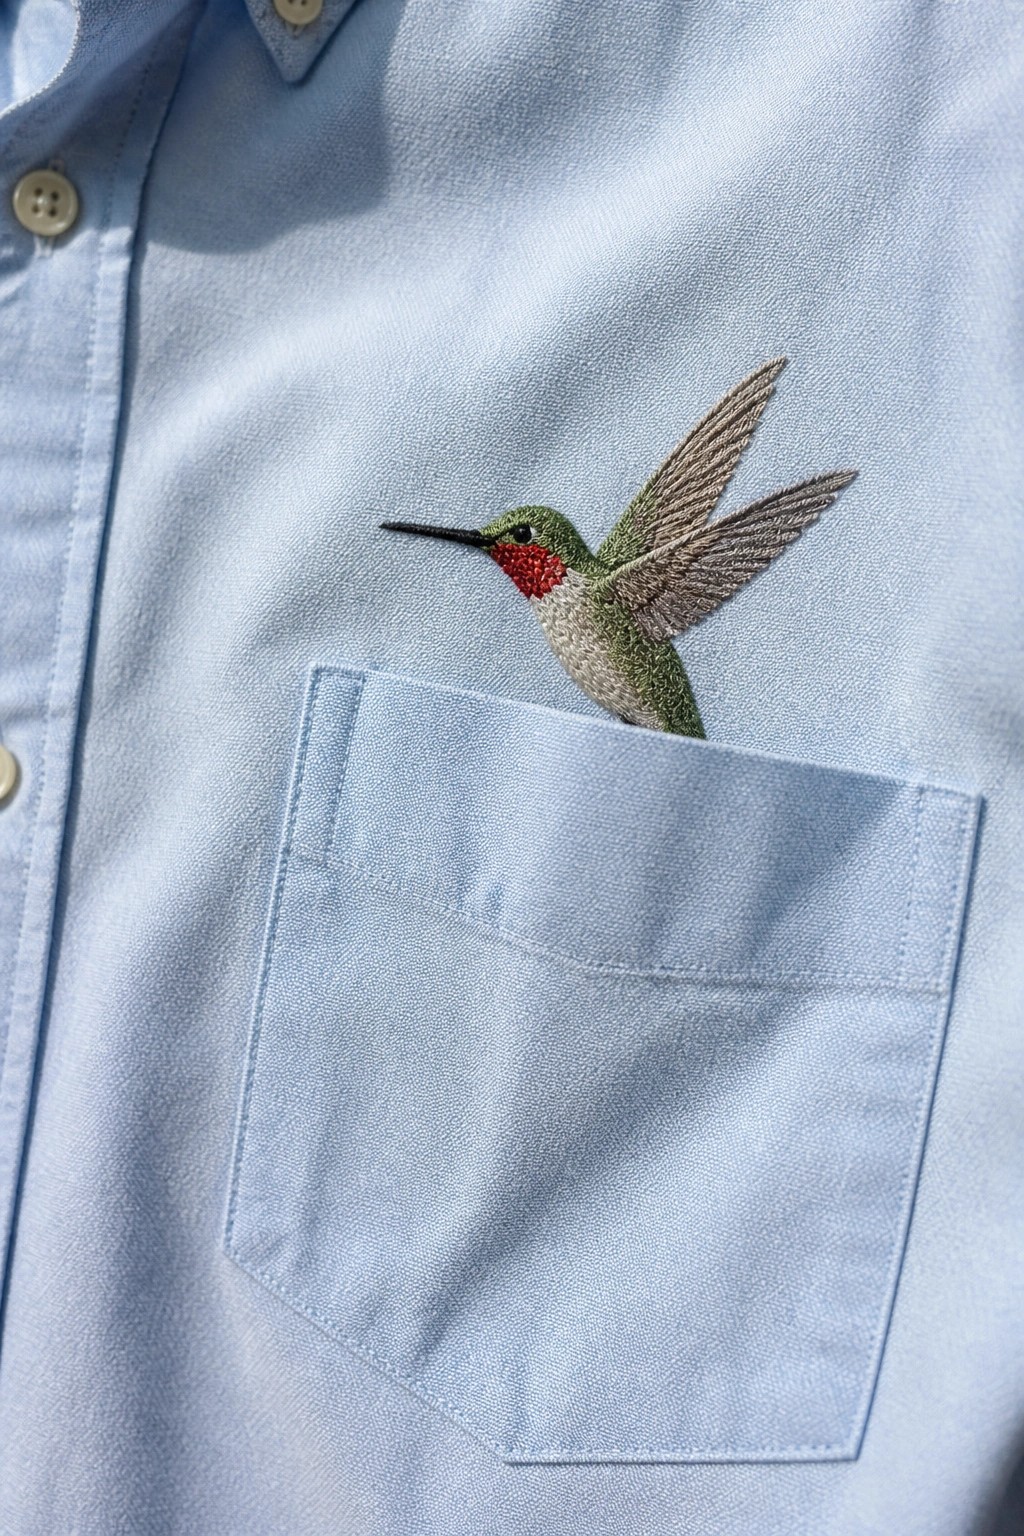
A hummingbird motif works here because the pocket becomes part of the scene, with the bird’s body stitched so it looks like it is lifting off from inside the pocket. The head, beak, and wings sit above the pocket edge while the lower body stays partially hidden, giving the design built-in depth and movement on the chest. This placement turns an ordinary shirt pocket into the main feature without needing extra fabric or patches. It suits button-down shirts, workwear, or any top that already has a chest pocket.
What makes this idea useful is that the pocket does most of the visual work, so you only need to embroider the visible part of the bird. The same layout could be swapped for a dragonfly, bee, or small plane on jackets, aprons, or kids’ shirts. Changing thread colors to match or contrast the shirt fabric keeps the design readable at small scale. If the pocket is too narrow, shift the motif slightly to one side so the wings still clear the edge.
Moon and Stars on Shirt Upper Back

A crescent moon with four small stars scattered around it creates a simple celestial pattern on the upper back of a button-up shirt. The moon uses a dense fill while the stars stay light and open, with just a few getting a small center accent. This loose placement keeps the design from looking centered or stiff and lets it sit naturally on the yoke area above the pleats. The idea works well for updating plain button-downs or similar shirts where you want something visible from behind.
What makes this idea useful is how the small scale fits easily onto ready-made clothing without needing major adjustments. You could shift the whole layout lower onto the back panel, move it to one shoulder, or repeat just the stars along a sleeve. Changing the thread to a bolder color would make the same motif stand out more on darker fabrics. The scattered arrangement also translates well to other garments like jackets or dresses where a single centered motif might feel too formal.
Mushroom Border Along a Cuff

A row of small mushrooms stitched in different brown shades creates a repeating border along the edge of a shirt cuff. The design varies the mushroom sizes slightly and adds tiny accent stitches between them to avoid a stiff, even line. This placement keeps the embroidery visible when the sleeve is rolled or buttoned but stays narrow enough to sit flat on the fabric. It suits button-up shirts, lightweight jackets, or any garment where the cuff gets regular use.
What makes this idea useful is how the compact scale fits neatly on narrow edges without needing much fabric space. You could move the same row onto a collar, pocket, or hem by tightening the spacing to follow the curve. Switching the thread colors to match your garment keeps the look subtle, while using brighter tones makes the border stand out more. The layout works well for quick projects because each mushroom stays small and the repeat pattern is easy to mark out in advance.
Vine Pattern Along a Striped Collar

A simple vine motif stitched along the neckline uses two thread colors to create looping lines that follow the curve of the collar on a striped shirt. The design mixes a dark thread with a bright one, adding small clusters and leaf shapes at intervals to break up the flow. This placement keeps the embroidery visible but contained, so it works with the existing stripes instead of fighting them. The idea fits well on casual tees or button-ups where you want to add detail near the face without covering large areas.
The placement does a lot of the work here because the collar already gives you a clear path to follow. You could shift the same vine to a sleeve cuff or hem by shortening the loops and using just one thread color. Matching the dark thread to the stripe color makes the yellow stand out more, while swapping both colors lets the design fit different shirt palettes. For clothing, this kind of narrow border motif saves time since it needs only a short length of stitching to look finished.
Geometric Motifs Along a Shirt Placket
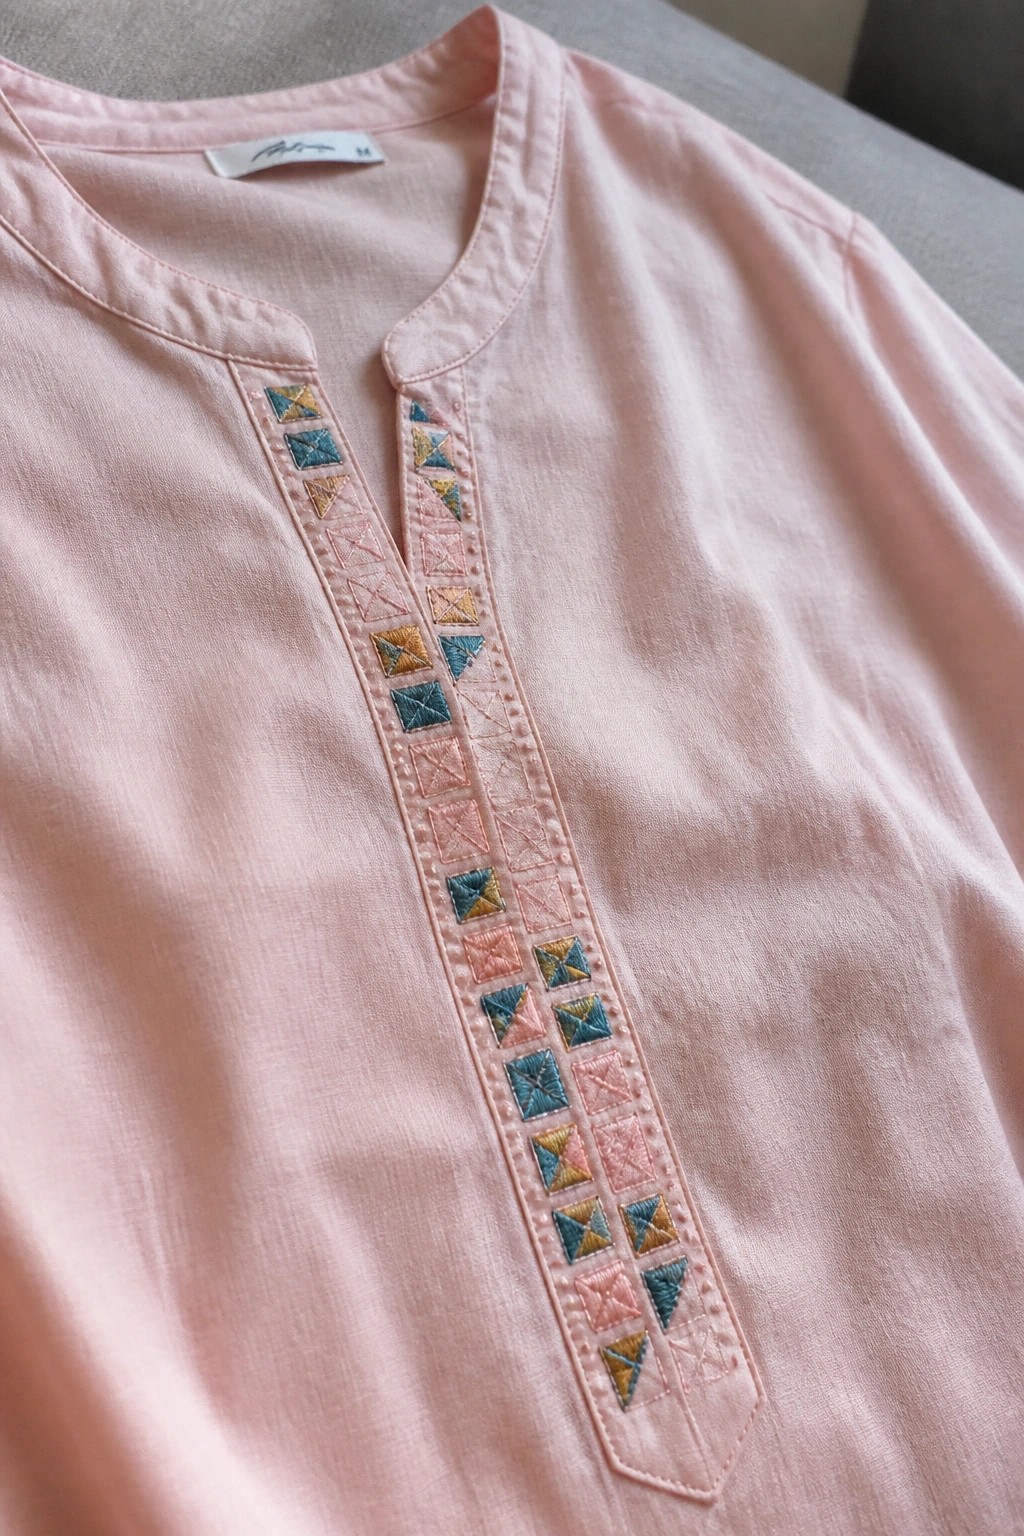
A vertical line of small geometric shapes runs down the front opening of a shirt, using triangles and squares in a repeating pattern. The motifs sit right along the placket edges and use a mix of thread colors to stand out against the fabric. This placement keeps the embroidery narrow and structured so it frames the neckline without covering much of the garment. The idea works well on button-up shirts or tunics where you want detail that follows an existing seam or opening.
What makes this idea useful is how the straight layout can be copied onto any shirt front without needing special fabric prep. Shorten the row for a subtle collar accent or stretch it lower if the shirt has a longer placket. Changing the thread colors to match the fabric tone gives a quieter result while keeping the contrast version makes the shapes pop on lighter materials. The small scale also means you can move the same pattern to a cuff or pocket edge without much adjustment.
Sailboat Waves Patch on Denim Jacket Elbow
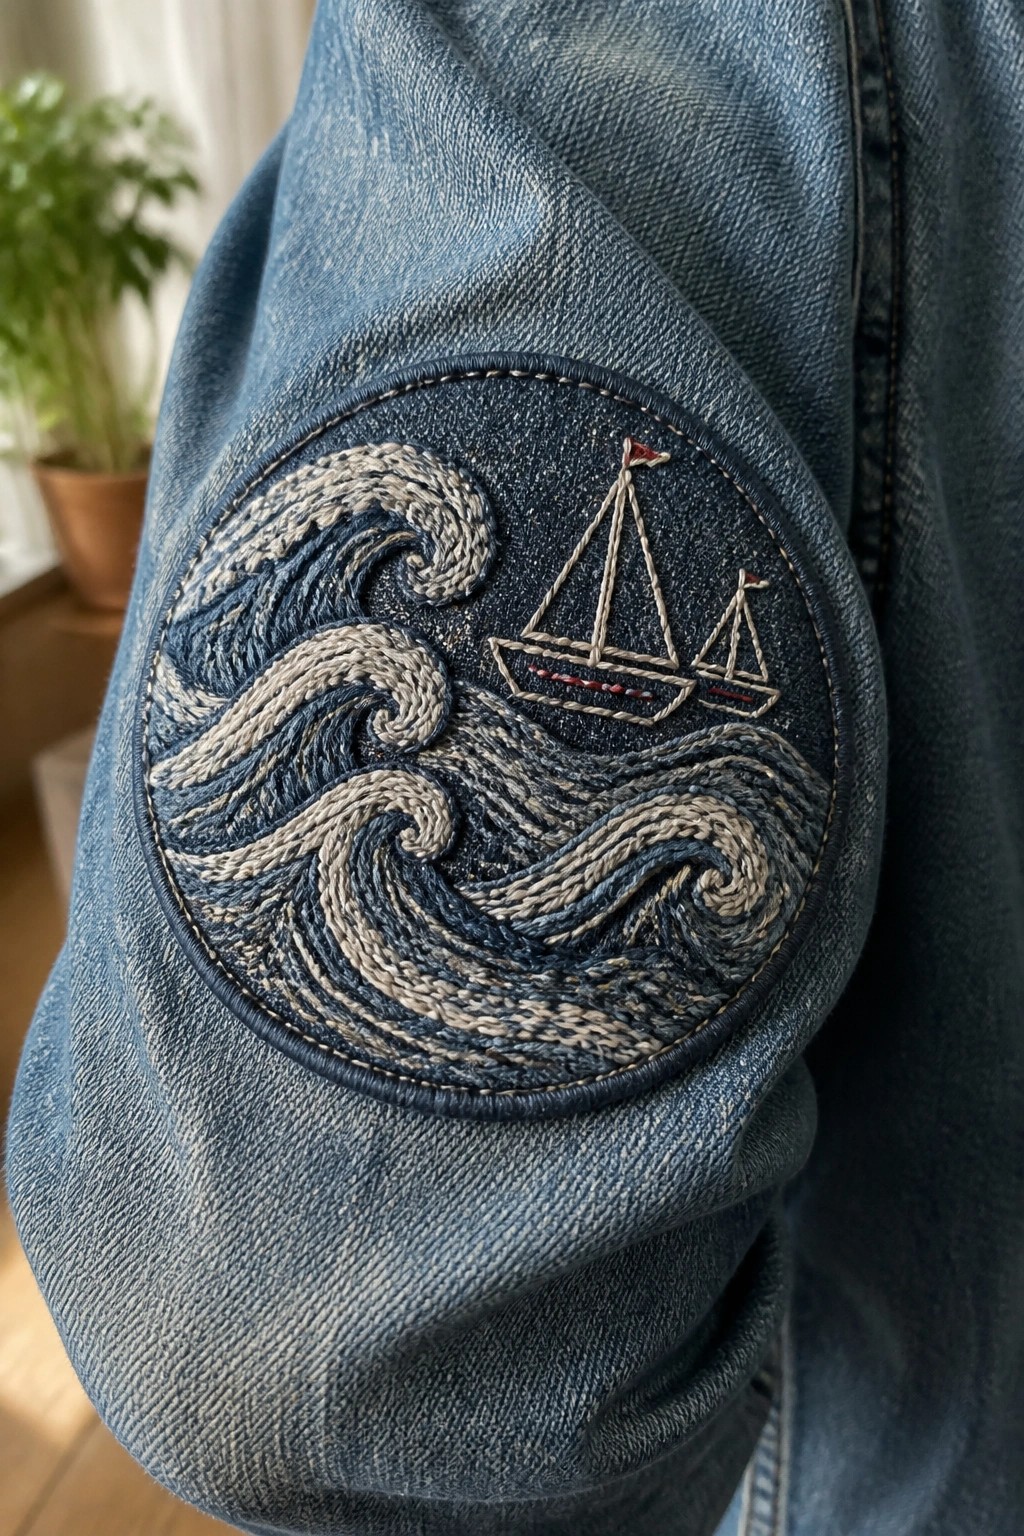
A round patch with layered waves in blue and gray tones and two small sailboats works as a standalone design on the elbow of a denim jacket. The waves fill most of the circle with varied thread density to suggest movement, while the boats stay light with simple outlines and small red accents on the flags. This placement keeps the embroidery visible when the jacket is worn but avoids large areas that would stiffen the fabric.
What makes this idea useful is how the contained circle format transfers easily to other jacket elbows or even the knees of pants. You could drop the boat count to one for a smaller cuff version or swap the wave colors to match a different base fabric. For clothing, this kind of motif holds up well on areas that see movement because the dense stitching stays compact. The small scale also makes it simple to test on scrap denim before committing to a finished piece.
Butterflies Stitched Along a Sleeve Hem
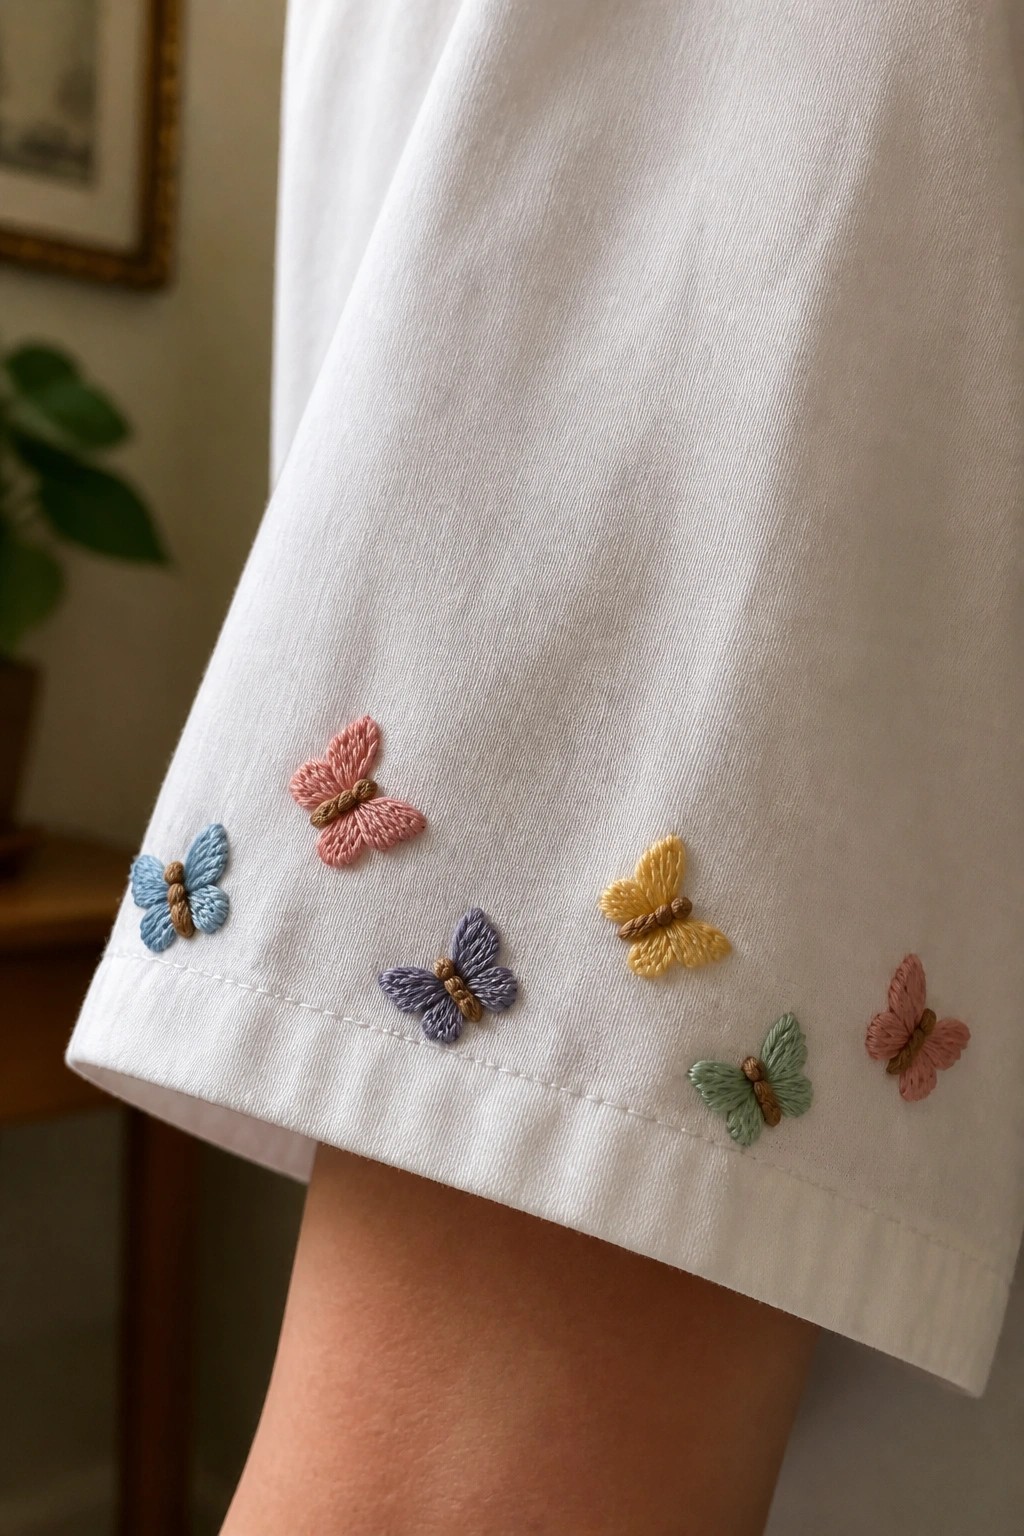
Small butterflies in soft pastel threads offer a straightforward way to update the hem of a short sleeve or cuff. The design places several butterflies of varying colors along the finished edge, spaced at uneven intervals rather than in a straight line. This loose arrangement prevents the embroidery from looking rigid while keeping each motif small enough to sit comfortably on narrow fabric edges. The approach suits basic cotton shirts, blouses, or children’s garments where the stitching stays near the sleeve opening.
What makes this idea useful is how simply it adapts to different garments without needing much space. You can swap the thread colors to match an existing outfit or drop a few butterflies if the hem feels too busy. The scattered layout also works on dress hems or the edges of lightweight jackets where a single row of motifs would look too uniform. On Pinterest this style stands out because the color mix and irregular spacing read as casual rather than overly planned.
Scattered Stars Along a Denim Collar

Small star motifs stitched in a loose row across the top edge of a shirt collar give a simple way to customize a button-down. The design uses soft thread colors that sit lightly against the denim so the pattern stays visible without covering much fabric. Placing the embroidery only on the collar keeps the rest of the shirt clean and wearable. This approach suits anyone who wants to update an existing shirt or add detail to a plain one.
The small scale makes it easy to finish in a few short sessions and leaves room to add more stars if needed. You could move the same line of stars onto a cuff or pocket flap for a coordinated look. Switching the thread colors to match or contrast with the shirt fabric changes how bold the result feels. A design like this works especially well on social media because the detail shows up clearly in close-up photos without requiring a full garment overhaul.
Symmetrical Floral Bands for a Shirt Front
A vertical row of small flowers stitched on either side of a central opening creates a balanced front panel on a blouse or shirt. The design uses repeating blooms in graduated sizes, with foliage filling in at the base to form a pointed shape that follows the garment’s cut. This placement works best on lightweight fabric where the embroidery can sit flat along a neckline or placket without adding bulk. It suits clothing projects because the narrow width keeps the focus on the garment shape rather than covering large areas.
The placement does a lot of the work here by using the existing slit as part of the design. You could shift the same rows onto a sleeve cuff or down the side of a skirt by dropping the bottom foliage and keeping only the straight bands. Switching to two or three colors instead of a full gradient makes the pattern faster to stitch while still looking intentional. For Pinterest saves, the clean symmetry stands out because it photographs clearly and translates easily to different shirt styles.
Floral Branch Embroidery Along Shirt Cuffs

A series of slender branches with narrow leaves and small clustered buds runs down the sleeve and stops just above the cuff. The design stays narrow enough to sit comfortably on the fabric without crowding the seam. Light thread on a matching pale satin creates a tonal look that reads as texture more than pattern. This approach works well on button-up shirts or lightweight blouses where the embroidery shows when the arm is in motion.
The placement does a lot of the work here by using the sleeve length as a built-in guide. You can repeat the same branch on the opposite cuff or shorten it for a collar point if you want a matching set. Changing the thread to a soft contrast color would make the stitches stand out more on similar fabrics while keeping the scale small. Designs like this get saved often because they translate easily to ready-made garments without needing much fabric or time.
Celestial Pocket Embroidery on Flannel Shirts

A solar system motif with thin orbiting lines, small filled planets, crescent moons, and scattered stars fits neatly on the front pocket of a plaid flannel shirt. The design stays compact so the pocket flap still functions while the stitched elements create a clear focal point against the dark checks. Using varied thread weights for the lines versus the shapes helps the orbits read as separate from the planets without needing extra layers. This approach works for customizing casual button-downs or lightweight jackets where you want visible detail in a small area.
What makes this idea useful is how the contained layout lets you test the motif on one pocket before deciding to add more elsewhere. You could shift the same orbit pattern to a sleeve or back yoke by dropping one moon and tightening the spacing. Switching to brighter thread colors on a lighter plaid would change the mood from subtle to bold while keeping the same scale. For clothing projects, the pocket placement protects the stitching from daily wear better than an open chest design.
Chain Link Embroidery Along Shirt Cuff Edges

A repeating chain-link motif stitched along the outer edge of a shirt cuff creates a narrow border that follows the curve of the fabric. Two thread colors alternate to form the interlocking shapes, keeping the pattern readable even on a small scale. The placement sits right at the fold so the design shows when the sleeve is down but stays out of the way during wear. This approach suits button-down shirts or blouses where a clean linear detail can replace a plain hem.
The placement does a lot of the work here because the cuff edge already provides a natural line to follow, so the embroidery reads as intentional trim rather than added decoration. You could shift the same chain pattern onto a collar stand or pocket flap by adjusting the length and keeping the width under half an inch. Using one color instead of two would make the motif quieter on a patterned shirt, while a brighter contrast thread would stand out more on solid fabric. The straight repeating format also transfers easily to other garments without needing to redraw the full design each time.
Peacock Feather on Denim Jacket Shoulder
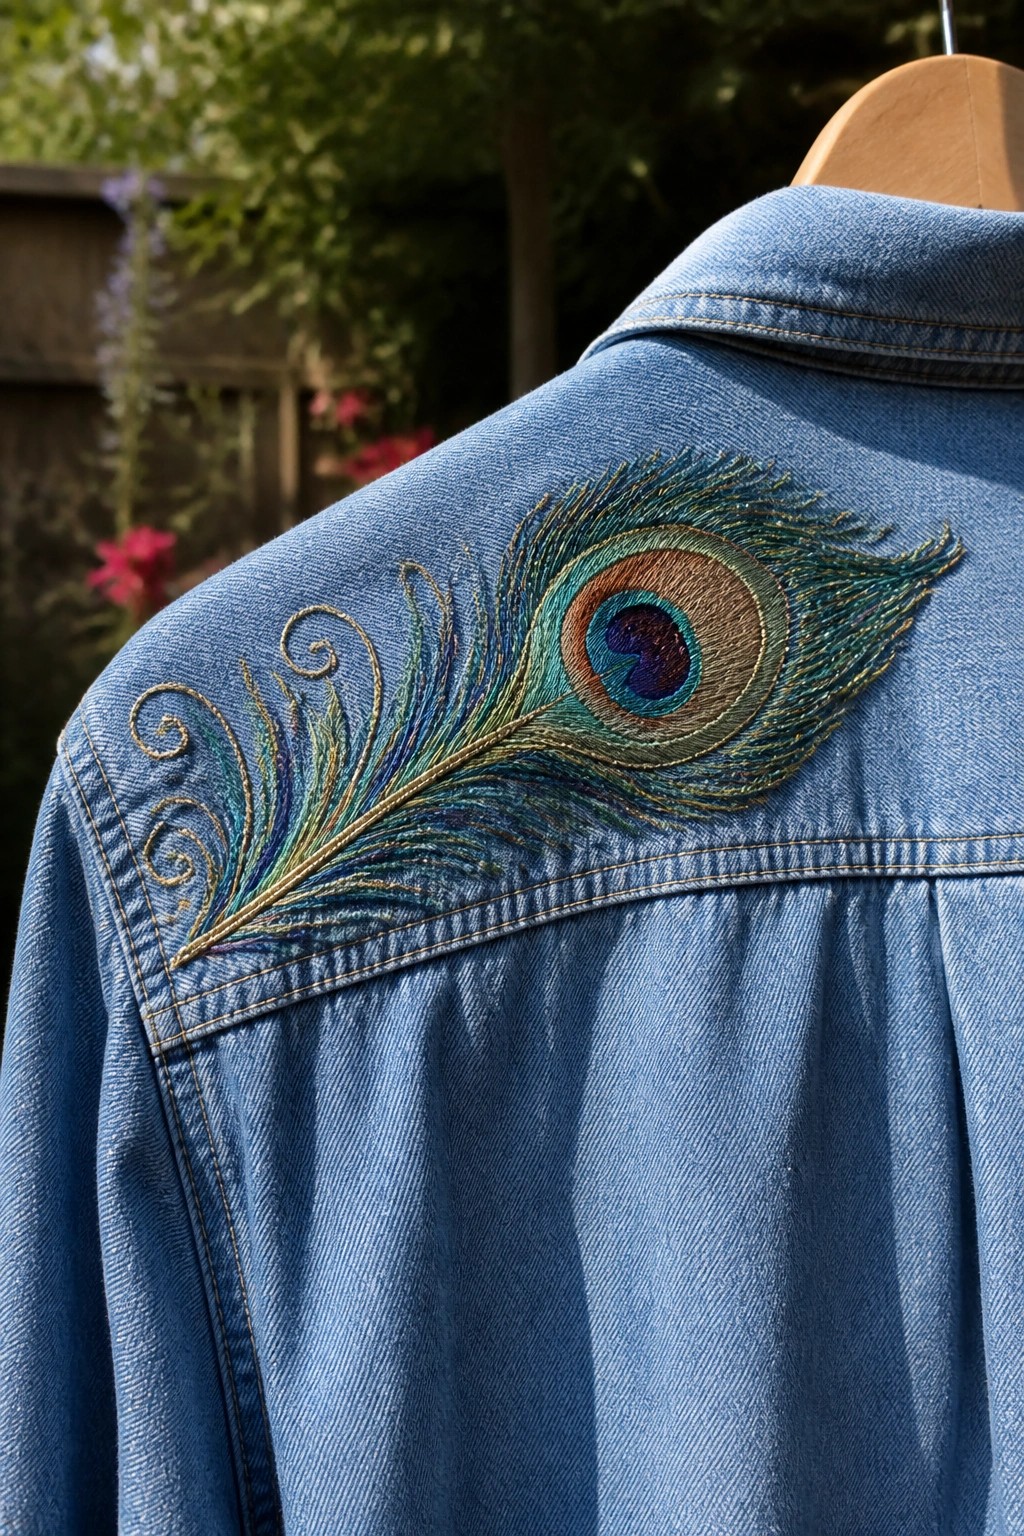
A peacock feather motif embroidered across the shoulder of a denim jacket creates a focal point that follows the natural curve of the seam. The design uses blended blue and green threads for the barbs, a brown and teal eye, and gold outlines to define the shape against the fabric. This placement keeps the embroidery visible when worn while staying clear of the collar and armhole. The project suits anyone looking to customize outerwear or button-up shirts with a single statement motif.
What makes this idea useful is how the feather shape aligns with the shoulder slope without needing extra fabric or backing. You could shift the same motif to a shirt sleeve or scale it down for the back yoke of a jacket. Switching the thread palette to cooler tones or earth colors changes the look to match different base garments. For clothing projects this approach keeps the embroidery compact while still drawing attention to the upper body area.
Citrus Slices Embroidered on Shirt Cuffs
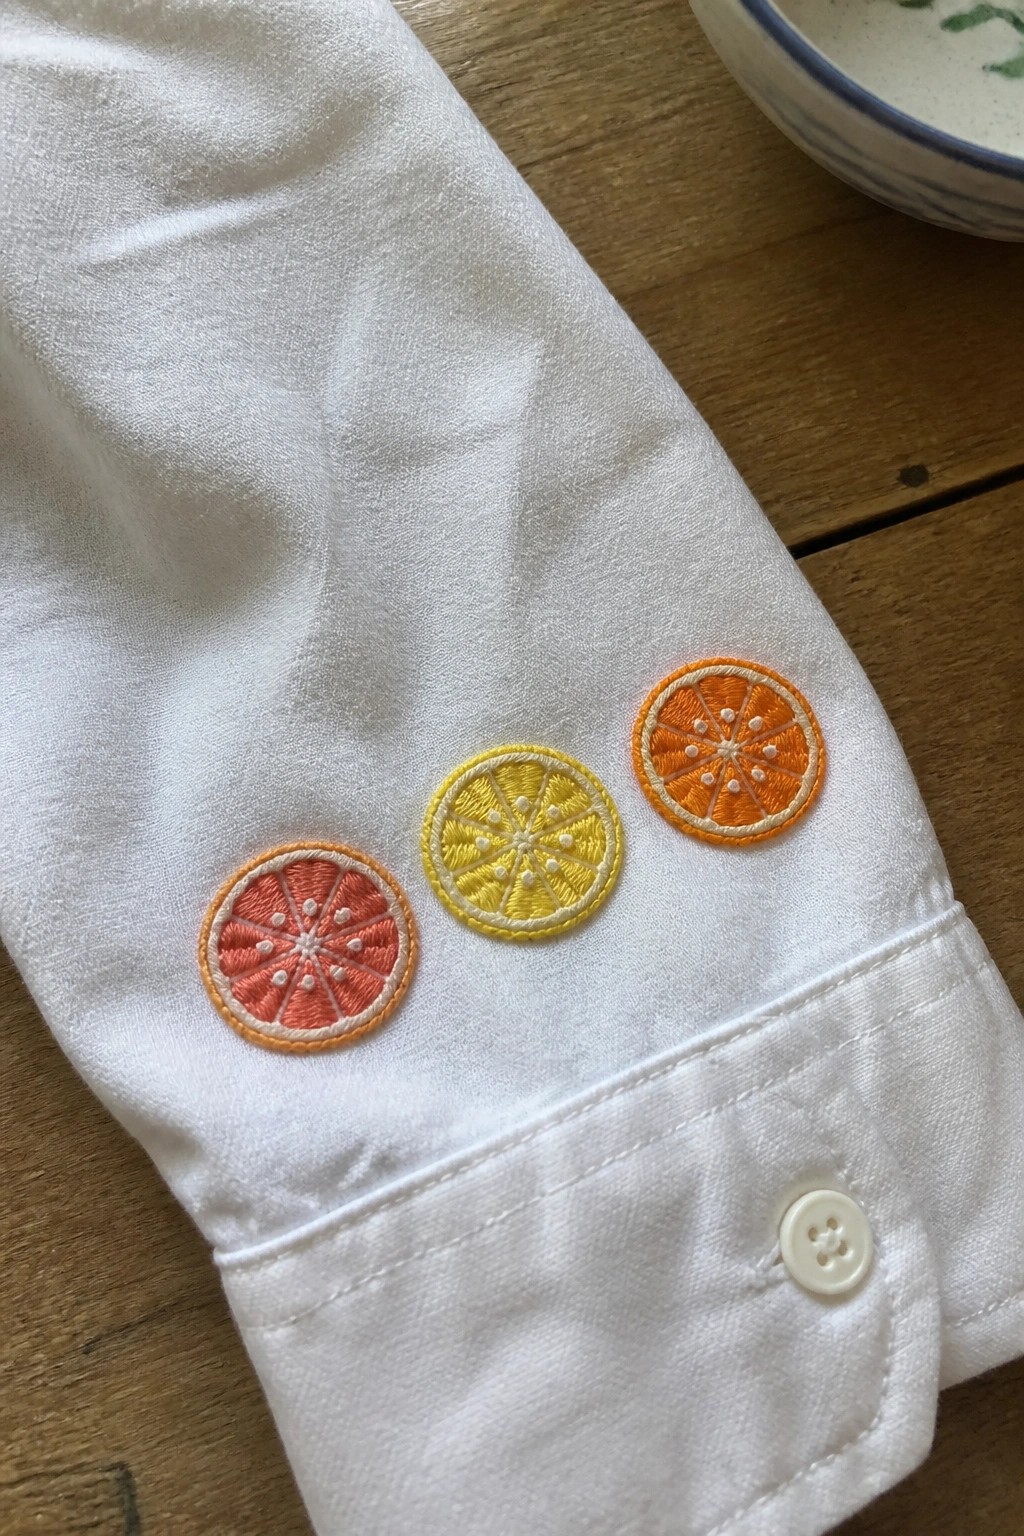
A row of three citrus slices works as a simple repeating motif placed along the edge of a shirt cuff. The design uses a grapefruit, lemon, and orange in different thread colors to create a short sequence that follows the curve of the fabric. This placement keeps the embroidery visible when sleeves are rolled or buttons are fastened, and the round shapes fit neatly without interfering with the button or seam.
What makes this idea useful is how the cuff acts as a built-in frame, so the embroidery stays contained and balanced. The same motif can shift to a collar, pocket edge, or hemline with little adjustment, and swapping one fruit color for another changes the look without redrawing the pattern. Small individual slices also make it easy to test on scrap fabric first or add to existing shirts without committing to a large project.
Mini Town Embroidery on a Shirt Collar

A row of small buildings creates a compact motif that fits neatly along the pointed edge of a shirt collar. Different roof shapes and a few colored sections add variety while the overall design stays narrow enough to follow the fabric fold. This approach keeps the embroidery visible during wear without covering large areas of the shirt. It works especially well for customizing button-up shirts or similar collared pieces.
The placement does a lot of the work here because the collar shape already frames the row of buildings. You could shift the same motif to a cuff or pocket by trimming it shorter or changing the roof colors to match the shirt fabric. The small scale also makes it simple to test on an old shirt before trying it on something new. Designs like this stand out on Pinterest because they turn an ordinary collar into the main detail.
Dragonfly Embroidery on a Shirt Pocket

A small dragonfly works well as a single motif placed right along the top edge of a shirt pocket. Light blue threads form the wings while a green thread builds the segmented body, and two small blue knots mark the eyes. The placement lets the pocket stitching act as a subtle border so the design feels integrated rather than added on. This scale and style suit button-down shirts, lightweight blouses, or any garment with a visible pocket you want to highlight without covering a large area.
The placement does a lot of the work here because the pocket already gives the dragonfly a clear spot to sit without extra outlining. You could shift the same insect to a collar tip or the corner of a cuff by shortening the tail and using fewer strands for the wings. Swapping the thread colors to match the shirt fabric keeps the look quiet, while darker threads on a light shirt make the shape stand out more on photos. The compact size also means the pattern transfers quickly to other small spots like the hem of a sleeve or the edge of a scarf.
Seashell Border Along a Shirt Hem
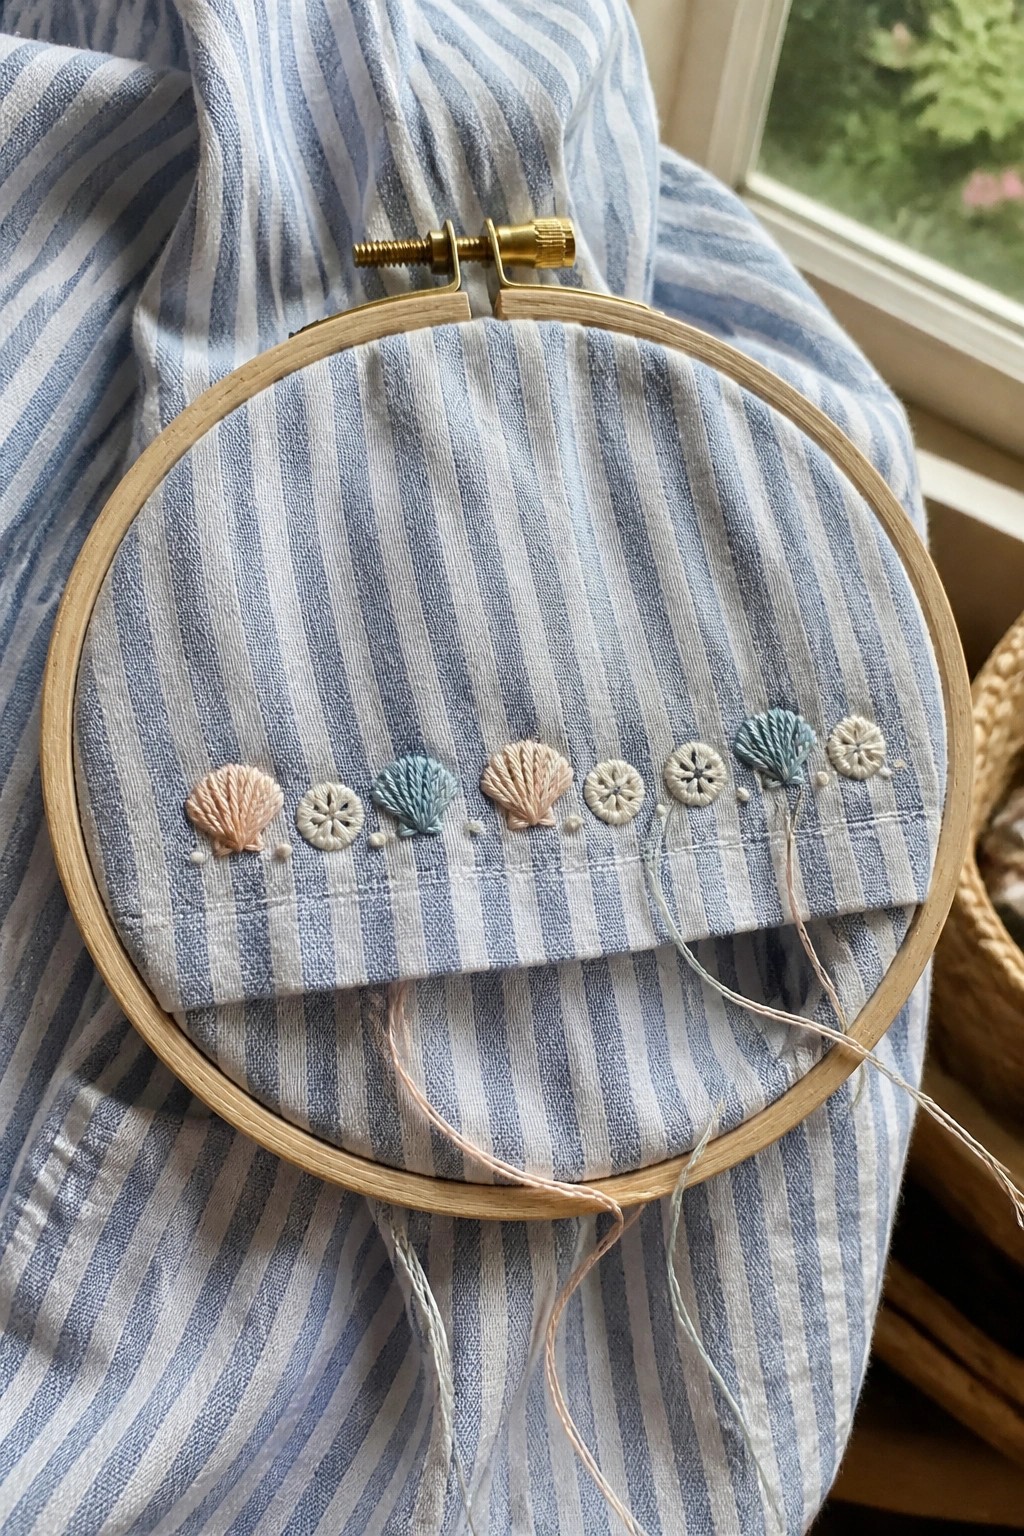
A straight row of tiny seashell and sand dollar shapes forms a repeating border right along the folded edge of a striped shirt. The motifs alternate between fan-shaped shells and small round patterns, stitched in soft peach, blue, and cream so they sit evenly against the blue stripes. This placement keeps the embroidery contained to the hem or cuff area, turning a plain garment into something more finished. The idea works especially well on lightweight cotton shirts or casual dresses where you want a light decorative touch.
The small scale makes this border quick to stitch and easy to fit on sleeves, collars, or even the bottom of a tank top. You can adjust the spacing or swap the thread colors to match different fabrics without changing the layout. A design like this stands out on Pinterest because the clean repeat is simple to copy and adapts fast to other clothing pieces.
Abstract Arches Along the Placket

Abstract arches in varying widths and colors run vertically along both sides of a button placket on a collared shirt. The design stacks curves of different thicknesses in black, gray, and yellow to build a repeating pattern that follows the shirt’s existing lines. This approach keeps the embroidery balanced with the garment rather than overpowering it. The placement suits button-front shirts where the buttons already create a natural focal line.
The placement does a lot of the work here by treating the placket as a built-in frame. You could shrink the arches to fit just above a pocket or stretch them higher toward the shoulders on a different shirt style. Switching to two colors or using all one weight of thread would make the same motif feel more minimal on a patterned fabric. The irregular spacing between the arches prevents the design from looking too rigid when viewed up close.
Crescent Moon Vine on Shirt Cuffs

A small gold crescent moon sits above a curving green vine that arches across the inner cuff of a white shirt. The vine adds a simple frame without filling the space, and the placement keeps the design visible when the cuff is turned back. This motif suits button-down shirts or lightweight blouses where you want a small detail that does not compete with the rest of the garment. The compact size makes it easy to finish in one short session.
The placement does a lot of the work here because the curve of the cuff already shapes the design. You could shift the same moon and vine to a sleeve hem or the corner of a collar by shortening the vine on one side. Using a darker shirt fabric would let the gold stand out more, while matching thread colors would keep it understated. This kind of small inside detail often gets saved on Pinterest because it adds interest without showing in every photo.
Fox and Trees on Shirt Cuffs

A fox stitched in brown thread sits beside two small pine trees and scattered berry clusters on the cuff of a plaid shirt. The design runs along the outer edge so it remains visible whether the sleeve is down or pushed up. Tight spacing keeps the elements balanced against the check pattern instead of competing with it. This layout suits flannel shirts, denim jackets, or any garment where a narrow band of fabric can hold a short horizontal scene.
The small scale makes the motif easy to repeat on a pocket flap or the opposite cuff for a matched pair. Swapping the fox for a different animal or trimming the number of trees lets the same idea fit a lighter shirt without looking crowded. Placement on the cuff avoids large fabric areas and still gives the embroidery room to show. A design this size also photographs cleanly for project shares since the details stay contained in one clear section.
Frequently Asked Questions
1. What types of fabric work best for embroidery on shirts, collars, and sleeves? Cotton, linen, and denim are ideal because they provide a stable surface that holds stitches well without excessive stretching. Avoid very stretchy knits unless you use a stabilizer backing, as they can cause designs to distort over time. Always test a small area first to ensure the fabric does not pucker.
2. How should I care for shirts with embroidery to make the designs last? Turn the garment inside out before washing in cold water on a gentle cycle, and avoid bleach or harsh detergents. Air drying is best to prevent heat damage to threads, and iron on the reverse side using a pressing cloth if needed. This approach keeps colors vibrant and stitches secure through many wears.
3. Can beginners try these embroidery ideas at home without special machines? Yes, hand embroidery with basic supplies like needles, embroidery floss, hoops, and scissors works well for most collar and sleeve designs. Start with simple stitches such as backstitch or satin stitch on pre-drawn patterns. Many of the 25 ideas adapt easily to freehand work, though complex motifs may benefit from an embroidery machine for precision.
4. How do I select thread colors that enhance rather than clash with my shirt? Match thread hues to the shirt’s existing tones for a subtle effect or choose contrasting shades for bold impact, such as white on navy or metallic gold on black. Consider the overall outfit palette and lighting conditions where the shirt will be worn. Swatching threads against the fabric beforehand helps achieve balanced, chic results.
5. What common mistakes should I avoid when adding embroidery to collars and sleeves? Do not pull stitches too tightly, as this creates unwanted puckering or holes in the fabric. Plan designs to follow the garment’s natural curves and seams rather than fighting them. Also, secure all thread ends properly on the inside to prevent unraveling, and keep motifs proportional to the area to maintain a polished appearance.