
I’ve been adding embroidery to my everyday clothes for a while now.
It started with small motifs on jeans pockets.
These designs feel playful without being too fussy.
I picked 19 favorites that are simple to stitch.
You might want to copy a few on your own pieces.
Rocket and Stars on Jeans Pocket
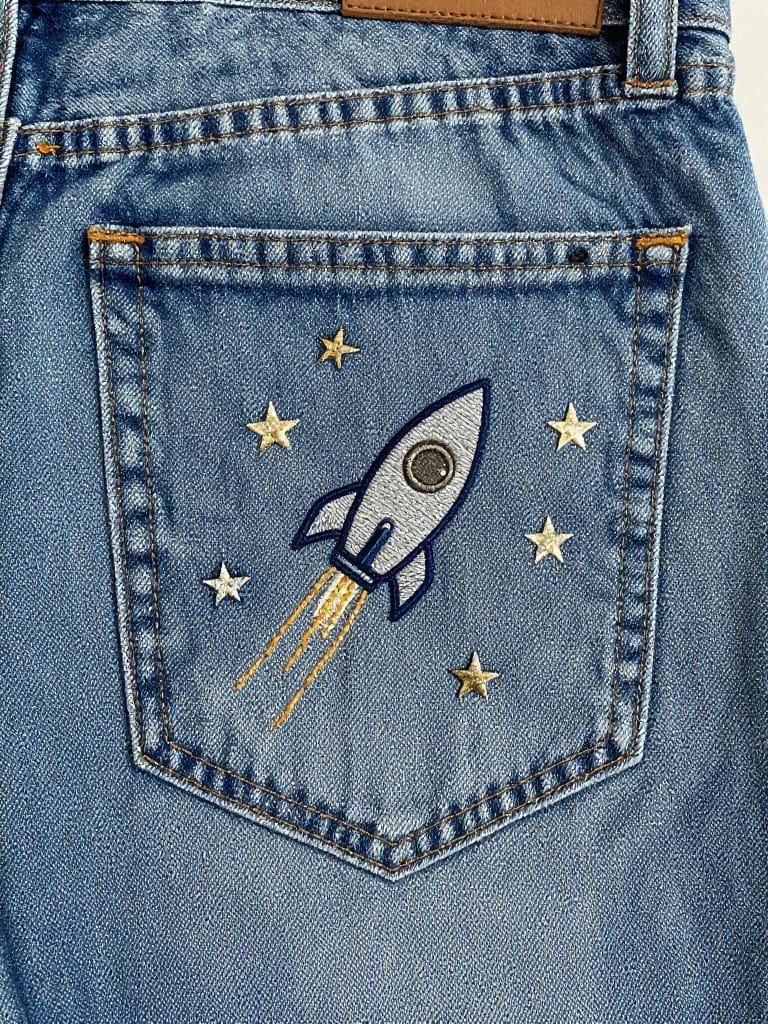
A rocket ship with a trailing flame launches upward from the bottom corner of a jeans back pocket, encircled by small scattered stars. White stitching outlines the rocket and stars sharply against the faded blue denim, with gold thread on the flame and star centers for metallic pop. The compact layout fits perfectly on pocket edges, making it ideal for customizing casual pants or adding flair to thrift finds.
The pocket placement draws eyes right to the seat without dominating the outfit, and the simple lines stitch up fast on medium-weight fabrics like denim or canvas. Adapt it to jacket flaps or tote corners by flipping the rocket direction, or swap gold for silver on black fabric for a night-sky effect. This stands out on Pinterest for its clean, graphic style that beginners can nail in under an hour.
Bee and Daisy Collar Embroidery

Embroider tiny yellow bees, white daisies, and green leaves along both edges of a shirt collar to create a lively border. The motifs hug the collar’s shape, spacing out just enough to balance the design across the front opening. This setup works best on crisp button-up shirts where the collar stands out as a focal point.
The edge placement turns a plain collar into an instant upgrade, and you can copy it onto blouses, jackets, or even sweater necks. Shrink the bees for aprons or enlarge them for tote bag straps, keeping the clustered layout for movement. White fabric lets the colors stand out sharp, but navy or black bases make the yellow bees glow even more.
Smiling Avocado Pair on a Kids Tee
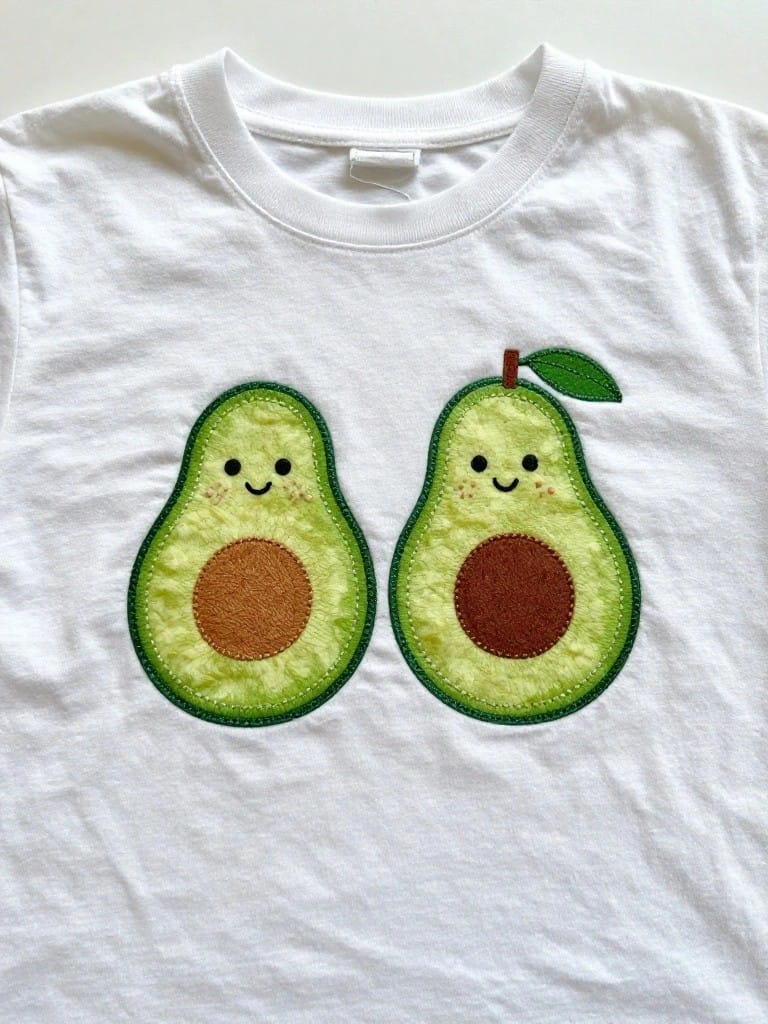
Two cheerful avocados with happy faces and simple pits sit side by side on the front of a plain white t-shirt, their green outlines and textured edges creating a bold pop against the fabric. The centered placement keeps the design balanced and eye-catching without overwhelming the shirt, perfect for a quick kids’ clothing project. Applique-style stitching adds dimension that holds up to wear and washing.
A design like this works especially well on casual kids’ tees or rompers, where the food theme adds everyday fun without being too babyish. Scale it down for tote bag patches or up for a tote front, and swap avocados for other fruits like strawberries to match seasons. The white background makes color swaps easy, helping it grab attention on Pinterest feeds full of plain apparel upgrades.
Crescent Moon Airplane Pocket
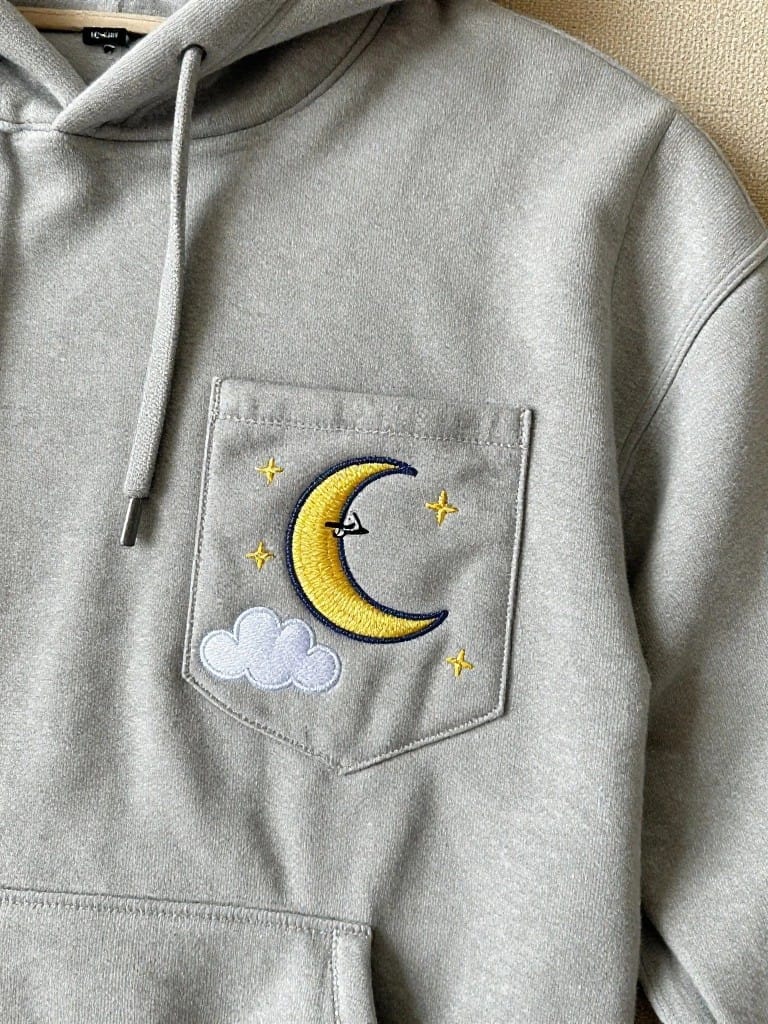
A crescent moon motif embroidered directly on a hoodie pocket cradles a small airplane silhouette in its curve, accented by scattered stars and a puffy cloud below. Yellow threads fill the shapes solidly against the gray fabric, building subtle layers that hug the pocket edge without overwhelming it. This setup suits sweatshirts or jackets with front pockets, turning a plain spot into an eye-catching detail.
Pocket placement anchors the design so it moves with the garment, keeping it practical for daily wear like hoodies or bomber jackets. Scale it smaller for jean pockets or sew it as a removable patch for bags, and the moon’s open curve leaves room to swap the airplane for a bird or heart. The color pop and compact layout make it quick to replicate and shareable on craft boards.
Rainbow and Stars Baby Onesie

Embroider a curved rainbow flanked by small stars directly on the chest of a baby onesie to create a bright focal point. The full spectrum of colors builds dimension through layered arcs, while the stars add scattered sparkle that keeps the design balanced on a small garment. This motif fits stretchy infant clothes like bodysuits or sleepers, where the compact scale prevents bulk.
A design like this works especially well on babywear or kids’ tees, since the front-center placement highlights it without interfering with snaps or movement. Shrink it for jean pockets or expand it onto bibs, and try monochrome threads for a subtler everyday look. The bold colors against plain fabric make it pop in photos, perfect for quick Pinterest shares or baby shower gifts.
Embroidered Mushrooms on Denim Cuffs
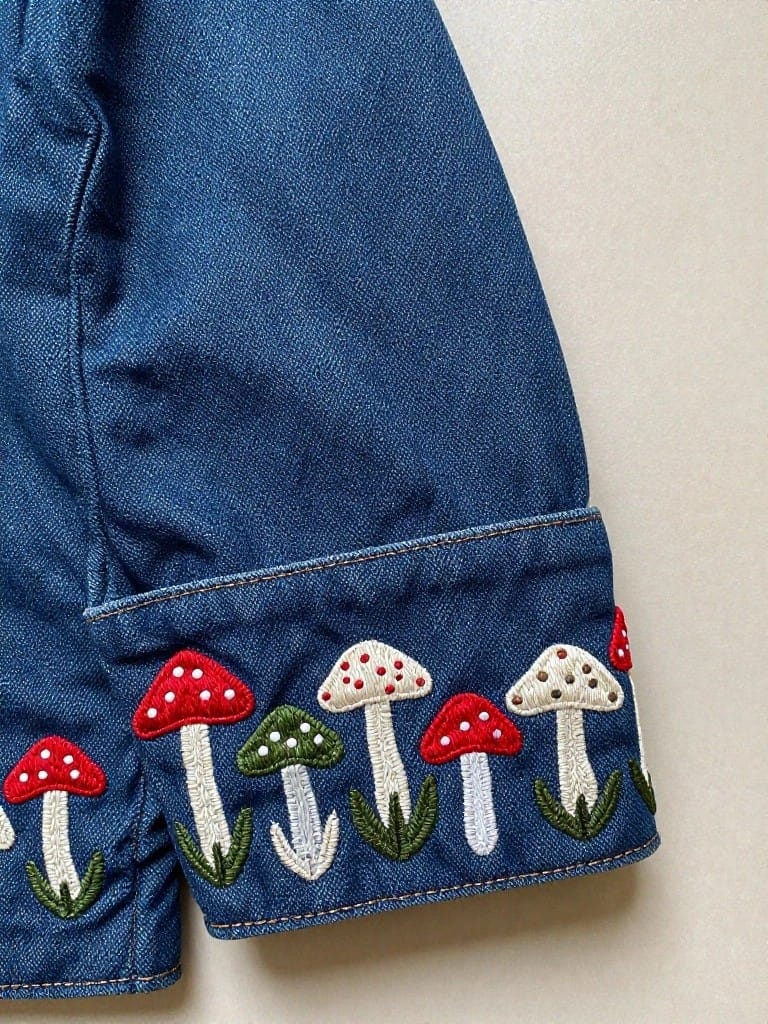
Line up a cluster of different mushrooms along the edge of a denim cuff to add a playful border that follows the garment’s shape. The mix of red-capped, white, and green-stemmed shapes with tiny grass details creates contrast against the blue fabric, making the design pop without taking up much space. This works best on jacket sleeves, jean hems, or pocket edges where the row can wrap around curves.
A design like this fits right into casual clothing upgrades since the edge placement keeps stitches secure during wear and washing. Shrink the scale for tote bag straps or adapt the row into a straight line for apron hems, and swap colors to match seasonal fabrics. The varied mushroom shapes make it stand out on Pinterest feeds full of basic florals.
Three Sailboats on a Skirt Hem

Embroider a row of three tiny sailboats along the hem of a gathered skirt, with each boat featuring sails in a different color and wavy lines below to suggest ocean waves. The white base fabric lets the boats’ colors stand out clearly, while their small scale keeps the look balanced and not too busy. This motif suits hems on skirts, dresses, or smocks where you want subtle movement as the fabric shifts.
A design like this works especially well on lightweight summer clothing since the simple lines stitch up quickly on curved edges. Shift the boats to apron bottoms or tote bag flaps, or swap colors for holidays like red and green sails. The hem placement draws the eye downward, making legs look longer on kids’ outfits, and it pins well on craft boards for quick reference.
Embroidered T-Rex on Jeans
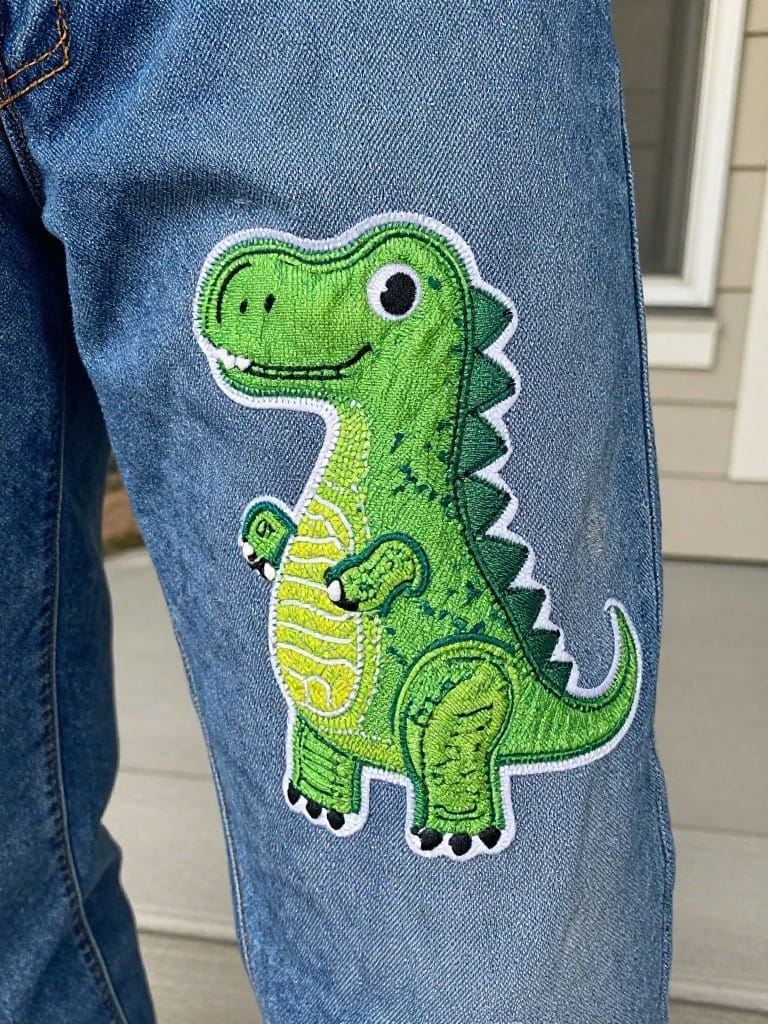
A smiling green T-Rex dinosaur stitched as a large patch sits high on the thigh of blue denim jeans, its bold scale filling the space without overwhelming the leg. The embroidery uses dense stitching for a plush texture on the body, spikes, and claws, with a lighter yellow belly for contrast that pops against the dark denim. This setup turns everyday pants into a kid-friendly statement piece, perfect for customizing jeans, shorts, or cargo pants.
A design like this works especially well on denim because the thick fabric holds the heavy stitching without puckering. Shrink the motif for backpack patches or sneakers, or swap the green for pink on a skirt to fit different styles. The cartoon details make it Pinterest-friendly for quick kid fashion searches, and you can outline it freehand or trace for easy replication.
Honeycomb Bees on Overalls

A yellow hexagonal honeycomb fills the center of the overalls bib, packed with black-and-yellow bees and a few white rounded accents for texture. Smaller bees perch along the lower bib edge and straps, creating a scattered effect that draws the eye across the front. The tight clustering fits the bib’s rectangular shape without overwhelming it, making this a solid pick for casual pants or jumpers.
The organic grid of the honeycomb adapts easily to pockets, tote panels, or even sneakers by resizing the hexes smaller. Switching to pastels tones it down for baby clothes, while bold colors amp up visibility on jackets. This layout grabs attention on social feeds because the central cluster pulls focus right away.
Ice Cream Cone Shirt Pocket
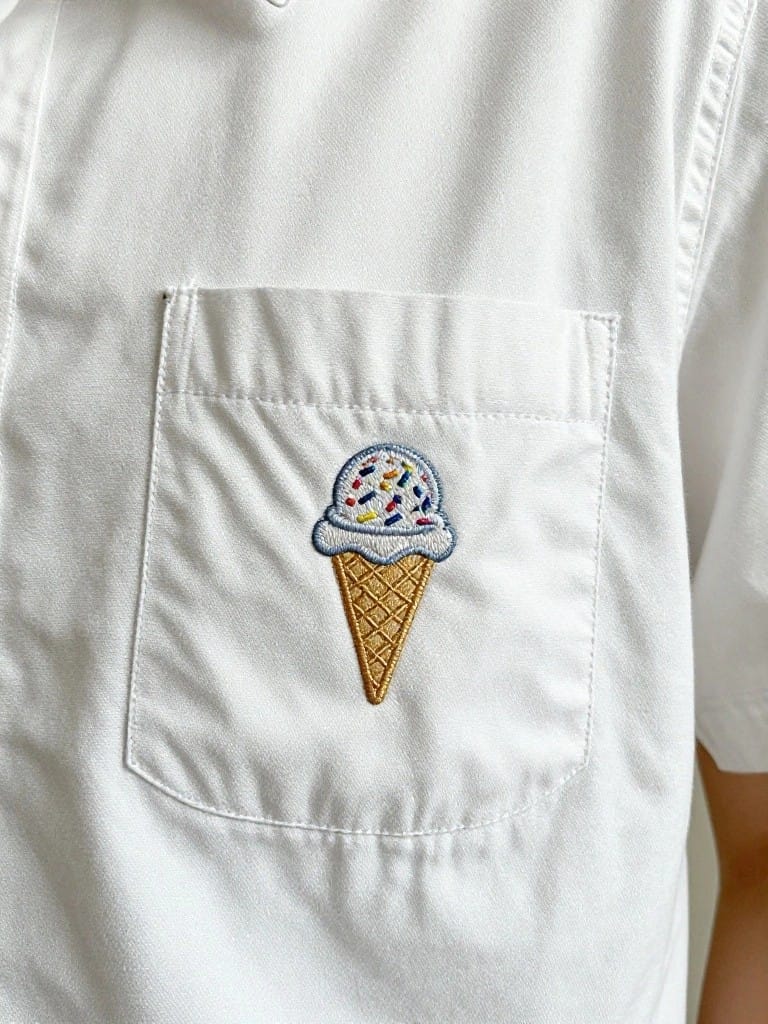
Embroider a single ice cream cone on a shirt pocket to add a pop of summer fun to casual button-ups. The design stacks a white scoop loaded with multicolored sprinkles over a textured waffle cone, keeping the scale small to fit neatly inside the pocket flap. This pocket-focused motif turns plain white fabric into something playful without taking over the whole garment.
The pocket placement makes this idea dead simple to execute and impossible to mess up positioning-wise. Shrink it further for kids’ polos or swap sprinkles for holiday colors to fit any season on tees and jackets. For non-clothing, stitch it onto tote bags or aprons where the contained shape holds up at a glance.
Connected Animal Faces on a Sweater Back
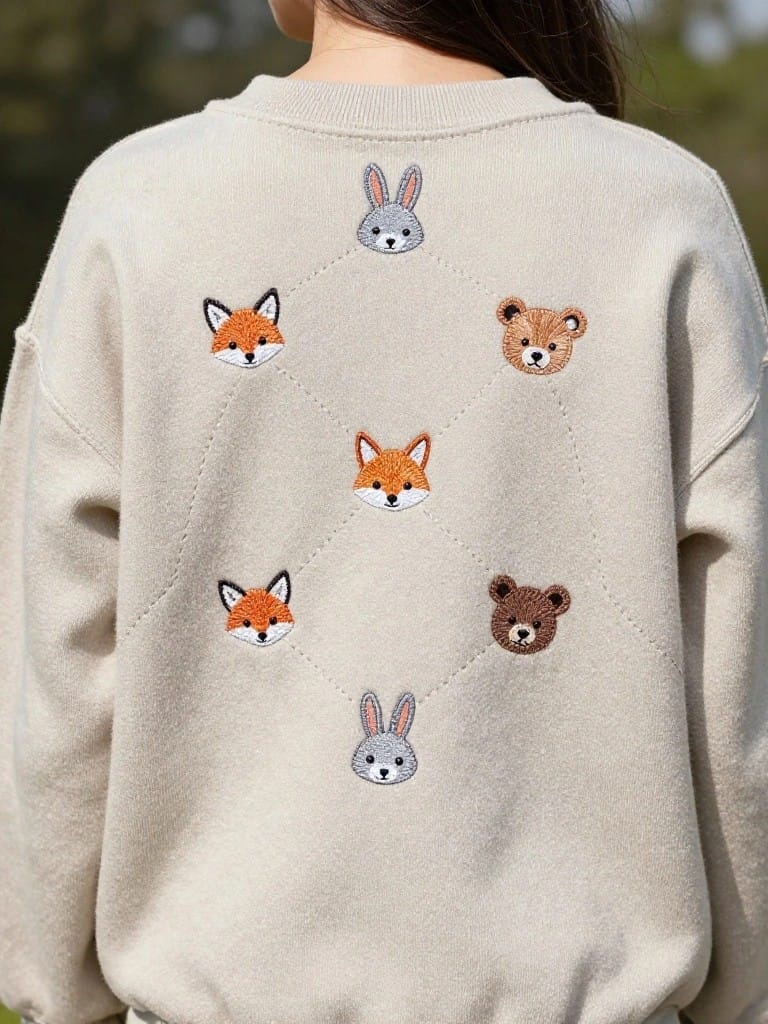
A cluster of small fox, bear, and rabbit faces stitched in a star-like geometric pattern spans the upper back of a sweater, with thin lines linking each animal head to a central motif. This layout uses repetition and symmetry to build visual interest across a larger area, keeping the scale compact so it fits casual outerwear without dominating. The mix of similar-sized faces in earthy tones makes it ideal for sweatshirts or hoodies, where the design shows up when worn.
The placement across the back works great for clothing that gets layered or viewed from behind, like jackets or pullovers, and the connected lines give it a modern graphic edge. Scale it smaller for denim patches or canvas totes, or swap foxes for wolves to tweak the theme while keeping the structure intact. A design like this stands out on Pinterest because the symmetry photographs cleanly from any angle.
Double Cherries on a Sleeveless Onesie

Two red cherries dangle from short green stems and leaves, embroidered as a compact cluster on the upper shoulder strap of a plain white sleeveless onesie. The off-center placement keeps the front clean while adding a spot of color near the neckline. Bright red against white fabric creates instant pop, and the small scale fits beginner clothing projects like baby outfits or summer tanks.
The small footprint means you can stitch this onto romper straps, t-shirt sleeves, or canvas sneakers without much fabric needed. Scale it up for bag flaps or down for collar tips, and swap cherries for berries to fit any wardrobe. Red-on-white contrast grabs attention on plain basics, making it a go-to for quick kids’ customizations that pin well.
Faux Bead Trim on Shorts Hems

Stitch tiny orange and blue circles along the bottom hem of casual shorts to create a beaded edge effect. Placed right at the leg openings, the contrasting colors stand out against neutral gray fabric and add movement when the shorts sway. This keeps the focus low on the garment while turning basic knit shorts into a playful clothing update.
The placement right at the hem makes it low-commitment for everyday wear like kids’ play clothes or lounge pants. Adapt by using fewer beads for socks or spacing them wider on pajama legs, and switch to metallic threads for evening versions. A design this simple scales easily without looking busy, which is why it pins well for quick clothing tweaks.
Stacked Cat Faces on Ankle Socks
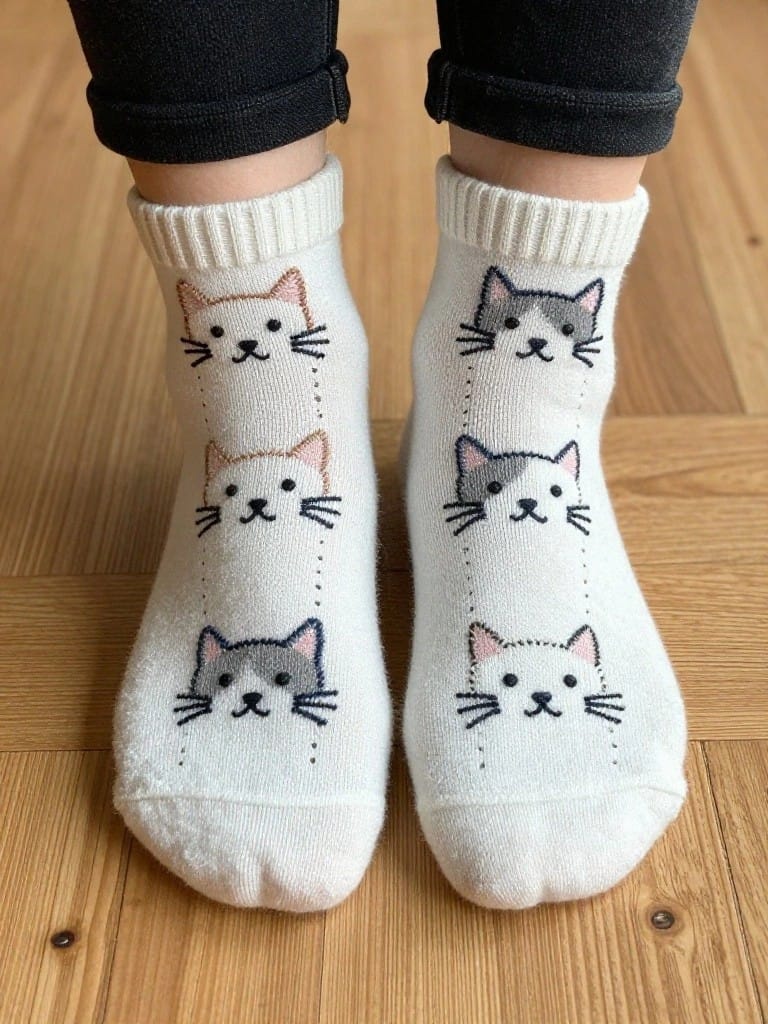
Stack four simple cat faces vertically along the front of white ankle socks, mixing gray, peach, and white threads for subtle outlines and fills. This lineup fits the narrow cuff-to-ankle space perfectly, creating a repeating pattern that adds fun without bulk. The slight color shifts between cats make the stack pop against plain fabric. It suits quick embroidery on socks, slippers, or other knit accessories.
A design like this works especially well on stretchy knits where the vertical format follows natural contours. Shift the cats to leggings cuffs or glove fingers by reducing to two or three faces, or swap for dogs and foxes on kids’ socks. The small scale keeps stitching time under an hour, ideal for batching pairs as gifts. On Pinterest, the peekaboo effect from rolled pants edges grabs attention fast.
Whale Cluster Around a Leather Patch
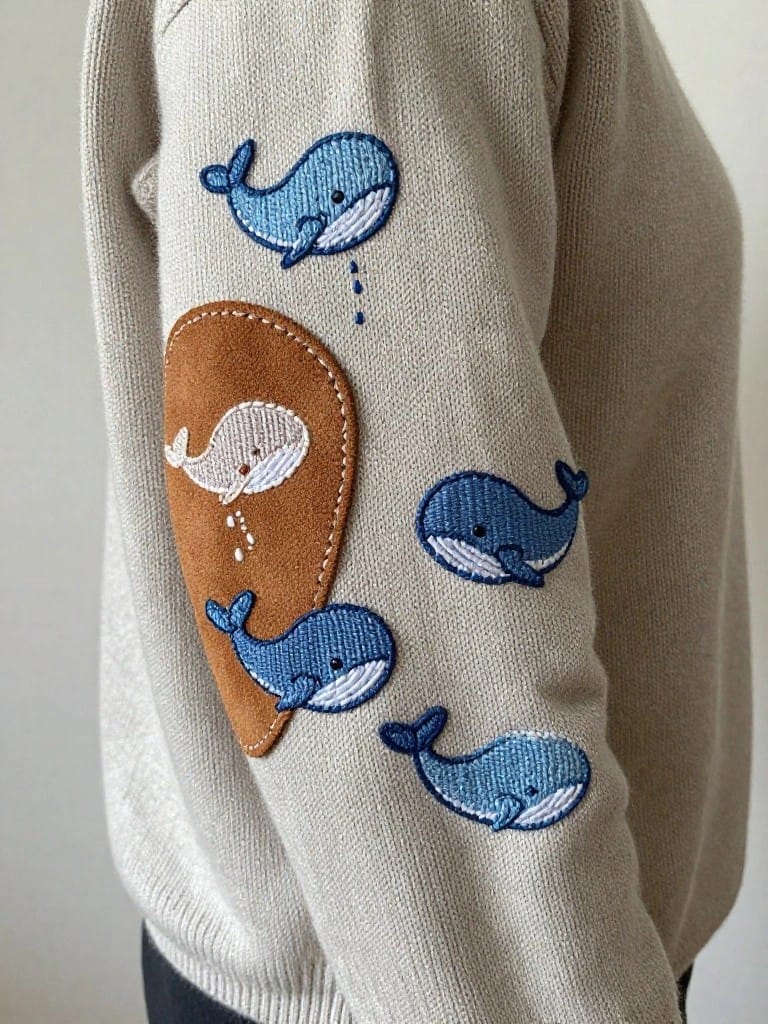
Cluster a few small whale embroideries around a larger whale stitched onto a leather applique patch, positioning the whole group on a sweater sleeve for a textured, layered look. The central patch grounds the design while the orbiting whales add movement and fill the space without overwhelming the knit fabric. This setup suits casual knitwear like cardigans or sweatshirts, where the raised patch contrasts nicely against soft yarns.
A design like this works especially well on sleeves or cuffs of jackets and hoodies, drawing the eye upward without needing much space. Scale down the whales for tote bags or adapt the patch to denim for sturdier wear, or swap whales for fish to fit a nautical shirt. The mix of flat stitching and dimensional patch keeps it from looking flat, which helps it pop in photos or on Pinterest feeds.
Scattered Coffee Cups Tea Towel

Scatter small coffee cup motifs with rising steam lines across a plain white tea towel for a casual kitchen accent. Mix blue and brown threads on the cups to suggest different ceramic finishes, paired with tiny spill drops on one for extra play. The spaced-out layout uses negative space well on rectangular fabric, suiting dish towels, napkins, or oven mitts.
A design like this works especially well on linens where repetition builds pattern without bulk. Scale down the cups for shirt pockets or jeans hems, or cluster them denser on a tote bag front. The coffee theme grabs attention on Pinterest boards for quick, everyday stitches that fit beginner samplers too.
Colorful Butterflies on Tank Hem
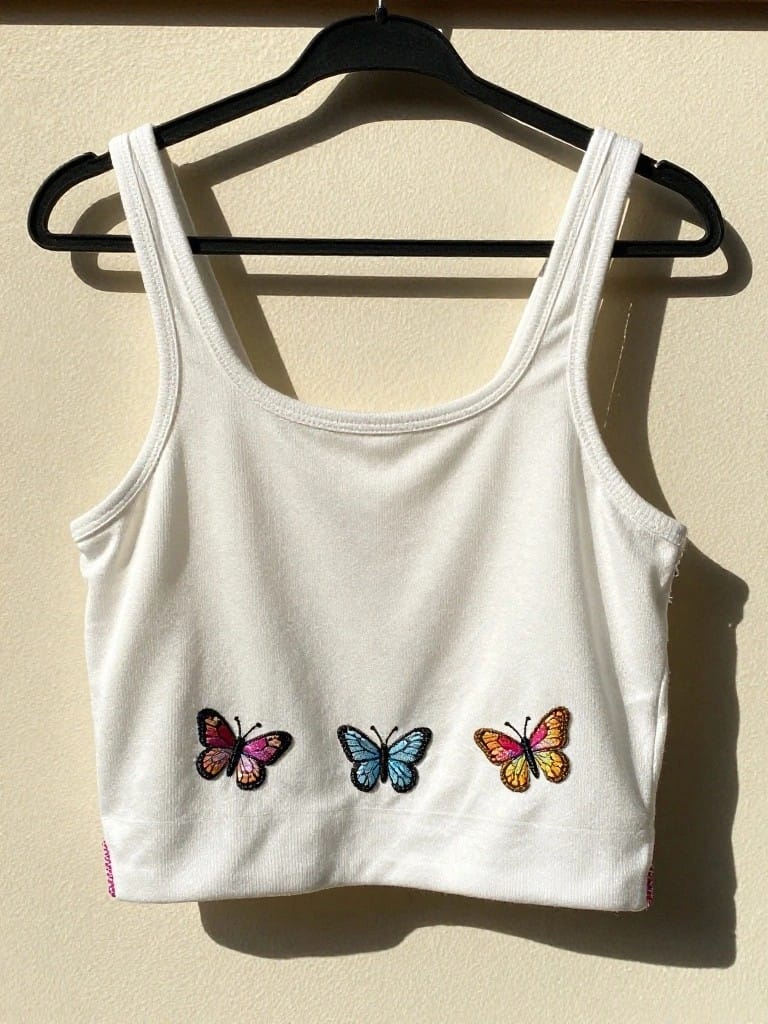
Three embroidered butterflies in shades of pink, blue, and orange line up across the lower hem of a white tank top. Their detailed wings, built up with layered stitching, create texture that pops against the smooth fabric. This hem placement keeps the focus low and balanced, perfect for casual summer tops or activewear.
The small scale and even spacing make this easy to adapt to other clothing like shorts hems or tote bags. Switch up the butterfly colors to match seasonal fabrics, or shrink them for jean pockets. For clothing, the clustered motif adds trendiness without bulk, which grabs attention on Pinterest feeds.
Ladybug Button Placket Accents
Tiny ladybugs stitched in red and black along a shirt’s button placket turn plain buttons into a focal point. Their small scale and bold color contrast make them stand out on white fabric without cluttering the front. This works best on casual button-up shirts or lightweight blouses.
The placement lines up perfectly with existing buttons, so you can add it to thrift finds or ready-to-wear pieces fast. Scale it down for kids’ clothes or up for jackets, and swap ladybugs for ants or beetles to match seasons. A design like this pops on Pinterest in outfit photos because it adds detail without extra bulk.
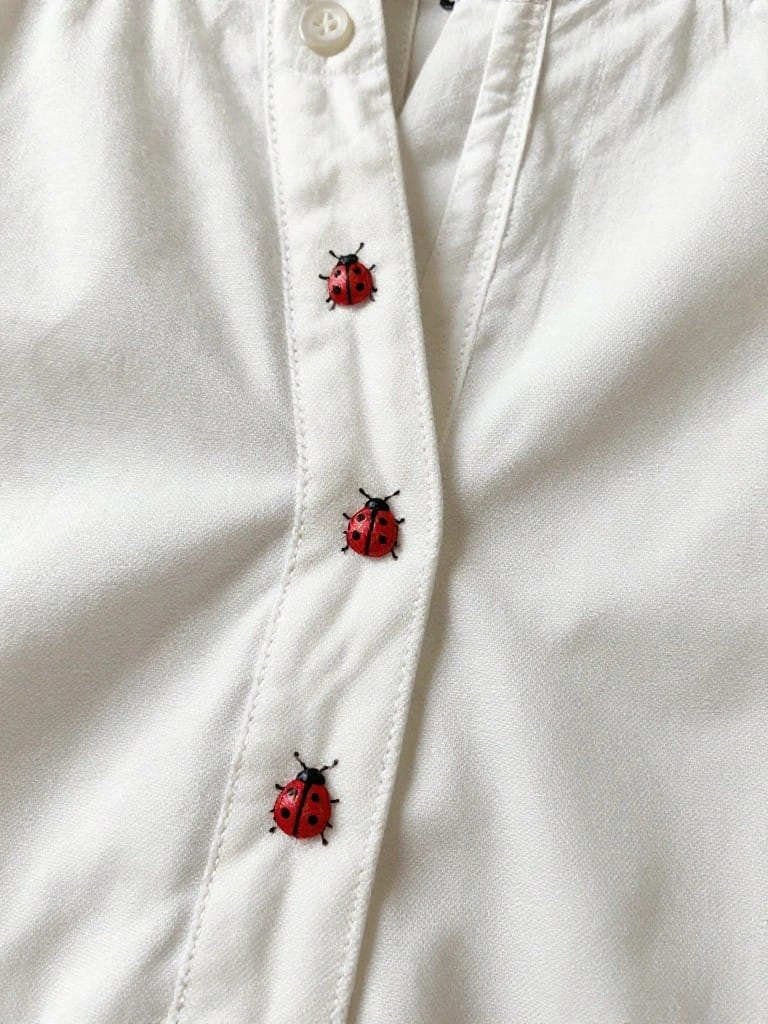
Ladybug Trail on a Blouse Placket

A row of tiny red ladybugs with black spots runs along the button placket of a white blouse, linked by a simple dotted trail that suggests movement. This central placement frames the buttons perfectly and adds playfulness without crowding the neckline. The small scale and color contrast keep it light and effective on lightweight cotton clothing like kids’ tops or baby dresses.
The placement does a lot of the work here, turning a basic shirt front into a focal point that stitches up fast. Adapt the trail to jeans pockets, tote bag straps, or apron edges by swapping ladybugs for bees or snails. Red on white stands out sharply for photos, but try pastels on denim for everyday wear.
Frequently Asked Questions
1. What basic supplies do I need to start embroidering playful designs on clothes? To get started with fun, playful embroidery like cute animals, fruits, or quirky phrases on clothes, gather these essentials: embroidery floss in vibrant colors (DMC brand is beginner-friendly and widely available), embroidery needles with large eyes (sizes 5-10 for floss), an embroidery hoop (4-6 inches for small designs on sleeves or pockets), fabric scissors, a water-soluble fabric marker or chalk pencil for tracing, and stabilizer like tear-away or cut-away types to prevent puckering on knits. Optional but helpful: a needle threader, floss organizer bobbins, and beeswax to condition thread for smoother stitching. Start with a small kit under $20 from craft stores or online to test designs without big investment.
2. How do I transfer embroidery designs onto clothing fabric easily? Transferring playful designs accurately is key for copying those 19 ideas. First, print or draw the design at actual size on paper. For light fabrics like cotton tees, use the transfer pencil method: trace the design on tracing paper with a transfer pencil, pin it face-down on fabric, iron on low heat for 10-15 seconds, then remove paper. For dark fabrics, try wash-away stabilizer: trace design on stabilizer, pin or baste it to fabric, stitch through it, then soak in water to dissolve. Freezer paper works great too: iron shiny side to fabric, trace on matte side, cut out, peel off. Always test on scrap fabric first, and hoop tightly to keep everything taut.
3. What beginner-friendly stitches should I use for these playful embroidery designs? Playful designs shine with simple stitches like the backstitch for outlines (great for doodle-like fruits or animals: stitch forward, then back half-length), satin stitch for bold fills (cover shapes smoothly by stitching parallel lines close together), French knots for dots and eyes (wrap thread around needle 2-3 times, insert nearby), and stem stitch for wiggly lines or stems (twist thread over line as you go). Chain stitch adds bouncy texture for borders. Practice on scrap fabric: start with 6-strand floss split to 2-3 strands for delicate work. Tutorials on YouTube for each stitch make it foolproof in under 10 minutes.
4. Can I embroider on stretchy clothes like t-shirts or jeans, and what are the tips? Yes, stretchy fabrics like t-shirts or denim work well for playful designs with these tweaks. Use cut-away stabilizer under the fabric to hold shape (hoop fabric sandwich-style: stabilizer, fabric, top stabilizer). For knits, embroider with the garment flat, not worn, and avoid over-stretching in the hoop. On jeans, reinforce pockets with interfacing ironed on first. Stitch loosely to allow fabric movement: use fewer strands and larger stitches. For machine embroidery (if upgrading), select knit-specific settings. Test on an inside seam; most designs take 30-60 minutes per small motif.
5. How do I wash and care for embroidered clothes so the designs stay vibrant? To keep your playful embroidery looking fresh, turn clothes inside out before washing in cold water on gentle cycle with mild detergent (no bleach or fabric softener). Air dry flat or hang to avoid heat distortion; skip the dryer until designs set after 2-3 washes. For hand-wash only on delicates, soak 10 minutes then rinse gently. Iron inside out on low heat or use a pressing cloth over designs. Store folded away from direct sun. Most floss is colorfast after initial washes, but seal ends with Fray Check for longevity. With care, designs last years on everyday wear.