
I like hand embroidery on my quiet afternoons.
It keeps my hands busy in a relaxing way.
I’ve gathered 18 simple projects that anyone can try.
They use basic stitches and don’t need fancy tools.
Give one a shot next time you have some free time.
Daisy Cluster Hoop
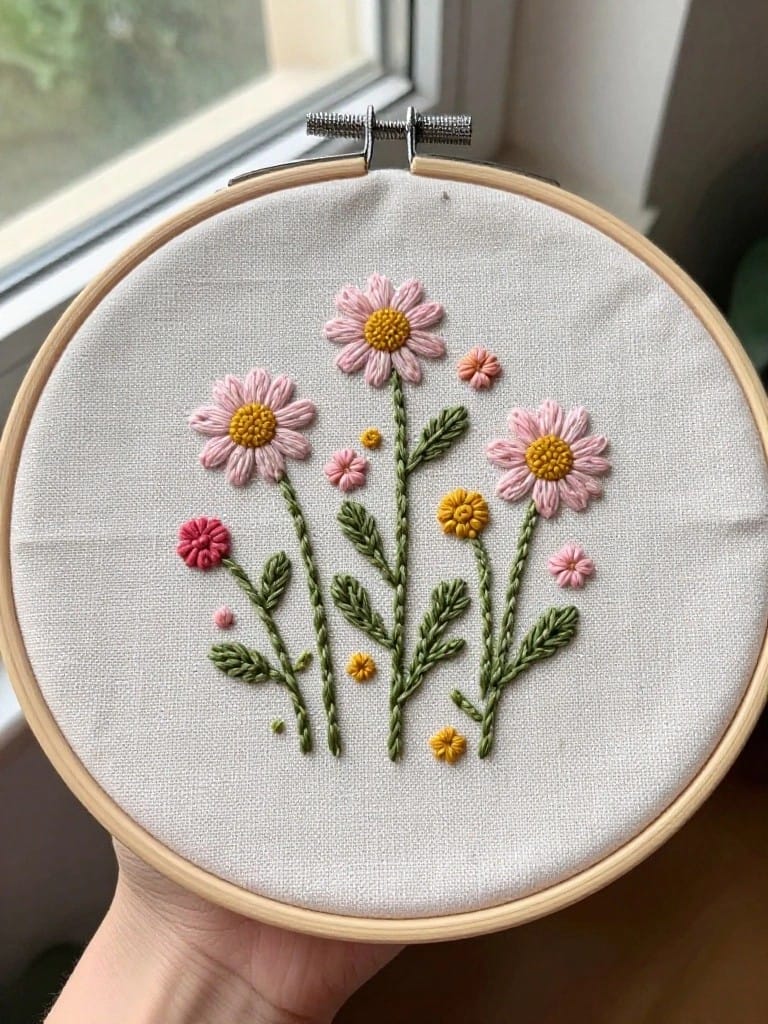
A cluster of daisies in soft pinks and yellows fills an embroidery hoop on plain white fabric, with slim green stems and leaves holding the flowers at varying heights for a natural bouquet effect. Small filler blooms and dots add subtle texture without overcrowding the design. The asymmetrical layout keeps the focus loose and balanced, making it a straightforward hoop project that finishes neatly on its own.
A design like this works especially well in a hoop for shelf display or as a quick gift topper. Shrink the scale for jean pockets or swap pinks for blues to fit denim jackets. The color mix pops against white or light backgrounds, which helps it get saves on Pinterest for everyday embroidery inspo.
Moon and Star Denim Pocket
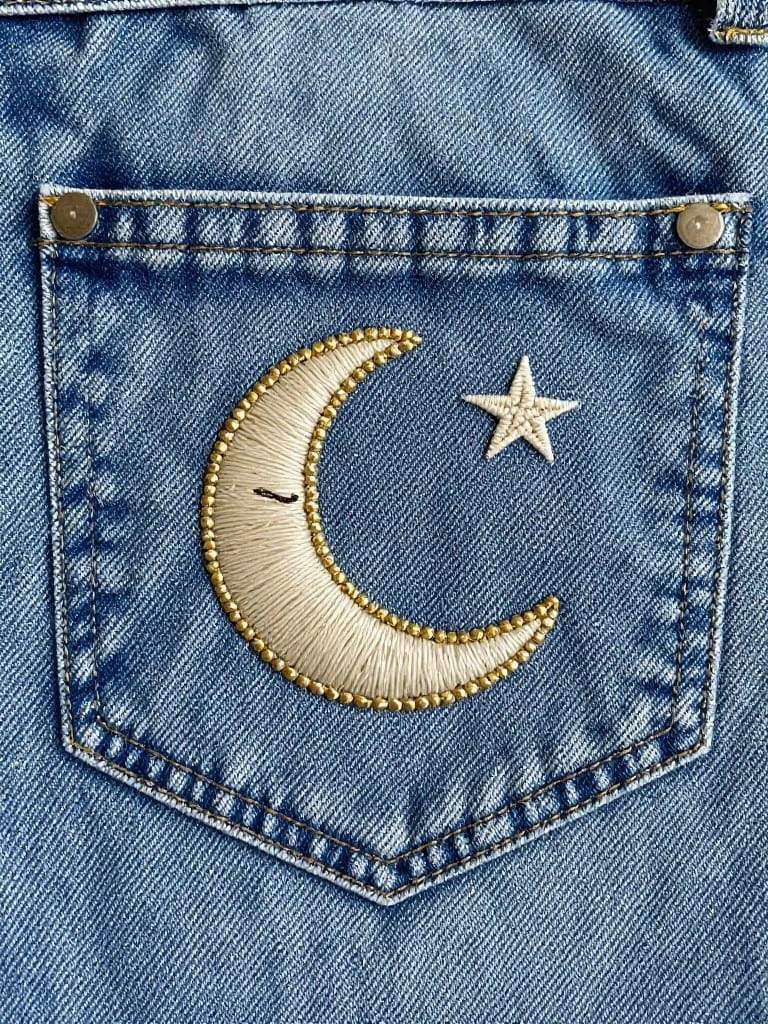
Stitch a simple crescent moon paired with a small star onto the back pocket of jeans to add a celestial touch to casual wear. The moon’s white stitching with gold outlining creates subtle shine against the denim texture, and the star’s compact size keeps the whole motif balanced within the pocket’s edges. This pocket placement makes it ideal for clothing that gets regular use without drawing too much attention.
The placement does a lot of the work here, using the pocket seams to frame the design and limit stitching time to under an hour. Try it on tote bags or aprons by resizing the moon slightly larger for more impact, or switch to pastel threads for lighter fabrics like canvas sneakers. High-contrast embroidery like this grabs attention on Pinterest feeds full of minimalist customizations.
Coffee Cup Tote Embroidery
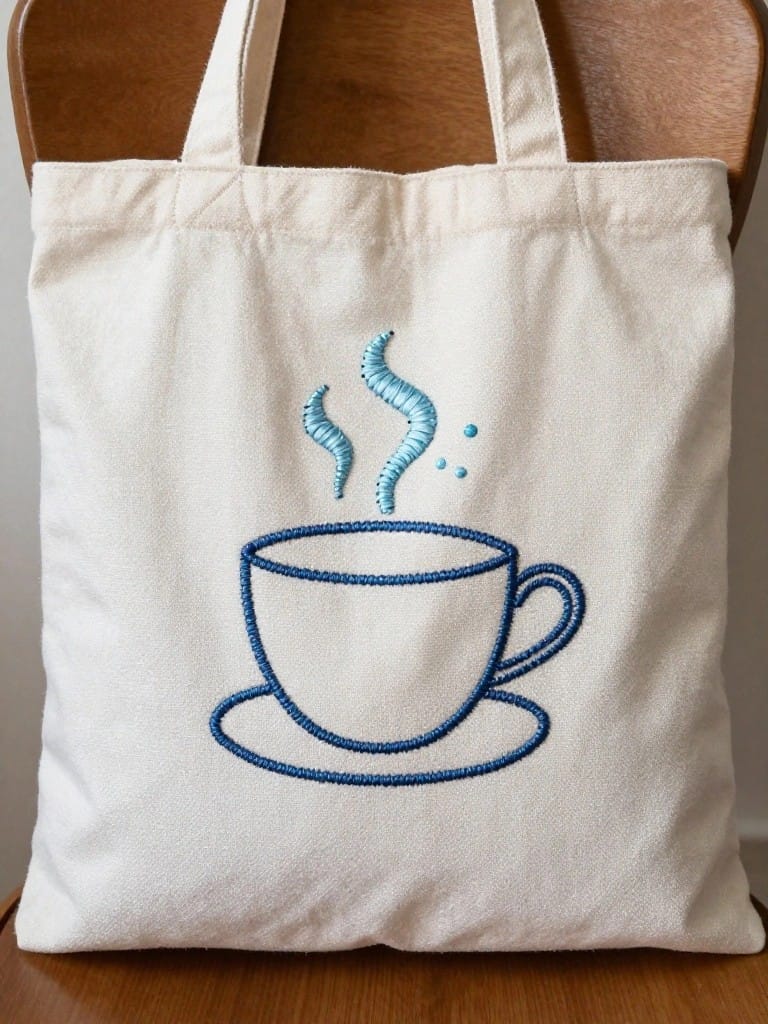
Stitch a simple coffee cup motif with rising steam curls onto the front panel of a canvas tote bag. Blue outline stitching on white fabric gives it sharp contrast and a flat, graphic feel that reads clearly from a distance. This setup fits reusable bags or shopper totes, turning a basic accessory into something branded for daily coffee hauls.
The placement right in the center maximizes impact on a tote’s flat surface without crowding the handles. Shrink the scale for jeans pockets or swap the blue for pastels to match seasonal fabrics. Its bold lines against blank space make it a quick win that pins well for everyday embroidery seekers.
Corner Strawberry Napkin
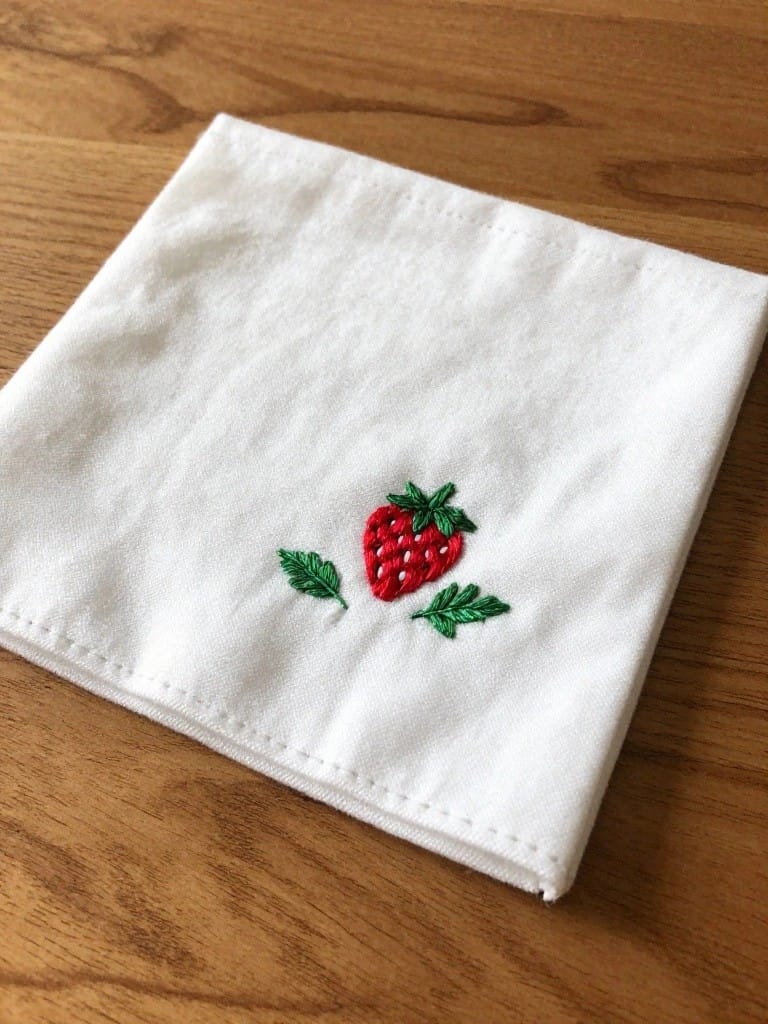
Embroider a single strawberry with two leaves in the corner of a plain white napkin to add a fresh fruit accent without overwhelming the fabric. The red berry and green leaves pop against the white background, and their small scale keeps the focus on everyday use rather than display. This setup works best on flat linens like napkins, handkerchiefs, or pocket edges where a subtle motif enhances without dominating.
The small scale makes this easy to adapt to tea towels, shirt cuffs, or tote bag corners by resizing the strawberry or swapping colors for seasonal fruits like blueberries. White fabric lets the embroidery shine, but try it on pastels for a softer look on kids’ bibs. Pin-worthy for its quick finish and versatility across table settings or personal accessories.
Star Scrunchie Embroidery
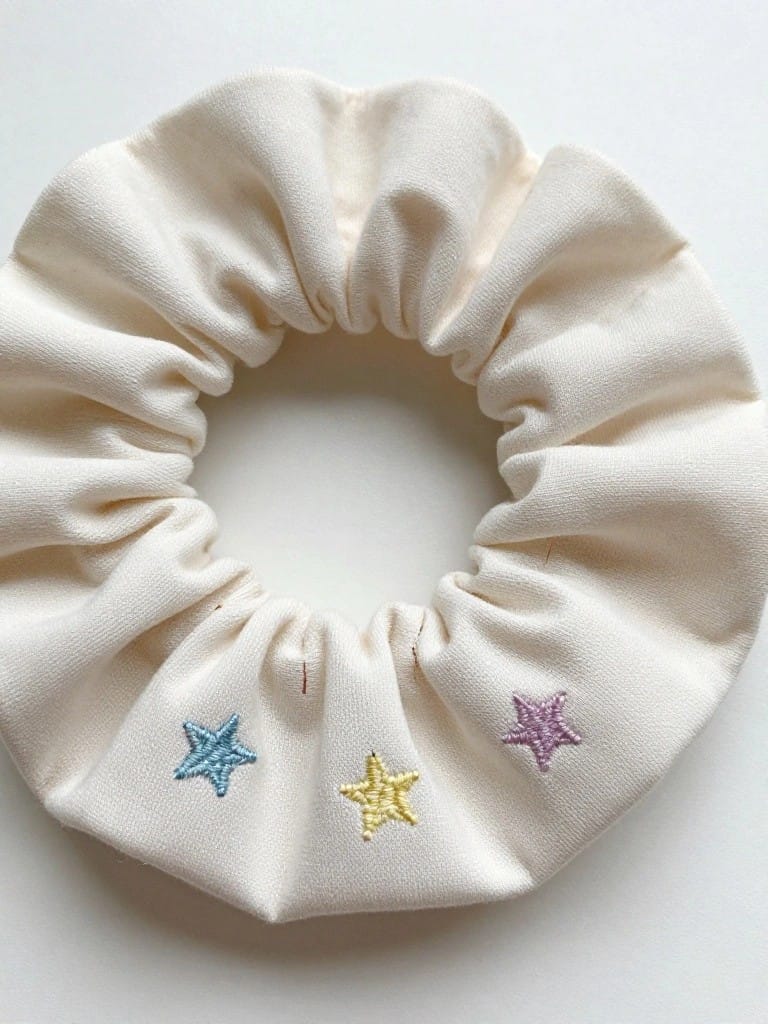
Embroider three small stars in blue, yellow, and purple onto a plain cream scrunchie, spacing them evenly around the gathered fabric band. The contrasting colors pop against the neutral background, drawing attention without cluttering the circular shape. This motif suits everyday hair accessories, where the elastic form holds the stitches securely in place during wear.
A design like this works especially well on stretchy items like scrunchies or headbands, since the simple shapes distort minimally when stretched. Scale it down for sleeve cuffs or up for tote bag flaps, and swap thread colors to coordinate with seasonal fabrics. The even spacing makes it a smart Pinterest pick for beginners wanting wearable results fast.
Subtle Sprig on a Shirt Collar
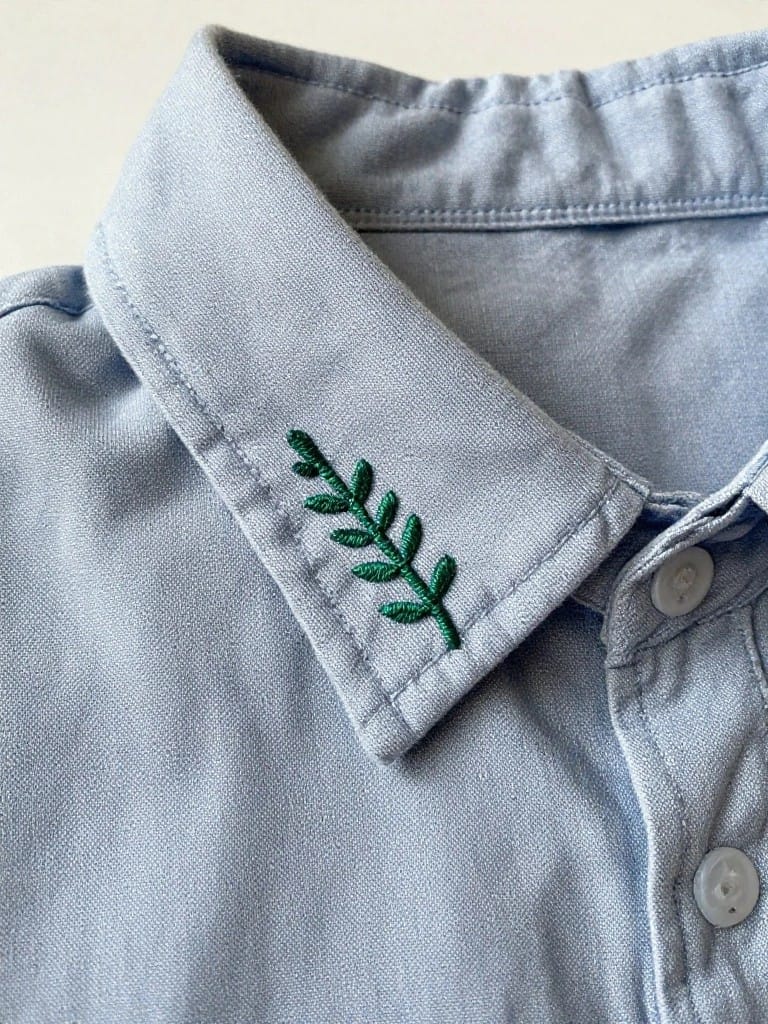
Stitch a single green sprig along the edge of a shirt collar to add a fresh detail to casual button-ups. The slim branch shape with its few leaves fits neatly into the collar’s curve, using the fabric’s light blue tone to make the embroidery pop without dominating the look. This works best on ready-to-wear clothing like denim shirts or chambray tops where a tiny accent elevates the everyday.
The placement right at the collar edge draws the eye upward and frames the neckline, making it ideal for shirts you wear often. Scale it down further for cuffs or up for jacket lapels, or swap the green thread for seasonal colors like red berries in winter. On Pinterest, these understated clothing tweaks get saved for their quick impact on thrift finds or uniforms.
Bee on a Zippered Pouch

Stitch a simple bee motif onto the front of a small zippered pouch to turn basic fabric into a fun accessory. The black-and-yellow stripes, white wings, and minimal face details pop against the plain white background, creating a balanced design that fills the space without overwhelming it. This works best for small items like coin purses or gift bags where the embroidery becomes the main focal point.
A design like this fits perfectly on everyday carriers such as makeup bags or key pouches, and the compact size lets you finish it quickly. Scale it up for tote bags or down for patches, or swap the bee for other insects to match seasons. The bold color blocking grabs attention on Pinterest feeds full of subtle florals.
Herb Sprigs on a Drawstring Bag
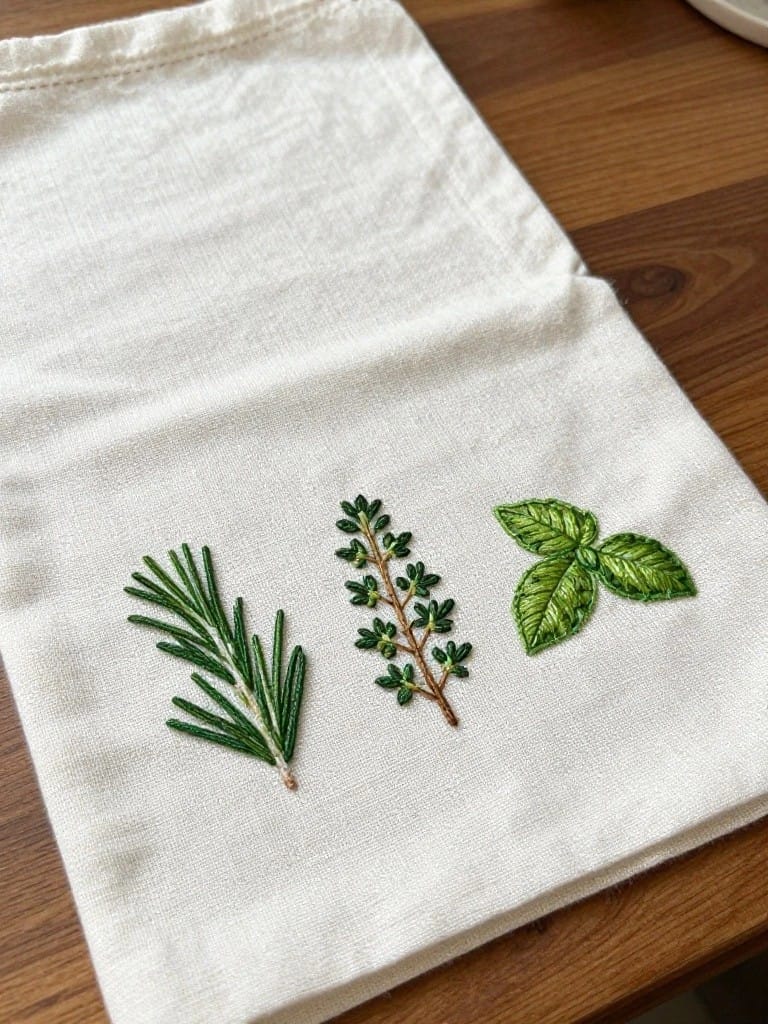
Embroider three realistic herb sprigs—rosemary with its needle-like leaves, thyme on a branching stem, and basil with broad leaves—in a neat horizontal row across the front of a plain drawstring bag. The all-green stitching against the white cotton keeps the focus on the fine details of each plant, creating a fresh, identifiable look without overwhelming the small surface. This setup turns a basic fabric pouch into a practical herb carrier or gift bag that showcases your stitching skills on everyday items.
A design like this works especially well on produce bags, tea towels, or apron pockets where the herbs tie into kitchen use. Shrink the scale for jeans pockets or enlarge it for tote bags, and swap greens for seasonal colors like red peppers or autumn leaves to fit any theme. The row layout stays balanced even if you add a fourth sprig, making it simple to replicate or tweak for quick projects that get saved on Pinterest for their clean utility.
Sleepy Cat Pillow Accent

Stitch a minimalist sleeping cat outline onto a plain pillow cover to create a low-key pet motif that stands out through sharp line contrast on neutral fabric. The cat’s relaxed pose with closed eyes and curled tail fills the space simply without overcrowding, using basic embroidery lines for a clean, graphic look. This setup suits cushions or throws where the design adds interest without dominating the room.
A design like this works especially well on linen pillows or canvas totes for everyday use. Shrink the cat to pocket size on a denim jacket or stretch it across a tote for bigger impact. Navy thread gives strong definition, but earth tones would blend into boho throws while keeping the stitch time short.
Jagged Peaks Horizon Line
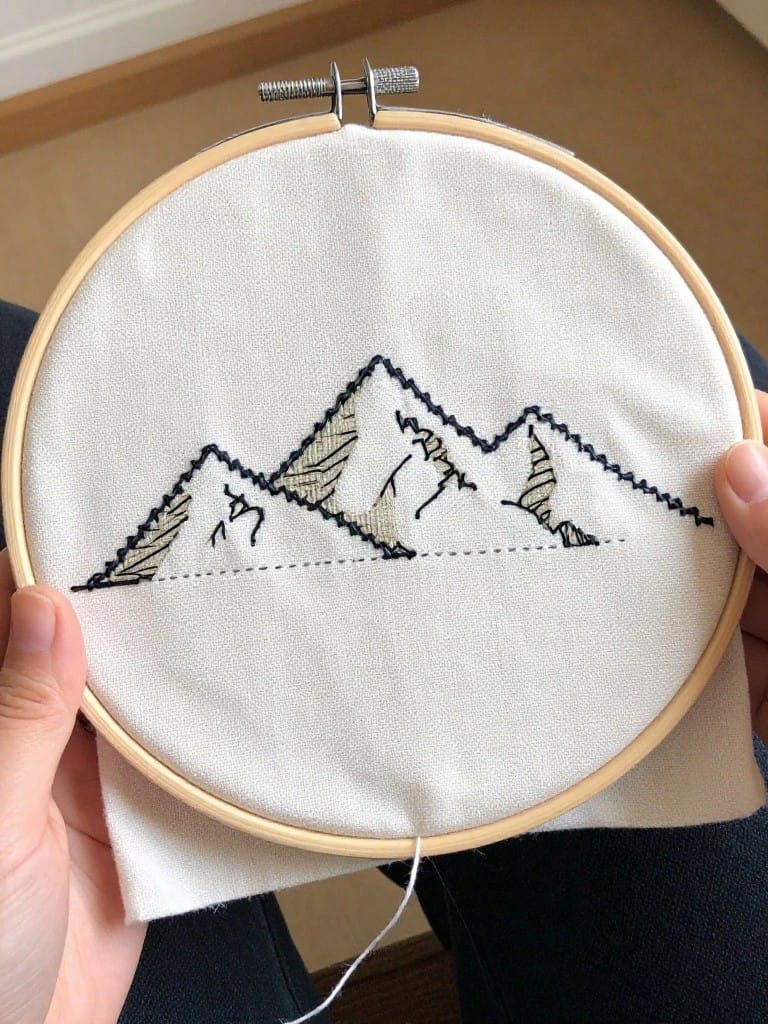
Stitch three distinct mountain peaks rising from a straight baseline in crisp black outlines, adding beige shading to the slopes for subtle dimension on plain white fabric stretched in an embroidery hoop. The repeating zigzag pattern across the peaks builds a compact landscape that fills the hoop without crowding. This motif shines as a quick-fill project for hoops meant to display on a shelf or wall.
The stark line work translates easily to patches for jackets or bags, where the horizon baseline aligns with edges for a grounded look. Swap black thread for metallics on denim to catch light, or shrink the scale for sleeve cuffs. On Pinterest, the minimalist profile stands out in feeds full of florals, pulling in searches for modern nature embroidery.
Mushroom Trio on a Denim Pocket
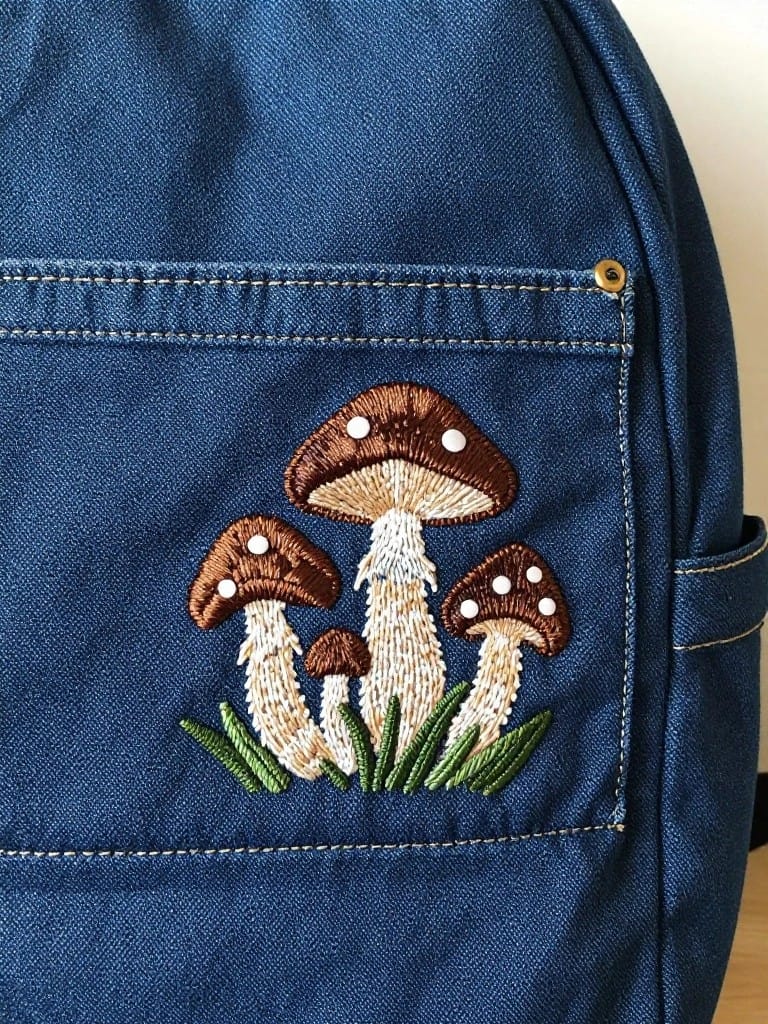
A cluster of three mushrooms rooted in grass makes a compact nature motif for the pocket of a denim backpack or jacket. The central tall mushroom flanked by two smaller ones creates balance, while the white stems and spotted brown caps stand out clearly against the blue fabric. This design fits accessories like bags or pouches, where the pocket framing keeps it neat and functional.
Pocket placement like this protects the stitching during use and draws the eye right to the detail. Shrink the mushrooms for shirt pockets or stretch them across a tote panel, and try yarn-like threads for more texture on canvas. Denim’s texture boosts the earthy feel, making these motifs pin-worthy for upcycling old jeans.
Sunflower on Denim Jacket Sleeve
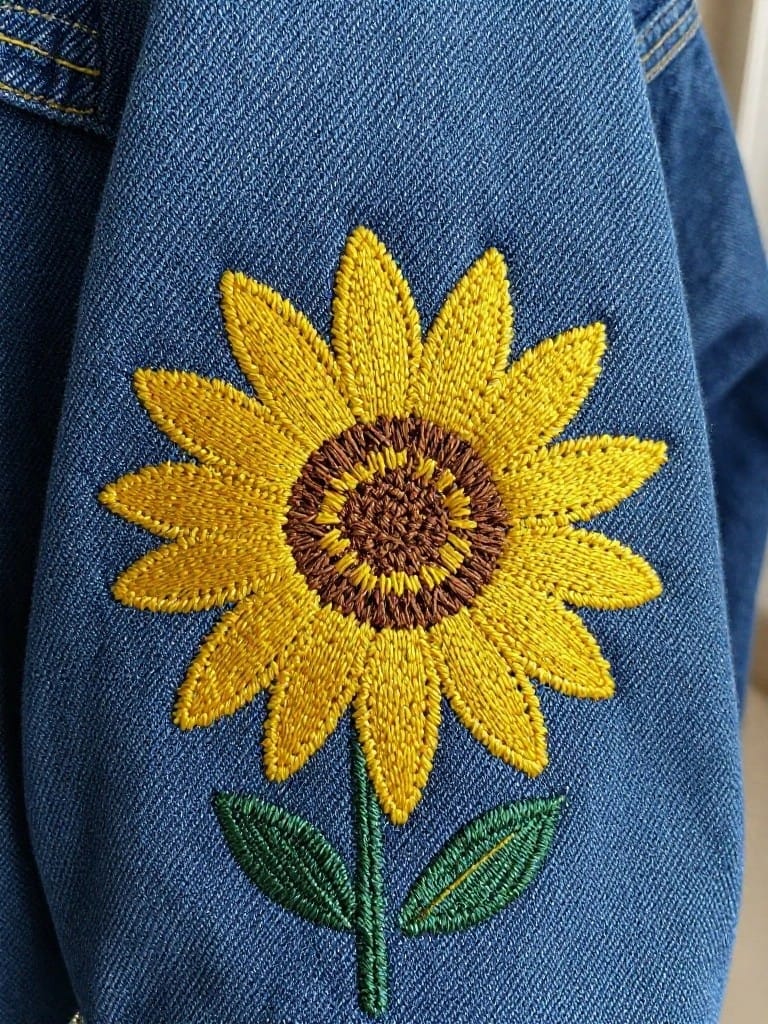
Embroider a full sunflower motif with layered yellow petals around a textured brown center, plus a green stem and leaves, directly onto the upper sleeve of a denim jacket. The bold yellow against the faded blue denim creates strong contrast that draws the eye without needing extra framing. This setup suits customizing thrift-store jackets or jeans, turning them into standout casual pieces.
The placement on a sleeve keeps the design mobile and visible during wear, unlike static hoops. Adapt it to back pockets, tote straps, or aprons by flipping the stem horizontal for better fit. Denim’s texture grips the stitches well, so it holds up to laundering better than smooth fabrics.
Olive Branch Border Pouch
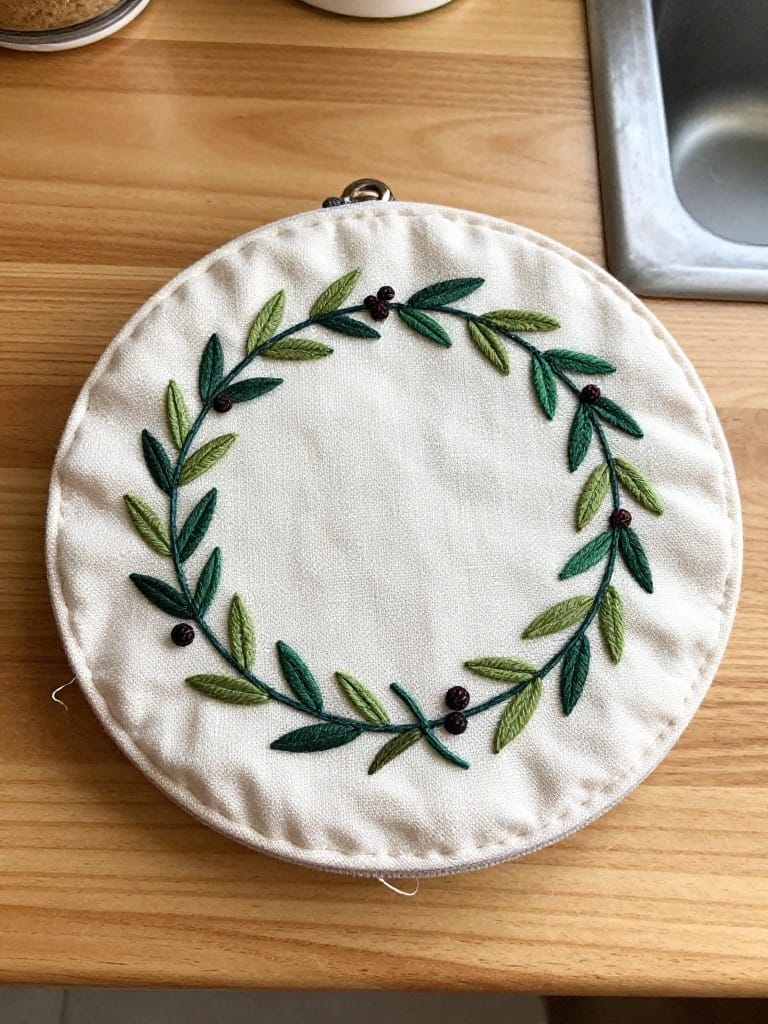
Stitch olive branches with pointed leaves and clustered berries around the edge of a round fabric pouch to frame the center panel cleanly. The green stitching on white fabric keeps the focus on the motif’s natural curves without cluttering the small surface. This border design fits zipper pouches, coin purses, or hoop covers where a contained shape adds structure.
A design like this works especially well on curved accessories like bags or ornaments since the wreath echoes the outline. Shrink it for jacket patches or stretch it across a tote for bigger impact, and swap greens for reds to match seasonal fabrics. The tight border leaves room for personalization in the middle, making it quick to finish and versatile for gifts.
Saturn Planet Wood Hoop
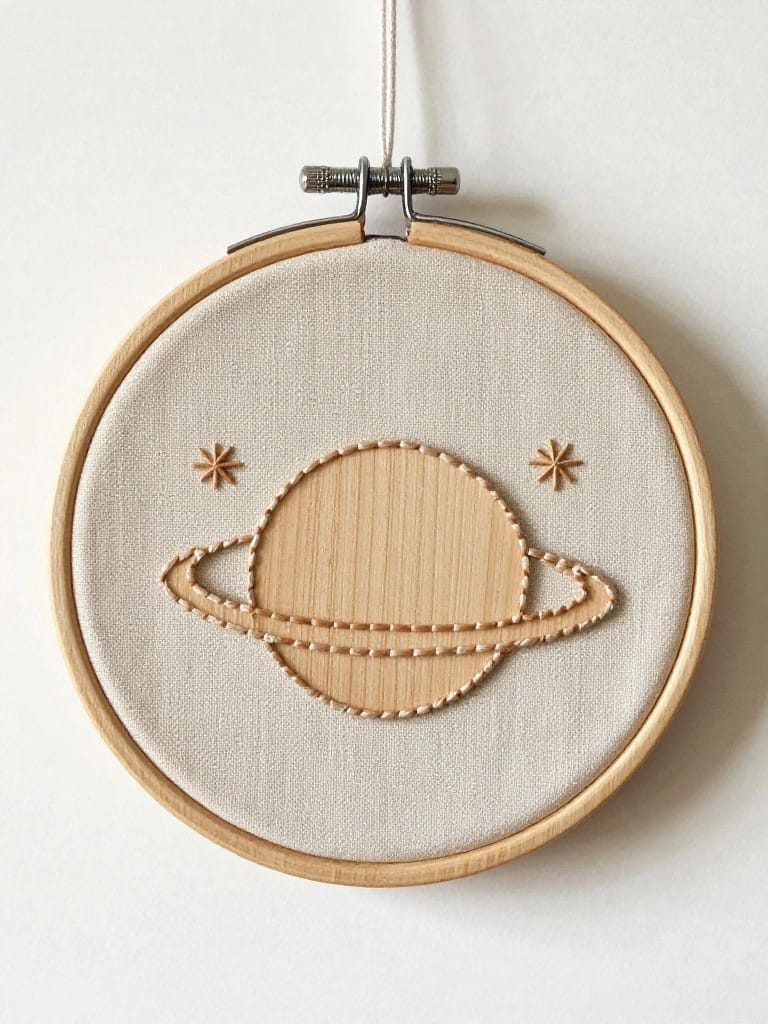
Stitch a light wood cutout shaped like Saturn’s globe and rings onto neutral fabric taut in an embroidery hoop, then add simple lines around the edges and small star accents nearby. The wood’s grain provides built-in texture and color against the plain background, keeping the focus on shape over heavy stitching. This approach suits small hoop hangings that double as instant wall accents.
The wood applique cuts stitching time way down while adding a tactile element that fabric alone can’t match. Shrink the planet for jean pockets or tote bags, or swap woods for seasonal colors like deep blue on white linen. Hoop designs like this pop on blank walls and travel well as gifts, with the neutral palette easy to tweak for any room.
Cherry Tea Towel Motif

Embroider two red cherries linked by a green stem and leaves onto the corner of a plain linen tea towel for an instant kitchen upgrade. The bold red pops sharply against the white fabric, with textured stitching that gives the fruit a plump, raised look. This compact design suits everyday linens like napkins or hand towels, where it adds subtle color without taking over.
The small footprint makes this perfect for personalizing sets of kitchen towels or guest napkins that see regular use. Try it on a canvas tote for market runs by enlarging the cherries slightly, or switch to blue for berries on a summer tablecloth. That high-contrast red ensures it photographs well for sharing your makes online.
Stacked Waves on Sleeve Cuffs
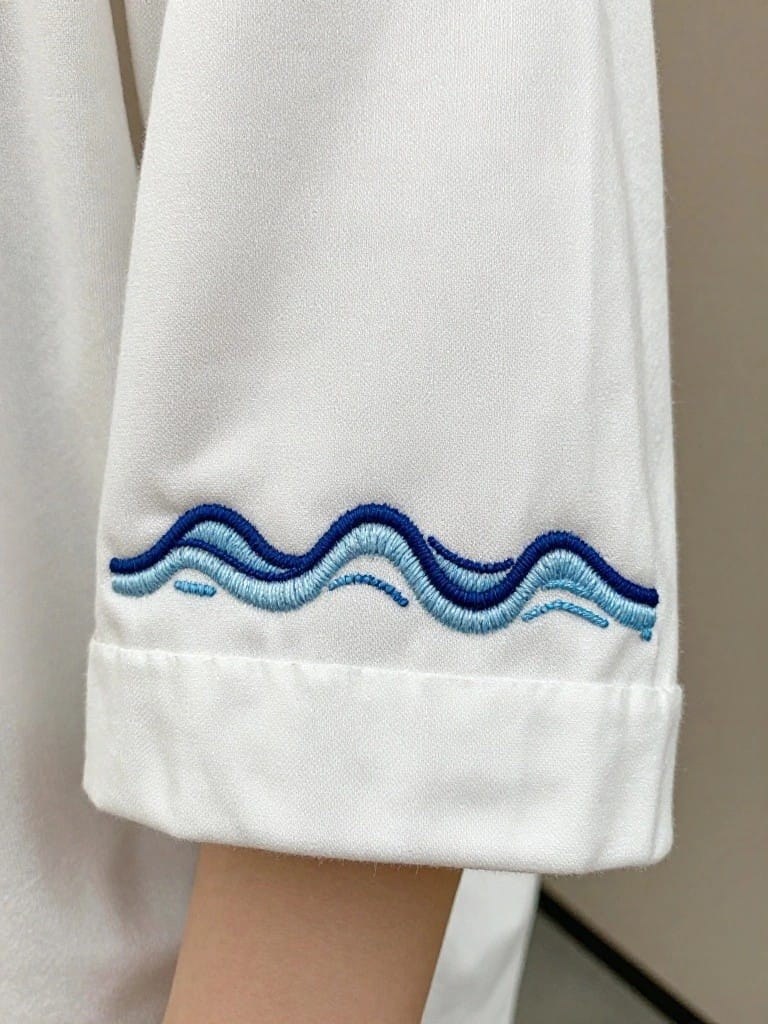
Stitch overlapping wavy lines in shades of blue along a shirt sleeve cuff to mimic gentle ocean swells. The narrow placement fits the cuff’s edge perfectly, with the white fabric providing clean contrast that lets the curves stand out. This motif suits casual clothing like button-ups or tees, turning everyday wear into something with quiet detail.
The small scale keeps stitching time short while the repetition builds visual flow across tight spaces like cuffs or pant hems. Shift the waves to tote bag straps or apron ties for everyday utility, or change to single-color thread for a bolder graphic punch. On Pinterest, the slim profile photographs sharp against clothing, making it easy to spot in flat lays.
Denim Flap Bird Patch
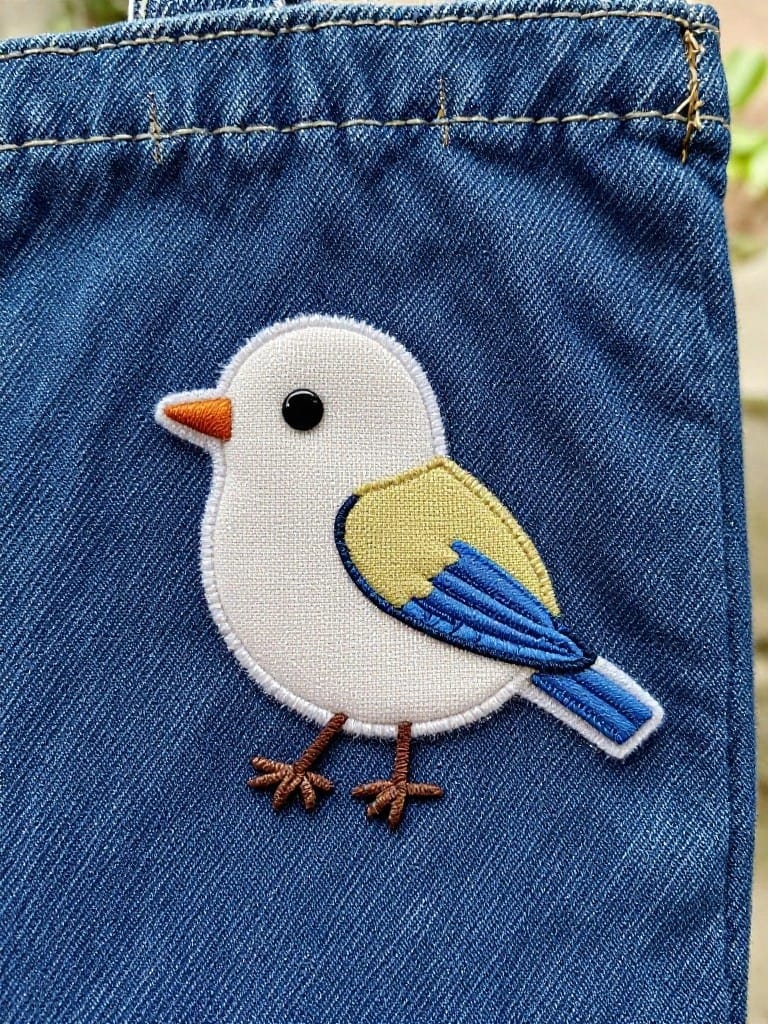
Stitch a compact white bird with a yellow underwing, blue wing tip, orange beak, and tiny legs onto the flap of a denim bag or pocket. The satin-stitched body and simple outlines create a bold pop against the rough blue denim texture. This motif suits quick personalization of kids’ clothing, tool pouches, or aprons where space is tight.
Pocket flaps like this hold the design steady during wear, and the raised embroidery adds grip without bulk. Shrink it for jeans tabs or stretch it across a backpack strap, using scrap felt for the base if you want extra dimension. Color swaps, like a red bird on khaki, keep the high-contrast effect that scrolls well on craft feeds.
Moon and Stars Pouch Motif

Stitch a crescent moon with a few scattered stars above gentle green hills and tufts of grass onto the front panel of a small felt pouch. The clean outlines and sparse fills create subtle depth on the soft beige fabric. This compact scene suits pouches, sachets, or drawstring bags as a thoughtful gift or personal accessory.
A design like this works especially well on fuzzy fabrics where the stitches add texture without overwhelming the base. Scale it up for a tote bag pocket or down for jeans patches, and swap greens for blues to suggest a lakeside view. The neutral background lets thread colors shift seasonally, making it versatile for year-round projects that pin well for their clean adaptability.
Frequently Asked Questions
1. What basic supplies do I need to get started with these projects? You will need a few simple items to begin: embroidery floss in various colors (start with six-strand cotton like DMC for easy splitting), embroidery needles (sizes 7-10 for most fabrics), a small pair of sharp embroidery scissors, an embroidery hoop (4-6 inches for beginners), fabric scraps or fat quarters in cotton or linen, and a water-soluble fabric marker or chalk pencil for tracing. Optional but helpful additions include a needle threader, beeswax for conditioning thread, and a small project bag for portability. These projects use minimal supplies, so a starter kit under $20 covers everything for the first few.
2. Are these projects suitable for complete beginners? Yes, all 18 projects are designed for beginners with no prior experience. They focus on basic stitches like running stitch, backstitch, satin stitch, French knots, and lazy daisy, which you can learn in under 10 minutes via free YouTube tutorials (search “beginner embroidery stitches”). Each project builds simple motifs like florals, leaves, or quotes on small hoops or tea towels. Start with Project 1 (a basic heart outline) to build confidence. Practice on scrap fabric first, and remember: imperfections add charm to hand embroidery.
3. How much time do these projects really take? Most projects take 30 minutes to 2 hours, perfect for quiet afternoons. Quick ones like single-motif bookmarks or napkin edges finish in 30-45 minutes, while hoop art with layered florals might need 1-2 hours over a couple sessions. Factor in 5-10 minutes for setup and thread changes. They are “effortless” because you can pause anytime without losing progress, and many use just 2-3 colors to minimize swapping. Track your time on the first few to gauge your pace.
4. Where can I find the patterns for these projects? Patterns are simple and included as free printable templates in the article (or download from the linked PDF). If you missed them, trace basic shapes freehand using a lightbox, window, or transfer paper. Search “free embroidery patterns” on sites like Pinterest or Needle ‘n Thread for similar motifs. For these specific projects, use graph paper to sketch enlarged versions: count stitches like pixels (e.g., a daisy is 10 stitches wide). Pro tip: photocopy patterns onto lightweight paper, pin to fabric, and poke holes for easy stitching guides.
5. What tips make embroidery sessions more relaxing during quiet afternoons? Set up in a cozy spot with natural light, a cup of tea, and soothing music or podcasts. Use a comfy hoop stand or lap frame to avoid hand cramps, and limit sessions to 45 minutes to prevent fatigue. Keep supplies organized in a divided tin for quick access. Stitch while breathing deeply: inhale on needle down, exhale on pull-up. If frustrated, switch to a mindless filler stitch like seed stitch. End by pressing finished pieces with a warm iron (floss side down on a towel) for that satisfying crisp look. These habits turn embroidery into true mindfulness.