
I’ve been stitching a bit of hand embroidery lately alongside my crochet projects.
It feels straightforward once you get the basics down.
I gathered these 19 patterns because they’re the ones that worked well for me as a beginner.
You can try them without much fuss.
They use simple stitches that build up your skills naturally.
Lemon Slice Hoop
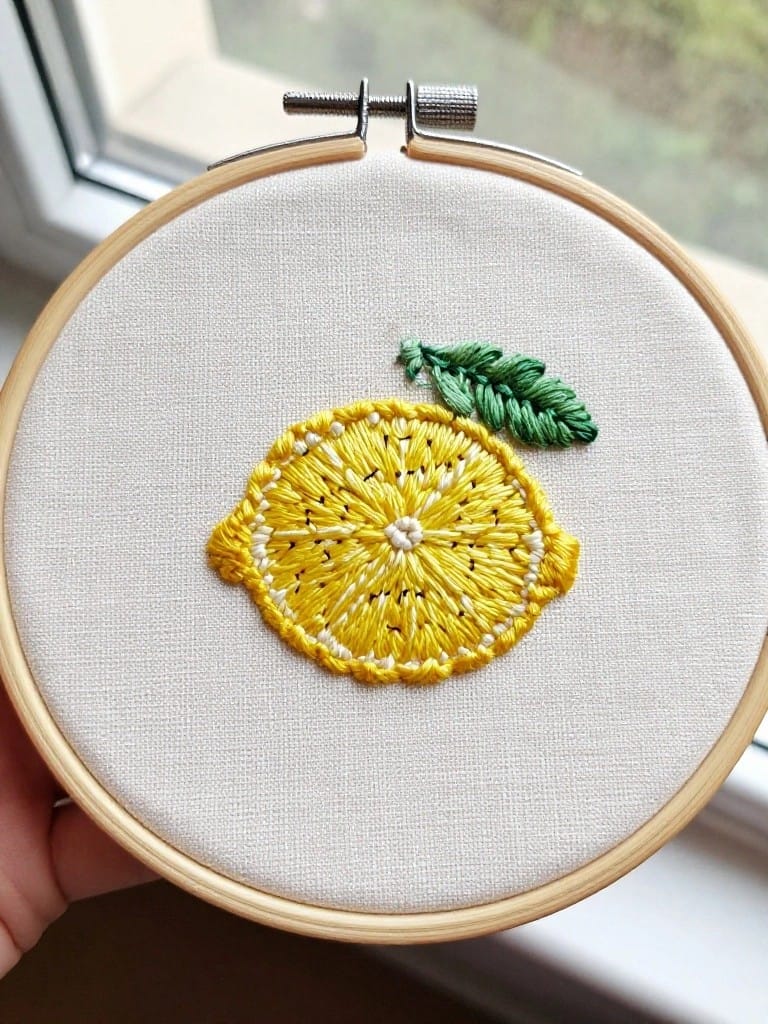
A sliced lemon with a trailing leaf forms a compact citrus motif stitched onto white fabric inside a small embroidery hoop. Bright yellow threads build out the segmented pulp and rind, while green accents the leaf for a fresh pop of color. The tight circular layout keeps the focus sharp, making it ideal for standalone hoops or quick accents on fabric items.
What makes this idea useful is its straightforward shape that fits anywhere from denim patches to linen napkins. Scale it down for button covers or up for pillow centers, and swap yellow for lime green to match kitchen towels. The hoop format travels well for on-the-go stitching, and fruit motifs like this grab attention on Pinterest feeds full of busy patterns.
Daisy Pocket Accent
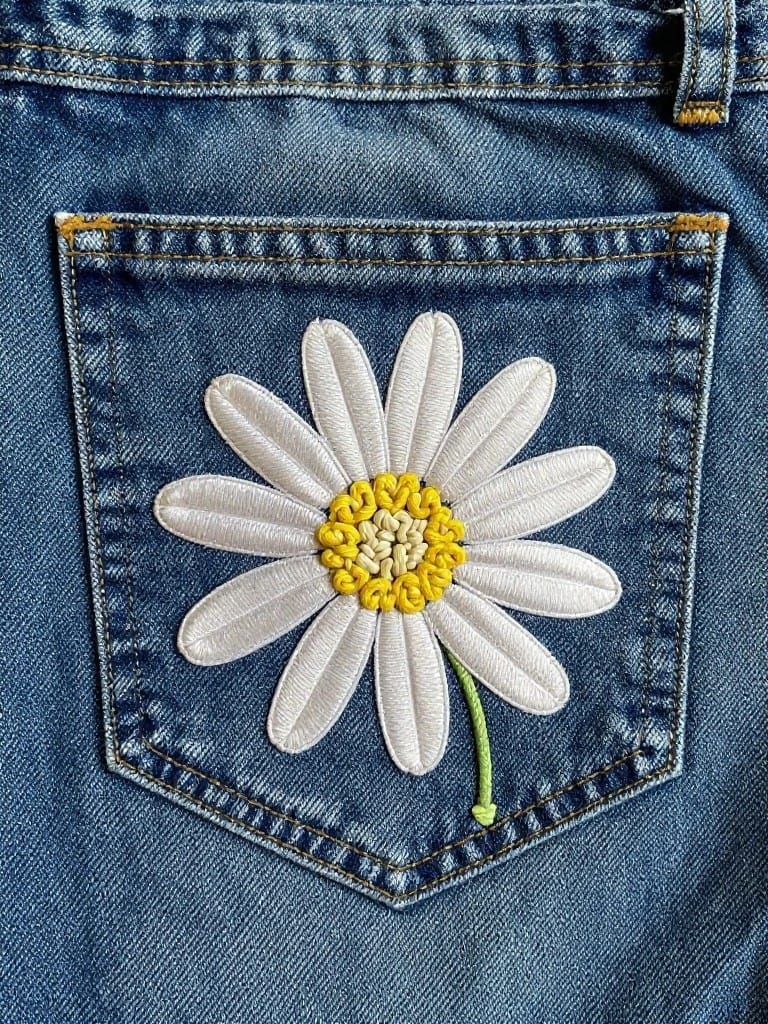
Embroider a single daisy with a curving stem right on a jeans back pocket to add a fresh, focused detail to casual pants. White petals and a bright yellow center create strong contrast against blue denim, while the stem follows the pocket edge for a natural fit. This motif suits denim clothing or sturdy fabrics where a small floral patch draws the eye without dominating.
The placement does a lot of the work here, framing the flower with the pocket’s seams for an instant finished look. Shift it to jacket pockets, canvas totes, or skirt hems by matching the scale to the surface. Dark backgrounds amplify the white and yellow, so it adapts easily to black tees or bags for everyday wear that gets noticed on social feeds.
Daisies on a Canvas Tote

Embroider a loose cluster of three daisies plus a bud on the front panel of a canvas tote bag, with slender stems and leaves extending downward. White petals and yellow centers blend subtly into the cream fabric, while green threads add definition and a bit of height to the arrangement. This keeps the bag looking clean and everyday-useful, like for grocery runs or library hauls.
A design like this works especially well on totes or drawstring bags since the vertical stems follow the shape without crowding. Scale it down for a coin purse or apron pocket, or outline the petals in black thread for more contrast on denim. The simple lines make it a quick win that stands out in flat lays on Pinterest.
Star and Moon Collar Accents
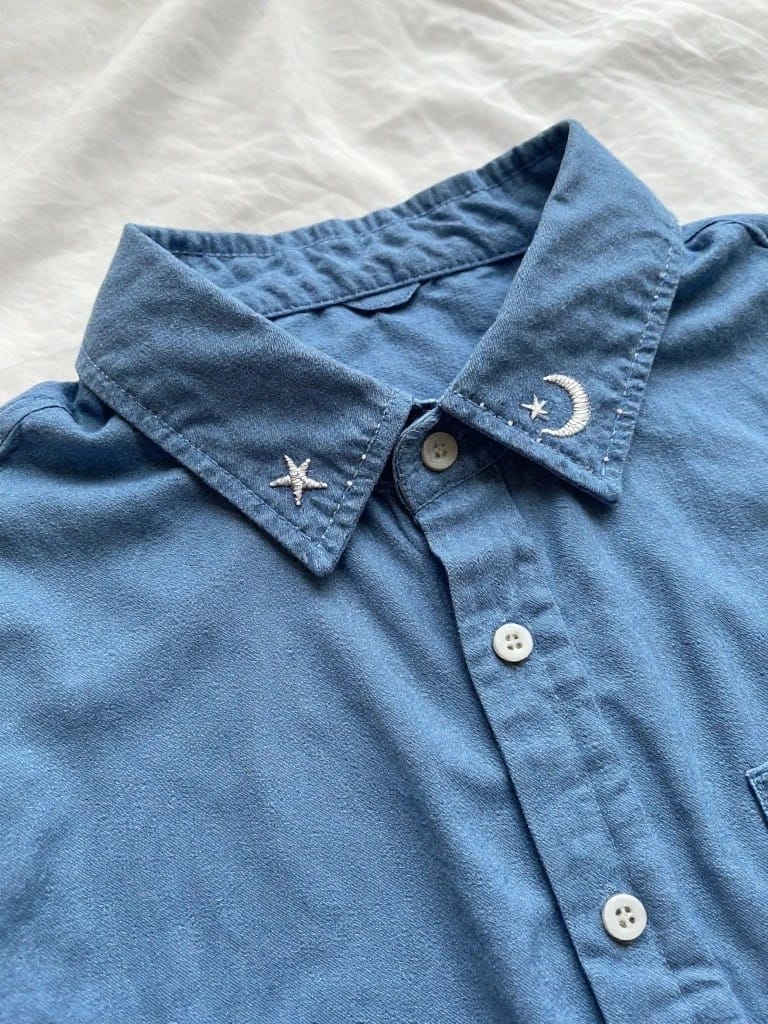
Tiny star and crescent moon shapes embroidered on the points of a shirt collar turn everyday denim into something with subtle interest. The paired motifs balance each other across the open collar, keeping the look clean and not fussy. White threads against the blue fabric create sharp contrast that catches the eye up close.
A design like this works especially well on shirt or jacket collars where the embroidery stays visible without shifting. Shrink it for sweater lapels or enlarge it for canvas tote straps to match the scale. Switching to metallic threads amps up the shine on darker fabrics, making it a go-to for fast clothing tweaks that pop in photos.
Corner Strawberries on Napkins
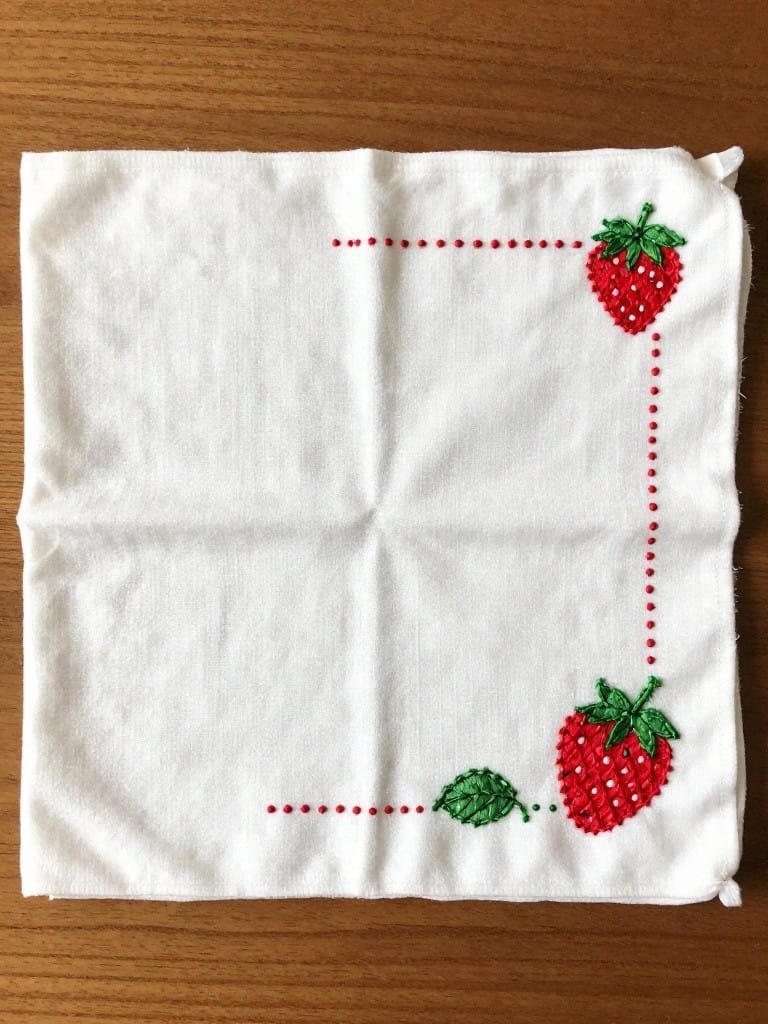
Embroider small strawberry motifs with green leaves into the corners of a plain white napkin, paired with a thin red dashed border that frames the edges. This corner placement keeps the design compact and symmetrical, letting the berries stand out without crowding the center space. It suits napkins, tea towels, or handkerchiefs where you want a fresh accent that washes well.
The corner layout makes this dead simple to replicate on any square fabric up to placemat size, and you can skip the border for an even cleaner look on jersey pockets. Shrink the berries for apron bibs or enlarge them slightly for quilt blocks. On Pinterest, these pop because they’re quick to stitch but read as thoughtful hosting details.
Star-Embroidered Scrunchie

Small embroidered stars scattered across a scrunchie create a playful accent on everyday fabric accessories. The irregular placement follows the natural folds of the gathered band, making the design move with the fabric for subtle movement. This approach works best on stretchy items like hair ties or wristbands where the stars add interest without stiffening the material.
The small scale makes this easy to adapt to cloth napkins, tote bag corners, or pajama pockets. Switch to bolder thread colors for pop against denim or neutrals for a tonal effect on linens. A design like this stands out on Pinterest because it personalizes basics fast, turning store-bought finds into custom pieces.
Pineapple Pouch Embroidery
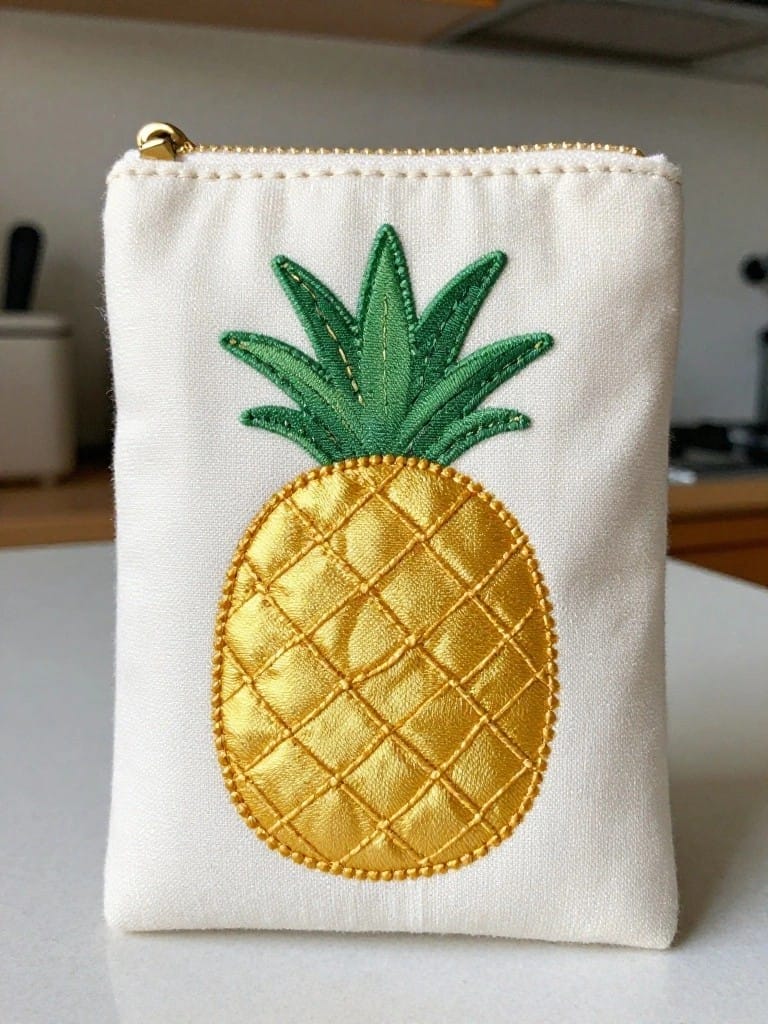
A pineapple motif covers the front of a small zip pouch, with layered green leaves over a textured yellow body outlined in gold stitching. The design’s compact scale fits perfectly on the rectangular fabric panel, using high contrast against the white background to make every detail pop without overwhelming the surface. This setup turns a basic accessory into a standout piece ready for daily use.
The bold shape and color blocking make this a quick win on canvas pouches, makeup bags, or keychain wallets. Shrink it down for jeans pockets or scale it up for tote fronts, swapping greens for seasonal shades like red berries in winter. Its clean layout grabs attention on Pinterest feeds full of scattered florals.
Smiling Cloud Patch
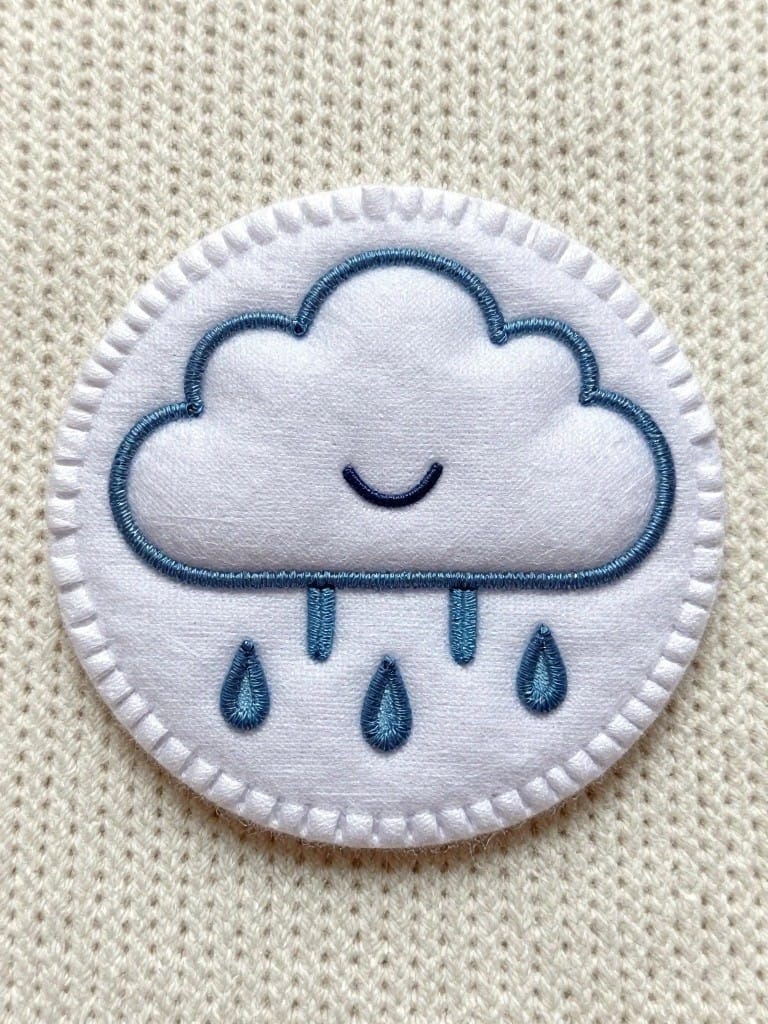
Stitch a puffy white cloud with a simple smile and three dangling raindrops into a circular patch backed with felt. Blue embroidery outlines the shape and accents the drops, creating clean contrast on the soft fabric for a dimensional look. This motif fits jackets, sweaters, or tote bags, where the edges blend into textured surfaces.
A design like this works especially well on knits, as the cloud texture echoes fuzzy yarns without overwhelming the base. Adapt by enlarging for quilt blocks or shrinking for hat brims, and switch to pastels for spring versions. The compact circle shape travels easily to pinboards or scrapbooks, standing out in feeds for its no-fuss cheer.
Cactus Trio on Hand Towels

Three embroidered cacti in graduating sizes form a tidy horizontal row across a hand towel, with the tallest in the center flanked by shorter ones on each side. The green outlines capture spiny shapes simply against white fabric, using visible stitching for subtle texture. This layout fits small linens like kitchen towels or napkins without crowding the space.
Scale this down for washcloths or up for placemats, and swap cacti for succulents to match any room. The even spacing makes it forgiving for beginners aligning stitches on straight edges. Dark threads on light backgrounds like this grab attention fast on Pinterest feeds full of busy patterns.
Tiny Fruit Flower and Leaf Patches
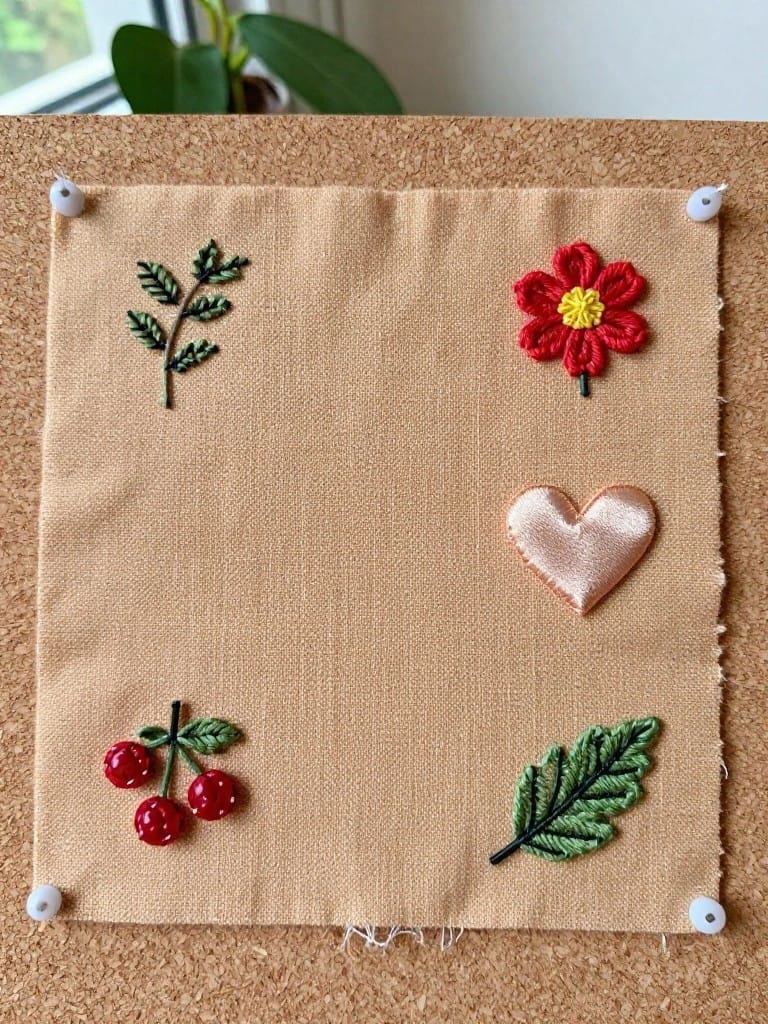
Scatter small embroidered motifs like red cherries with stems, varied green leaves, a puffy red flower, and a satin heart across a plain beige fabric square for an easy patchwork effect. The loose asymmetrical layout keeps the focus on each element’s simple shapes and color pops, with the heart’s shiny texture adding subtle variety. This design shines as customizable patches for sewing onto tote bags, denim jackets, or scrapbook pages.
What makes this idea useful is the bite-sized motifs that stitch up fast and mix well with existing fabrics. Shift the layout to a single row for bracelet patches or cluster tighter on a keychain fob. Neutral backgrounds let bold reds and greens pop on darker clothes, turning basic items into Pinterest eye-catchers with minimal thread.
Fox Face Pillow Cover
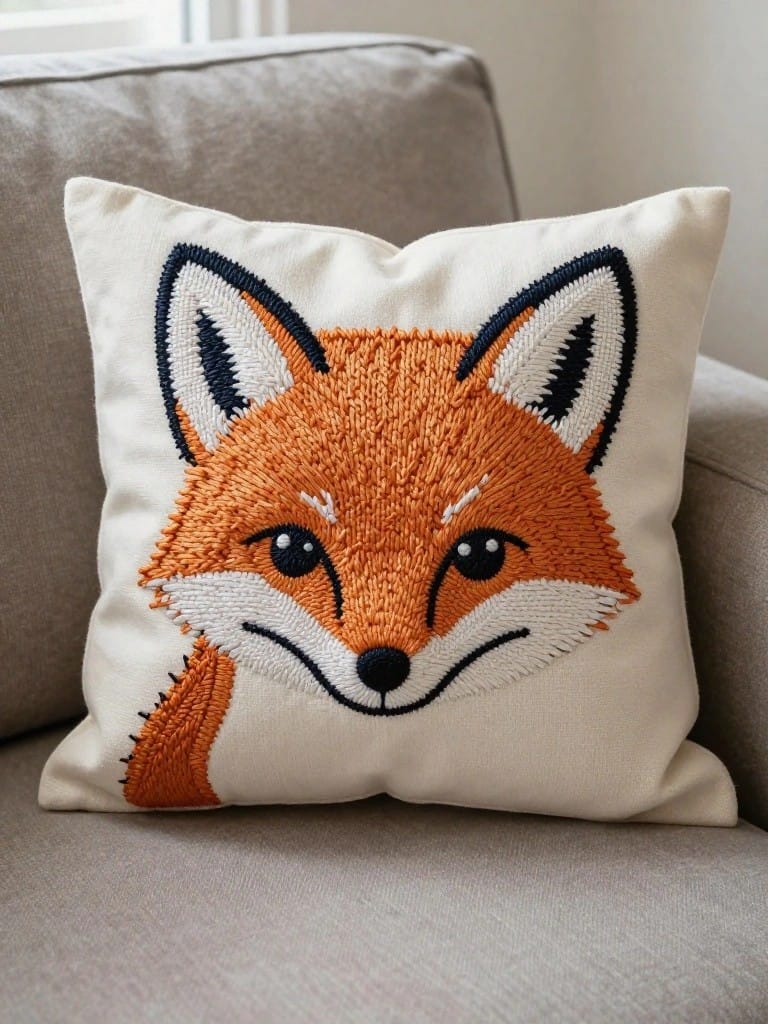
Stitch a detailed fox head onto a plain square pillow cover to create a plush, textured focal point. Dense orange embroidery builds the fur with visible texture, while black outlines define the ears, eyes, and snout for clear expression against the light fabric. This design suits cushions or bolster pillows, where the centered motif fills the space without overwhelming it.
A design like this works especially well on linen or cotton throws for living room accents. Scale it down for denim jackets or canvas totes, or swap orange for grays to fit modern rooms. The strong color contrast ensures it photographs sharply, making it a Pinterest standout for quick shares.
Bee on Denim Jacket Sleeve
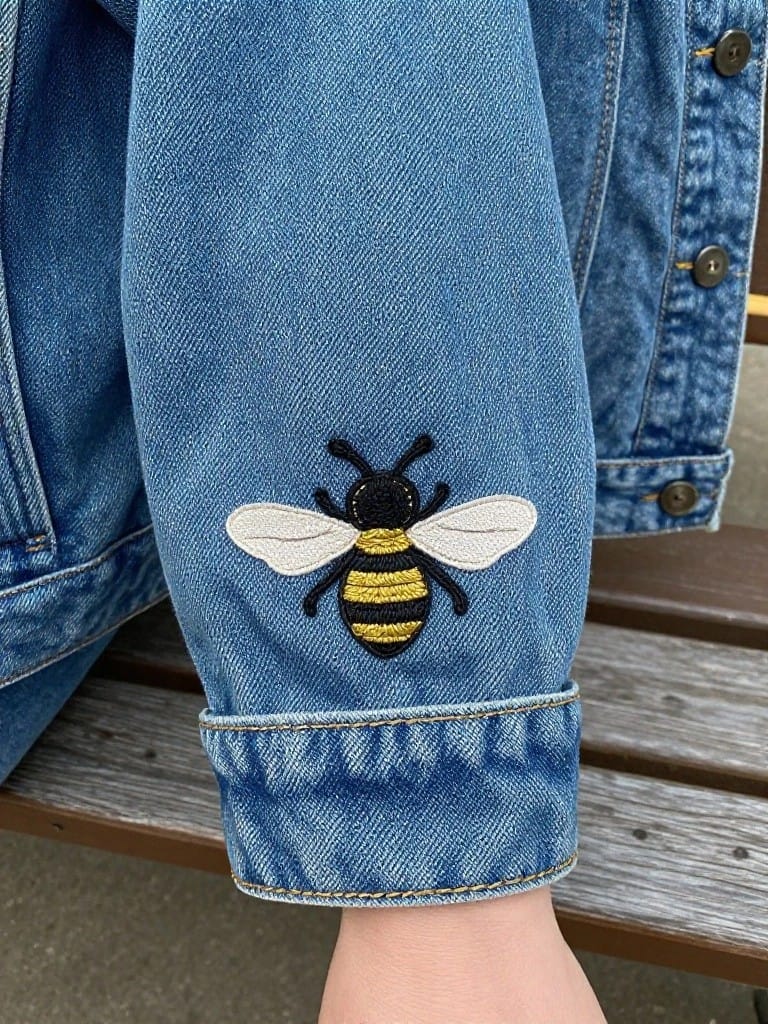
Stitch a detailed bee motif right onto the cuff of a denim jacket sleeve to add a bold, textured accent to casual outerwear. The black body accented with yellow stripes and crisp white wings creates strong contrast against the faded blue denim, while the embroidery’s padding gives it a raised, three-dimensional look. This placement keeps the design contained and focused, perfect for jackets or heavy fabrics where it won’t shift during wear.
The placement does a lot of the work here, hugging the sleeve curve without dominating the whole arm. Shift it to jeans pockets or tote bags for everyday use, or resize smaller for iron-on patches that travel well. Color swaps like metallic threads keep the insect pop on darker fabrics, and its clean lines make it quick to replicate for matching sets.
Rainbow Arch on Baby Onesie

A rainbow motif arched across the chest of a baby onesie, flanked by two small clouds, turns basic clothing into a bright focal point. The curve of the rainbow matches the body’s natural contour for a secure look during wear and tumbles. Bold color bands against plain white fabric keep it simple yet eye-catching, ideal for stitching onto infant knitwear.
A design like this works especially well on stretchy baby garments where the centered placement stays visible no matter the angle. Shrink the scale for hats or bibs, or stretch it across a kid’s t-shirt for older wearers, and it adapts without losing impact. Swap the full spectrum for two-tone versions to fit seasonal outfits, making it a go-to for quick gift personalization that pops in craft feeds.
Mountain Stars on a Felt Wallet Flap

Stitch a compact row of three jagged mountain peaks with scattered stars above them across the front flap of a flat wallet or pouch made from light felt. The dark outline stitches create sharp contrast against the pale background, making the scene pop without overwhelming the small surface. This setup turns a simple accessory into a nature-themed statement piece that stitches up quickly on even fabric.
A design like this works especially well on everyday carriers like phone cases, journal covers, or bag flaps where the horizontal layout fits narrow spaces. Shrink the scale for pocket patches on jackets or enlarge it slightly for tote bags, and swap the dark thread for metallics to catch light better. The minimal lines keep it beginner-friendly while looking polished enough to stand out in feeds full of busy florals.
VW Camper Van on a Backpack Pocket
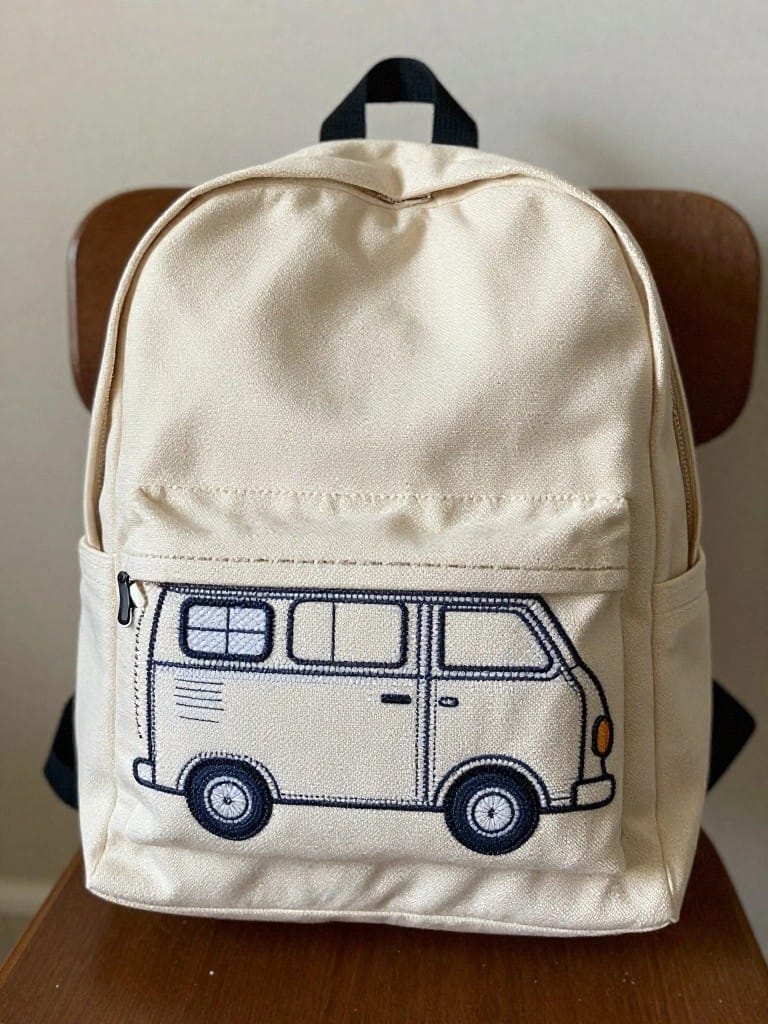
Embroider a compact VW camper van directly onto the front pocket of a canvas backpack to turn a plain bag into a standout accessory. The design uses clean outlines and subtle fills for the bus body, windows, and wheels, which keep the lines sharp against the fabric without overwhelming the space. This setup works best on sturdy items like bags or totes where the motif adds a fun graphic punch at eye level.
A design like this shines on everyday carriers such as backpacks, messenger bags, or shopping totes since the pocket placement keeps it secure and visible. Shrink it down for iron-on patches or scale it up for a larger tote panel, and swap the navy outlines for brighter threads to match seasonal outfits. The retro bus shape pulls strong views on Pinterest from travel fans who want quick personalization without complex shading.
Simple Heart on Knit Sleeve
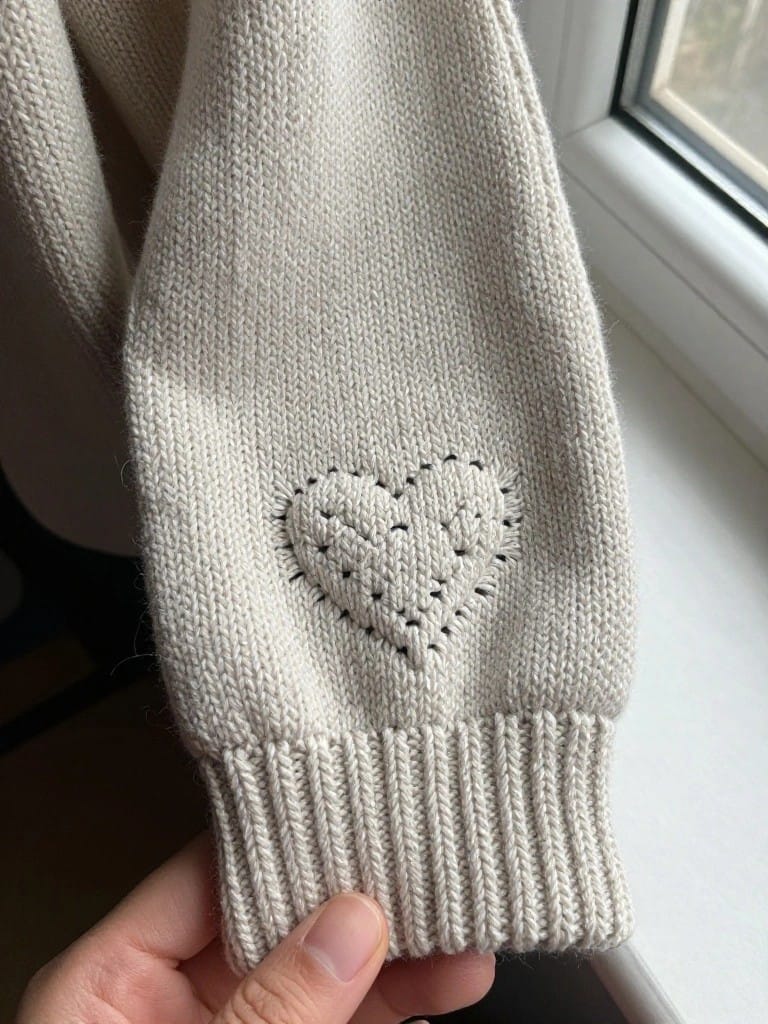
A small heart embroidered in black thread sits on the upper sleeve of a cream knit sweater, where the stitches outline and fill the shape to stand out against the fuzzy fabric. The compact size keeps it from overpowering the sleeve while drawing the eye to the arm. This motif suits casual clothing like sweaters or cardigans that you wear often.
The placement near the shoulder keeps the design visible without getting stretched during movement. Try it on denim jackets or wool hats by scaling up slightly for balance. Black thread gives sharp contrast on light fabrics, but swap to pastels on dark knits for a softer effect.
Mushroom Bookmark Row
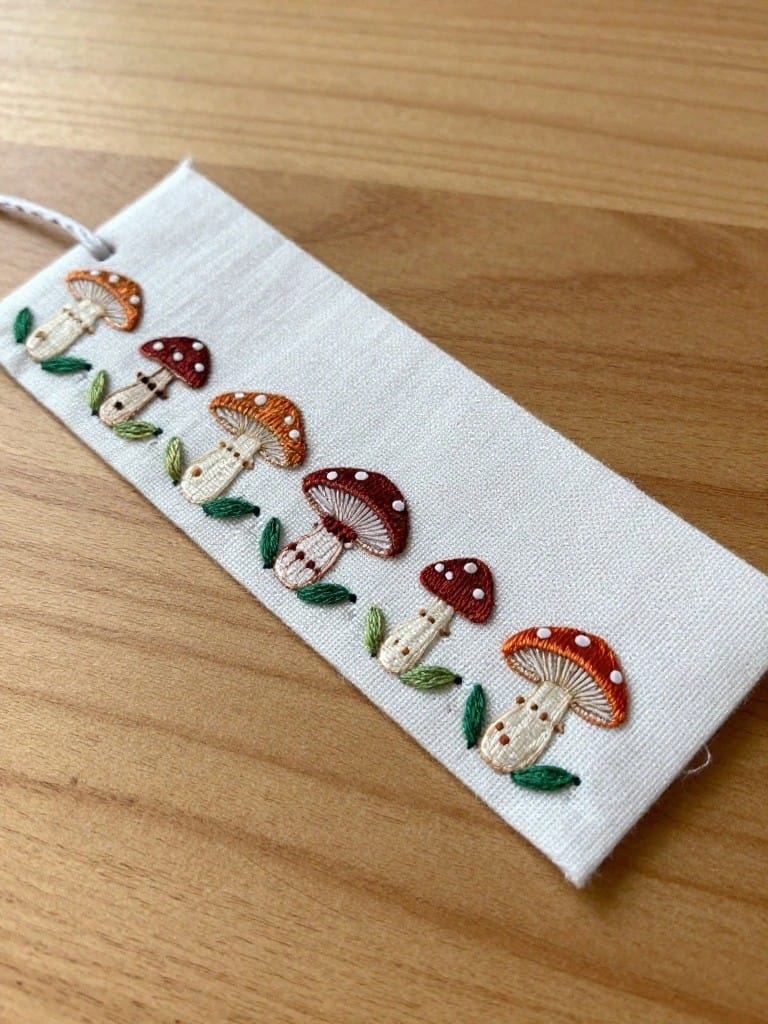
Line up a row of varied mushrooms along the length of a narrow fabric bookmark to create a playful, elongated design that fits perfectly between book pages. The mix of stemmed caps in reds, oranges, and spotted whites, paired with simple green leaves, adds visual interest without overwhelming the small space. This setup works best on lightweight white fabric where the colors pop clearly.
The narrow format keeps stitching contained and quick, making it ideal for beginners testing out shape variety on accessories like gift tags or bag straps. Scale it down for patches or up slightly for towel hems, and swap colors for seasonal tweaks like pastels in spring. On Pinterest, the clean row stands out as an easy win for functional yet cute handmade items.
Embroidered Sailboat Locket

Stitch a compact sailboat motif inside a small circular metal frame to turn a scrap of fabric into a wearable accessory. The design uses clean white sails against soft beige fabric with blue waves below, creating sharp contrast in a tiny space that fits perfectly on a chain or clasp. This setup works best for jewelry like pendants, keychains, or bag charms where the frame adds structure without bulk.
The small scale keeps stitching simple and quick, ideal for practicing basic fills on curved edges before tackling larger pieces. Shift the colors to match seasonal fabrics—red sails for holidays or pastels for spring—and it adapts easily to hoop earrings or ornament tags. A design like this stands out on Pinterest for its polished finish on everyday items that don’t take up much thread or time.
Sheer Fabric Mushroom Cluster Hoop

Cluster five red-capped mushrooms with white spots on tall white stems across sheer fabric stretched tight in an embroidery hoop. Felt shapes form the textured caps and stems, secured with stitching, while tiny red beads add detail at the base. The transparent background lets light pass through and reveals the view behind, so the design gains depth from its setting.
Scale this down for patches on jeans pockets or up for lamp shades, keeping the loose grouping for balance. Switch to pastel caps on white tulle for baby blankets, or black stems on colored mesh for hats. On Pinterest, the glow-through effect grabs attention in photos taken near windows.
Frequently Asked Questions
1. What basic supplies do I need to get started with these embroidery patterns? To begin with confidence, gather these essentials: embroidery floss (six-strand cotton like DMC for vibrant colors), embroidery needles (sizes 7-10 with large eyes for easy threading), an embroidery hoop (6-inch size works for most patterns), fabric (cotton or linen scraps), scissors for sharp cuts, a water-soluble fabric marker or chalk pencil, and a thimble if you prefer protection. Start with a small starter kit if buying everything feels overwhelming. These patterns use simple running stitches, backstitches, and satin stitches, so no fancy tools are required. Pro tip: Keep floss organized by sorting into a muffin tin or floss bobbin box to avoid tangles.
2. Which stitches should beginners practice first for these patterns? Focus on three foundational stitches that appear in all 19 patterns: the running stitch (simple in-and-out for outlines), backstitch (strong line for stems and letters), and satin stitch (smooth fills for shapes like hearts or leaves). Practice each on a scrap fabric square first. For running stitch, space stitches evenly at 1/4 inch. Backstitch overlaps by half a stitch length for solidity. Satin stitch lays parallel threads close together without gaps. Free practice templates are often available online from sites like DMC or Pinterest. These build skills quickly and appear in patterns like the daisy chain or simple monogram.
3. How do I transfer the embroidery patterns onto my fabric easily? Use the trace-and-transfer method for beginners. Print the pattern at actual size, place it under thin fabric in good light (or use a lightbox), and trace with a water-soluble marker. For thicker fabrics, try the iron-on transfer pencil: trace the pattern on paper, iron it onto fabric (shiny side down), then stitch over. Another foolproof option is poking holes along the design with a needle and pouncing chalk through for a dotted guide. Always test markers on scrap fabric first to ensure they wash out. These patterns are designed for hoops, so hoop your fabric taut before transferring.
4. What fabrics and threads are best for beginners tackling these patterns? Choose lightweight cotton or muslin fabric (weave count 28-32 threads per inch) as it is forgiving and grips stitches well without puckering. Avoid stretchy or slick synthetics at first. For threads, DMC six-strand embroidery floss is ideal: separate into 2-3 strands for delicate work in these patterns. Start with 5-10 skeins in basic colors like white, black, red, and green. Pre-wash fabric to prevent shrinkage. Helpful hack: Starch fabric lightly with spray starch before hooping for extra stability, making your first flowers or motifs turn out crisp.
5. How long does it take to complete these beginner patterns, and what are tips for finishing successfully? Most patterns take 30 minutes to 2 hours, depending on size and your pace (e.g., a single flower is 30-45 minutes, a full name tag 1-2 hours). Stitch in 20-minute sessions to build stamina without frustration. Tips for success: Hoop fabric tightly but not wrinkled, knot threads at the back securely (use a waste knot for starts), and stitch from left to right if right-handed. If stitches pucker, loosen tension. Finish by washing in cold water to remove marks, then press from the back. Track progress with a photo journal to stay motivated. These patterns scale up, so repeat favorites on pillows or totes once confident.