
I like using botanical themes in my embroidery because they remind me of walks in the garden.
Leaves and vines can be stitched in so many different styles.
I have tried a few projects with these motifs and wanted to share some ideas.
There are patterns for all sorts of garden elements that work well on fabric.
These 21 suggestions cover a range of options you might want to try.
Wreath of Leaves and Berries for Hoop or Fabric

A circular wreath built from different leaf shapes and small berry clusters creates the main motif. The branches curve around an open center on the stretched fabric, with the elements spaced unevenly to avoid a rigid look. Mixing several green tones with a few brown berries adds subtle contrast while keeping the overall design light. This works well as a finished hoop piece or as a motif you can move onto a bag, cushion cover, or jacket back.
What makes this idea useful is the open middle, which prevents the wreath from dominating larger surfaces. You could shrink the whole thing for a pocket or stretch it wider for a table runner. Swapping the berry color to red or keeping everything in one green family changes the mood without redrawing the layout. The loose spacing also makes it simple to adjust as you stitch if the fabric size shifts.
Ivy Vine Along a Denim Pocket
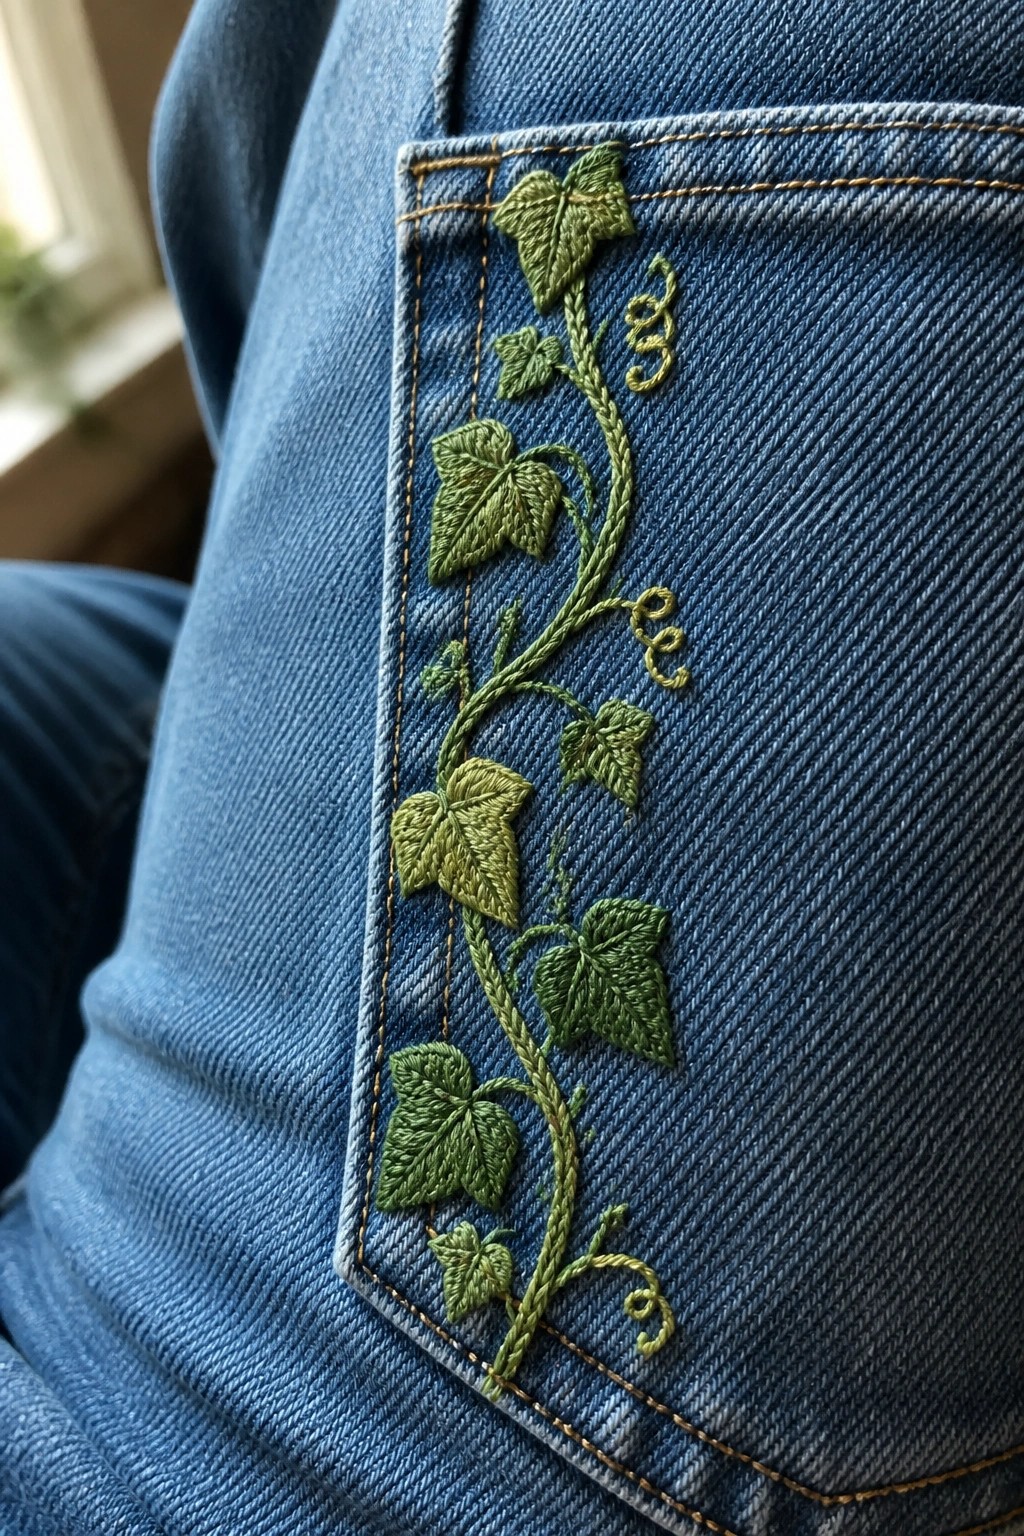
A narrow ivy vine stitched along the side of a jeans pocket creates a simple botanical accent on clothing. The design uses a single curving stem with small heart-shaped leaves in several shades of green to follow the pocket’s vertical edge. Varying the leaf sizes and letting a few tendrils curl outward keeps the motif from looking too stiff against the denim. This approach suits pants, jackets, or any garment where you want to add interest without covering a large area.
What makes this idea useful is how the vine tucks neatly beside an existing seam. You could shorten it to fit a shirt cuff or repeat the same stem along the edge of a canvas tote. Switching the thread colors to deeper greens or adding a touch of yellow would change the season without altering the layout. The narrow shape also copies easily onto other edges like a backpack strap or the front of a pencil case.
Herb Pot and Trowel on a Canvas Tote

A potted mix of tall rosemary and smaller lavender stems sits in a woven basket, with a metal trowel and scattered seeds placed beside it. The design is centered low on a plain canvas tote bag, leaving the upper half empty so the bag remains functional. The layered green threads create depth in the foliage while the brown stitching on the pot and the gray tool add contrast without crowding the space. This motif works well on bags or other accessories that get carried around rather than hung on a wall.
What makes this idea useful is the way the small tool and seeds balance the plant so the design feels complete without needing extra elements. The placement near the bottom of the tote keeps the opening clear and avoids bulk where the fabric folds. You could easily swap the herb types or shrink the whole scene to fit a smaller pouch or apron pocket. Changing the pot color or thread shades would let the same layout match different bag fabrics without starting over.
Vine Border Along a Pillow Edge

A trailing vine worked in several shades of green runs horizontally across the lower half of a cushion cover. The design includes a narrow band of dense, dotted stitching beneath the leaves that grounds the motif and adds texture without extra layers. Keeping the embroidery low on the fabric leaves the upper area plain so the piece stays balanced for everyday use. This approach suits pillows, bench cushions, or even the front of a simple tote where the motif can sit flat.
What makes this idea useful is how the straight horizontal placement fits neatly on any rectangular or square item without needing a hoop for the full piece. You could shrink the vine and repeat it along the hem of a curtain panel or shift it to the flap of a makeup bag. Swapping the muted greens for brighter or variegated threads would change the season without altering the layout. The contained scale also makes it simple to test on a scrap before committing to a larger project.
Climbing Vine on a Shirt Collar

A simple vine of morning glory flowers stitched along the front edge of a shirt collar gives the garment a finished detail without overwhelming the fabric. The design starts at the collar point and trails upward, with flowers placed at intervals so the curve of the collar guides the layout. Green stems and a few small leaves keep the line light while the blue and purple blooms add contrast against the white cotton. This approach works best on button-down shirts or blouses where the collar stays visible during wear.
What makes this idea useful is how the narrow shape of the collar already controls the scale and direction of the vine. You can shorten the trail to just two or three flowers for a quicker project or extend it further on a wider collar. Changing the flower colors to match other shirts in your closet keeps the same layout reusable across multiple pieces. The placement also transfers well to the edge of a cuff or the front placket if you want to repeat the motif without starting a new design.
Leaf Grid on a Zippered Pouch
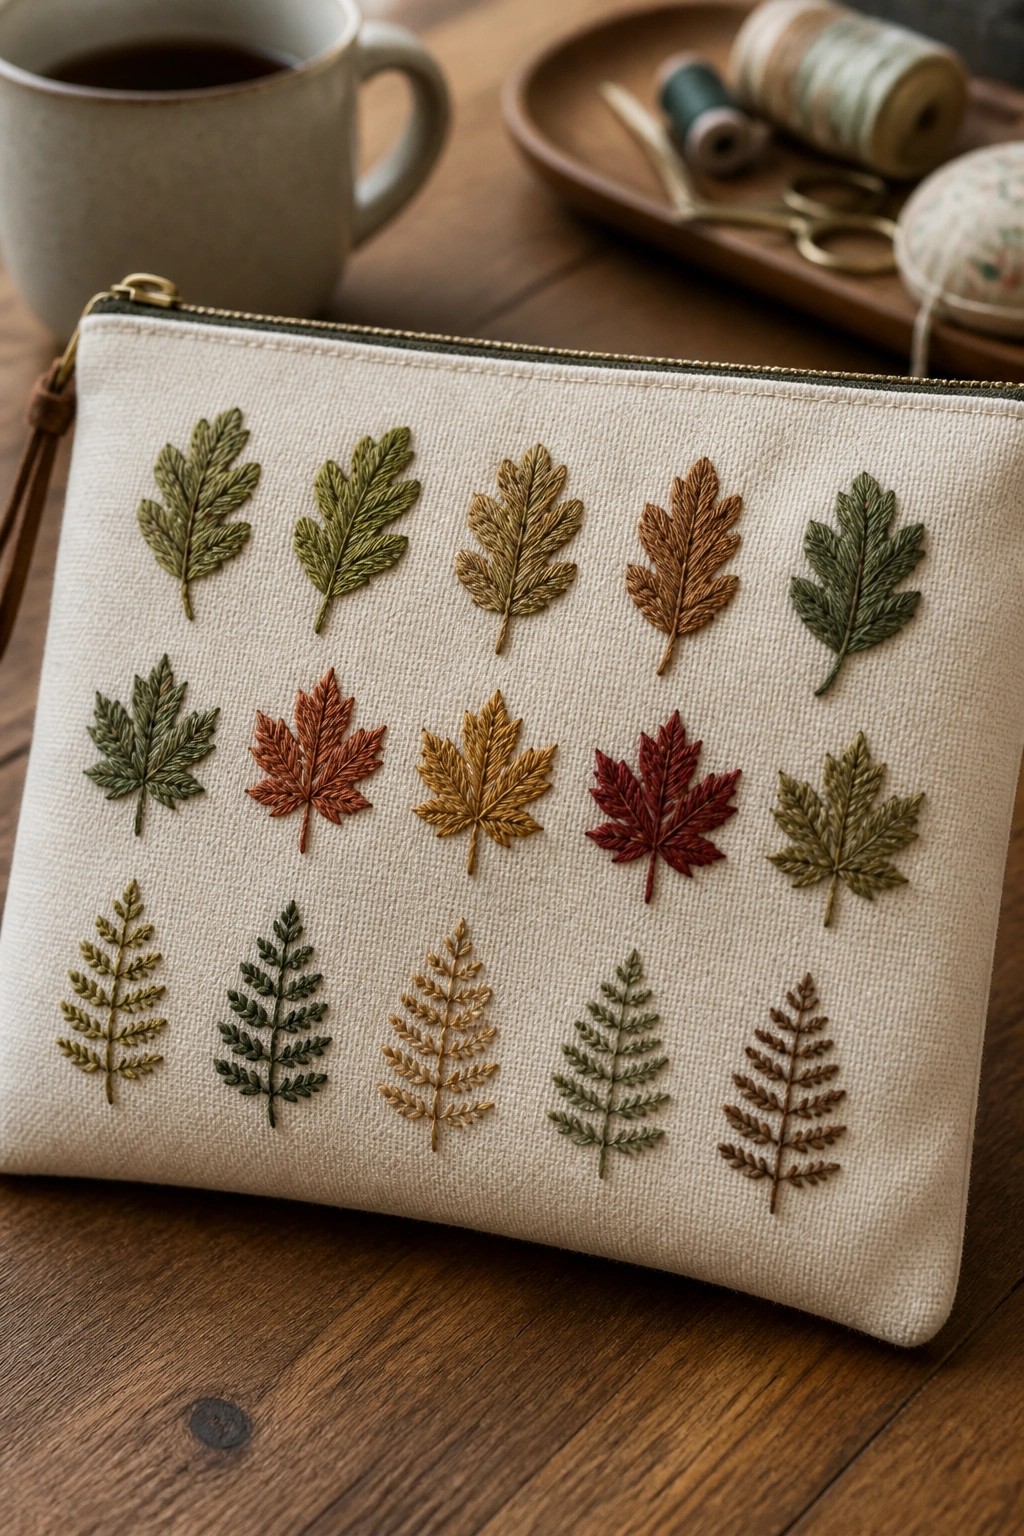
Embroider a grid of different leaf shapes across the front of a zippered pouch using thread colors that range from green to brown and red. Place the leaves in even rows so each shape stands out while the overall pattern stays orderly. The mix of oak-style, maple, and fern leaves creates variety without extra elements like stems or borders. This layout suits flat accessories such as pouches, makeup bags, or notebook covers where you need a compact botanical design.
What makes this idea useful is how simple it is to change the leaf count or spacing to fit any pouch size. You can shift the colors toward all greens for a different season or use leftover thread scraps for each leaf. The same grid works on a jacket pocket or a tote corner if you want to move it off a bag. It stands out on Pinterest because the neat rows make the variety of shapes easy to spot at a glance.
Corner Vine Border on Napkins

A trailing vine with small leaves stitched along the corner edge of a napkin creates a clean border that follows the fabric shape. The design uses a gentle curve and several green shades to keep the leaves from looking flat while staying light on the linen. This approach suits table linens, tea towels, or sets of napkins where you want a repeating motif without covering the whole surface.
The placement along the corner lets the rest of the fabric stay plain, which keeps the project quick to finish and easy to scale up for multiple pieces. You can shorten the vine for smaller cloths or extend it for a longer runner, and swapping the greens for one solid color changes how bold it looks on different fabrics. A design like this works especially well on gifts because it adds detail without requiring much fabric or time.
Cottage Garden Scene on a Tea Towel

A rectangular kitchen towel or runner works well for this design because the long shape lets the garden layout stretch across the fabric with room for climbing vines on both sides and a row of shorter flowers along the bottom edge. The central house sits behind a fence with beds of different plants in front, creating clear layers that keep the scene readable even at a distance. Pea pods and leafy greens add height on the outer edges while the lower section fills in with smaller blooms and cabbages. This placement turns a plain towel into a finished project that can be used daily instead of hung on a wall.
What makes this idea useful is how the fence lines and plant rows divide the space so you can easily drop or add elements without breaking the layout. You could move the same house and beds onto a set of napkins by shrinking the scale or extend the vines further for a longer table runner. Changing the flower colors to match a specific kitchen palette keeps the structure intact while making it fit different decor. The scene also works for gift towels because the full garden view reads clearly without needing extra framing or hoops.
Tomato Vine on a Denim Jacket Pocket
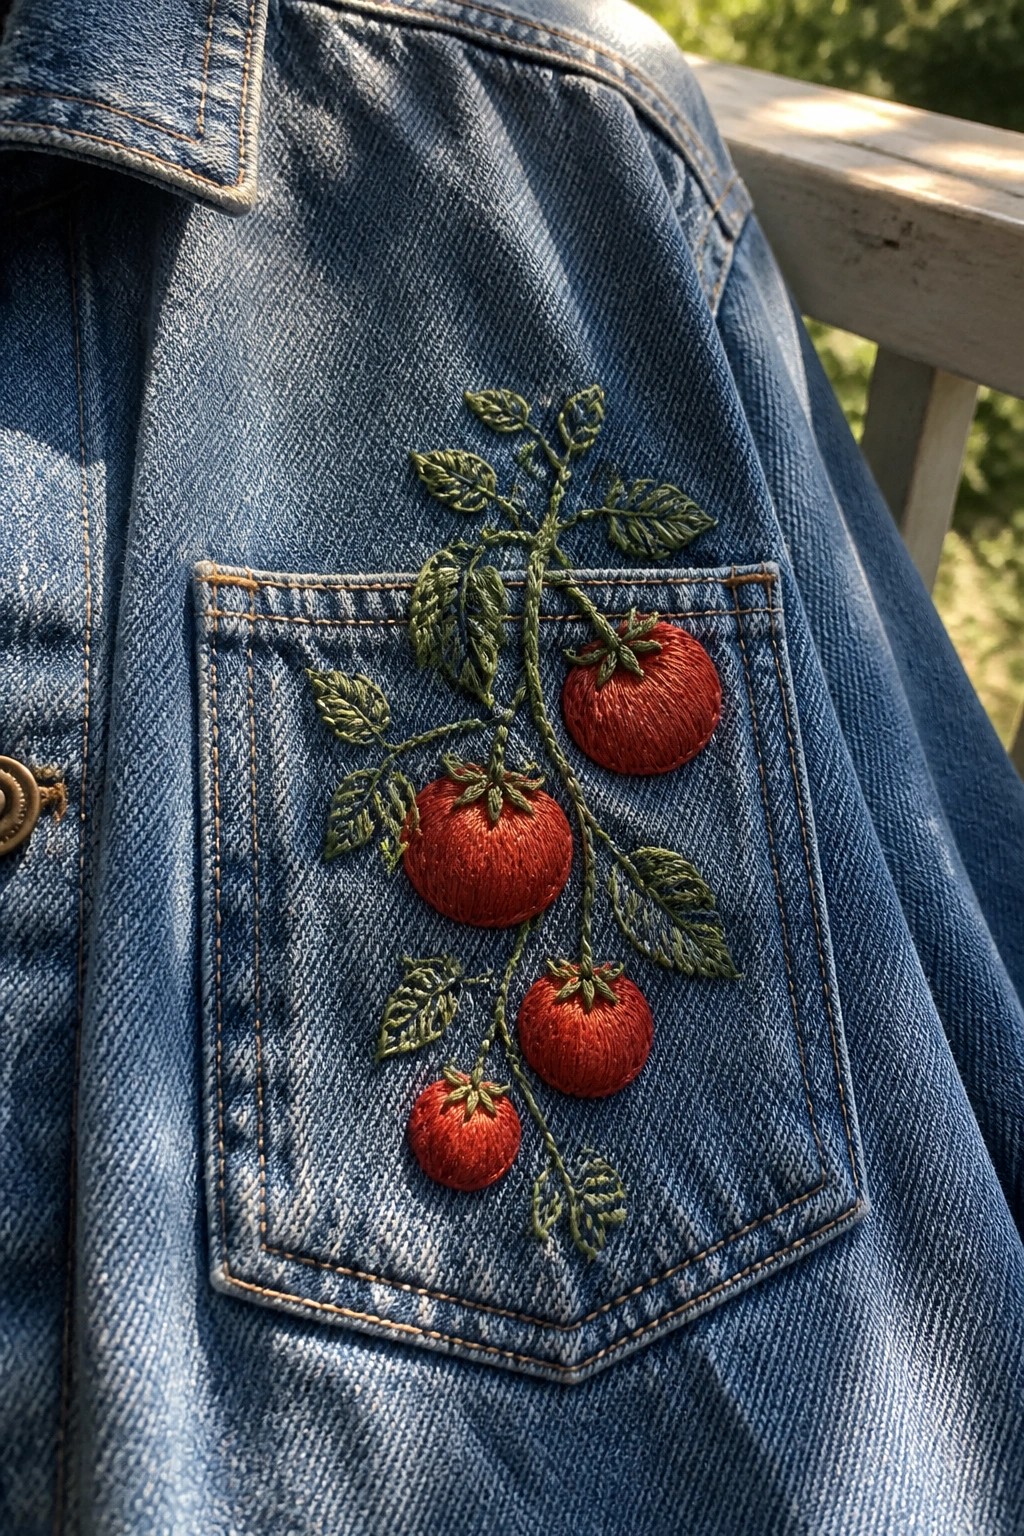
A tomato vine with several red fruits and green leaves makes a strong focal point when stitched right onto the pocket of a denim jacket. The stems start inside the pocket and extend upward so the plant appears to grow out of the opening. This placement uses the pocket flap as a built-in base and keeps the design compact enough to avoid overwhelming the garment. The idea works especially well for clothing updates or upcycled jackets where you want a garden motif without covering large areas of fabric.
What makes this idea useful is how the pocket edge already supplies a natural starting line for the vine. You can swap the tomatoes for other small produce like strawberries or peas and still keep the same layout. Shrinking the whole design lets it move to a shirt cuff or bag corner while larger versions stay readable on outerwear. The red fruit against blue denim also gives clear contrast that photographs well for pattern sharing.
Succulents in a Geometric Hanging Frame

A cluster of succulents sits inside a low planter base that forms the bottom of a simple geometric outline. A single trailing vine extends from the top left corner outside the main shape. The straight lines of the frame give the round plant forms clear structure and keep the whole design compact. This approach suits a finished hoop or a patch that can be sewn onto a bag or jacket.
What makes this idea useful is the way the frame contains the plants so the piece reads clearly even at small sizes. You could shorten the trailing vine or remove it to fit a narrower hoop, or shift the brown planter tones to match a specific fabric background. The contained layout also works well as a repeating motif across multiple hoops without needing extra filler stitching.
Embroidered Lavender Vines on a Fabric Scrunchie

A repeating line of small purple flowers with green stems and leaves runs along the gathered surface of a fabric scrunchie. The motif follows the natural folds so the vines appear to wrap continuously around the band. This approach keeps the stitches visible on the raised areas while the fabric texture helps the fine details stand out without extra outlining. The project suits hair accessories or similar small fabric items where a light botanical accent adds interest without bulk.
What makes this idea useful is how the narrow vine layout fits curved or gathered surfaces without needing a large design area. You can shift the same pattern onto a headband or wrist cuff by shortening the repeat or changing the thread colors to match the base fabric. Scaling the flowers slightly larger would work on a tote pocket or small pouch, while keeping them tiny lets you finish multiple scrunchies in one sitting. The contrast between the soft blue fabric and the muted green and purple threads helps the motif read clearly in photos, which is why similar accessory projects perform well online.
Nasturtium Border on a Kitchen Apron

A border of bright orange and red nasturtium-style flowers with green leaves and curving vines works well when stitched around the edges of an apron. The design follows the shape of the bib and skirt so the center stays clear for actual use. The flowers vary slightly in size and angle, which keeps the line from looking stiff while still forming a clear frame. This approach fits any fabric item that needs decoration along its outer edges rather than across the full surface.
What makes this idea useful is how the vine layout naturally matches an apron’s curved outline without filling the middle. You could move the same flowers onto a tea towel by running them in a straight band along one short edge instead. Scaling the whole border down would let it fit a pocket or sleeve, while widening the spacing between flowers would suit a larger table runner. The strong color contrast against the light fabric also helps the pattern read clearly from a distance on Pinterest.
Mushroom Vine on a Backpack

A slender vine with mushrooms in several colors and scattered leaves creates a vertical accent when placed along the front edge of a backpack. The design follows the bag’s existing seam and zipper line, letting the embroidery sit neatly without needing extra framing. Small leaf clusters and color changes in the mushrooms keep the narrow strip from looking flat. This layout suits bags, totes, or jacket panels where a tall, thin motif fits the shape better than a wide hoop design.
What makes this idea useful is how the vine can be shortened or extended to match different bag heights without redrawing the whole pattern. Using fewer mushrooms or repeating just one color makes the same idea work on smaller items like a pencil pouch or side pocket. The placement next to a zipper or seam already gives the design structure, so you spend less time planning borders or backgrounds. On a larger tote the same motif can stretch taller and add more leaves if you want extra coverage.
Floral Vines Trained on a Lattice Trellis
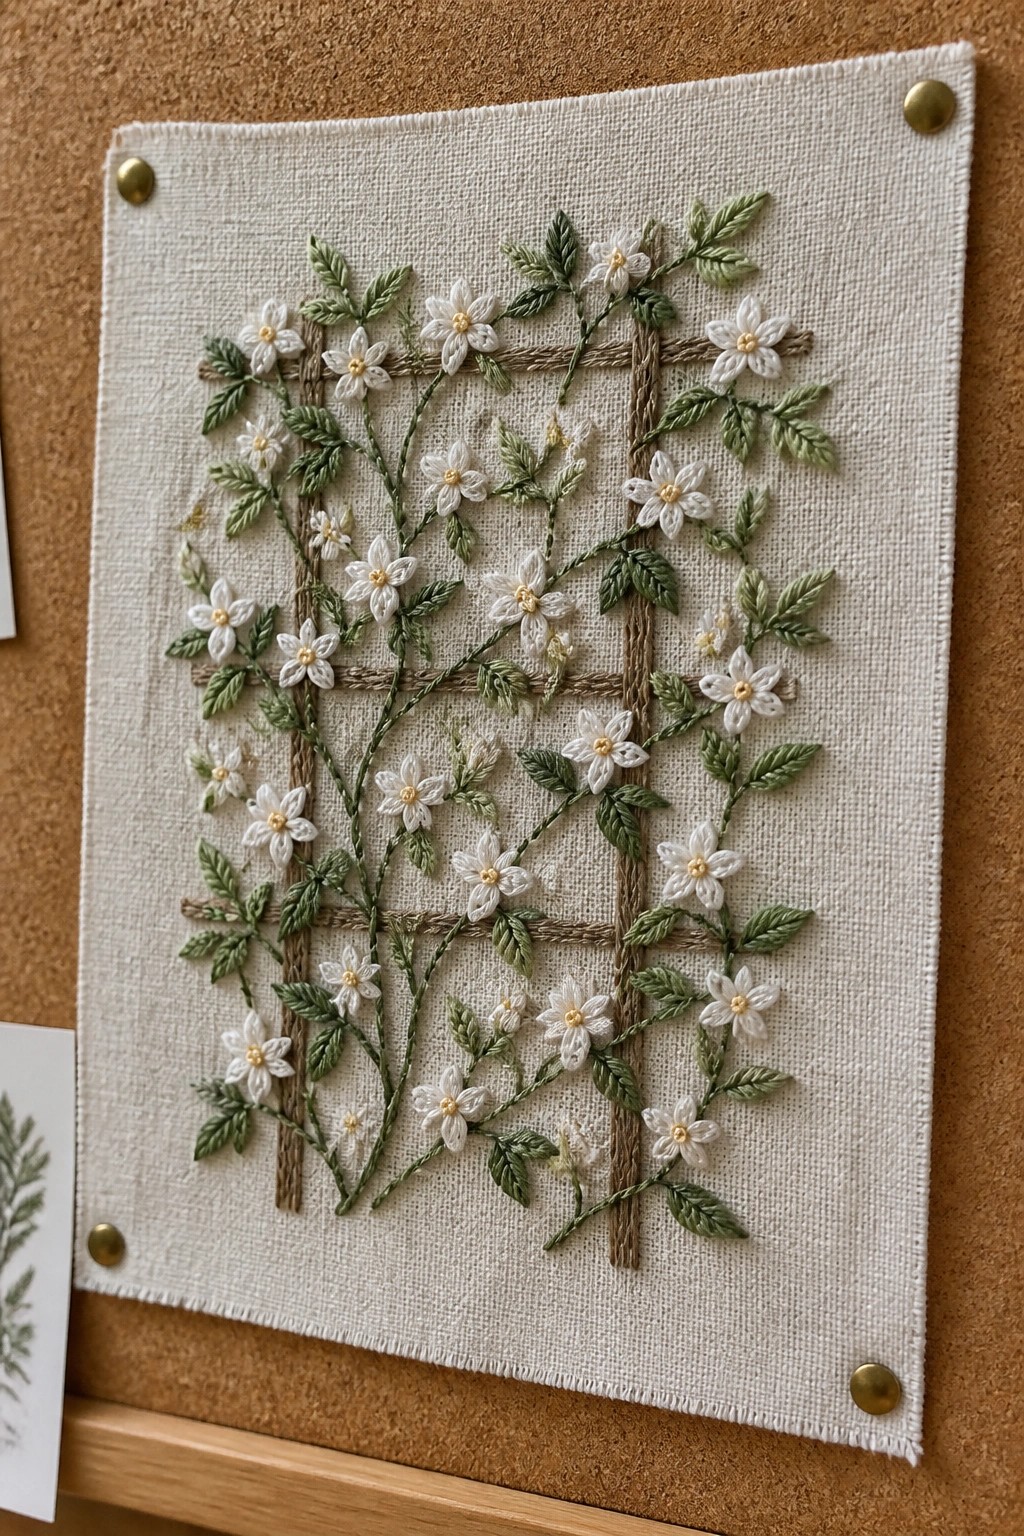
A design of small white flowers with yellow centers and green leaves climbing along a simple brown grid creates a contained botanical scene. The lattice lines give the vines clear paths to follow, keeping the overall shape rectangular and balanced rather than sprawling. This approach suits a fabric panel that can be finished as a small wall hanging, added to a tote bag, or turned into a cushion cover.
What makes this idea useful is how the grid handles the layout work for you. You could shrink the entire pattern to fit a pocket on a jacket or stretch it across a longer strip for a table runner. Swapping the flower color to blue or leaving the trellis in a darker thread would change the look without needing new stitches. The contained shape also photographs cleanly for project sharing.
Fern Border on Pillowcase Edges

A repeating row of fern fronds creates a narrow border that runs along the finished edge of a pillowcase. Multiple green thread shades give the leaves slight variation so the line feels natural rather than flat. The design stays compact and linear, which keeps it from competing with other bedding patterns. This approach suits pillowcases, sheets, or any linen item with a straight hem that needs a quiet botanical detail.
What makes this idea useful is how simply the border transfers to other straight edges like table runners or curtain panels. Shorten the repeat or drop to one green shade and the same motif works on a shirt cuff or tote bag without extra time. The small scale keeps the stitching quick while still reading clearly from across the room. On Pinterest this kind of clean, repeatable border gets saved often because it updates plain linens without requiring new fabric or complex layout.
Scattered Wildflower Stems

A group of wildflower stems in different heights and colors sits across the fabric, with some flowers in soft pinks, others in blue, and several green leaves filling gaps between them. The stems are spaced unevenly so the design feels like a small picked bunch rather than a formal border. This arrangement suits an embroidery hoop as the main project, though the same layout can move onto a bag front or a jacket pocket without crowding the space.
What makes this idea useful is how the varied stem lengths let you fill a round hoop without needing a strict pattern repeat. You can drop or add a stem to fit a smaller or larger hoop, and swapping the pink flowers for yellow ones changes the whole mood without altering the structure. On clothing the loose placement keeps the embroidery from stiffening the fabric too much, while the same design on a cushion would give a quick garden accent without dense stitching.
Trailing Vine Border on Napkins

A narrow vine with small flowers and leaves stitched along the hem gives plain white linens a finished look without covering the whole surface. Green thread forms the stems and leaves while the flowers stay in white or off-white to keep the pattern light against the fabric. The design sits right next to the existing hem stitches, which makes the embroidery feel like part of the construction rather than an add-on. This approach suits napkins, table runners, or the edges of pillowcases where the motif stays visible but out of the way during use.
The border placement lets you repeat the same strip on several items without needing much extra fabric or time. You could shorten the vine for a single placemat corner or continue it around all four sides of a larger cloth. Changing the green to a deeper shade or adding one extra flower color would update the look for different seasons. Designs like this rank well in searches because the clean edge layout shows up clearly in photos of finished linens.
Leaf Vine Border on a Denim Jacket Cuff

A repeating vine of leaves and small berries creates a narrow border when placed along the rolled edge of a jacket cuff. The design uses a mix of leaf sizes and two or three green tones to add subtle variation while staying light on the fabric. Positioning the line right at the hem keeps the embroidery visible during wear and follows the natural curve of the cuff without extra framing. This approach suits everyday clothing like jackets, shirts, or even the hem of a skirt where a single band of detail is enough.
What makes this idea useful is how the straight layout adapts to different cuff widths by simply adding or removing a repeat. The same vine works on pant hems, sleeve edges, or the front placket of a shirt if you want a coordinated set. Switching the berry color to match an existing garment keeps the project quick while maintaining contrast. On denim or similar mid-weight fabric, the small scale prevents bulk and lets the stitching sit flat.
Layered Leaf Circles on a Square Potholder

A mandala-style arrangement of leaves stitched in rings works well when centered on a square quilted potholder. The design uses graduated sizes of leaves that start small near the middle and grow larger toward the outer edge, with a few scattered dots to fill the spaces between rings. This layout keeps the focus tight on the fabric surface while leaving a plain border around the edge that matches the item’s practical shape. It suits small kitchen pieces where the embroidery needs to stay contained and balanced.
What makes this idea useful is how the circular layout fits neatly inside a square without needing extra framing stitches. You could shift the same rings onto a matching set of napkins or a tea towel by shrinking the scale and dropping the outer ring. Changing the leaf colors to a single shade of green would make it simpler to stitch while still keeping the layered effect visible from a distance. The design also translates easily to a fabric patch if you want to add it to an apron or bag later.
Cascading Vine Clusters in a Mini Hoop

A set of hanging branches with scattered leaves and tight flower clusters creates a simple trailing motif that fits neatly inside a small hoop. The design starts from a single point at the top and drops downward in uneven lengths, leaving open space in the center. This layout keeps the piece balanced while showing off the contrast between the green leaves and the pink blooms. The same pattern works as a standalone hoop or as a patch to sew onto a bag or jacket.
The placement does a lot of the work here because the downward flow fills the circle without needing extra elements. You can shorten the vines or drop in more clusters if you want to cover a taller rectangle for a bookmark or card. Switching the pink to a deeper shade or using all green turns the same stitches into something that reads more like foliage than flowers. On Pinterest this kind of contained trailing design gets saved often because it looks complete on its own yet stays easy to resize.
Vine Embroidery Along a Collar Edge

A slender vine with small leaves and loose flower clusters stitched in muted greens and soft neutrals runs along the fold of a garment collar. The placement follows the natural curve of the fabric so the stems appear to grow from the seam. This keeps the design compact and lets the embroidery sit on everyday clothing like a linen jacket or button-up shirt without interfering with wear.
The placement does a lot of the work here because the collar already gives the vine a clear path and finished edge. You could shift the same layout to a cuff, pocket flap, or the front placket of a blouse by shortening the stem or dropping a few flowers. Using the same thread tones on a darker fabric would increase contrast while keeping the scale small enough to finish in a few hours.
Frequently Asked Questions
What basic supplies do I need to start creating botanical embroidery with leaves, vines, and garden motifs?
You will want a few key items to begin. Choose a medium-weight fabric like linen or cotton that holds stitches well without puckering. Use embroidery floss in shades of green, brown, and floral colors to mimic natural elements. Gather an embroidery hoop to keep tension even, sharp scissors, and needles sized 5 to 9 for different thread thicknesses. A water-soluble marker helps sketch vines and leaves directly on the fabric before stitching.
Which embroidery stitches work best for realistic leaves, vines, and garden motifs?
The satin stitch fills leaf shapes smoothly while the backstitch outlines vines with clean lines. Use a stem stitch for curving stems that look natural and a French knot for small buds or seed details. Chain stitches create textured vines that stand out, and the lazy daisy stitch forms simple flower petals in garden scenes. Practice these on scrap fabric first to control tension and achieve the layered look seen in botanical designs.
How can beginners adapt the 21 botanical ideas if they have limited stitching experience?
Start with simpler motifs such as single leaves or short vines rather than full garden scenes. Break complex patterns into small sections and use only two or three stitches per project. Trace outlines lightly and fill one area at a time to avoid overwhelm. Many of the ideas scale down easily to small hoops or patches, letting you build skills gradually while still producing attractive results like embroidered bookmarks or coasters.
What are some practical ways to transfer botanical patterns onto fabric for embroidery?
Print or draw the design on paper, then place the fabric over it against a bright window or use a light box to trace the lines. Carbon transfer paper works for darker fabrics, or you can use a water-soluble stabilizer sheet printed with the motif and stitch through it before rinsing it away. Test any method on a scrap first to ensure the lines do not bleed or remain visible after stitching.
How should finished botanical embroidery pieces be cared for to keep the colors and stitches looking fresh?
Hand wash items gently in cool water with mild soap, then roll them in a towel to remove excess moisture without wringing. Lay flat to air dry away from direct sun to prevent fading. Iron on the reverse side with a pressing cloth if needed. For framed pieces, keep them out of strong sunlight and dust occasionally with a soft brush to maintain the garden-inspired details over time.